
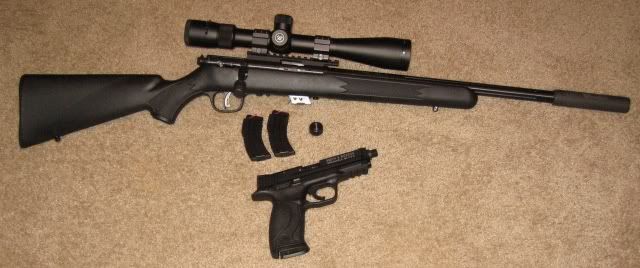
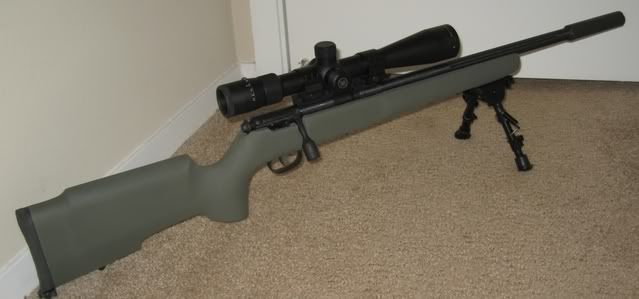
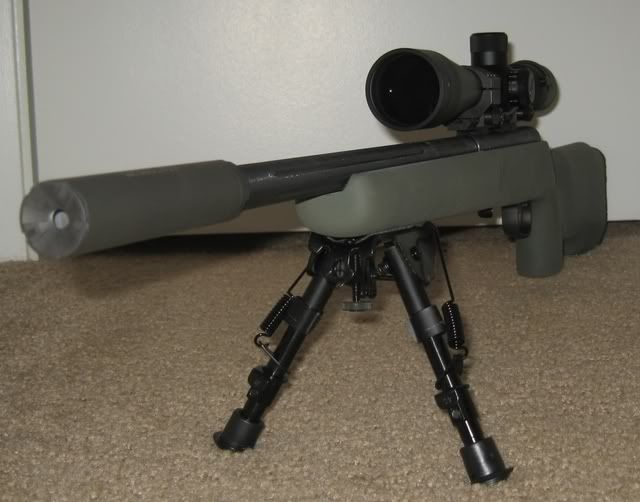
After a couple weeks of searching for a Savage FV-SR to go with my new SS Sparrow I finally got a lead on one and ordered it ASAP. I had a Vortex 6.5-20x44 mildot, XTR low rings, and EGW 20moe rail waiting for it. I was very excited to get it and had plans to get a Boyd's Tacticool stock but didn't realize just how poor the OE stock would be. I shot it once and decided there was no way I was putting off upgrading the stock. So I ordred a stock from Boyds and ordered OE action screws and bottom metal from Midway. The OE bottom metal was disappointingly cheap and flimsy and the root of some of the accuracy woes with the MKII. The DIP and Savagegunsmithing bottom metals are MUCH more stout and a great upgrade, especially if you don't plan on bedding the stock. I decided to make this rifle, my first bolt action rifle, my first try at pillar bedding.
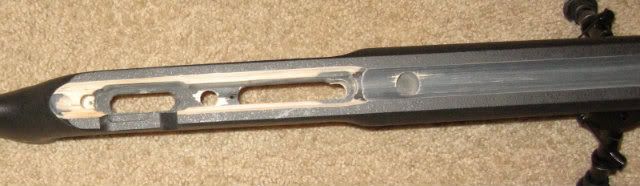
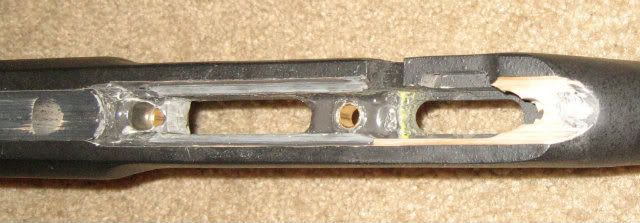
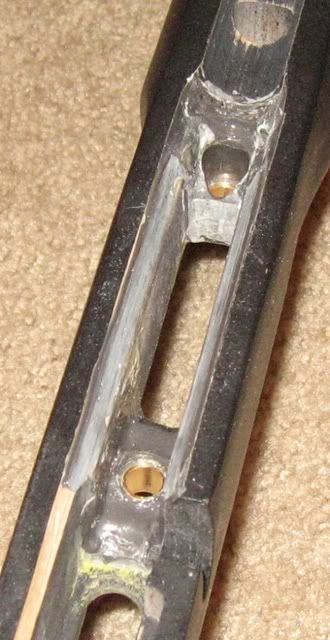
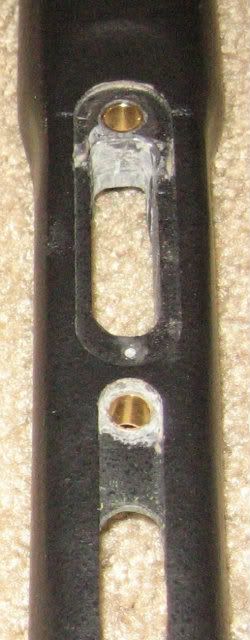
There is a large gap between the bosses that screw into the action and the stock plus my barrel wasn't completely free floated. Considering I only have basic hand and power tools including a dremel and drill press, making the pillars was one of the most challenging parts for me. I did a TON of research, watch numerous youtube videos and read up on a few tutorials to get a good idea of what the goal of pillar bedding is and how best to accomplish that with my tools and skills. While in the hardware store I stumbled upon some brass couplers for some sort of 1/2" ID hose. Since they had ribs for the epoxy to grab onto, were long enough for me to cut down, and only $0.89ea so I decided to grab a couple. I also found some 60min Devcon Plastic Steel 2-part mix at another store which is supposed to be great for bedding. It took me 2 tries but I got the pillars the correct length, left them a couple hundreths long and trimmed them down with my dremel once they were set.
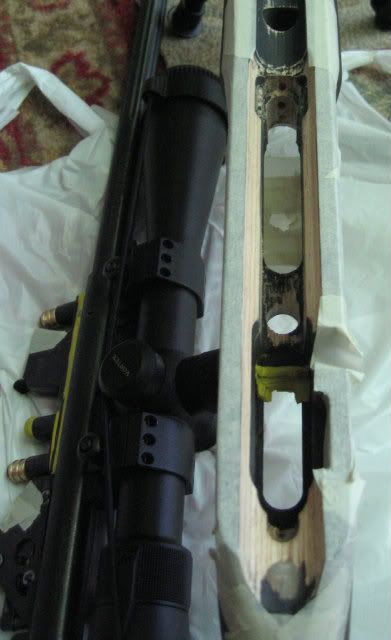
I drilled out the areas where the pillars would go with a 1/2" bit. I roughed up the inside of the inlet, lightly sanded the areas were the receiver touched the stock, waxed the action with Kiwi Neutral shoe polish, filled larger voids with modeling clay(not the best but it worked) and waxed it as well. As I saw one guy do and I thought it was a good idea, I drilled a few holes into the forend to give the epoxy even more to bite onto. I roughed up the pillars a bit also with some sand paper, attached them to the bosses making sure the action screws and bosses were well waxed.
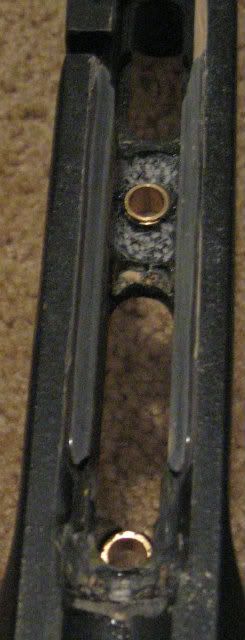
I mixed the epoxy and let it sit until it was a thick paste. I should've let it get a little thicker so that it didn't run so much. Mix it every 5min or so until it keeps the mixed shape and doesn't settle back flat in a minute. After taping up areas I wanted to keep expoxy off/out of, I began applying it to the stock where the pillars would be trying to build up those areas as much as possible, and to the top edges of the inlet where the receiver touched the stock. I applied epoxy to the pillars and set the action in place using electrical tape to hold the action and stock together. The toughest part of keeping the epoxy where it needed to be was the front pillar because there was nothing to hold it back. The mag well is very close making it difficult to make any sort of dam and I didn't want to attach the bottom metal because that would create a stress point defeating the purpose of bedding according to what I've read.
After letting this sit over night, the action came out with just a couple taps of a mallet, but I was a little disappointed with the results. Boyds removes a little too much material IMHO and the stock obviously uses a light wood, not a dense hardwood, so I really felt the need to build up the pillar areas as much as possible. Since there was nothing stopping the expoxy from dripping down, much of what was on the back side of the front pillar simply fell out leaving the epoxy so thin that I could see the ribs of the pillar. Now that the pillars were set it was easy to create a damn with waxed electrical tape and build up the front pillar area and simply added more epoxy to the rear pillar area. Of course I roughed up both areas with my dremel using the small ball-end carbide bit.
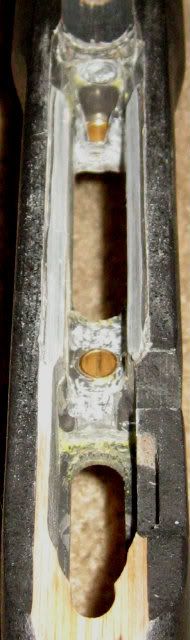
I let this sit overnight as well and it looked great! I had to trim the front pillar area to allow the magwell to clear but that's it. It may not look pretty but it is very solid, the action fits tightly, and the barrel is completely free floated while the action is bedded to the top edges of the stock. All that was left was clean up, prep, and paint. Or so I thought!
Once I tried to install the trigger guard and bottom metal I discovered that the rear action screw was too short when using the trigger guard. Unfortunately the screws are a UNEF thread which is extremely tough to find. They are 12-32 to be exact, and you need a 1"-1.125" long screw. DIP sells 1" screws with a Torx Drive but I stubbornly wanted regular hex(allen) drive. I found out that Savage sells longer screws, part # 704346, for $10 shipped for a pair. You just have to call to order. I'm still waiting on them but I'm going shooting tomorrow and will simply shoot w/o the trigger guard to see how this has helped accuracy at 25-200yds. It's now a cool OD green, how I envision it from day one!
Sorry for the long commentary and poor pics but hopefully this helps out someone.

There is a large gap between the bosses that screw into the action and the stock plus my barrel wasn't completely free floated. Considering I only have basic hand and power tools including a dremel and drill press, making the pillars was one of the most challenging parts for me. I did a TON of research, watch numerous youtube videos and read up on a few tutorials to get a good idea of what the goal of pillar bedding is and how best to accomplish that with my tools and skills. While in the hardware store I stumbled upon some brass couplers for some sort of 1/2" ID hose. Since they had ribs for the epoxy to grab onto, were long enough for me to cut down, and only $0.89ea so I decided to grab a couple. I also found some 60min Devcon Plastic Steel 2-part mix at another store which is supposed to be great for bedding. It took me 2 tries but I got the pillars the correct length, left them a couple hundreths long and trimmed them down with my dremel once they were set.
I drilled out the areas where the pillars would go with a 1/2" bit. I roughed up the inside of the inlet, lightly sanded the areas were the receiver touched the stock, waxed the action with Kiwi Neutral shoe polish, filled larger voids with modeling clay(not the best but it worked) and waxed it as well. As I saw one guy do and I thought it was a good idea, I drilled a few holes into the forend to give the epoxy even more to bite onto. I roughed up the pillars a bit also with some sand paper, attached them to the bosses making sure the action screws and bosses were well waxed.
I mixed the epoxy and let it sit until it was a thick paste. I should've let it get a little thicker so that it didn't run so much. Mix it every 5min or so until it keeps the mixed shape and doesn't settle back flat in a minute. After taping up areas I wanted to keep expoxy off/out of, I began applying it to the stock where the pillars would be trying to build up those areas as much as possible, and to the top edges of the inlet where the receiver touched the stock. I applied epoxy to the pillars and set the action in place using electrical tape to hold the action and stock together. The toughest part of keeping the epoxy where it needed to be was the front pillar because there was nothing to hold it back. The mag well is very close making it difficult to make any sort of dam and I didn't want to attach the bottom metal because that would create a stress point defeating the purpose of bedding according to what I've read.
After letting this sit over night, the action came out with just a couple taps of a mallet, but I was a little disappointed with the results. Boyds removes a little too much material IMHO and the stock obviously uses a light wood, not a dense hardwood, so I really felt the need to build up the pillar areas as much as possible. Since there was nothing stopping the expoxy from dripping down, much of what was on the back side of the front pillar simply fell out leaving the epoxy so thin that I could see the ribs of the pillar. Now that the pillars were set it was easy to create a damn with waxed electrical tape and build up the front pillar area and simply added more epoxy to the rear pillar area. Of course I roughed up both areas with my dremel using the small ball-end carbide bit.
I let this sit overnight as well and it looked great! I had to trim the front pillar area to allow the magwell to clear but that's it. It may not look pretty but it is very solid, the action fits tightly, and the barrel is completely free floated while the action is bedded to the top edges of the stock. All that was left was clean up, prep, and paint. Or so I thought!
Once I tried to install the trigger guard and bottom metal I discovered that the rear action screw was too short when using the trigger guard. Unfortunately the screws are a UNEF thread which is extremely tough to find. They are 12-32 to be exact, and you need a 1"-1.125" long screw. DIP sells 1" screws with a Torx Drive but I stubbornly wanted regular hex(allen) drive. I found out that Savage sells longer screws, part # 704346, for $10 shipped for a pair. You just have to call to order. I'm still waiting on them but I'm going shooting tomorrow and will simply shoot w/o the trigger guard to see how this has helped accuracy at 25-200yds. It's now a cool OD green, how I envision it from day one!
Sorry for the long commentary and poor pics but hopefully this helps out someone.
