• Watch Out for Scammers!

    We've now added a color code for all accounts. Orange accounts are new members, Blue are full members, and Green are Supporters. If you get a message about a sale from an orange account, make sure you pay attention before sending any money!

Duracoat/Cerakote questions

Ryan81

Private
Full Member
Minuteman
Mar 23, 2013
11
0
Texas
I've never painted any of my rifles or accessories but am going to be starting soon. At first, I want to just start off with duracoat since it seems a little bit cheaper than cerakote.


Questions:
What is a good quality airbrush that I should look into? I understand that cheap and good usually don't go together so I'm willing to spend a little if I have to but would rather not spend a whole lot if I don't have to.
What would be a good compressor? I'll also be getting into blasting so I'll need something large enough that can get that done but haven't been able to find a clear answer as to what size I should get.
For camo patterns, what's the best way to make stencils? Cut out some patterns and have them laminated? Use painters tape with patterns cut out and stick it to the rifle/stock?

Any other tips are appreciated.

-Thanks
 
You are right, you can go cheap but you usually end up regretting it. I would recommend you look at the Lauer website for examples of what you need. A link to everything is HERE.

It is worth looking into a standalone air compressor with pressure gage and moisture drain, harbor freight has a few of these s do most hobby stores. They make small ones that are ideal if you only plan on doing it once in awhile. If you already have one in your garage, then you're in luck, you may only need to buy a few fittings to marry the gun and the compressor up. Also, go to the dollar store and buy a set of cheap measuring spoons, some small glass containers with screw on lids ( baby food jars work well), a few small cheap funnels and popsicle sticks for mixing and a can of thinner for clean up. Pick up a dual filter respirator at Home Depot while you are there getting supplies.

For stencils, some use frisket, which you can get at the hobby store. Some just use the frisket camo kits offered by Lauer or the old school manilla folder cut out method.

For blasting there is a link on the Lauer page I posted. If you plan on doing it alot you are looking at a fullsize air compressor and a large booth. Otherwise get one big enough to fit the pieces you think you will be blasting.

When it comes to spraying duracoat, follow the directions and mixture ratios and allow for the times they recommend, trust me, rushing it only causes headaches for you. Get an extra bottle of hardener when you order your colors. Plan on practicing on something unimportant as well as figuring out your air brush nozzle settings and distance from the object that works best. Clean your gear up right away, especially your air gun nozzles.

Watch the tutorial videos on the Lauer website on how to use the product, they are helpful.
 
Last edited:
You didn't mention it, and if there is a reason for that, my apologies, but I prefer KG Gunkote over both the listed options. If applied properly, I find it easier and just as durable as duracoat. It is very forgiving, and very cheap.
 
One thing I have found is that preperation makes or breaks a paint job. Degrease everything. Twice. Then do it again. Make sure you get ALL the oils off of what ever you are painting.

Spend way more time on preperation than you do on the actual painting.

Sean
 
I have to add something about the durability of Duracoat: I just used the newer flat black, tactical (I am starting to hate that word) which is absolutely DEAD flat.
I had some left over, so I sprayed my rock hammer, an old Estwing. I really didn't prep it much at all, just looked for something that I could spray with the last of the bottle I had loaded on the air brush. I picked it up, wiped it with the rag, and sprayed over the rust and all.
It lay around for a couple of months, over a very cold winter in a unheated garage.
Two days ago, we went out looking for different types of obsidian, and I took that thing with me. for two days straight we pounded and chipped with both the point and the flat, and the paint held up. It was used by a teenager who was smashing things left and right all day.
I am impressed.
 
Thanks for the information. It's good to see that the durability will hold up well. I've asked before on another forum and everyone seemed to be talking down on duracoat because cerakote was better.


Do any of you have a specific airbrush you could point me to? I plan on trying to do some very nice stuff with mine so I don't want the quality to suffer due to a cheap airbrush.

Duracoat applied wrong and or mixed wrong, like anything done wrong, can yield less than desirable results. Cerakote is fine if you can bake/heat the item , so items that don't do well with heat, like some plastics, are better off having Duracoat applied to them. Both are quality products IMO.

Follow the link I provided above for a specific airbrush maker. The Paassche made airbrushes are quality airbrushes and work well for just about everything.
 
I missed that link the first time. That Paasche looks like it will be right in my price range.

So far on my list of stuff to buy:
Gloves, degreaser/acetone, sandpaper/scotch brite, lacquer thinner, respirator, painters tape, airbrush, hose, extra bottles, air compressor, regulator, water trap and obviously the duracoat, reducer, and hardener.

Anything else that might be of use?

Thanks.
 
Thanks for the information. It's good to see that the durability will hold up well. I've asked before on another forum and everyone seemed to be talking down on duracoat because cerakote was better.


Do any of you have a specific airbrush you could point me to? I plan on trying to do some very nice stuff with mine so I don't want the quality to suffer due to a cheap airbrush.

It is better (Cerakote) much better.

Badger 350 Airbrush.

I much prefer my Finex FX1000 mini HVLP with the backup .8 tip.
 
Sandblasting uses a shit-ton of air. Do NOT get a single stage compressor if you plan on using it for blasting. It will run way too much and you will be waiting a lot more than you will be blasting.

I got the two stage from Harbor Freight for around $400(actually made in U.S. amazing!) it's pretty much the bare minimum. I still wait for it quite a bit. There's probably cheaper ways to get more C.F.M's, but this was quick and easy to get going. Check the air consumption of the blaster you plan on getting, then decide what compressor is right for you.

It's also nice to light up the object being painted from multiple angles.

+1 for the importance of prep work

-1 for waiting the 3 weeks for duracoat to cure
 
Here are the two airbrushes recommended above.

Badger and Paasche single action
It seems like the Badger kits comes with a bit more accessories so I'm leaning towards it. I read some reviews and it seems like both will be good airbrushes to start out with. Next I just need to find a compressor with a regulator and water trap and I think I'll be set.
 
+1 on 2-stage compressor and those brands of airibrushes. I've been very happy with the Badger 200.
 
does anyone know how to remove cerakote? I just bought a barreled action that was cerakoted and they sprayed the whole bolt so it is hard to lock into place. i would like to remove some of that so it moves more freely.
thanks.
 
I missed that link the first time. That Paasche looks like it will be right in my price range.

So far on my list of stuff to buy:
Gloves, degreaser/acetone, sandpaper/scotch brite, lacquer thinner, respirator, painters tape, airbrush, hose, extra bottles, air compressor, regulator, water trap and obviously the duracoat, reducer, and hardener.

Anything else that might be of use?

Thanks.


Get multiple widths of tape, large office tape holders are a plus.
Get both thin latex gloves for most use and heaver rubber gloves for degreasing parts (acetone degrades latex).
X acto knives for cutting and removing stencils.
Metal ruler, you'll need to cut strips of tape for scope numbers and T marks. Get a small pane of tempered glass to cut on.
Use isopropyl alcohol to degrease optics.
Small paper cups, like at the water cooler for mixing DuraCoat and hardner. Plastic cups melt.
Measuring spoons, get a set with at least a 1/2 tsp but better a 1/4 tsp for mixing small amounts of product.
Funnels for recycling acetone/degrease solution.
Can for dirty degrease solution.
Cheese cloth for filtering dirty solution.
Make or buy a hanger/stand for your airbrush.
Small metal can or bucket for cleaning paint jars and airbrush.
Make stencil tools out of 1/4" dowel rod, for placing and pushing them down. Round one end and flatten the other like a screwdriver
Use larger dowels to make handles for holding parts, you can add tape to make them custom fit. put hooks on these for hanging.
Start hoarding coat hangers. Use them for hanging and holding parts.
Wine corks are good for making barrel plugs to protect crowns.
Get a metal locker or gun cabinet and put a couple heat lamps in the bottom for a oven, you only need 110 degrees. Put rods inside for hanging parts. It cuts drying time to about 15 min, but remember to let parts cool before removing stencils.
You can also use that type of oven to leach out grease from tight spots, in case you are not completely disassembling. If you don't do that, grease may start coming out of cracks between coats.
Metal rectangle pans used for cement work are great for degreaseing. You'll need something long enough for barrels.
Some parts will need to soak overnight, have a lid to prevent acetone loss to evaporation.
Wire and plastic brushes of multiple sizes, including old toothbrushes, for degreasing and cleaning airbrush parts.
Have good lighting from multiple angles to reduce shadows.
Devise some kind of hanging system that will allow you to work more hands free and make sure you can rotate parts.
Make areas to hang degreased parts before coating.
Have dedicated rags/towels for handling degreased and hot parts. Also dedicated mat for stenciling, no greased parts ever touch it
Your hands are covered with oil, don't handle degreased or coated parts without gloves. You'll go thru lots of gloves.
With DuraCoat, adding 5-10% more hardner will increase gloss, reducing by 5% will add flatness.

I recommend a airbrush compressor; AND a two stage for your blaster and other tools. I also use HVLP but that's more for large jobs. Get the airbrush from a quality mfg, but also get the cheep one from Harbor Freight that has the multiple/quick-change cups. I use those as one-time use cups because they melt a little, but the whole thing with airbrush and 8 cups is about $7. Harbor Freight will save you money on small air tools, couplers and hoses.

Blasting makes everything easier and you can get a good/cheep cabinet from Harbor Freight, they now also stock aluminium oxide. If you really want to get into it you should also look at setting up a park tank. DuraCoat really loves parkerized steel.

DO NOT use a non explosion-proof (EP) fan to pull paint fumes. Use several to PUSH fumes out a vent or window. If you plan on doing this often or for a business I highly recommend a EP rated fan and dedicated vent.
Or, as I built, a pressurized paint booth. It's basically a closet with a window on one wall and filtered vent in the other. Using a large snail fan I pressurize the room and push the fumes and overspray out the window. To further EP the booth, the ceiling is plexiglass and sealed, with all my fluorescent lights outside the booth. Keep your compressor or HVLP turbine outside the booth also.
No sparks, flames or smoking; all this stuff can go boom.

That's all I can think of off the top of my head. I just found and joined Sniper Hide today, so sorry for the late response.
 
Thanks for the advice and tips!


I've been a little busy the past month but just began buying stuff. I ordered a Paasche kit that came with a small compressor(I actually think it's sitting on my doorstep right now) as well as the duracoat. I plan on picking up all of the smaller stuff like gloves, tape etc. in store.
 
Just finished spraying two AR mags.


I scrubbed the first one with the scotch brite pad which didn't seem to work very well. Is this better for plastics? I used sandpaper on the second one. I just need to pick up a mask and some lacquer thinner for clean up. The reducer worked but there just wasn't enough of it.

Overall, I'd say it went pretty well. Everything went pretty smooth and it was easier than I thought.
 
The best thing to do is media blast it, as far as spraying goes you can spray duracoat with an airbrush as long as you really look at your pattern and make sure you overlap just enough to not get lines or too much build up. Make sure you clean it out really good or you will get a clogged nozzle which will splatter your paint next time you go to use it. If you mess it up just redo it, duracoat is cheap and easy enough to redo.

Christian
Owner
Warrior Customs
https://www.facebook.com/WarriorCustomz
 
Passche h single action tip comes in 1 2 or 3 fine med large, med tip is good for duracoat I use both h nd vl series h is better for duracoat I find. Also prepping and mixing ur paint is paramount or your finish won't work. I also use just a small air comp nothing fancy.
 
Not sure which tip I'm using but I've found a pretty good setup for now. Didnt take too long to figure things out. The posts here have definitely helped.

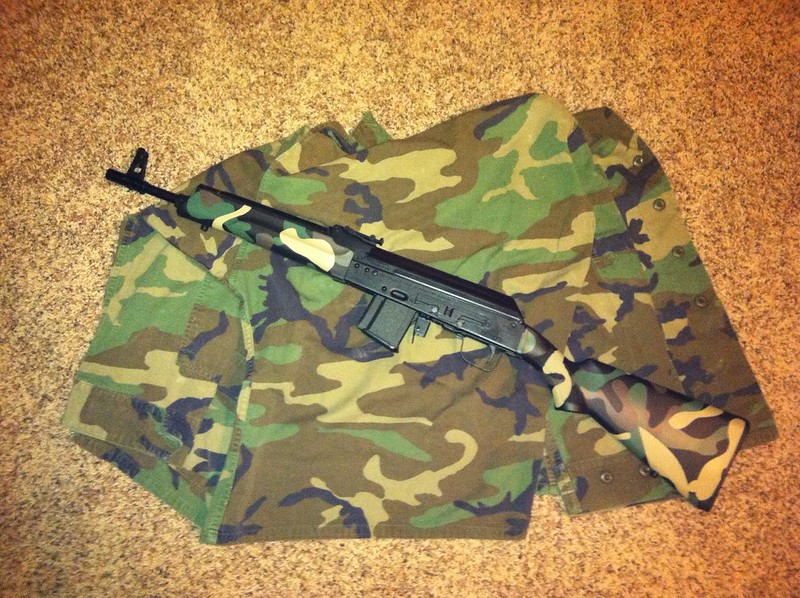
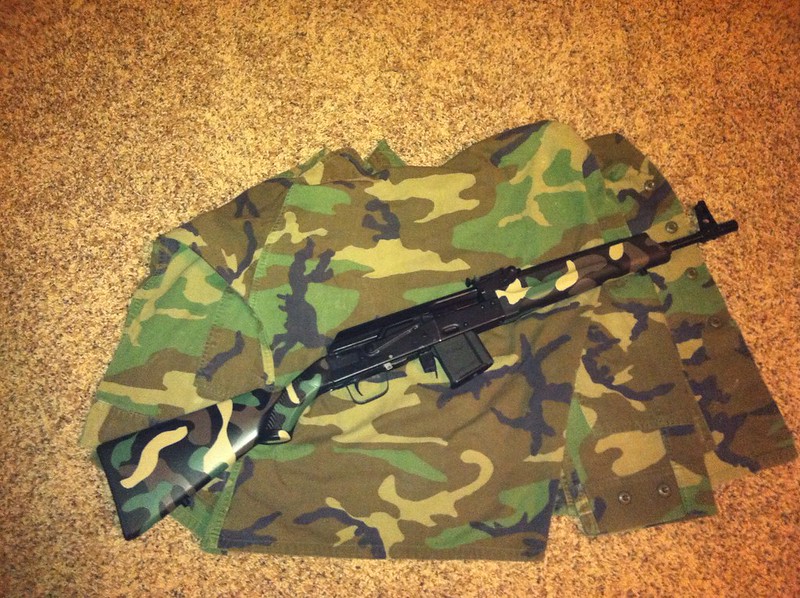
I started on some mags and tonight I'll be seeing how my camo job was on my Saiga. Only did the stock/forend but I think it will turn out okay. I did a woodland pattern using woodland tan, woodland green, woodland brown, and matte black. Since I don't plan(at this time at least) to paint the rest of the gun, I chose to go with more black rather than the green/brown.


One more question, how many layers of each color should I put on?

thanks.
 
Operation: Duracoat Saiga is complete.

9260052124_5f4c878051_c.jpg

9260051070_9f03cb7f8d_c.jpg


From a looks standpoint, I thought it turned out pretty nice. There are a few blemishes where I didn't quite have the tape pressed down and there was a little bit of a bleed under it but it was very minor. The only thing I don't really like about it, is that you can feel the different layers. I'm not sure if I was laying it on too thick which or not but when you run your hands across it, you can definitely feel the different between the tan/black/brown/green where it overlaps. I guess that's something I'll have to work on. I wanted the last coat to be black since that's the color of the gun. Overall, I'm very satisfied for it being my first project.
 
I used krylon after a camo job cause I was too cheap to buy the duracoat clear. DON'T DO IT. The krylon will stain and spot when cleaning the weapon. It had a rubbery feel to it. I finally got tired of it and stripped the krylon off. Duracoat remained in place. Lesson learned!
 
Is the clear duracoat worth it? I'm honestly not that worried about it. I wasn't expecting it to look this good lol.


I think it had something to do with me not pressing the tape down enough. It's really only noticeable on the tan outline which is also where I had a few parts bleed through on that.
 
Ryan81 - Shotgun looks great! I am toying with the idea of using duracoat to paint my stripped upper and lower for a new AR build. I have never done anything like that before, and I haven't used an airbrush since grade school art class. Any suggestions based upon your experience?
 
Last edited:
Sadly, it's not a shotgun. It's in .223. I wish it was a Saiga 12 though.


Suggestions: Practice on a few, smaller items you really don't care about. I had just had some extra AR mags laying around and gave it a whirl on a few of those. And then I stepped it up to the Saiga which I honestly didn't care if I messed that up either lol. That came out pretty well so I was going to paint the stock, grip, and handguard on one of my ARs tonight when just about everything went wrong. I'm not sure if I forgot to clean the last jar, but the tube that the airbrush pulls it through was clogged, the duracoat didn't go on smooth, and then about halfway through the 2nd coat the cheapo air compressor went out.

The jar was obviously my fault, I just forgot to clean it. I'm really not sure why the duracoat didn't go on smooth. Every time I've used the woodland tan it's been much rougher than the other colors. Maybe I need to add a little bit more reducer with it next time. Anyone have an idea if it could be caused by something else? The compressor was set on the same setting as it was on the Saiga and it went on smooth with the brown/green/black colors.

Also, if anyone is wanting to remove duracoat, all I did was use acetone. It was probably about an hour after the air compressor had quit and stopped. Got an old toothbrush, dipped it on a bottle of the acetone and it started to come off in seconds. Took maybe 10 minutes to get 95% of it off the handguards. I'm not sure how well it would work on duracoat that has fully cured though.