• Watch Out for Scammers!

    We've now added a color code for all accounts. Orange accounts are new members, Blue are full members, and Green are Supporters. If you get a message about a sale from an orange account, make sure you pay attention before sending any money!

  • Site updates coming next Wednesday at 8am CT!

    The site will be down for routine maintenance on Wednesday 6/5 starting at 8am CT. If you have any questions, please PM alexj-12!

Resizing 5.56 LC brass to .300 Blackout... Experiences?

Strykervet

ain'T goT no how whaTchamacalliT
Full Member
Minuteman
  • Jun 5, 2011
    6,054
    4,935
    48
    Pierce County, WA
    I just got 2000 newly annealed 5.56 LC brass pieces and was thinking I could instead take these and trim and resize to .300 Blackout, which is a bit hard to find at the moment for good prices. What say you? Is this a worthwhile endeavor, will I get good results, upsides or downsides to be aware of? Anyone on here do it as the norm, 5.56 LC to Blackout I mean? I have a quality set of Forster dies, but I'd like/need to upgrade the trimmer (which needs it along with other stuff anyway --going .50 soon).

    I'd just like to hear of issues experienced related to resizing 5.56 LC brass to Blackout and if it is worth doing to 2000 pieces.
     
    I had a member her that goes by the screen name of "hoser" do my first 500 for me. I'm not sure if he still does it or not, but the price was right and fast turnaround. I've been doing my own since then, probably 3-4 thousand and it's not that big of a deal to process them. You'll have just a tiny bit less capacity compared to AAC headstamped Blackout brass, but not enough to cause any issues. If you have access to an annealer, it's a good idea to anneal the new necks. If not, killshot on here offers annealing for .10 per case if I remember correctly.
     
    Thanks, I'll probably need something special to trim just these cases with if I go this route. I can keep it in mind when I'm looking.
     
    Depends on what you have already but, I've used the Dillon RT1200 and a case form/trim die from CH4D to make thousands of pieces. Just lube the cases and go to work. One thing is to make sure that your press has a long enough ram (4" should do it) to get the brass all the way up the die.
     
    Well, I think the best way will be to size 'em first as 5.56 to get the case straight and knock out the primer and clean that up, then cut 'em to length (with a chop saw or something, I can't do 2000 one at a time) then resize them as Blackout, final trim (on some kind of power trimmer that'll do .50BMG and below) and deburr. That sound like a plan, or is there one more streamlined?

    The brass I have was just annealed, the fellow I got it from did it and he does it on here, but I think he goes by a different name. Will have to check prices. I suspect it is low enough for the BLK, but I could be wrong. I could get it done again if I have to I suppose.

    I may also just PM the screen name you mention above and see if he still does it, see if it is worth it for me to do it that way instead.
     
    If I were you I wouldn't "waste" that 223 brass, since its fairly optimal for its intended purpose and doesn't offer any advantages when converted. Since annealing only softens the neck and shoulder fully, and the head/body of the case needs to remain "tempered" to withstand chamber pressure without rupturing... That means most if not all of the fully annealed portion of the 223 case will be trimmed off. I've experimented with forming BLK brass quite a bit, and found that well annealed case necks were one of the most important factors to accurate loads, due to neck tension effecting ignition properties so drastically. Forming from previously annealed 223 brass produced better, but not very uniform results.
     
    If I were you I wouldn't "waste" that 223 brass, since its fairly optimal for its intended purpose and doesn't offer any advantages when converted. Since annealing only softens the neck and shoulder fully, and the head/body of the case needs to remain "tempered" to withstand chamber pressure without rupturing... That means most if not all of the fully annealed portion of the 223 case will be trimmed off. I've experimented with forming BLK brass quite a bit, and found that well annealed case necks were one of the most important factors to accurate loads, due to neck tension effecting ignition properties so drastically. Forming from previously annealed 223 brass produced better, but not very uniform results.

    %100 agree. Save that .223 brass.

    Use fired brass for 300 BLK.

    Tumble brass
    Universal decapping die to pop the primers.
    (Or if using wet stainless tumble afterward)
    Trim to size using HF mini cut off and jig
    Deburr
    Anneal brass
    Size brass
    final trim
    prime powder and seat.

    The reason I anneal first is because of others reporting inconsistent bullet to case tension when annealing after re-sizing.
     
    If you're gonna do its send it to Hoser. It'll save you a headache if your not properly equipped. All you need to do is debur it when you get it back and it's ready to load. You probably wouldn't have to debur it. I chamfer all the necks on my brass. His brass is the best I've found.
     
    Thanks for the replies. I hear what you are saying, but if I have access to tons of this LC brass and I can get it converted and then re-annealed, all for the right price, then why not go this route?

    I have two lots of brass, 2000 ct. One is newly annealed, once fired. The other is still primed w/factory crimp. I understand both of these lots would be more ideal for 5.56 given what has been done to each.

    But I can get more. Cheaper, not annealed, once fired. Now provided it can all be done for less than the price of AAC/Remington brass, any concerns? Issues? If the brass is converted and then annealed for the .300 length, then wouldn't this be an ideal case? Shouldn't I get consistency given the fact the brass is all from the same lot, formed properly, annealed, etc.?
     
    I have a Dillon 550b with a special tool head and trimmer die I got from Brad's Warehouse that runs with the Dillon 1200 electric trimmer motor. I run it through there and then I run them through a Forster full length size die. Made around 1000 for myself and about 500 for a buddy with no issues what so ever. I need to make some more, but have been lazy lately.

    Here is a thread I made on a few others forums to show my process.


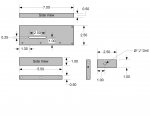
    Brad's Warehouse modified 550b tool head and trimming/forming die. These are made by Whidden Gun Works. The tool head is not simply a cut down Dillon tool head, but a CNC machined brand new tool head. I had to shave some material off of one side because it would not slide into my press. You can see the little step up right at the hole the locator pin drops into. I didnt have to take all that material off, but a bit to get it to slide in. The other side needed no work, the back needed no work, just that one part. A little work with a file had things working a lot better. I guess this is better than if it was way under sized and loose in the press. The trimming/sizing die is pretty nice too. This tool head is also milled on the bottom to allow your lock ring to go there since there isnt room on the top. I had to try 3 or 4 lock rings before I found one that was small enough to work. You have to take the tool head out of the press to snug it down because there was no way to turn it with the tool head in the press. This and the little filing I had to do on the tool head where the two things that made me want to pull my hair out, but once I figured those two issues out everything else went well. I am not sure if my lock ring was a factory dillon ring, a Lee ring, Hornady, or RCBS, I dont know. It was a standard with no set screws or anything like that, fairly small OD. I will try to shoot a picture and get it up here.

    imag0516y.jpg


    imag0517ea.jpg


    imag0518e.jpg


    imag0526c.jpg


    imag0519e.jpg


    First step in the process is to set head spacing. To do this you simply run the forming/trim die down until you are at spec. You need to have a case gauge for this. I didnt take pictures of any of the brass I used for this because I ended up trimming it for use so I didnt actually waste any brass except for the 2 or 3 where I set the shoulder slightly low. I think I used 5 or 6 pieces of brass to get it just right and then after running 10 pieces through I actually ran the die down just slightly lower. I used a piece of new factory loaded ammo as well as a piece of once fired brass from my gun to setup head spacing. I think I set it up kind of in between, but at the point I was at I was trying to get it within maybe a couple thousands so pretty dang close. Factory non-fired dropped slightly deeper into the gauge and the once fired was slightly higher. If I find I have issues with it running in my gun I will probably crank down the die just ever so slightly more, but I am pretty happy with where I am at. I also have not run this brass through a full length die with an expander ball. That may sharpen everything up just slightly more and get me even closer to being perfect.

    imag0520o.jpg


    imag0521d.jpg


    imag0527e.jpg


    Factory non fired round in the case gauge
    imag0532q.jpg


    I believe this is where I ended up. I cant find the picture of the once fired in the case gauge, but it was basically level with the top of the gauge. The factory was level with the bottom, and I was in between.
    imag0533y.jpg


    But, like I said, once I started running a few cases through I dropped the die down slightly more, but I dont know if I took any pictures of them in the case gauge, but it looked way closer to factory non fired than the first 10 or so I did(I ran them back through).
     
    • Like
    Reactions: wayno1
    So after I had that setup I got the trimmer set. 1.368 is max and it was recommended to trim to 1.358. I got pretty damn close and called it good. I was getting 1.358-1.359.
    imag0530r.jpg

    imag0529n.jpg


    This was what I ended up with. From left to right: 1 of the 1st 10 I did. Factory non-fired. Final setup(after 10 I cranked the die down a little more). Factory once fired.
    imag0536t.jpg


    Trimming this much brass off causes lots of shavings and long slivers. The way the milled tool head is and how short everything becomes you cant use the blue ring vacuum attachment that comes with the Dillon RT1200. There simply isn't the height required. The recommendation was to modify a vacuum cleaner nozzle attachment to basically surround the die and cutter. So out came the dremel to a nozzle I found in the garage(I hope I dont need that nozzle later) and this is what I came up with after trimming and measuring and trimming some more. The only issue is its open on the right side so you have to kinda have your thumb ride on it to deflect brass shavings back into the vacuum. I will figure out something to put in there at a later date, but for now, my thumb works fine.
    imag0537y.jpg

    imag0538v.jpg
     
    Thanks for the replies. I hear what you are saying, but if I have access to tons of this LC brass and I can get it converted and then re-annealed, all for the right price, then why not go this route?

    I have two lots of brass, 2000 ct. One is newly annealed, once fired. The other is still primed w/factory crimp. I understand both of these lots would be more ideal for 5.56 given what has been done to each.

    But I can get more. Cheaper, not annealed, once fired. Now provided it can all be done for less than the price of AAC/Remington brass, any concerns? Issues? If the brass is converted and then annealed for the .300 length, then wouldn't this be an ideal case? Shouldn't I get consistency given the fact the brass is all from the same lot, formed properly, annealed, etc.?

    First off, I'm jealous of your source for brass!
    My $.02 earlier was more of a reflection on my own state of supply (or lack of) than a direct reflection on your stated concerns, and I apologize.
    To the best of my knowledge there are no concerns/issues with your proposed plan. Those should indeed make excellent BLK cases. The only limitation they will have will be the slightly reduced case volume (compared to factory produced hornady/AAC/rem brass) that all converted 223/5.56 military brass have.
     
    Simple to do, really doesn't require annealing if using once fired LC cases. I'd say it'd be worthwhile to form some of your LC 223 brass for 300 BLK. Recently completed a 1000 round lot of LC brass to Blackout brass. Only thing I'd recommend is a cheap Harbor Freight mini chop saw for about $30. Need to make a positive stop for the little saw so all cases are cut to the same length. Whatever length you cut them to they will grow in length about .010" when sized in the Blackout sizing die. LC .223 brass makes perfect .300 BLK cases. Some brands of .223 cases have too thick case walls. Your neck diameter with a seated bullet should not exceed .334" or they could be too tight in your chamber. LC brass necks are about .330" dia. with a seated bullet. Too easy to make .300 Blk cases and since you have a good supply of LC brass I'd make some. 300 Blackout is fun to load and shoot and the majority of Blackout shooters form their own brass. Cut to length 1st, deburr, size in blackout sizing die, trim, load with published data. NO problems other than doing the standard case checks for signs of case stretching-separation issues, and primer pocket crimp removal.
     
    Last edited:
    Thanks guys, and jealous? I'm jealous of that Dillon setup above! I'd love a 550b.

    But I'm getting into .50BMG and .375CT and so now I basically need an all new reloading bench, complete with a big press that accepts regular dies too (unless that is concession; I already have a good single stage) a large trimmer (I'd like one that will do everything, a good one, with a power drill attachment preferably --or even one that attaches to a drill press). Then I'll need all the dies and parts for my RCBS brass station to clean out .50BMG primer pockets and such. All the little things that eat you to death and turn that $500 order into a $1000 order, you know, those?

    So if I form my own .300BLK, it has to be worth it. I hate Harbor Freight junk tools, but if I can't find a better one at a decent price, I may go with that --$30 and it has this one job. And that guy in the video sells what looks to be like useful stops, looks quick and cuts 'em off where you can finish 'em properly. I may go this route, form a bunch up, then send it off to be annealed later so I have good, long lasting brass.

    In fact, instead, I'll probably go ahead and just place another order for 2000pcs. non-annealed brass and form 2000pcs. .300BLK pieces and then send 'em back to be annealed properly. That'll be the way to go I think. Then I can use the 4000pcs. LC brass I have, ready to go, for 5.56.

    Once primers come back, I'll be ready to go! That and some more powder I guess...

    Thanks again for all the suggestions and ideas. That chop saw and stop probably saved me a bit of trouble finding something else (or that actual setup). I just gotta crunch some numbers and I should be good to go.
     
    there is a guy on M4C that sells a trimming jig to use with a cheap harbor freight mini chop saw to get them close to the correct length. then resize and trim as normal.

    here is a link to a youtube video with the contact info
    Converting .223 Brass to 300 Blackout - YouTube

    Thanks for the info. I just got one of these and ordered a jig from that guy. I had been using my Dillon trimmer until they stated that it would void the warranty if you use it to form/trim .300BLK. I plan to just use this rig and then finish the last little bit in the Dillon.
     
    So after I had that setup I got the trimmer set. 1.368 is max and it was recommended to trim to 1.358. I got pretty damn close and called it good. I was getting 1.358-1.359.
    imag0530r.jpg

    imag0529n.jpg


    This was what I ended up with. From left to right: 1 of the 1st 10 I did. Factory non-fired. Final setup(after 10 I cranked the die down a little more). Factory once fired.
    imag0536t.jpg


    Trimming this much brass off causes lots of shavings and long slivers. The way the milled tool head is and how short everything becomes you cant use the blue ring vacuum attachment that comes with the Dillon RT1200. There simply isn't the height required. The recommendation was to modify a vacuum cleaner nozzle attachment to basically surround the die and cutter. So out came the dremel to a nozzle I found in the garage(I hope I dont need that nozzle later) and this is what I came up with after trimming and measuring and trimming some more. The only issue is its open on the right side so you have to kinda have your thumb ride on it to deflect brass shavings back into the vacuum. I will figure out something to put in there at a later date, but for now, my thumb works fine.
    imag0537y.jpg

    imag0538v.jpg

    Don't know what I was thinking but I thought I was gonna be able to get a toolhead setup like that but forgot about how the case wont press high enough into the trimmer. Shit, back to the drawing board...

    Are these toolheads available for purchase or custom? If so how much? Source? thx
     
    • Like
    Reactions: wayno1
    Don't know what I was thinking but I thought I was gonna be able to get a toolhead setup like that but forgot about how the case wont press high enough into the trimmer. Shit, back to the drawing board...

    Are these toolheads available for purchase or custom? If so how much? Source? thx

    Not sure what you are talking about on the case not getting high enough into the trimmer.

    Brads Warehouse.com sells the tool heads for the 550 and the 650 as well as the trimmer die. I dont know if they have any in stock right now. I think the whole setup was $99 bucks or so.
     
    Not sure what you are talking about on the case not getting high enough into the trimmer.

    Brads Warehouse.com sells the tool heads for the 550 and the 650 as well as the trimmer die. I dont know if they have any in stock right now. I think the whole setup was $99 bucks or so.

    It has been a while since I've processed .300blk but I have an extension shell holder that places the case about an inch and a half higher than usual. I just though you were accomplishing the same by lowering the trimmer in the toolhead. Maybe I missed your reasoning for the lower placement of the trimmer...
     
    It has been a while since I've processed .300blk but I have an extension shell holder that places the case about an inch and a half higher than usual. I just though you were accomplishing the same by lowering the trimmer in the toolhead. Maybe I missed your reasoning for the lower placement of the trimmer...

    probably. I dont know, thats the way I bought the whole setup with the modified tool head and trimmer specially designed for that tool head. Works great, lasts long time(well 40k rounds at least).
     
    There's a new case cutting jig on the market that eliminates the need for an expensive case trimmer. It's only $20 bucks, it works, it's accurate and fast. No moving parts and I think it works better than that VZ thing with the spring and ball bearing in it. That one shoots the case and scrap out on your bench to make a mess. It's easy to set up and the length is uniform within a thousandth or two. Different cases will produce different lengths depending on the thickness of the brass so you if you need perfect uniformity you may want to sort your brass by manufacturer first, then adjust the length when you switch. As a case trimmer you only need a chamfer/deburring tool to finish the case. It's available on EBay and also on the forum called 300blktalk.com in the classified section. Oh yeah, you can modify it yourself easily to do other calibers as well and you don't have to buy more than one to do all your calibers. I love it.

    I can't get the video to post. It's by Reloadimizer, search EBay for 131061264810.

    http://youtu.be/dnMNJVQeTUw[/URL
     
    Last edited:
    I started with FC and PMC stamped brass and used a redding cut off die to shape, harbor freight chop saw to cut to length and a lee trimmer to make the brass that I've shot so far. It was fairly cheap and has been working great, albeit a little labor intensive.
     
    I have manufactured maybe less than 100 BLK cases from used 223 brass, and it was pretty easy to do. I simply used a dremel with a cut wheel to chop the brass at around the shoulder/body junction, which is messy, but doesn't matter. Then run them up through a redding die and trim to length with the giraud trimmer. Very easy, and actually pretty fun too. Too bad my BLK project fell thru for the time being, so I ended up making a bunch of lonely brass.

    I did see a method that seems to be the best I have seen. If you have a Dillon 1200 trimmer, you can actually do it in one step. Not sure about the die, but he was able to connect the trimmer to the sizing die, ran a full 223 case into the die, sized and trimmed it in one step. Very cool
     
    Here's another option for a jig to hold your cases for that HF mini chop saw. You'll just need to lengthen the slot that is 2.00" long, another .75" to the right.

    Also, I've attached a photo showing it in use (it uses the cheap Lee case trimmer, case holder in the 2.50" fence with the "J" drilled size hole).

    Just drill a hole in the HF saw base plate and use a square nut to lock the jig into place and set the distance form the fence the blade cuts. When drilling the plate, ensure that the rear fence (the one closest to you) of the jig is positioned in enough to act as a stop for the saw.

    Easy peasy...

    And if the BLK case is anywhere close to the 300 Whisper dimensions, then with LC brass, you will need to neck turn. I've typically gone the other route with forming (.223=>.221FB => .300 Whisper/17 Mach IV/.20 Vartarg), basically due to the dies I have and the other cases/rifles that end up needing .221 parent cases...
     

    Attachments

    • Chop Saw Jig Blue Prints.jpg
      Chop Saw Jig Blue Prints.jpg
      63.4 KB · Views: 49
    • Finsihed Jig and saw_small.jpg
      Finsihed Jig and saw_small.jpg
      74.4 KB · Views: 57
    • Jig and parts.jpg
      Jig and parts.jpg
      86.5 KB · Views: 40
    Last edited:
    I have manufactured maybe less than 100 BLK cases from used 223 brass, and it was pretty easy to do. I simply used a dremel with a cut wheel to chop the brass at around the shoulder/body junction, which is messy, but doesn't matter. Then run them up through a redding die and trim to length with the giraud trimmer. Very easy, and actually pretty fun too. Too bad my BLK project fell thru for the time being, so I ended up making a bunch of lonely brass.

    I did see a method that seems to be the best I have seen. If you have a Dillon 1200 trimmer, you can actually do it in one step. Not sure about the die, but he was able to connect the trimmer to the sizing die, ran a full 223 case into the die, sized and trimmed it in one step. Very cool

    The Dillon Trimmer is awesome, but EXPENSIVE and you still should cut the brass before trimming or you will have a huge pile of brass dust on your bench. I use the $20.00 Reloadimizer jig and a $29.00 Harbor freight saw to cut the case and then a trimmer is not needed. Search EBay for 131061264810 to see the jig in action.
     
    Well, I'm stocking up on LC 5.56 inadvertently, so I may end up making all the .300BLK from LC after all. I plan on looking at that reloadimizer and weighing that against having it fully processed (buying it that way). I have 500 on the way to try out and compare against 200-300 or so factory 1x Blackout brass, and I'd like about 5000 pieces in this caliber on hand and I'd like to not have to trim all of that myself. Once I settle on converted or not and I begin to accumulate enough of it, I'll send it off to be annealed before I load much of it. But due to how difficult it is to find factory brass at good prices, I'm really hoping on this trimmed brass working out well.
     
    you still should cut the brass before trimming or you will have a huge pile of brass dust on your bench.

    Says who? I only convert in a single pass on a my Dillon setup and I never pre-trim and I do not have brass shavings everywhere. My vacuum takes care of everything nicely.
     
    Sorry, I was wrong. With a vacuum the Dillon Trimmer is good to go in one pass. I did say it was awesome and I wished I had one. But $255.00 for the trimmer and $23.00 for a tool head plus a $30.00 shop vac is a big hit even if you already own a Dillon press, as I do. A square cut with the $20 Reloadimizer jig and a $29 Harbor Freight saw will do the same job, just as fast, without a press, and you don't have to switch tool heads. Just my opinion, I have to keep a low budget under the wife's radar :).
     
    trimming 300 blackout

    I was wondering I am using the Dillon set up on a Dillon 1050 and my overall length are all over the place and if I can get that taken care of I still have an ID of .292 which puts a ring on the bullet when loaded
    any help