So trying to decide which method is best for dealing with crimped primer pockets. Should I swage them or use a cutting tool? What are the pros and cons of both? Does the cutting tool also uniform the pocket or is that a separate tool?
Join the Hide community
Get access to live stream, lessons, the post exchange, and chat with other snipers.
Register
Download Gravity Ballistics
Get help to accurately calculate and scope your sniper rifle using real shooting data.

Install the app
How to install the app on iOS
Follow along with the video below to see how to install our site as a web app on your home screen.
Note: This feature may not be available in some browsers.
You are using an out of date browser. It may not display this or other websites correctly.
You should upgrade or use an alternative browser.
You should upgrade or use an alternative browser.
Primmer pocket prep
- Thread starter mzvarner
- Start date
For years I've used the Hornady bits, which are cheap, cut very well, made of good tool steel and have a positive stop, where you can't cut any deeper.
Back in late '05, I bought the RCBS TrimMate and got their two decrimper reamers for lg/sm pockets and one of them didn't work very well, but the Hornady bits fit just fine and so I use those.
A few years back, my sisters got me the Dillon SuperSwage 600, so I'm using that now, with the rubber band/string 'auto-indexing' mod.
You need to set the Dillon up, by headstamp sometimes, but it's a nifty device that's worth the scratch if you're processing a lot of .mil brass.
Chris
If you are looking for the BEST way then swage using a Dillon Super Swage or perhaps the new RCBS swaging tool that does NOT mount on a single stage press. (I have the Dillon)
Swaging, in my mind is the best way as first, it removes no metal. It merely pushes it back where it started out. Second, when the primers were originally crimped not just metal around the primer pocket mouth was displaced but the primer pocket itself could have had the walls "hour glassed" slightly. The "spud" on the swaging tool will push his back where it started as well.
Brass gets stronger when it's worked and swaging does that, especially in an area where it's beneficial. Strong primer pockets don't loosen as quick.
Not to say that "cutters" don't do the job too, it's just that they remove metal on the edge of the pocket and usually do nothing for the hour glass sides of the primer pocket if the crimping action was a little "vigorous".
I prefer to swage and it's a whole lot easier than trying to hold a case while a cutter is trying to spin it. Also don't have to stop when the drill battery is dead. I just keep on swaging.
Priming & Swage Kit : CH4D
CH4D swager on top of a single stage press is fastest way to get that swaging crap behind you so you can get on with your life. Fast, cheap, built like a tank in the USA. Once adjusted it only takes about 1 or 2 inches of travel on your press handle. You can swage as fast as you can swap out brass in a shell holder. All the work takes place ON TOP OF THE PRESS where you have plenty room.
CH4D swager on top of a single stage press is fastest way to get that swaging crap behind you so you can get on with your life. Fast, cheap, built like a tank in the USA. Once adjusted it only takes about 1 or 2 inches of travel on your press handle. You can swage as fast as you can swap out brass in a shell holder. All the work takes place ON TOP OF THE PRESS where you have plenty room.
So trying to decide which method is best for dealing with crimped primer pockets. Should I swage them or use a cutting tool? What are the pros and cons of both? Does the cutting tool also uniform the pocket or is that a separate tool?
Crimp removal cutters, like the Hornady tool, don't uniform the pocket as well. If you want to uniform Sinclair makes a good inexpensive set you can chuck up in a drill. That said, the Hornady tools do get the crimp out
I used a Dillon super swage and it works well, but my reloading time is so limited anymore that if I have once fired 5.56 brass that needs decrimping I just send it out in large batches and pay to have it resized, trimmed, polished, and swaged in one shot. I hate swaging brass by the hundreds!
Priming & Swage Kit : CH4D
CH4D swager on top of a single stage press is fastest way to get that swaging crap behind you so you can get on with your life. Fast, cheap, built like a tank in the USA. Once adjusted it only takes about 1 or 2 inches of travel on your press handle. You can swage as fast as you can swap out brass in a shell holder. All the work takes place ON TOP OF THE PRESS where you have plenty room.
I have the CH4D swager and it will rip the rims off cases with a standard RCBS shell holder, I have read that the CH4D shell holder works better. But my CH4D swager is not being used due to damaging case rims.
The Dillon Super Swage is the best unit, I have the Hornady unit below "BUT" as stated above the Dillon unit does NOT remove brass and therefore is a better design. I have Federal brass that had a 50% failure rate using reamers and the Dillon unit would not have done this.

My Hornady unit is equipped with a RCBS reamer designed for their prep station but requires hand held operation and it is very hard on your fingers.

If you have a large volume of cases to do your fingers will get very sore using any type of hand held crimp remover. Get the Dillon unit and be done with it, its easy to use, won't damage your rims or make your fingers so sore you can't pick your nose.
(buggered up finger humor)
")
Last edited:
I use a neck chamfering tool.
When I'm prepping brass, I already have the chamfering tool spinning in a chuck and am chamfering each piece of brass after length trimming; I chamfer the neck, then flip the case and chamfer the crimp off if it needs it.
I don't find it increases brass prep much when added to the process like this. I've done 10k .223 cases and 500 .308 cases like this.
As for the potential negative effect of removing brass from the primer pocket with a chamfer, the radius around the bottom of the primer cup is about the same size as the chamfer on the pocket, so I don't lose anything by chamfering instead of swaging.
Joe
Last edited:
Dillon or the RCBS that supports the case from inside the web. You can ruin too many cases with the rim hold device.
So trying to decide which method is best for dealing with crimped primer pockets. Should I swage them or use a cutting tool? What are the pros and cons of both? Does the cutting tool also uniform the pocket or is that a separate tool?
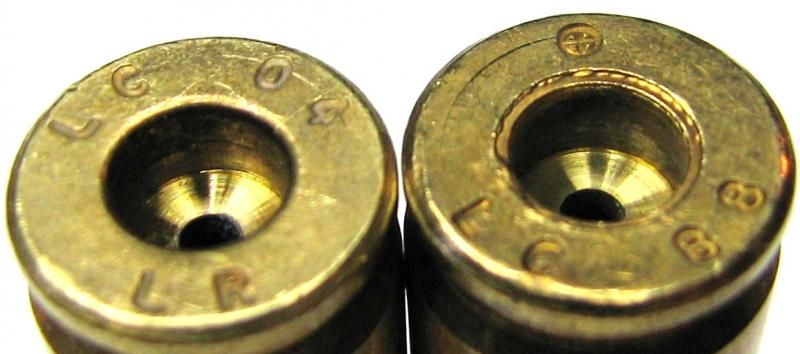
To me it depends on how long you plan on using the brass. If you only plan on using it one more time, it doesn't really matter. The thing is that if you cut the crimp out, you are removing brass, and eventually the primers will be too loose. I keep my brass as long as practical, so I prefer to swage. Swaging does not uniform the primer pocket though. Swaging is similar to how most primer pockets are formed in the first place, at least that is my understanding. You end up with a rounded edge at the bottom of the pocket. The separate tool you refer to cuts brass at the bottom of the primer pocket and squares off both the circular edge at the bottom, and also makes sure that the bottom of the primer pocket is square to the centerline of the case. (it will not help if for any reason the pocket is not concentric with the centerline.) Hope I didn't confuse you with my description. A drawing would work much better. One other consideration, while we are in that area of the case, is trimming the flash hole. If you are using premium brass such as Lapua or Norma, I believe they drill the flashhole, but on run of the mill stuff such as LC, it is punched out. That can leave a "hanging chad" so to speak. Not sure how much influence it has on powder initiation, but it is something that can change from case to case, and the name of the game in accuracy is consistency. I use the Dillon SuperSwage when I process Military Brass.
Last edited:
If you are looking for the BEST way then swage using a Dillon Super Swage or perhaps the new RCBS swaging tool that does NOT mount on a single stage press. (I have the Dillon)
Swaging, in my mind is the best way as first, it removes no metal. It merely pushes it back where it started out. Second, when the primers were originally crimped not just metal around the primer pocket mouth was displaced but the primer pocket itself could have had the walls "hour glassed" slightly. The "spud" on the swaging tool will push his back where it started as well.
Brass gets stronger when it's worked and swaging does that, especially in an area where it's beneficial. Strong primer pockets don't loosen as quick.
Not to say that "cutters" don't do the job too, it's just that they remove metal on the edge of the pocket and usually do nothing for the hour glass sides of the primer pocket if the crimping action was a little "vigorous".
I prefer to swage and it's a whole lot easier than trying to hold a case while a cutter is trying to spin it. Also don't have to stop when the drill battery is dead. I just keep on swaging.
I hadn't thought about the possibility of it getting stronger. I know that brass gets harder when it is worked, and therefore less ductile. If you are right, that would be another big plus to swaging. I'm not a metallurgist so I wouldn't know.
Say Joe, isn't that two different ends of the primer pocket? If you cut the crimp and then normalize the primer pocket, you are trimming brass at both ends.I use a neck chamfering tool.
When I'm prepping brass, I already have the chamfering tool spinning in a chuck and am chamfering each piece of brass after length trimming; I chamfer the neck, then flip the case and chamfer the crimp off if it needs it.
I don't find it increases brass prep much when added to the process like this. I've done 10k .223 cases and 500 .308 cases like this.
As for the potential negative effect of removing brass from the primer pocket with a chamfer, the radius around the bottom of the primer cup is about the same size as the chamfer on the pocket, so I don't lose anything by chamfering instead of swaging.
Joe
Say Joe, isn't that two different ends of the primer pocket? If you cut the crimp and then normalize the primer pocket, you are trimming brass at both ends.
I don't understand your question.
I remove the crimp from the primer pocket by chamfering the opening.
I don't do anything else to the primer pocket except loosen the fouling it with one of those screwdriver-tip like tools before I run them through the vibratory polisher with corn cob media.
My point was that I'm already handling each case to chamfer the inside of the neck after trimming, so turning the case around and chamfering the primer pocket adds at most a few seconds to the prep time for each case. I usually wait until I have collected around 2000 .225/5.56 fired cases then prep them in one batch, and they go pretty fast.
Joe
+1 for the dillon. It makes the process a lot easier, and if you do the rubber band mod you can really get cookin
I don't understand your question.
I remove the crimp from the primer pocket by chamfering the opening.
I don't do anything else to the primer pocket except loosen the fouling it with one of those screwdriver-tip like tools before I run them through the vibratory polisher with corn cob media.
My point was that I'm already handling each case to chamfer the inside of the neck after trimming, so turning the case around and chamfering the primer pocket adds at most a few seconds to the prep time for each case. I usually wait until I have collected around 2000 .225/5.56 fired cases then prep them in one batch, and they go pretty fast.
Joe
Ahh, I think I see where I am having a failure to communicate. When you say, turn the case around, it makes me think that you are talking about a different process than I am, such as trimming the flashhole. Let me try to make a quick and dirty drawing here to illustrate my point. Try to ignore the periods (dots) on this media, the drawing collapses if I use spaces.
--------------..................................-----------------
...................\............................... / <-- swaged crimp
....................|............................. |
....................|............................. |
....................|............................. |
....................|............................. |
....................\............................. /
.....................\........................... / <--un-normalized primer pocket
.......................-------......--------
.................................|... |<-- Flashhole
.................................|... |
.........------------------.... -----------------
.........|...................../............................. |
.........|................... / <-- Hanging "chad" ..|
.........|................................................... |
.........|................................................... |
Notice how there is a rounded or chamfered area at the top (the swaged crimp) and at the bottom (the un-normalized primer pocket) When I normalize my primer pocket, the bottom of the pocket is squared off.
edit: I reread your post a few times and now I think I understand what you are talking about. Yes, a chamfered crimp looks very similar to a swaged crimp, to the naked eye. Chamfering is removing brass, a small amount, but removing some nonetheless and will leave an angled transition ~45deg. Swaging pushes the brass back from the primer pocket but does not remove any brass, and leaves a radiused transition. We are talking a small amount, but is it possible that that small amount of brass could be the difference between a firing or two before the primer pocket gets loose? That is a big part of this discussion. Also, someone brought up the idea that by working the brass with a swage, it may even get stronger, as well as harder.
Last edited:
Ahh, I think I see where I am having a failure to communicate. When you say, turn the case around, it makes me think that you are talking about a different process than I am, such as trimming the flashhole. Let me try to make a quick and dirty drawing here to illustrate my point. Try to ignore the periods (dots) on this media, the drawing collapses if I use spaces.
--------------..................................-----------------
...................\............................... / <-- swaged crimp
....................|............................. |
....................|............................. |
....................|............................. |
....................|............................. |
....................\............................. /
.....................\........................... / <--un-normalized primer pocket
.......................-------......--------
.................................|... |<-- Flashhole
.................................|... |
.........------------------.... -----------------
.........|...................../............................. |
.........|................... / <-- Hanging "chad" ..|
.........|................................................... |
.........|................................................... |
Notice how there is a rounded or chamfered area at the top (the swaged crimp) and at the bottom (the un-normalized primer pocket) When I normalize my primer pocket, the bottom of the pocket is squared off.
edit: I reread your post a few times and now I think I understand what you are talking about. Yes, a chamfered crimp looks very similar to a swaged crimp, to the naked eye. Chamfering is removing brass, a small amount, but removing some nonetheless and will leave an angled transition ~45deg. Swaging pushes the brass back from the primer pocket but does not remove any brass, and leaves a radiused transition. We are talking a small amount, but is it possible that that small amount of brass could be the difference between a firing or two before the primer pocket gets loose? That is a big part of this discussion. Also, someone brought up the idea that by working the brass with a swage, it may even get stronger, as well as harder.
Yes, I'm aware the primer pocket is not perfectly cylindrical to the bottom.
I don't touch that part.
It's not going to make a difference in the ammo I load from crimped military brass.
I have Lapua brass for precision reloads.
Joe
I have the CH4D swager and it will rip the rims off cases with a standard RCBS shell holder, I have read that the CH4D shell holder works better. But my CH4D swager is not being used due to damaging case rims.The Dillon Super Swage is the best unit, I have the Hornady unit below "BUT" as stated above the Dillon unit does NOT remove brass and therefore is a better design. I have Federal brass that had a 50% failure rate using reamers and the Dillon unit would not have done this."
I had that problem at first until I figured out that I didn't have to penetrate the primer pocket all the way to the bottom just to swage the crimped edge away. Backed off on the adjustment and all good now. But I did notice a std RCBS shell holder was pretty loose, and I found another one that was tighter at the LGS but I don't recall the brand now.
rsplante gets a star on his refrigerator door for most creative graphics - nice job.
I swage but use the RCBS press tool. Works great, RCBS even sent me a second larger cup that works with my Lee press that has a larger diameter ram.
I got the tool for free, RCBS refurbished it for free and sent me the extra cup for free.
I swage but use the RCBS press tool. Works great, RCBS even sent me a second larger cup that works with my Lee press that has a larger diameter ram.
I got the tool for free, RCBS refurbished it for free and sent me the extra cup for free.
OP,
Even swaging the primer pocket will not get it back to the same dimensions as an un-crimped pocket. But I swage crimped pockets before using a Sinclair Uniformer. Much prefer to use LC LR 7.62MM or new/un-crimped LC 5.56MM brass.
Even swaging the primer pocket will not get it back to the same dimensions as an un-crimped pocket. But I swage crimped pockets before using a Sinclair Uniformer. Much prefer to use LC LR 7.62MM or new/un-crimped LC 5.56MM brass.

Last edited:
I hadn't thought about the possibility of it getting stronger. I know that brass gets harder when it is worked, and therefore less ductile. If you are right, that would be another big plus to swaging. I'm not a metallurgist so I wouldn't know.
Primer pockets are formed using a punch that forms the hole rather than just a reamer that cuts it out of the case head. Reason is two fold. One, because it's quick, and two, because if strengthens the case head through the working of the brass. Less expensive brass has he flash hole formed at the same time while most premium brass has this hole drilled for more uniformity of position and finish.
Thanks guys for the advice, sounds like what I am going to do is swage (probably the RCBS die set, with in pricepoint). I want as much consistency as I can in all my loads (9mm, 223, 308). Currently I only have military loads in the 223/556, but I have A LOT of LC brass with other brands in too so they are the only ones that need to be swaged. After this I then would uniform the primer pocket (this step only cuts material at the bottom {top?} of the primer pocket on the material where the flash hole is?) then I use a flash hole de-burring tool to clean out the inside of the flash hole.
Is this the "correct" process? Does it make a difference/ sense to do this for 9mm?
Thanks guys!
Is this the "correct" process? Does it make a difference/ sense to do this for 9mm?
Thanks guys!
I don't do anything to the primer pocket on military pistol brass except remove the crimp. I'm not good enough with a pistol for anything else to be worth the time. I pretend that I'm good enough with a rifle that I deburr the flash hole and uniform the pocket! Lightman
I don't do anything to the primer pocket on military pistol brass except remove the crimp. I'm not good enough with a pistol for anything else to be worth the time. I pretend that I'm good enough with a rifle that I deburr the flash hole and uniform the pocket! Lightman
LOL I hear ya, I am the same way so I want to give myself every advantage!
You should not need to clean out the "inside" of the flashhole. The problem is that when the flashhole is punched out in LC quality of brass (not premium like Lapua or Norma) the displaced brass sometimes remains attached. Think "Hanging Chad". This is what needs to be removed with a trimmer.Thanks guys for the advice, sounds like what I am going to do is swage (probably the RCBS die set, with in pricepoint). I want as much consistency as I can in all my loads (9mm, 223, 308). Currently I only have military loads in the 223/556, but I have A LOT of LC brass with other brands in too so they are the only ones that need to be swaged. After this I then would uniform the primer pocket (this step only cuts material at the bottom {top?} of the primer pocket on the material where the flash hole is?) then I use a flash hole de-burring tool to clean out the inside of the flash hole.
Is this the "correct" process? Does it make a difference/ sense to do this for 9mm?
Thanks guys!
After this I then would uniform the primer pocket (this step only cuts material at the bottom {top?} of the primer pocket on the material where the flash hole is?) then I use a flash hole de-burring tool to clean out the inside of the flash hole.
Is this the "correct" process? Does it make a difference/ sense to do this for 9mm?
Thanks guys!
If you swage the primer pocket and have the tool set to put the proper radius on the outer edge of the hole then uniforming is next. It will make the primer pocket shaped the same as the primer you're going to insert in it.
On uniforming tools for primer pockets, make sure to get one that is machined with an integral stop. Uniforming tools that have separate collars that were held in place by a set screw and the head filled in at the factory have a bad habit of starting to cut pockets deeper and deeper over time (the collar slips, especially if you use the tool in a cordless drill).
When that happens, say hello to misfires you never had before.
Similar threads
- Replies
- 22
- Views
- 1K
