Join the Hide community
Get access to live stream, lessons, the post exchange, and chat with other snipers.
Register
Download Gravity Ballistics
Get help to accurately calculate and scope your sniper rifle using real shooting data.

Install the app
How to install the app on iOS
Follow along with the video below to see how to install our site as a web app on your home screen.
Note: This feature may not be available in some browsers.
You are using an out of date browser. It may not display this or other websites correctly.
You should upgrade or use an alternative browser.
You should upgrade or use an alternative browser.
3D printing
- Thread starter hlee
- Start date
Uh wut?Got the kids an Ender 3 pro, 3D printer for Christmas. I gotta say, we’re getting pretty good at printing stuff. Pretty much 0 learning curve…
View attachment 7772474
.gif")
Lol. I just got one a few weeks ago. Make sure your bed is level, and learn how to tweak your slicer settings. I use Cura and it works well for me. Also, use purple glue stick to help with bed adhesion. Clean it off with alcohol before each print.

Thanks for sharing.View attachment 7772896
Glock Armorers bench block
I just sent to my kid to have him print.
Any other good ones?
Anything more for Glock or building my AR's???
Leveling the bed is the best advice I can give you. Also bracket the temps on a few designs to see what temp works best for you. My nephew was having a terrible time with his Ender. I go over and it's sitting right in front of a window and it was January. Temperature fluctuations can be a source for failures.
@Campguy308 What modeling software are you using? My son is in HS so we should have access to an educational version of Fusion 360, though we are just ‘tinkering’ with TinkerCad right now…
We’re going through and answering a progression of questions that makes sense to my mind.
Can I create and save a model- of anything?
WTF is a slicer?
Where in the printer do I stick this tiny memory card?
How close does the extruder need to be to the bed to lay down the filament?
We’re on our 4th or 5th print and this is the first that didn’t need to be aborted several times to adjust the height on the bed, so I think we have that licked. I already know that TinkerCad is too limiting for what I want to do, but we’re still just learning the platform.
I'm just getting started myself. Sat on the floor for a couple months and I think my problem might be water in my PLA now. Need to get something to dry it out.
About to build this to make it easy to print from PC.. https://octoprint.org/
About to build this to make it easy to print from PC.. https://octoprint.org/
A slicer software is the software used to actually print the model. Utimaker Cura for FDM (filament) printing and ChituBox for Resin printing.
With Fusion save a wire model. Make sure the wire model is hi res.
Send to your slicer.
Place on platten how you want it then slice it.
Send to your zip/USB then fire up the printer.
You can dick with your printer setting after you've done a few to speed things up etc.
The above is the basics, it can go much further if you want/need.
Fusion 360 is a powerful cad tool.
R
The prints that I posted above are on Thingiverse. The only modeling I have done is in Tinkercad. I also have the free educational version of Fusion 360, but there's a learning curve.@Campguy308 What modeling software are you using? My son is in HS so we should have access to an educational version of Fusion 360, though we are just ‘tinkering’ with TinkerCad right now…
We’re going through and answering a progression of questions that makes sense to my mind.
Can I create and save a model- of anything?
WTF is a slicer?
Where in the printer do I stick this tiny memory card?
How close does the extruder need to be to the bed to lay down the filament?
We’re on our 4th or 5th print and this is the first that didn’t need to be aborted several times to adjust the height on the bed, so I think we have that licked. I already know that TinkerCad is too limiting for what I want to do, but we’re still just learning the platform.
Forget the modeling until you learn the printer by printing shit from thingiverse and playing with your slicer.
The slicer (i use Cura) is the computer program that converts a 3D model (often a .STL file from thingiverse, tinkercad, fusion 360, etc) into G-code ( instructions that the printer uses to print shit into layers). The magic happens in the slicer settings by adjusting speeds, thickness, temperatures, etc.
I use a business card to adjust my bed to nozzle height. Just a snug fit between. That's a debatable method, but it works great for me. Trial and error will give you the feel.
Go to thingiverse and download the "Benchy" boat. It's a standard test piece that people use to adjust their slicer settings. Print it with various settings and experiment from there. Theres also other test pieces designed to test different characteristics of the print process such as overhangs, temperatures, etc.
Last edited:
i got a prusa mini so i could print better baffles for my air rifle moderator, and a speed loader. pretty slick but the extruder kept jamming 1/2 through the first print and i had to take it apart and figure out how to get the tension correct.
i don't really have room to leave it all out with the kids at home so nothing since then.


i don't really have room to leave it all out with the kids at home so nothing since then.
Last edited:
Fusion is free to hobbyists, but has a steep learning curve. Owning a 3D printer doesn't make you a 3D designer.@Campguy308 What modeling software are you using? My son is in HS so we should have access to an educational version of Fusion 360, though we are just ‘tinkering’ with TinkerCad right now…
We’re going through and answering a progression of questions that makes sense to my mind.
Can I create and save a model- of anything?
WTF is a slicer?
Where in the printer do I stick this tiny memory card?
How close does the extruder need to be to the bed to lay down the filament?
We’re on our 4th or 5th print and this is the first that didn’t need to be aborted several times to adjust the height on the bed, so I think we have that licked. I already know that TinkerCad is too limiting for what I want to do, but we’re still just learning the platform.
A slicer (which fusion includes) takes a 3d model and creates layers for 3d printing.
Can't help with your printer. Both of mine are pretty intuitive, and include designs on provided memory cards for test prints.
First layer clearance is clearly laid out in the instructions for the printer. It's somewhat critical to get a good "foundation" for the rest of the print.
Just buy a new roll of PLA, or i can mail you a few yards of it to see if it helps.I'm just getting started myself. Sat on the floor for a couple months and I think my problem might be water in my PLA now. Need to get something to dry it out.
About to build this to make it easy to print from PC.. https://octoprint.org/
I love my 3d printer. I make all kinds of little widgets.
Way wipes for my lathe. Tpu and pla epoxied together.
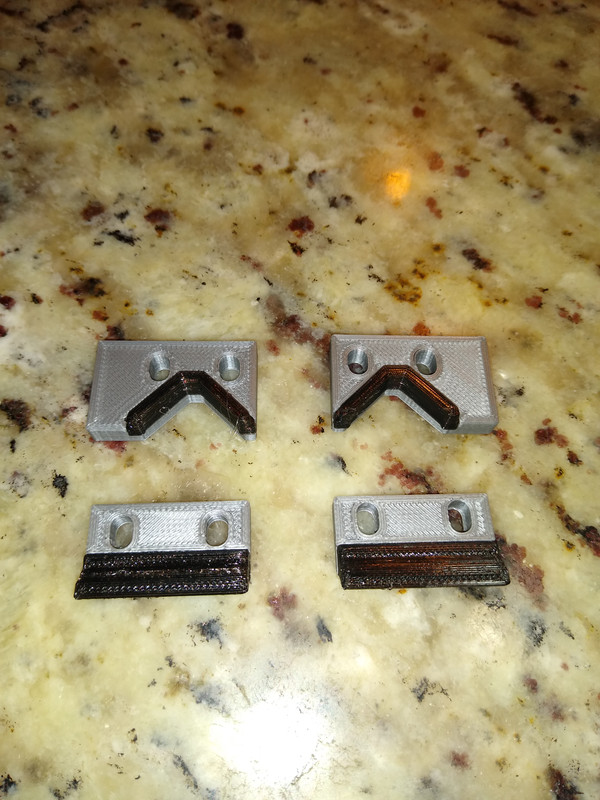
I even drilled and tapped my tailstock for a set.
Way wipes for my lathe. Tpu and pla epoxied together.
I even drilled and tapped my tailstock for a set.
Last edited:
Reloading tool organizers

BXA tool holder rack

Collet racks

Test indicator holder

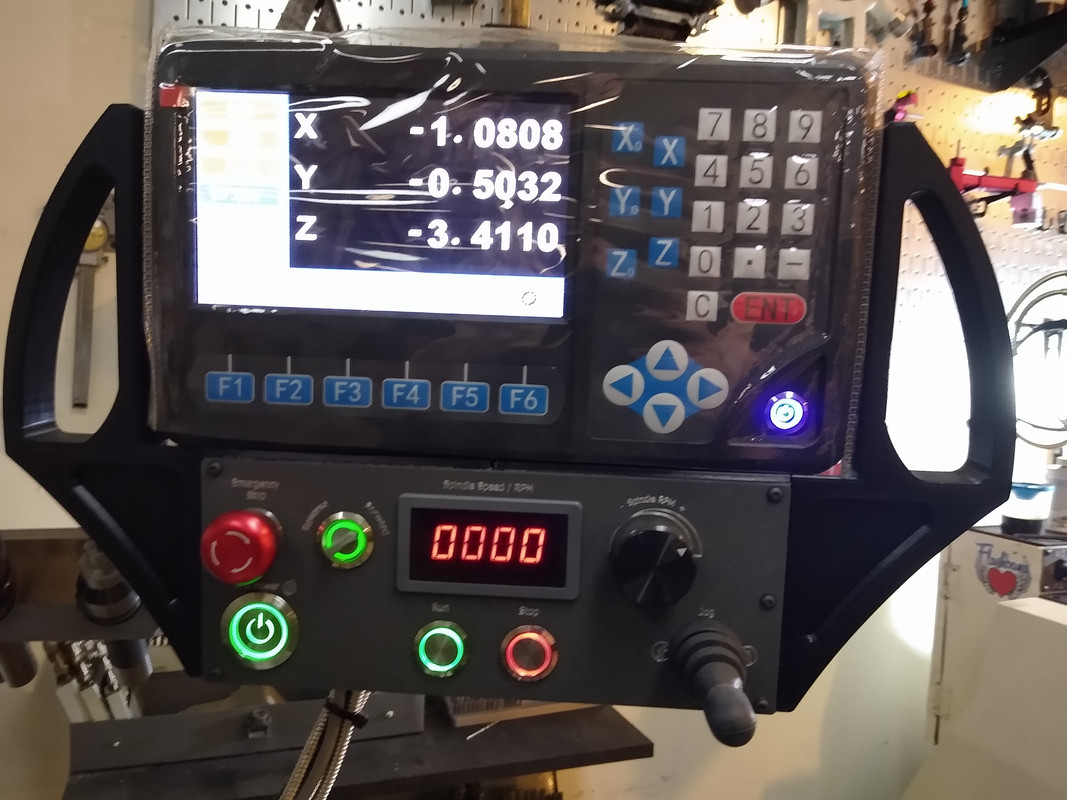
Control panel handles
Chuck cradle

Mill table parts tray

I wouldn't be without my 3d printer.
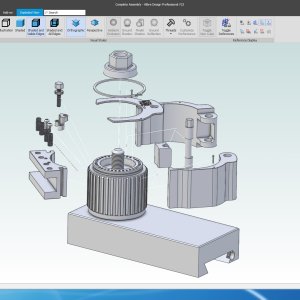
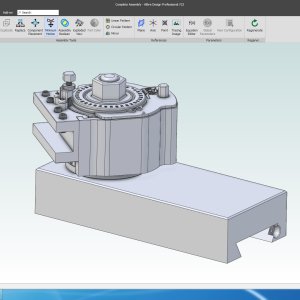
All modeled using Inventor Pro and/or Alibre Design Pro. I used Inventor for 10 years, then switched to Alibre Pro a year ago.
Alibre Design Pro is damn near as good as Inventor, but cheaper and a one time purchase.
My Multifix/Drehblitz hybrid design, modeled with Alibre. It has a 36 spline wheel for 10 degree toolpost position increments.
BXA tool holder rack
Collet racks
Test indicator holder
Control panel handles
Chuck cradle
Mill table parts tray
I wouldn't be without my 3d printer.
All modeled using Inventor Pro and/or Alibre Design Pro. I used Inventor for 10 years, then switched to Alibre Pro a year ago.
Alibre Design Pro is damn near as good as Inventor, but cheaper and a one time purchase.
My Multifix/Drehblitz hybrid design, modeled with Alibre. It has a 36 spline wheel for 10 degree toolpost position increments.
Last edited:
I'm just getting started myself. Sat on the floor for a couple months and I think my problem might be water in my PLA now. Need to get something to dry it out.
About to build this to make it easy to print from PC.. https://octoprint.org/
If you have a food dehydrator or an oven with very good temperature control, you can simply heat the material and drive off the moisture. I try to stick around 120-135F when doing this - any higher and the material will get too soft. Fusing together a spool does not improve print quality

I eventually bought a dedicated spool dryer, which is just a food dehydrator with a slightly different upper rack.
Bulk desiccant and Tupperware work well to store filament. I use the stuff that changes color when it absorbs moisture, and then recycle it by heating at 300F for a half-hour or so. Works well in gun safes, too.
I'd dare say that soggy filament and drafts in my office were responsible for, oh, 75% of my issues. Struggles in getting the print bed glass perfectly clean represented the other 25%.
These look fantastic. The black 'seals/wipers' themselves, that is "extruded too? Soft, rubbery-stuff as opposed to (what I'm assuming) the grey 'hard' plastic?I love my 3d printer. I make all kinds of little widgets.
Way wipes for my lathe. Tpu and pla epoxied together.
I even drilled and tapped my tailstock for a set.
If so, I didn't know that 3D printers could do that sort of material. That also opens up a whole different tangent of possibilities.
I especially like the chuck cradle and your tool holder rack. If you're machine is ever sitting idle one day....Reloading tool organizers
BXA tool holder rack
Collet racks
Test indicator holder
Control panel handles
Chuck cradle
Mill table parts tray
I wouldn't be without my 3d printer.
All modeled using Inventor Pro and/or Alibre Design Pro. I used Inventor for 10 years, then switched to Alibre Pro a year ago.
Alibre Design Pro is damn near as good as Inventor, but cheaper and a one time purchase.
My Multifix/Drehblitz hybrid design, modeled with Alibre. It has a 36 spline wheel for 10 degree toolpost position increments.
Cheap hairspray on the bed also helps with first layer adhesion.
I tried that and was generally unimpressed; given the number of people that advocate for this method, clearly I'm the one doing something wrong. I did have great luck with the adhesive film sheets, but those take so damn long to clean off the bed afterwards that I generally avoid them unless absolutely necessary (like printing ABS or nylon with small amounts of surface contact area).
Vigorous cleaning with acetone and Scotchbrite pads is what I've found to work the best to prep the glass prior to printing. I don't think that alcohol was aggressive enough to remove all remnants of the PVA support material, and was just kinda smearing around a thin film of it.
These look fantastic. The black 'seals/wipers' themselves, that is "extruded too? Soft, rubbery-stuff as opposed to (what I'm assuming) the grey 'hard' plastic?
If so, I didn't know that 3D printers could do that sort of material. That also opens up a whole different tangent of possibilities.
I especially like the chuck cradle and your tool holder rack. If you're machine is ever sitting idle one day....
Yea, the grey is PLA, hard plastic. The black, TPU, is about the consistency of rubber. I control the hardness of the TPU, with the infill. Thin walls and low infill gets you a soft spongy type part. Thick walls and heavy infill makes for a fairly solid rubber puck. RC car people use the stuff to print their tires. Ya gotta watch out with TPU though, try to extrude too fast and it wraps around the feed rollers.
I used the same idea for some stick-on door bumpers.

And for the Jaws in my homemade, way over built and too damn heavy hogsaddle.

Consider getting a bl touch for the Ender 3. Brings the fun back to 3D printing if you aren’t levelling the f$&king bed all the time……
Thanks much for this - Alibre is exactly what I've been looking for. When I was a tax slave, I used Catia V5. I never liked Inventor, and have been using Fusion for my 3D printing (educational license, I'm a mentor for First Lego League Robotics). I'm using the 30 day trial of Alibre Pro, and after just a few days I've already decided to buy it.I wouldn't be without my 3d printer.
All modeled using Inventor Pro and/or Alibre Design Pro. I used Inventor for 10 years, then switched to Alibre Pro a year ago.
Alibre Design Pro is damn near as good as Inventor, but cheaper and a one time purchase.
My Multifix/Drehblitz hybrid design, modeled with Alibre. It has a 36 spline wheel for 10 degree toolpost position increments.
Last edited:
The CR Touch is probably an easier install.Consider getting a bl touch for the Ender 3. Brings the fun back to 3D printing if you aren’t levelling the f$&king bed all the time……
I have a really nice custom printer, but bought an Ender 3 V2 to mess around with and make toys for the kid (and replacement parts for my other printer if it breaks). The following upgrades I consider necessary:
- Install CR Touch and Upgraded firmware. Incredibly easy and lots of walkthrough videos on youtube if you need it.
- Install magnetic sheet and spring steel sheet with PEI. Everything sticks to it like glue and pops off easy.
- Install stiffer bed springs - yellow is recommended a lot.
I'm getting pretty incredible prints now for the money I have in the dang thing. I also recommend printing with PETG. Never have liked PLA and most people won't need properties of ABS.
Someone here needs to check on on the battery pack for COTI thread.
https://www.snipershide.com/shooting/threads/coti-battery-packs.7076809/page-2
Anyone up for trying to print the battery cap? I think Wigwamitus even has the printer file.
https://www.snipershide.com/shooting/threads/coti-battery-packs.7076809/page-2
Anyone up for trying to print the battery cap? I think Wigwamitus even has the printer file.
I'd try it.Someone here needs to check on on the battery pack for COTI thread.
https://www.snipershide.com/shooting/threads/coti-battery-packs.7076809/page-2
Anyone up for trying to print the battery cap? I think Wigwamitus even has the printer file.
Edit: Sent @wigwamitus a PM about it.
Well, my first 'real print' was a successful failure. It is supposed to be a pic rail go pro mount. However, the supports for the go pro interface were insufficient and caused that part to fail. But, the pic rail mount slides on and off of the pic rail fine. I don't need a go pro mount, but the goal is to use this model as a jumping off point for a brass catcher for an AK that will not hinder the bolt movement, and be easily rotated out of the way for bolt manipulation. Why a brass catcher on an AK? Because I ran into a decent deal on boxer primed brass cased 7.62x39 and I'd like to save the brass. Doesn't need to be bomb proof, just easy to use and sufficiently durable to withstand range duty...

So, the exercise in creating a printable model that translates into a functional piece continues. I've got a case block for my reloading bench printing right now. Man, the ender 3 is slow...
So, the exercise in creating a printable model that translates into a functional piece continues. I've got a case block for my reloading bench printing right now. Man, the ender 3 is slow...
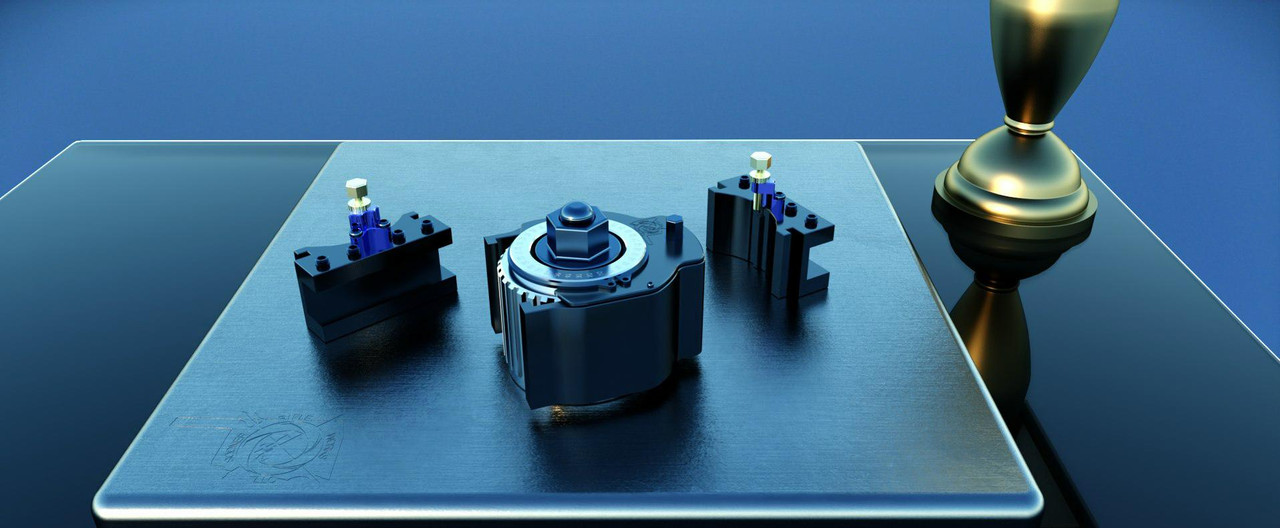
That looks really good. I bet it took a while to print? Is that pla?Going to head over to Bass Pro in the morning and talk to the store manager about stocking these bad boys in the reloading section. I figure they’ll be big sellers…
View attachment 7778498
Thought ya'll might enjoy this one. 3D printing on a large scale.
Habitat for Humanity Just Unveiled Its First-Ever 3D-Printed Home
House Beautiful via Yahoo News· 15 hours ago
"While this is the first 3D-printed owner-occupied Habitat home in the nation, every Habitat home...

@Campguy308
Shiny, Silky, green bronze PLA. Yes, it did take a while to print- 14 hrs and change. And that is with only 10% infill, and the random "lightening" pattern that Cura does. Going to 10% and away from cubic infill saved 4 hours and 40% materials. But, I think that led to 2 issues with the print. 2 of the slots- the rear left most- didn't fully build the walls of the slot. I think lack of infill prevented one of the layers in each from going down well and failed. The case is sitting in one of the holes, and the spiderweb effect of the failure that formed in the slot prevents it from going all of the way in. The other is directly behind the case. The case is hiding the imprefections for the picture. And, no, that is not a mirror imaged picture. Cura has a "mirror" function, and if you are not paying attention, and really don't know what you are doing, you can hit that button and flip your print and not know it until the text is appearing on your print. One of the few downsides of printing a very symmetric model. Not perfect, but perfectly usable. have some pegboard screwdriver holders on the printer now. While the kids are at school I get to print things that I can actually use...
Shiny, Silky, green bronze PLA. Yes, it did take a while to print- 14 hrs and change. And that is with only 10% infill, and the random "lightening" pattern that Cura does. Going to 10% and away from cubic infill saved 4 hours and 40% materials. But, I think that led to 2 issues with the print. 2 of the slots- the rear left most- didn't fully build the walls of the slot. I think lack of infill prevented one of the layers in each from going down well and failed. The case is sitting in one of the holes, and the spiderweb effect of the failure that formed in the slot prevents it from going all of the way in. The other is directly behind the case. The case is hiding the imprefections for the picture. And, no, that is not a mirror imaged picture. Cura has a "mirror" function, and if you are not paying attention, and really don't know what you are doing, you can hit that button and flip your print and not know it until the text is appearing on your print. One of the few downsides of printing a very symmetric model. Not perfect, but perfectly usable. have some pegboard screwdriver holders on the printer now. While the kids are at school I get to print things that I can actually use...
Yeah Cura definitely has a lot of options. Ive wanted to print a reloading tray but havent wanted to monitor a print that long yet.@Campguy308
Shiny, Silky, green bronze PLA. Yes, it did take a while to print- 14 hrs and change. And that is with only 10% infill, and the random "lightening" pattern that Cura does. Going to 10% and away from cubic infill saved 4 hours and 40% materials. But, I think that led to 2 issues with the print. 2 of the slots- the rear left most- didn't fully build the walls of the slot. I think lack of infill prevented one of the layers in each from going down well and failed. The case is sitting in one of the holes, and the spiderweb effect of the failure that formed in the slot prevents it from going all of the way in. The other is directly behind the case. The case is hiding the imprefections for the picture. And, no, that is not a mirror imaged picture. Cura has a "mirror" function, and if you are not paying attention, and really don't know what you are doing, you can hit that button and flip your print and not know it until the text is appearing on your print. One of the few downsides of printing a very symmetric model. Not perfect, but perfectly usable. have some pegboard screwdriver holders on the printer now. While the kids are at school I get to print things that I can actually use...
Thanks much for this - Alibre is exactly what I've been looking for. When I was a tax slave, I used Catia V5. I never liked Inventor, and have been using Fusion for my 3D printing (educational license, I'm a mentor for First Lego League Robotics). I'm using the 30 day trial of Alibre Pro, and after just a few days I've already decided to buy it.
So far, the only thing Alibre really struggles with is wrapping 2d sketches or text around curved 3d surfaces, or creating curved text in a 2d sketch. Not many good solutions for that in Atom or Design Pro, but design expert can do it using the sheetmetal module.
Going to head over to Bass Pro in the morning and talk to the store manager about stocking these bad boys in the reloading section. I figure they’ll be big sellers…
View attachment 7778498
That model doesn't happen to be from here is it? It sure looks familiar
I've uploaded several dozen of my model files to Thingiverse around 2018 ish.
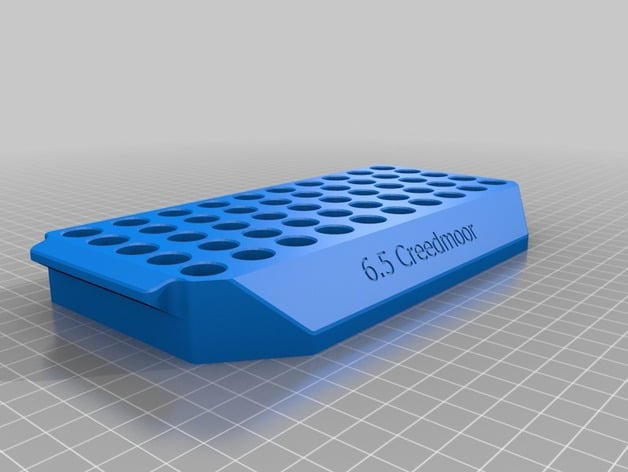
6.5 Creedmoor Reloading Tray by Ken226
Works with PLA or ABS. Use supports at your own discretion. I printed several of these with no supports whatsoever. Redesigned using metric measurements as most 3d print software is metric.
 www.thingiverse.com
Definitely from Thingiverse. And, ken226 looks familiar too! I sure do appreciate the efforts of those that are both more talented than myself and generous.That model doesn't happen to be from here is it? It sure looks familiar
I've uploaded several dozen of my model files to Thingiverse around 2018 ish.
6.5 Creedmoor Reloading Tray by Ken226
Works with PLA or ABS. Use supports at your own discretion. I printed several of these with no supports whatsoever. Redesigned using metric measurements as most 3d print software is metric.
Definitely from Thingiverse. And, ken226 looks familiar too! I sure do appreciate the efforts of those that are both more talented than myself and generous.
No prob, I'm happy to contribute.
Those with an Ender 3, what do you do for spool management during a print? The extruder doesn’t seem to have enough juice to move a full spool on the little spool hanger. I have been unspooling a bit at a time during a print, but as slow as these things are, long prints are a pain in the ass. And I’ve got a growing drawer full of failures due to this. Thinking about going to measuring and cutting the necessary filament and hanging just that.
Rookie here, but I noticed that my spool center hole is bigger than the holder and it jerks a lot. That might be part of my feed issue. I was thinking of installing bearings on the spool.
Bought an Ender5. Shipped broken. Returned. Bought an Anycubic 4Max Pro 2.0. Works great out of the box. Have printed lots of stuff for the Dillon 1050's just off thingiverse. Need to get better at 3d modeling either with Fusion360 or Solidworks.
Well, lets see how measuring and cutting works. I didn't have any issues until I ran out of the little starter roll of filament (no spool). I think the 1 Kg spools are just too much for the little extruder motor to handle...
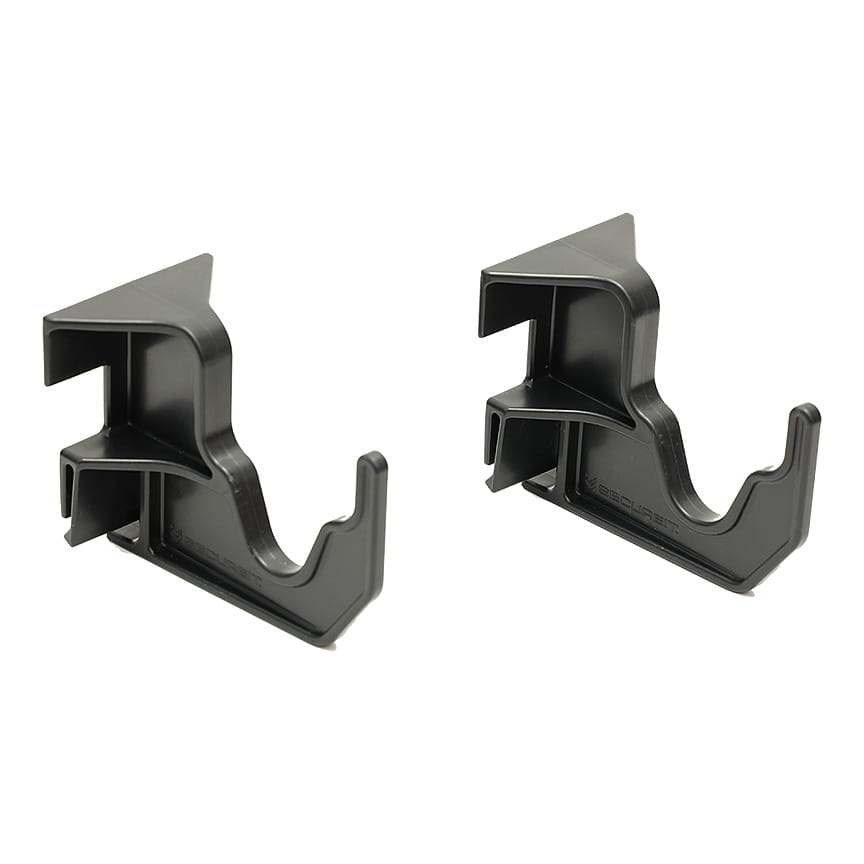
I'm looking for something that hopefully one of you knows where I might find it. I have a bunch of Secure-it gun racking and need some more mounts for rifles. I could buy more from secureit, but I'm looking for something a bit more affordable as I need to get several.
These are what I'm talking about from the company-
 www.secureitgunstorage.com
They don't need to be exactly this design, just something that holds the rifle horizontal and fits the racking. Any of you guys make these or know where I might find someone that does? I was going to fab some but thought I would check out the 3dprint world first.
These are what I'm talking about from the company-
Horizontal Display Mount
Display your guns horizontally on any SecureIt gun wall system.
www.secureitgunstorage.com
They don't need to be exactly this design, just something that holds the rifle horizontal and fits the racking. Any of you guys make these or know where I might find someone that does? I was going to fab some but thought I would check out the 3dprint world first.
Here’s what I’ve learned in my foray into 3D printing.
First, part needs to be able to account for weakness in 1 dimension. They can be pretty strong, but layer adhesion is the weak link, and not designing for this will lead to failure.
Second, FDM printed parts are not 1:1 drop in replacements for parts made by other processes. I have no doubt that someone could make a 3D printed horizontal gun mount, but it will not interface properly with the system.
I've just about abandoned my FDM printer. I made 2 stands for my Baofeng radios and wouldn't have thought to use anything but my resin printer. The only thing I've done with the FDM printer is to dust it off every week. Probably need to make a cover for it. Sad, but true....
Similar threads
- Replies
- 0
- Views
- 219
- Replies
- 7
- Views
- 559
- Replies
- 3
- Views
- 176
