Someone’s scrapping their sticker off right now for the last set of free trays!
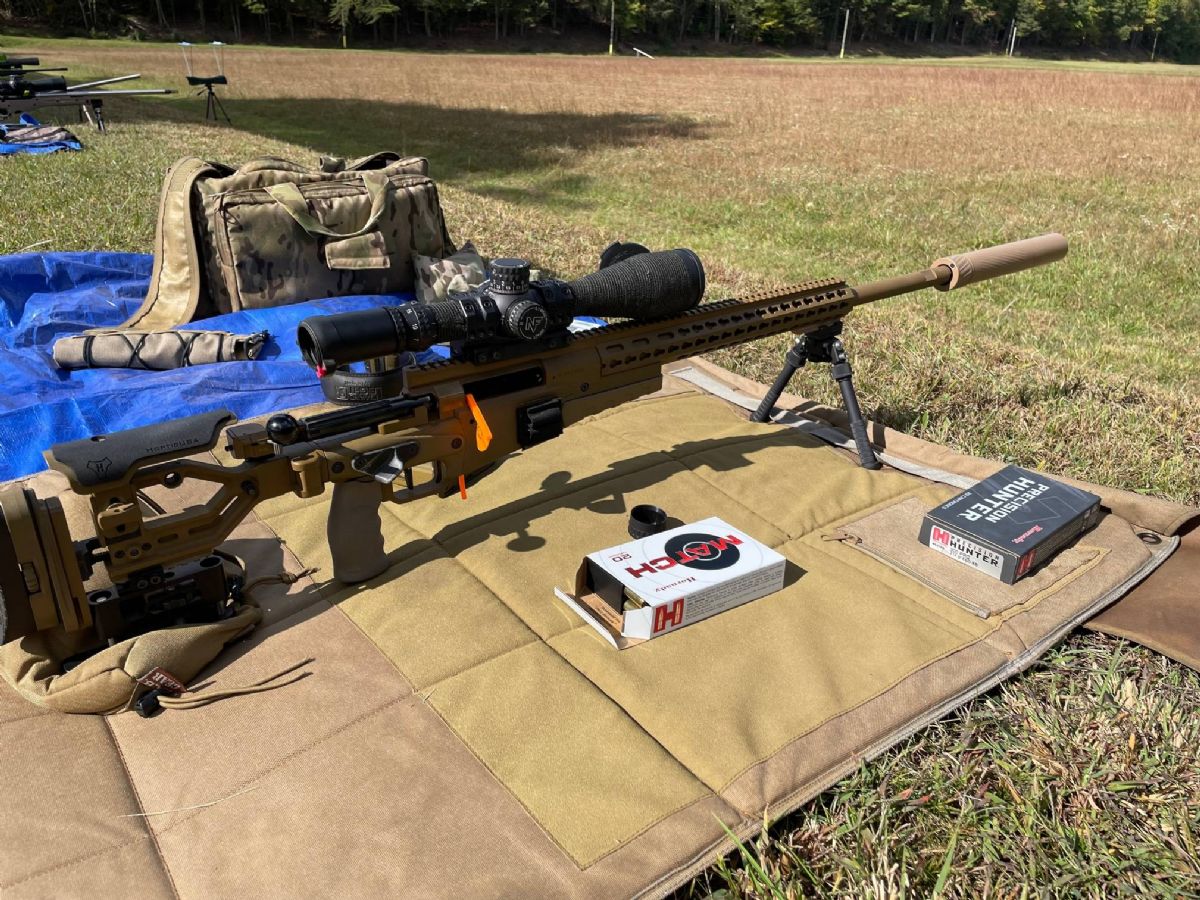
Pic of their AI sitting on the kitchen table or living room floor coming in 3…2…1…
Pic of their AI sitting on the kitchen table or living room floor coming in 3…2…1…
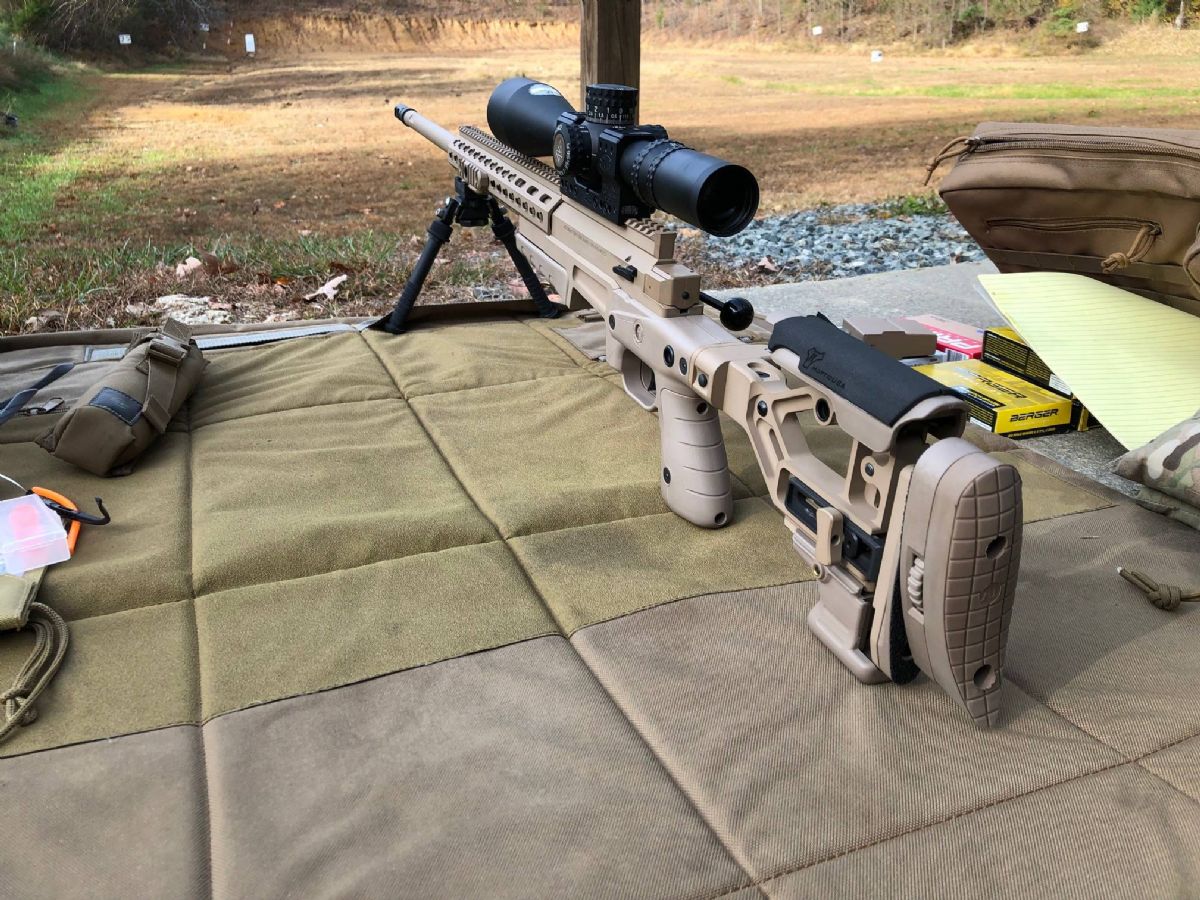
That setup with the garmin work good? I’m thinking of doing the same setup as you have here on my AI and VudooView attachment 8352455
“I will take it”
It’s perfect man. I’m partial to Area 419 gear but Greyops has a quick disconnect for the Garmin and a similar arca arm mount as well.That setup with the garmin work good? I’m thinking of doing the same setup as you have here on my AI and Vudoo
I didn't even know stickers were a thing.. I just go shoot, I don't care what color or what sticker.
Since I’m not an AI expert I don’t know if I’m pissing up a rope here, and I’m curious what you guys think? If you were buying such a thing would you rather have a bolt head to swap after disassembling your existing bolt, or a complete assembly needing only your existing firing pin?

Managed to snag a couple. Back out of stock now for anyone wonderingAW magazines are in stock at EuroOptic.
-Stan
Anyone miss out?Managed to snag a couple. Back out of stock now for anyone wondering
Use a 17/32 transfer punch and your AT fore skins to mark it and then drill a hole.
How to vandalize your AT rifle with AE Mk 2 skins:
Strip AT rifle, remove all flush cups because we don’t need no stinkin’ flush cups, mark cuts for skins with tape.
View attachment 8352844
View attachment 8352831
Cut skins as necessary with razor saw
View attachment 8352832
View attachment 8352833
Test fit
View attachment 8352834
View attachment 8352835
View attachment 8352836
Hey! One of the skin screws won’t pass through the chassis fore end! Use a 1/8” transfer punch to mark it.
View attachment 8352837
And drill a 15/64 hole because that’s what all the other holes in the chassis are.
View attachment 8352838
To be continued…
Dude, I had three sets of Viper skins I would have given you, free for nothin’.WTF!!!! I was about to ask you if I could but those back from you, because I didn't want to rattle can my Viper skins
I feel bad for you.I hear ya brother…. Try getting anything over an INOD.
Why’d you pick a 420 over a 527 for that ^?
That is a bitchin rifle!Two reasons for this post:
First, the MC is ready to roll for the first ELR match of the year around here next Saturday
Second. I have made some loading/staging shelves for the ZERO press for myself and a couple of buddies. I have 2 sets left. They are bead blasted but no anodize and may have some imperfections.
I want to give back to my Brothers from the AI Mother so I am giving ( that's "free" for you knuckle draggers) the last 2 units to the first 2 public " I will take it" posted with a pic of your AI, as long as A: you have been a member of this forum at least as long as me and B: You actually own an AI. and C: you promise not to put any 6.5CM rounds on the trays
I really appreciate all the knowledge that is passed around on this forum. You are a really good bunch of guys! So lets see how long this takes lol(just kidding) oh, and you have to live in the CONUS since I am covering shipping also.
View attachment 8352392
View attachment 8352393View attachment 8352394View attachment 8352395
View attachment 8352396
Late to task, but "I'll take it" if still available.Two reasons for this post:
First, the MC is ready to roll for the first ELR match of the year around here next Saturday
Second. I have made some loading/staging shelves for the ZERO press for myself and a couple of buddies. I have 2 sets left. They are bead blasted but no anodize and may have some imperfections.
I want to give back to my Brothers from the AI Mother so I am giving ( that's "free" for you knuckle draggers) the last 2 units to the first 2 public " I will take it" posted with a pic of your AI, as long as A: you have been a member of this forum at least as long as me and B: You actually own an AI. and C: you promise not to put any 6.5CM rounds on the trays
I really appreciate all the knowledge that is passed around on this forum. You are a really good bunch of guys! So lets see how long this takes lol
View attachment 8352392
View attachment 8352393View attachment 8352394View attachment 8352395
View attachment 8352396
Anyone who has the Greyops xero mount on a spuhr……It’s perfect man. I’m partial to Area 419 gear but Greyops has a quick disconnect for the Garmin and a similar arca arm mount as well.
Well with @M8541Reaper showing me the way on the short action calibers, I've finally completed the trifecta with the addition of a 6.5 Creedmoor barrel. I feel like I am utilizing the AXSR to it's fullest extent now, shooting 300 Norma in ELR Light comps, 7MM PRC in the magnum category just for the sheer smile it brings to my face when shooting UKD to a mile (and hopefully the NF ELR Challenge this year), and now the 6.5 Creedmoor. Can't promise I will actually shoot it in a PRS match, but I may shoot it at Major Land's Snipers Cup with the Creedmoor barrel.
View attachment 8354828
Regarding the trigger adjustability of the AI factory trigger depicted in the below video, what are the pitfalls to watch out for when adjusting it?
Will the adjustment screw eventually come out or is it captive?
Are light primer strikes a concern?
Anything else?
Thank you in advance for any advice.
-Stan

Might have been mentioned in this thread already, and I know I have seen references to it regarding AW mags in rem 700s, but you may have to knock down these rivets in the 308 mag for reliable feeding of the last round. Seems crazy that tiny bit of interference could stop a round from feeding, but there it is. 1 minute with the 7 axis Dremel tool care of it. And AI, shame on you.
View attachment 8356106
Yep! This is all the stuff I had to do to get them running reliably: https://www.snipershide.com/shootin...at-are-your-feeding-lip-measurements.7207889/
Have 3 of them that are running great now with those specific tweaks, but those little rivet bumps were definitely knocking the feeding off track and making rounds nosedive into the breech face.
Sorry, I just can't help myself...Dude just said F U to about 85% of the guys in here
* quietly takes off my fde skins for my camo painted....
Thank you!If a suppressor is too complicated for ya I really wouldn't venture into playing with an ai trigger
There is a limit to their adjustment range and it's easy to go to far and then trigger doesn't work and then you need to reset it. Which tbh I find really easy but I also figured out how to shoot supressed soooo
Thank you!
As a broken watch I am right twice a day.
-Stan
Heat and brute force.I picked up an AT, I read they possibly could be going out of production soon. And I like the thumbhole look and feel. But naively I bought a fixed AT instead of a folding.
I have an AT hinge so I thought it should be easy enough, unscrew some bolts and bolt the new one on. Wrong.
Should of done more homework, I didn't know this part is bonded as well.
What's the best method to change it, heat it up and give it a whack?
Your best bet is to just scrap the whole idea & sell me the hinge honestly.I picked up an AT, I read they possibly could be going out of production soon. And I like the thumbhole look and feel. But naively I bought a fixed AT instead of a folding.
I have an AT hinge so I thought it should be easy enough, unscrew some bolts and bolt the new one on. Wrong.
Should of done more homework, I didn't know this part is bonded as well.
What's the best method to change it, heat it up and give it a whack?

I picked up an AT, I read they possibly could be going out of production soon. And I like the thumbhole look and feel. But naively I bought a fixed AT instead of a folding.
I have an AT hinge so I thought it should be easy enough, unscrew some bolts and bolt the new one on. Wrong.
Should of done more homework, I didn't know this part is bonded as well.
What's the best method to change it, heat it up and give it a whack?
Sorry, I just can't help myself...
It's a jeep thing...What just happened?
I wanted to quote Functional's post about Jeep Bros (that I eventually edited into the post) but initially necro-quoted your Feb 23 post instead where you had two white jeeps with your rifle. Discovered once posted and changed to Functional's post.What just happened?