• Watch Out for Scammers!

    We've now added a color code for all accounts. Orange accounts are new members, Blue are full members, and Green are Supporters. If you get a message about a sale from an orange account, make sure you pay attention before sending any money!

Maggie’s The Welding and Metalworking Thread

When the wire is thicker than the metal you're welding, the metal heats up faster/first and blows out.

I figured I would update this, I had forgotten about this and went it popped up as having a new post I remembered.

I changed to 025 wire and the difference is night and day.

I have not done much lately, kid bought a new truck and been working on that big fucking thing every weekend. Next weekend is all new tierods, and ends. After that ball joints. I told him he is on his own with the rear main leaking. No way in hell am I pulling a V10 out of a 2500 dodge.

My lift is 10k, and that big fucking thing is just iffy up there.

We have done brakes wheel cyl and new drums. Still have not found anyone that can turn the old drums.

No one turns brakes anymore?
 
A2?

You do know that A2 is "air hardening" right ?
That's why the A is there.....W2 (water hardening).....O1 (oil hardening).

Did you quench it in *some odd* liquid or another ?
If so....toss it and start with something better like O1 or M2, both are ideal for chisels.
A2 is used in car frames (yup) and stamping dies for the most part and is not really a cutting steel like what you're needing.

hereyago
Good question. yes A2 is air quenched, and that’s the way it’s done.
A2 “can” be oil quenched, usually on larger parts, but you use hot oil and quench the part to 1000f and let it air cool from there. I haven’t tested that process though.

This is for a hand carving chisel on violins and their parts. Many of the great knife makers use A2 a lot. it’s a wonderful blade steel.

O1 was considered and is great. Didn’t have a suitable piece on hand at the moment.

I have made many punches and dies with M2 and D2. My current oven won't get hot enough for M2 though. Both are superb.
 
  • Like
Reactions: AmmoFort
A2 is wonderful steel for a chisel. Ask Lie Nielsen.

@n2ishun probably holds the record for posting the most incorrect information on just about any topic.
Thanks! Yeah i went and double checked my notes to make sure I didn’t mess up. Yep, A2 was what I wanted.

Lie Nelson makes top grade stuff!!
 
Needed a bumper on the new Kubota to drag the trash cans to the road. Quick job. Just need to pick up some end caps.


20240224_085136.jpg


20240223_132028.jpg

20240224_085146.jpg
 
Last edited:
Thanks! Yeah i went and double checked my notes to make sure I didn’t mess up. Yep, A2 was what I wanted.

Lie Nelson makes top grade stuff!!
Is your chisel going to be used for paring, chopping, or just general use?

Ensure the bottom is dead flat. Some recommend just the 1st half inch or so, but for paring I want the whole chisel back flat.

If it’s a chopping chisel leave it thick, and if used for any type of mortise work I’d ensure the sides are 90 degrees to the back.

Overall I like your design.
 
  • Like
Reactions: Hobo Hilton
Is your chisel going to be used for paring, chopping, or just general use?

Ensure the bottom is dead flat. Some recommend just the 1st half inch or so, but for paring I want the whole chisel back flat.

If it’s a chopping chisel leave it thick, and if used for any type of mortise work I’d ensure the sides are 90 degrees to the back.

Overall I like your design.
Thank you.
Probably mostly paring. delicate small tedious work. Not general house carpenter type work.

I initially made the back flat on the surface grinder, then lapped it.

For the edge I did close to 30 degree angle, then checked some of the chisels he has reground and they are about 23-24 degrees. I’m assuming that’s his preference for how he uses them.

Also ground the sides flat and perpendicular to the back.

It does cut nicely! I carved some wood, chiseled on a large knot for ten minutes, stabbed a board 100 times, chiseled some more. Still cuts the same and the edge looks perfect still.

I don’t know the best clearance angle. Maybe that changes depending on the intended use?
 
Yes, blade bevel angle can vary depending on use.

You can even vary the sides of the chisel for different uses. There are as many variations of chisel as there are words in the dictionary.

A pairing chisel should be 25 degrees or less. I have a couple I have ground at 17 degrees.

I keep my American bench chisels at 25 degrees with no micro bevel.

my Japanese chisels are 28-30 degrees with no micro bevel.

My mortise chisels are ground at 20 degrees.
 
  • Like
Reactions: Hobo Hilton
Ah! Ok. So I need to regrind this to low 20s then. Thank you @Bigfatcock

Update, he likes how it feels and cuts! Initial impression is he likes it.

Here is it in use. Maybe belongs in the woodworking thread, but since it pertains to the chisel more, here it is.


View attachment 8361320
Nice!

I really like your design. I like how it’s flat all the way to the bolster.
 
A2 is wonderful steel for a chisel. Ask Lie Nielsen.

@n2ishun probably holds the record for posting the most incorrect information on just about any topic.
Well since you are so perfect.
Please inform us all of any single thing in my post that was incorrect.

Yes, that is a callout on your lazy non-fact checking ass.
 
  • Haha
Reactions: Snuby642
Keep it civil or someone will give you a time out and sentence you both to the bear-pit.

Not a jab at anyone, i just like seeing metal work. Id post crazy cnc stuff, but i like when people post stuff thats hand made.
 
  • Like
Reactions: jetmd and AmmoFort
Well since you are so perfect.
Please inform us all of any single thing in my post that was incorrect.

Yes, that is a callout on your lazy non-fact checking ass.
Lee valley tools. Search for A2. Each of these is listing A2. Some have the option of A2 or their own material pmv11. Just the first page.
Screenshot_20240301_082747_Chrome.jpg
 
  • Like
Reactions: jetmd
Ah! Ok. So I need to regrind this to low 20s then. Thank you @Bigfatcock

Update, he likes how it feels and cuts! Initial impression is he likes it.

Here is it in use. Maybe belongs in the woodworking thread, but since it pertains to the chisel more, here it is.


View attachment 8361320
What’s that blue handled tool? Homemade scraper? Can you show us that one? I’ve made a few crappy little scrapers for a lever action Inletting job. They seem sort of intuitive shape wise, but I want to see what other have come up with.
 
It’s a set of Buck Bros chisels. They are ok but not great. Probably just not the right tool for the job.
Require frequent sharpening.
View attachment 8361961
They must be made of A2 instead of a better choice like O1 or M2.....or even W2, or 1095, or S1, and the list goes on.

Don't care if you're a fan boi of whatever brand of shit.
It's a poor choice.

Here, ask a certified master knife maker yourself instead of some fluff ad from scamazon.
 
  • Haha
Reactions: Bradu
They must be made of A2 instead of a better choice like O1 or M2.....or even W2, or 1095, or S1, and the list goes on.

Don't care if you're a fan boi of whatever brand of shit.
It's a poor choice.

Here, ask a certified master knife maker yourself instead of some fluff ad from scamazon.
Pm sent so we don’t clog this wonderful thread.
 
Nope. Let’s set the record straight, out in the open. A2 is a tool steel. A chisel is a tool. In this case, the chisel in question is essentially a knife.

IMG_5870.png


Just in case someone doesn’t know who Mr. Russell is…
IMG_5871.jpeg


Is A2 the best option for a chisel? Eh, ‘best’ is subjective. Is A2 the wrong choice? No, a quick search will show that it’s suitability for blademaking is on par with other tool steels, such as O1 and D2.

BTW, I remember Sorrells from Forged in Fire. Didn’t his blade snap due to improper heat treatment?
 
  • Like
Reactions: Makinchips208
Just a little project I've wanted to do since visiting The Mary Rose ship in Portsmouth last spring.

One of the Port Cannons just seemed like something I needed to make in miniature! These are the big guns that were added to the ship and contributed to her sinking. And was sort of Archaic Technology by the Tudor era. It was made of a thin tube with iron bands shrunk over it. Later, solid bronze cannons were coming into vogue and could be cast. But I liked the idea of making one with shrunk-on bands.

Started by trying to do it over a relatively thin-walled steel tube. But after shrinking on a few bands, the tube started to bow and then compress.

So found a cheap .50 Douglas pistol barrel on eBay... And it was probably cheap because it was bored off center by almost .0625. But for my purposes.... perfect! I was turning the octagon off and making it .750 anyway. So... perfect.

Turned up a series of bands... ribbed and plain. And a muzzle and a breech piece. This cannon is a breech loader so had to make a separate breech. Got almost all the metalwork for the barrel and breech done. I still have to make two 'ring pieces' for the breech. So can't assemble it yet.

Here are various thin and ribbed rings. The 'ears' are for a center 'lifting' hook area. Muzzle is at the left.

1709506622363.png


More of a close-up. Showing the ears. The first version the tube was a bit over .625" OD and a smooth 1/2" ID. The new one is rifled 1/2" with a .750" OD. Proper barrel. Much safer and a whole lot easier to assemble. The rings are bronze. Decided not to use cast iron. In part because I thought the cannon would look cooler in bronze. And the bronze is stronger and easier to shrink. I can get a good .003" shrink on the bronze... vs way less for cast iron.

1709506827206.png


Here is the steel barrel (below) next to rings before shrinking on. And with about half the rings (breech end) shrunk on.

1709506897387.png


Barrel complete with all the rings shrunk on and the initial pieces of the Breech laid out. I can make multiple breeches for 'faster firing.' This will be a fully-functional cannon, BTW. Black powder patched ball.

1709506962463.png


Here is the breech section in process. Note the bevel that will form the seal between the breech and barrel. These are cut at about a 60 degree andle and will be pressed together by the rear 'wedges' that hold the breech together.

1709507089725.png


And here is what it will be when done. I have a really cool piece of black Walnut that I pan on using for the carriage. Including the wheels. The finished cannon will be about 24" long and, as I mentioned, will fire!

1709507150176.png


More as I find some spring time to work on it! It should be a neat one to play with.

I'll do the woodwork for my war axe at the same time I start cutting the walnut for this.

Cheers,

Sirhr
 
Last time I looked into getting rotors turned, It was more than buying new ones online.

It is…. Drums are cheaper too.

I still turn drums for vintage cars that you can’t get new drums for. Use the big LeBlonde. Setup is a pita, but cutting is a breeze.

I’ve looked into getting a rotor turning lathe…they are cheap and all over eBay and FN marketplace. But I don’t do enough rotors to make it worth it.

Sirhr
 
Well pretty much done with the restoration of the SBL 10L. Complete tear-down, clean, refit, paint and reassemble. Fun project but not sure if I would want to do it again. Installed VFD and remote keypad as well as spindle tach and POT. All Aloris tooling and Bison chucks. Spindle runs true with virtually no runout. Final task will be to place in final spot in shop and level. Picture included what it looked like when picked it up.
Paul's 3.jpg


SBL10l-3.jpg
sbl10l-4.jpg
sbl10l-5.jpg
SBL10L-1.jpg
SBL10L-2.jpg
 
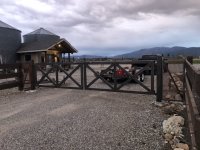
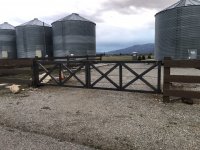
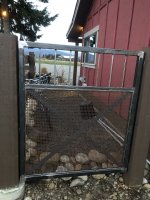
Well, 2 out of 3 main gates and a walk gate complete. 2x4x1/8 steel frames 1/2x1/2x1/16 horizontal tubes. The braces between the steel and wood posts were kinda fun, kinda sucky- 2x2 angle frames infilled with old rock screen. Walk gate is 2x2x 1/8 with the same rock screen. My “3 day project” took just over a week with my little Lincoln 100 series wire feed. Might’ve been a touch underpowered for this job
Going to let it all get good and rusty, then burnish with a wire wheel and clear coat it.
 

Attachments

  • IMG_6976.jpeg
    IMG_6976.jpeg
    646.4 KB · Views: 51
  • IMG_6977.jpeg
    IMG_6977.jpeg
    780.7 KB · Views: 50
  • IMG_6978.jpeg
    IMG_6978.jpeg
    547.8 KB · Views: 52
Finished up GMAW 1, with my highschool students so we built a couple of these to test our skills. Came out nice and surprisingly comfy to sit on for what it is.
Not my design, as we watched a video of a guy building one on a short class day. His welds were awful and my students said "we could do better than that!" So i had some material delivered and we went through the video again to make our cut lists. Plasma tabled the end caps and put em together. Not bad for a bunch of kids.
1000007701.jpg
 
Finished up GMAW 1, with my highschool students so we built a couple of these to test our skills. Came out nice and surprisingly comfy to sit on for what it is.
Not my design, as we watched a video of a guy building one on a short class day. His welds were awful and my students said "we could do better than that!" So i had some material delivered and we went through the video again to make our cut lists. Plasma tabled the end caps and put em together. Not bad for a bunch of kids.
View attachment 8379367
Great job.
A highschool with a metal shop still???
Tell me it isn't so.
That's where I got my start, brother. Mr mcClure was my machine and welding shop instructor.
He retired out of the mills and came to teach us, I always wanted to do the same.
 
Great job.
A highschool with a metal shop still???
Tell me it isn't so.
That's where I got my start, brother. Mr mcClure was my machine and welding shop instructor.
He retired out of the mills and came to teach us, I always wanted to do the same.
We have a weld shop with 14 booths with millermatic 255 machines, cnc plasma table, iron worker, band saw etc. We teach oa mig stick and tig steel. Flux core tig ss at night.

We also have a machine shop with 6 manual lathes, 6 mills, a cnc lathe and a surface grinder. Will have a heat treat oven next year. I know 0 about the machine shop side. Sonibstayvin my lane. Some about the smell of a machine shop makes me hang out in there lol
 
Great job.
A highschool with a metal shop still???
Tell me it isn't so.
That's where I got my start, brother. Mr mcClure was my machine and welding shop instructor.
He retired out of the mills and came to teach us, I always wanted to do the same.
Our ISD has a technology center. But to get to go there, you have to be ahead on your course requirements. (So, it’s really not the kids with no direction or prospects- as is often the stereotype for “shop kids.”) Anyway, you get 1 period for travel to the center, and some classes are 2 credits, so 1 class can eat up 3 course hours for the year. Not an exhaustive list, but they teach welding, automobile mechanic, diesel mechanic, aircraft mechanic, cosmetology, nursing, and several restaurant cooking classes.
 
Last edited:
Started with this.
IMG_8818.jpeg


And ended with this
IMG_8846.jpeg


CEA52E7F-A1FA-41A5-929E-87077138AE96.jpeg


My new tent stove. Only used stuff I had laying inside the shop, since everything outside was buried in snow. Total cash outlay was $0 (other then consumables) After some high temp paint and grate will be finished.
 
Last edited:
The Great Grate project is underway 🤣
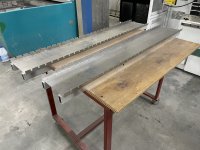
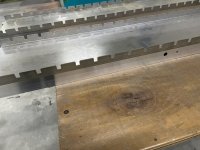
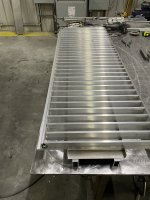
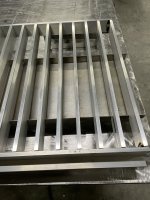
The boss needs some lighter drainage grates for a driveway, so I thought it was a good time to teach the kids about fixtures, and how much they make life easier.
I cut some 14ga sheet and bent to hold all the cross bars. All got welded half way on one side then removed to finish.
IMG_0921.jpegIMG_0922.jpegIMG_0923.jpegIMG_0924.jpeg
 
Has anyone gone down this route. I spent the money on the plans, all of $25. And have started the LONG process of printing the plastic bits.

There is no way in hell I am going to pay for a "real" table. I just refuse to spend that kind of money. I think this will do what I want to do, brackets and really rimfire targets.

Just wondering what I am getting myself into, hopefully pick up the steel sometime this week.


Just make sure you can replace the slats, as they'll get cut up over usage. Doesn't look too bad a setup, considering cost.
 
I think that warrants its own thread. What are you doing here, man? Get to work.

It will be a bit before I get started, I have a few more weeks of work on the kids truck, after I finish that I will get started. Only thing I have done so far is started the printing of the 3D parts. Some of the prints take about a day to finish.
 
  • Like
Reactions: Barneybdb
We have a weld shop with 14 booths with millermatic 255 machines, cnc plasma table, iron worker, band saw etc. We teach oa mig stick and tig steel. Flux core tig ss at night.

We also have a machine shop with 6 manual lathes, 6 mills, a cnc lathe and a surface grinder. Will have a heat treat oven next year. I know 0 about the machine shop side. Sonibstayvin my lane. Some about the smell of a machine shop makes me hang out in there lol
How are the 255's working out for you in the school? Have one in my home shop and been a very good welder so far and really like the pulse function. The XR Aluma Pro gun does a nice job on aluminum.
 
Nice rigs!
@mj1995
What is the hitch in the bed area used for? Love this pickup version BTW.View attachment 8300686
If you were still curious, i got an answer, Sonni put it in and built a seat to shoot his m2 browning. However when his m915 broke down on a trip he threw a hitch in there and used the Scorpion to haul his 5th wheel trailer from moab Utah back to New Mexico and that's why you see the hitch there in this picture.
 
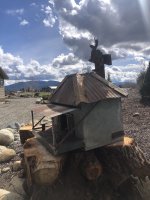
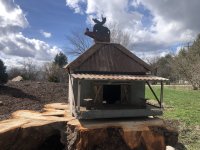
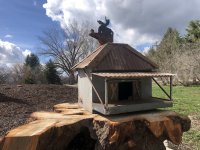
Another “honey do” checked off the list. A bird feeder/ bunkhouse out of an old fertilizer spreader. I bitched the whole time she wanted me to make it, but it turned out kinda fun
 

Attachments

  • IMG_6989.jpeg
    IMG_6989.jpeg
    513 KB · Views: 52
  • IMG_6988.jpeg
    IMG_6988.jpeg
    630.4 KB · Views: 49
  • IMG_6987.jpeg
    IMG_6987.jpeg
    744.4 KB · Views: 52
Another “honey do” checked off the list. A bird feeder/ bunkhouse out of an old fertilizer spreader. I bitched the whole time she wanted me to make it, but it turned out kinda fun
Story of my life.
 
  • Like
Reactions: JJMoody