• Watch Out for Scammers!

    We've now added a color code for all accounts. Orange accounts are new members, Blue are full members, and Green are Supporters. If you get a message about a sale from an orange account, make sure you pay attention before sending any money!

Gunsmithing 1st Build

dakor

Private
Full Member
Minuteman
Feb 8, 2007
94
0
ND
I was going to wait until the rifle was all done before I posted this but it is getting the best of me. I will not show the rifle until it is complete. The Wyatt’s mag box still needs to be installed and I need to coat the rifle.
The specs are a Rem 700 Action, High Tech stock, Lilja #4 SS 10 Twist 375 Cal barrel finished at 26 inch’s and chambered in 375 Ultra Mag.
The first step was to get the action running true in the lathe fixture and after that cut and square the face of the action and clean up the threads. I apologize at the moment I cannot find my picture of the dial Indicator setup for the action truing or the chambering I think it was deleted by accident. Here is a picture of the results from that. I also lapped the lugs.
Faced_Action.JPG


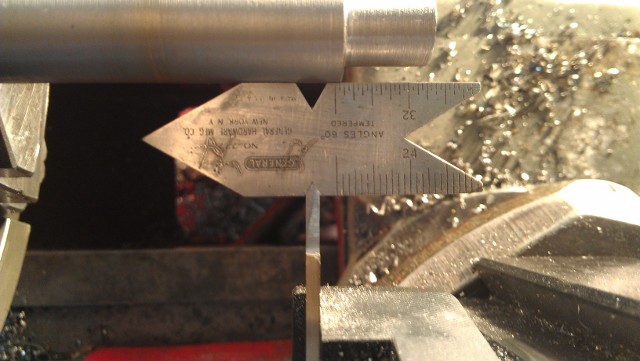
The next step was to indicate the barrel in the fixture and face the tenon off, cut it to length, turn the tenon down to 1.062 as that is what let the recoil lug fit tight on the tenon, and thread it. In case anyone was wondering the barrel and the action where both running under ½ a 1/10 thousands on the dial indicators. Here is the finished result.


Threading_1.JPG


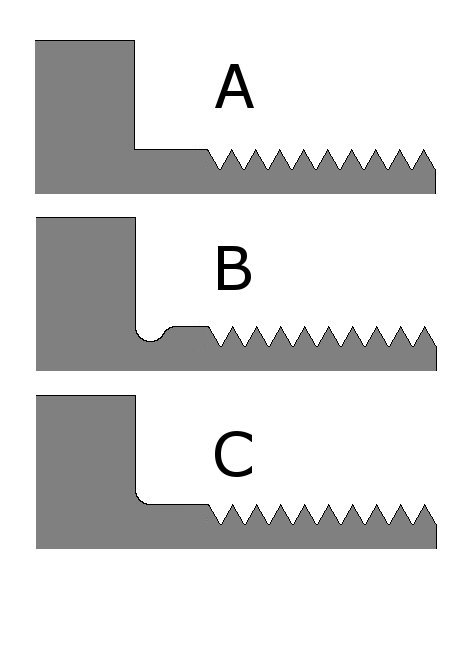
The next step was to cut the boltnose recess and here is a picture after that was finished.
Boltnose_Recess.JPG


Now it is time to chamber.
Chambering.JPG


Here is a picture of the rifle head spaced and finished.
All_Done1.JPG

I chambered this rifle tight and run out on the brass is 1 to 2 thousands of an inch as you will see here in a minute. Here is a new unfired case.
New_Unfired_Case.JPG


Here is the same case after it was fired.
Once_Fired_Case.JPG


Next was the bedding prep. I will get a picture of the bedding when I take the rifle apart for the mag box install.
Bedding_Prep_3.JPG

Bedding_Prep_2.JPG


Bedding_Prep_1.JPG
 
Last edited:
The recoil on the rifle is heavy without a brake. I think the back screw was touching some left over bedding in the stock and causing some accuracy issues. I drill the holes out after I bed them but since the rifle recoils so much I do not think the hole was big enough. I re drilled the holes in the stock last night with a bigger bit and here are the groups I shot. I am very happy at this point.
100 Yards 3 shots with 270 Speer SPBT and 94gr of IMR-4831.
375_Rum_Target_1.jpg

100 Yards 3 shots with 270 Speer SPBT and 94.5gr of IMR-4831.
375_Rum_Target_2.jpg


Muzzle Brake Install.
Indicating the Barrel.
Indicating_Bore.JPG


Turning the tenon to .623.
Turning_Brake_Tenon.JPG


Threaded and ready to fit the brake.
Muzzle_Brake_1.jpg


Muzzle view
Muzzle_Brake_2.JPG


All done
Muzzle_Brake_3.JPG


I did a quick test fire and with the brake it kicks about like a 300 win.

I did some load work up after the brake install and here are some groups all are 3 shots at 100 yards.

375_Rum_350_SMK.JPG


375_RUM_350_SMK_1.JPG
 
Last edited:
I shot last night off the bipod with a rear bag. I tried at 600 yards to start but the first shot broke one of the ropes on the gong so the only one I had left was the 1020 yard since the last storm took the rest down. The rifle has never been past 100 yards up to this point. I dialed up 30 MOA and fired a sighter and I was high. I dialed back to 28.50 and hit the plate low. I went to 29.5 MOA and fired 3 shots. Here is the group and this is with the 90gr of H-4831. I have not shot over 100 yards at targets since September of 2012. I am pretty happy to say the least.

600 yard gong.

600_yard_gong.jpg


The rifles first group at 1020 yards.
375_rum_1st_1020_yard_group_off_bipod.jpg
 
Sorry I had to brake the post up it would not let me post all the pictures in one post.
 
Thanks guys. I have some things I need to finish up before I can work on this rifle again but I am hoping in the next week or two it will be done. I also have not decided what color to coat it and if I am going to go with a single color or a couple colors.
 
I'm curious. I'm wondering about the tenon and muzzle threads. You seem to have a double groove at the shoulder and at the end of the threads. I've not done any real barrels yet (just practicing tenons and muzzles on 4140 bar stock) but I cut as close to the shoulder as I can get with my tool (modified 3/32 parting tool).

IMAG1555.jpg
 
For the barrel tenon and muzzle brake the first one is a relief cut for the threading tool to clear without touching the steel. The second one is to get rid of the radius the turning tool leaves and squares up the shoulder. I also want the recoil lug sitting on solid steel instead of threads that is another reason why there is the first relief cut right in front of the lug. This is just a different way of doing it and how I was taught. I think people just need to find what works for them since there are many ways some of this stuff can be done. I am still learning so I claim to have no answers at this point. That is nice looking work you have there.
 
Looking back up at the photos, I see you're using a 60 degree insert. I guess you need the extra groove to account for the radius of the insert at the root of the shoulder.

My mentor in all this is not a gunsmith; just a journeyman machinist with 30+ years in the trade. He won't let me touch carbide until I've mastered grinding HSS bits. For shoulders he's taught me that when I take my final cut, use a stone and hone the tool to a razor sharp edge and take it in to the shoulder and just a little past, then run it out with the cross slide so I have a very sharp shoulder. I don't know if that has any affect on the strength of the joint or tendency to crack or whatever. I'll have to ask him what he thinks of that.

The modified cutoff tool lets you get insanely close to the shoulder:

IMAG1589s.jpg
 
I would say you’re in good company with a guy that has been machining that long and willing to teach you. So from the looks of it you took a parting tool and ground it with the cutting edge you wanted. That is pretty cool you are learning how to grind your own tools. The gentleman I learned from is not a gunsmith either just I high level BR and F class shooter and a machinist. He has built his own rifles along with other rifles for high level F class and BR shooters. I figured if he can attain the level of accuracy he has over the years on the rifles he built that was a great place to start and learn from. I was offered the chance to go down to his place for some training and I took it and I am glad I did.
 
Having a small radius at the shoulder does not hurt anything as long as you account for it on whatever you screw on the end with a counterbore. When I say small though I mean like a .015 radius from a carbide insert.

You can make it look a lot cleaner by skipping the relief cut, if you don't have a dro make a sharpie mark on the bed rail where you need to stop the threading tool, as you are threading towards the shoulder, when you hit that mark do two things in order but at basically the same time, crank out the cross slide quickly, disengage the half nut.

That's how the guy did it with the aluminum test piece in the pic above. This makes for a stronger part, but more than that just looks good. You will just need to make sure your muzzle devices have an appropriate counterbore.

Galaxy S3 on tapatalk
 
I have a couple of questions so forgive me if I am getting this wrong but if you are saying leaving the radius will not hurt anything why would I want to leave the radius and have the recoil lug butt up against that? Now the recoil lug is not square to the shoulder and I can see a gap, or am I not following what you are saying? Wouldn't you want the recoil lug as tight and square to the shoulder as possible with no gap?

Second if we are talking strength the first relief cut was cut to .070 the threads on this action are cut .062 deep so there is .008 differences between the depth of the thread and the relief cut. If you thread all the way to the shoulder you would be removing .062 in the grove of the thread vs. having the threads stop where the recoil lug starts leaving the recoil lug a solid place to sit at 1.062 and taking the shoulder radius down .025 to square up the shoulder.

If I threaded all the way to the shoulder would I not be removing equal or more barrel tenon with the depth of the threads going the whole length of the tenon vs. the way I was taught since the tenon at the bottom of the thread is going to measure 1.00? I also do not want the recoil lug on threads I want it on solid tenon and as tight as it will go on the tenon and with this action and lug that is at 1.062.

I am new at this so this is why I am asking these questions.
 
Last edited:
You may be new at this, but you're a lot further along than me, so my comments are worth exactly what you paid for them.

I've yet to actually do a real barrel, but I've been practicing tenons and muzzle threads. I have a couple of factory take-off barrels and my goal thus far has been to duplicate as best I can the factory tenon and muzzle. That's why I don't use a relief cut and square up the shoulder with an HSS tool honed to a razor sharp edge. I may be completely off with this approach as it is the "factory" way and we all know how great factory R700s are. Hopefully we'll get some good advise from the pros.
 
Youre right, on the chamber end you will either need one of two things, 1. a chamfered recoil lug or 2. a slight relief at the shoulder. I prefer #1 but when #2 is required Ill only go as deep as is required to get the lug butting flush with the shoulder. I have a fixture I can chuck up a recoil lug and indicate the bore, then cut a small chamfer on it, I can also bore a small diameter lug to whatever size I want. Its a pretty rudamentary fixture I made up real quick, Ill take a pic next time Im out there and post it on here.

I was thinking more for muzzle threads when I said what I said earlier, I apologize. You are correct, its nice to have the lug on a solid shank instead of threads. Since you trued your action threads, you should have gotten an oversized bore recoil lug so you could have cut the tenon threads to match instead of being stuck with 062 on them.

Mind you this is all just constructive criticism, hopefully you dont take it as ragging on your work, it obviously shoots good.

Another thing you may consider is a different way to indicate, getting the work area closer to your spindle bearings. Id bet you can clean up that chatter by doing that.
 
I would like to see your fixture for the recoil lug. I like looking at how others do things and learn other ways of doing things. The chatter was not coming from the fixture. That lathe would do that no matter what material, brand new inserts and if I used the 3 jaw or 4 jaw chuck. I worked with grizzly and they sent me out a new replacment lathe. The new lathe I used for the brake install. I am still fine tuning it but it seems to cut better and have a lot less chatter then the old one. This is a un rifled stainless barrel that I turned in the 3 jaw. Not a mirror finish but I am still fine tuning the lathe and hoping to get the mirror finish.
Turning_with_New_lathe_1.JPG
 
For holding a recoil lug, I've had success with simply clamping it in the four-jaw. Obviously, this is not the time to put your body weight into the chuck key, or to see how big of a cut you can make in one pass.
 
I also should add I cleaned the threads up with a tap I did not recut them. I am not sold on the idea of re cutting of the action threads. I talked to a few gunsmiths about re cutting the action threads and the majority said they did not recut them. Seeing the results they have had and not re cutting the threads was a good enough answer for me.
 
Here is the tool kit that tool is from.
Arthur R. Warner Co. | Specialists in High Speed Steel - Kit #9 1/2 inch Turning (T)

When I talked to the tech at Warner he said you can face or turn O.D with any of the tools in that kit and that is why I bought it. After playing around with all of tools in the kit that tool is one of the ones that gave the best finish on my lathe so I went with it. The other tool opposite of it is what I use to cut the relief cut, square up the shoulder, and cut the crown. If you have something you think will work better for turning I am open to suggestions just be gentle on the price of it. I just bought carbide end mills this morning and I think I had to sell half a kidney to get them.
 
Normally the insert is orientated in the opposite direction. The straight edge would be perpendicular to the direction of the cut. That way you can turn the tool post on a slight negative angle, cut to the shoulder and then hit the cross feed to face the shoulder with the same tool (the tool will feed off of the part).

Try a little deeper depth of cut for your finish cut, kick the feed up to .003~.005. Rookies will try to cut .001 @ <.001 feed on the last cut, the part will have grooves in it. Barrel steel is free machining, I don't use any cutting oil except for threading.
 
Lug holding tool.

The center bushing is for a standard .062 lug to center it, then pull the bushing out after tightening. I have a bushing for oversize lugs also.

Like I said nothing super fancy but it does it's job and didn't take all day to make.

lugtool.jpg

lugtool2.jpg


Galaxy S3 on tapatalk
 
Al_Ski I will give that a try. So are you using HSS or carbide without the oil when turning? If you are using HSS is there a reason for no oil does it give a better finish? What about heat and being tough on the HSS insert without oil? Jonaddis84 that is a pretty cool fixture. I do not think chamfering lugs is for me but I am looking at using a modified parting tool to cut the shoulder radius down or trying the method Al_Ski described.
 
I turn the barrel tenon OD using a turning tool with a CNMG insert, and then do the barrel shoulder facing operation with a VNMG facing tool. That nominally yields a 0.015" radius at the shoulder/tenon interface. It doesn't take much additional work on the recoil lug ID to make it fit this geometry; either give it a small 45-degree chamfer while boring the ID, or just run a handheld deburring tool to break the corner (some variation on this is recommended regardless of the shoulder/tenon corner radius, as it'll make the lug easy to install over a tenon with what I feel is a properly-snug fit).
 
Maybe pics will help describe better than insert specs... I just chucked something up for pics, I don't t thread barrels with a 3 jaw

I use this for everything I do turning and facing, always cutting into the part not off of it. I have the same tool on the opposite side of this holder for chamfering am OD running in reverse. Can't remember the insert spec but the holder is Kennametal stgpr-062.

tool3.jpg


This is the Arthur Warner tpmc-32nv threading tool, awesome tool and inserts for manual lathes.

tool2.jpg


And this came from ptg I think, just a small solid carbide boring bar, perfect for crowning. But you can use it for bolt nose recess, pre boring a chamber, etc.

tool.jpg


Galaxy S3 on tapatalk
 
Last edited:
All the turning and threading tooling I have are from Arthur Warner and I do like their threading tool like you said. I will do some experimenting when I get a chance and if I am happy with the change than I will use it for the next two builds I have. I am really happy so far with this build I have extremely low run out on the brass and the rifle shoots well. Hopefully I will be able to get the mag box installed and Cerakote it soon.
 
So are you using HSS or carbide without the oil when turning? If you are using HSS is there a reason for no oil does it give a better finish? What about heat and being tough on the HSS insert without oil?

Yes I'm using a hand ground HSS tool bit to turn the barrel tendon. I grind the tip of the tool to a sharp point and then stone a radius (roughly .005") on the tip. I use a hand deburring tool to chamfer the hole in the recoil lug so that the lug butts up to the barrel shoulder without interference from the radius left from the turning tool. As I said earlier, SS barrels are fairly free machining so I don't use cutting oil when turning the O.D. Plus you aren't removing much material from the O.D. to generate excessive heat. Barrel SS isn't abrasive enough to destroy a HHS tool bit like other types of stainless (303) or alloy steels like 4140, D2, H13....

By nature carbide if meant to be pushed hard with a healty feed, depth of cut and RPM which generates plenty of heat. Theory is that the heat is removed in the chips...

So, as I mentioned earlier in the thread, I've only been practicing on 4140 bar stock, but given the picture below (not to scale), I've been striving for "A"; but due to the radius of my tool (I try to stone it razor sharp) I usually end up with something like "B" (again, not to scale). Should I be trying for "C" and chamfering my lug? Is there any reason "B" would be undesirable compared to "C"?

tenon_cut.jpg
 
Theoretically, "B" results in a weaker tenon than "C" because the undercut radius would act as a stress riser. In practice, the tenon is much stronger than it needs to be so there will not be a difference as long as your undercut isn't excessively deep (keep it to the thread root diameter and you should be fine).

All that being said, I use something like "C" because it's easy to do.
 
A is the weakest due to the sharp corner. As long as the relief in "B" is a radius and not excessively deep it's fine. The only issue would be if someone wanted to set the chamber back.
 
I installed the Wyatt's 4 inch box the other day and here is a rough picture when it was right off the mill.

Wyatt_s_2.jpg

With this box I can use 350 SMK's with an OAL of 3.985 and they fit in the mag box. I also weighed the rifle with a shell holder on the stock and thread protector and without the scope, rail, or brake and it weighed 6 lbs. 12 oz. My guess is with the scope, bipod, sling, and shell holder it will be in that 9.5 to 10lbs range. That is just what I need for elk hunting. I need to cerakote the rifle and it will be finished. I am hoping to do that this week.
 
I finished the rifle. I have always liked speckled finishes on stocks and I wanted to try come up with a way to do that type of finish with Cerakote on metal so I after some testing I went ahead with it. The base coat is a light grey color I mixed and the real dark specks are sniper grey along with another grey color I mixed. The bolt, bottom metal, and brake are coated with Graphite Black. The stock is a High Tech that I painted a couple years back in forest green that is a stone finish. I added some high lights over the green with another stone finish paint that has grey, black, and white specks in it. I also shot some clear coat over it. Here are the pictures.

Close up of the color on the action and barrel.

Action_1.JPG


Barrel_12.JPG


Here is what the rifle weighs ready to go.
Ready_to_go_Rifle_weight.JPG


All put together.

Rifle_4.JPG


Rifle_5.JPG


Rifle_3.JPG


Rifle_1.JPG


Rifle_21.JPG


You cannot tell from these pictures but the scope has about a credit card thickness in between it and the rail. When I started this build I had a few goals in mind. I wanted a rifle that weighed 10.5lbs or less all ready to go, A repeater, and I wanted it to be 1000 yard + capable of taking Elk and Deer. Time will tell if it will meet all those goals or not.
 
Last edited:
Interesting thread...nice build you got there. DIY projects are always more interesting then just going out and buying what you want.
 
Looking back up at the photos, I see you're using a 60 degree insert. I guess you need the extra groove to account for the radius of the insert at the root of the shoulder.

My mentor in all this is not a gunsmith; just a journeyman machinist with 30+ years in the trade. He won't let me touch carbide until I've mastered grinding HSS bits. For shoulders he's taught me that when I take my final cut, use a stone and hone the tool to a razor sharp edge and take it in to the shoulder and just a little past, then run it out with the cross slide so I have a very sharp shoulder. I don't know if that has any affect on the strength of the joint or tendency to crack or whatever. I'll have to ask him what he thinks of that.

The modified cutoff tool lets you get insanely close to the shoulder:

IMAG1589s.jpg

I suck at sharpening HHS! I love the finish it leaves... carbide is my friend.
 
Thanks guys. I am hoping to start the next build today we will see if that pans out or not.