• Watch Out for Scammers!

    We've now added a color code for all accounts. Orange accounts are new members, Blue are full members, and Green are Supporters. If you get a message about a sale from an orange account, make sure you pay attention before sending any money!

6.5 Creedmoor Gas Gun Build - Documenting my first 6.5CM

hstambaugh

Private
Minuteman
Feb 13, 2019
30
13
Kentucky, USA
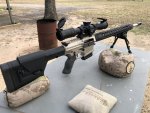
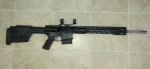
I figured I'd start a thread on my current build and.. whatever road it leads me down. Maybe there will be some drama? Maybe nothing at all. I've built a lot of rifles, bolt-action and gas gun alike, but this is my first 6.5 CM as well as my first "big head" gas gun. I found a lot of information out there about how to build one of these rifles but as with all information on the net, you can never really be sure what is real and what is a defective keyboard warrior. Whatever this thread turns into, it is unlikely to be definitive, but I bet it is helpful and if nothing else it'll tell you how to end up with whatever I end up with, more or less. :D I'll take better pics when I get some light.

One last thing, while friendly feedback is welcome and encouraged, don't be mad if you offer me unsolicited build advice and I ignore it. I've seen people torn apart on forums while trying to fine tune their guns. That side of things doesn't interest me.


Parts list is as follows:

Aero Precision M5 Upper & Lower Receiver

No-Name rail system & barrel nut that got thrown in with the upper and lower. (Torqued to 70 foot pounds with 1 3/8 crowfoot wrench) (It seems alright, we'll see.)

Toolcraft Nitrided 6.5 Creedmoor Bolt & Matching standard mass carrier (Double Ejectors, smaller firing pin, etc)

Aero Precision M5 Rifle Length Buffer, Spring, & Tube (bone stock stuff.. nothing fancy here)

BCM Forward Assist

Aero Precision M5 Dust Cover

Aero Precision M5 Charging Handle

KNS Receiver Pins

KNS Anti-Rotation Pins

Rock River Arms Varmint Trigger.

Aero Precision M5 Lower Parts Kit minus FCG

Ballistic Advantage 20" Stainless Fluted Barrel in 6.5 CM 1:8 Twist

Muzzle brake from my parts bin. (Sorry.. no idea)

Aero Precision .875 Gas Block (Non-Adjustable) *stares into the void blankly*

Aero Precision Rifle Length Gas Tube.

Ergo Deluxe Grip

Magpul PRS


Magazines:

Magpul 10 Round LR/SR
Magpul 20 Round LR/SR


Ammo:

Beck Ammunition 6.5 CM 140 Grain ELD-X


Liquids during Assembly:

Brakekleen

Loctite 271 (Permanent-ish)

Loctite 242 (Not so permanent)

Valvoline Full Synthetic Moly Fortified Grease Part # V V 9 8 6 (For barrel nut, gas rings, and trigger)

Royal Purple 5W30 (to lube everything else)


Lessons I learned while assembling the rifle:

The Dust Cover pin is a bit too long for my handguard and was preventing it from butting up. A little grinding solved this issue.

A good replacement for AeroShell 33 on gun stuff (maybe other stuff) is Valvoline Full Synthetic Grease (Tub format, advance auto parts #VV986) It is moly enriched lithium based, just right.

Don't be a doofus and reassemble your rifle without pushing the firing pin all the way in before replacing the cotter key. It won't go bang.

Rifle Length buffer system Plus standard stock screw (stainless) plus PRS = no lockey back, feed, or anything. Use the screw supplied with the magpul stock. It is quite a bit shorter and allows everything to cycle the way it is supposed to.

People have really complicated opinions about gas systems on 6.5 Creedmoor. Most of the opinions seem to be wrong.

Advice I ignored:

Use a JP bolt or your d--k will fall off.

Use a JP Low Mass Carrier or your d--k will fall off. (this one seemed the most counter-intuitive of any considering the pressure curve of the round)

Use a JP Captive Buffer or your d--k will fall off.

You will have gas & timing issues without an adjustable gas block or adjustable gas key

Rock River Arms hammers break in half

Ballistic Advantage barrels have bad chambers

KNS pins are for dinosaurs.


IMG_20190215_210008.jpg

IMG_20190215_205944.jpg
 

Attachments

  • 6-5 Rifle firstshots.jpg
    6-5 Rifle firstshots.jpg
    260.1 KB · Views: 65
Last edited:
Fired 8 rounds to make sure it would go bang and verify ejection. Ejects about 8 feet to 3:30/4:00. Hit 10" steel at 50 yards without sights.. i'd say the stock is adjusted pretty well :D No real perceived recoil, brake is loud as hell. Seems to be a kitten. Now to wait for optics and break the barrel in properly.
 
So looking at the brass it appears that I need to do a little more work. The two scratches are from sharp lugs in the barrel extension. Going to have to knock those edges off and do a spot of polishing/lapping. The Dents are from the brass deflector. Lot of folks use the soft side of velcro for that, I just never liked how ratty it gets. A little adhesive backed black leather should sort that problem out though. Traditional shelf arrow rests work great for the purpose. Adhesive backed navcom rubber is good too.

https://www.jakesarchery.com/product/martin-traditional-arrow-rest/


fired6-5brass.jpg
 
  • Like
Reactions: bfoosh006
Some pics of the barrel extension area & bolt. The marks on the brass make perfect sense. Shouldn't be too bad to sort. My gut is telling me that I should add a little more mass to the buffer as well to delay the unlock a touch. We'll see.

IMG_20190215_205529.jpg


IMG_20190215_205518.jpg


IMG_20190215_211221.jpg


IMG_20190215_205637.jpg


IMG_20190215_205550.jpg
 
Last edited:
This one is full of all that JP crap you feel isn’t necessary and the brass looks like it was fired in a bolt gun. Weather you want to believe or not, you really would benefit from an adjustable gas block. My first 6.5 started out as a factory Aero upper and the first round out of it proved the need for the adjustable gas.
 

Attachments

  • 1BB968E0-8778-4A92-A013-825D76E53835.jpeg
    1BB968E0-8778-4A92-A013-825D76E53835.jpeg
    649.1 KB · Views: 141
Last edited:
This one is full of all that JP crap you feel isn’t necessary and the brass looks like it was fired in a bolt gun. Weather you want to believe or not, you really would benefit from an adjustable gas block. My first 6.5 started out as a factory Aero upper and the first round out of it proved the need for the adjustable gas.


You sound personally offended. I explained in subsequent posts how to sort the brass scratches and dents. My rifle is neither over or under gassed presently.
 
Sticking leather to your upper isnt a fix for dented brass, it's a band-aid covering up the real issue.

It isn't a bandaid.. It is an autoloading rifle. Ever seen what an M110 does to brass on a super hot day? We're talking about preference. "I'd prefer that my brass not be dented." My ejection pattern is perfect and consistent. I may increase buffer mass to slow things down a touch more but not because it "needs" it. Rather for personal preference.


We'll see I reckon. As I said in the first post. I'm writing about my own experience in order to share. I've seen a lot of bad information given about building rifles. I'm not going to give information with the color of good or bad. I'm just going to do shit and show the results. I don't need to argue about it or get offended. As my old man said, "The truth is in the shooting."


On a high note, I could be wrong about all kinds of things. Mistakes are the greatest teachers. I'm not going to compromise on the outcome of this build when it comes to how it performs both functionally and downrange. Whatever it actually needs, it will get. Whether it takes a new spring, a new barrel, or nothing at all, I'm going to get what I want out of it (A 100% reliable sub MOA long range autoloader). All problems encountered along the way will be documented and shared, without regard to my own ego.
 
Last edited:
Replying to a post that disappeared.

Gas seems right but I wouldn't mind slowing down the cycle slightly because I have some room to work with. Nothing gross mind you, maybe replace 1 or 2 slugs to see how much the ejection pattern moves and how much it changes the witness marks on the brass. Really it is all up in the air until I shoot some groups.
 
KAK makes a 9.3oz .308 rifle buffer.

And I use the fuzzy side of self adhering velcro to help defend against brass dents.

You might consider trimming about 10% of your ejector springs... ( have a few spares on hand if I am completely wrong.. Lol , I don't know for sure if the dual ejectors use the same springs as a single )

And if you polish those locking lug edges... polish the extractor face as well... makes it far easier / smoother for it to "pop" over the case rim.

And no criticism intended at all... but is your mag catch threaded in far enough ? Mine go clear to the "end" of the threads on the mag release button.. just wondering if that is an Aero LPK "thing".
 
Last edited:
  • Like
Reactions: hstambaugh
KAK 9.3oz buffer and slr adj gas block ironed out my brass issues with and without a can. I was using a Bartlein 22” and it shot bugholes
 
  • Like
Reactions: bfoosh006
KAK makes a 9.3oz .308 rifle buffer.

And I use the fuzzy side of self adhering velcro to help defend against brass dents.

You might consider trimming about 10% of your ejector springs... ( have a few spares on hand if I am completely wrong.. Lol , I don't know for sure if the dual ejectors use the same springs as a single )

And if you polish those locking lug edges... polish the extractor face as well... makes it far easier / smoother for it to "pop" over the case rim.

And no criticism intended at all... but is your mag catch threaded in far enough ? Mine go clear to the "end" of the threads on the mag release button.. just wondering if that is an Aero LPK "thing".


Yep. Going to hold off on tinkering with the ejector springs since i think when I slow down the cycle a bit I should be off the brass deflector. Polishing the sharp areas of the barrel extension will fix the scratches surely.

Yep, mag catch is threaded in to the right depth, I think it is just the one that they put in the LPK. Will likely stick a set screw in there at some point to keep the crud out.
 
What’s the process to polish the sharp edges of the barrel extension?

Different folks have done it different ways but in my case, I'm going to pull the barrel, stick a big O ring in it to protect the engagement surfaces from certain possible mistakes (you're unlikely to ruin anything without it but it is free to do if ya have a big O ring kit laying around), put a spent case in the chamber, put the barrel in a vise, use a fine UFO wheel to very carefully put about a 10 thou edge break on the tips of the lugs, then a small inverted cone wheel (a cylinder dressed into an inside cone) dipped in grip vinyl on the front 1/2 to dress a small portion of the sharp points on the inside, a regular cone works fine on the exposed side. After that, I'll probably use a couple appropriately shaped fine kratex to polish the edges and call it good. I've considered chucking everything up and lapping the barrel extension/bolt lugs while i'm in there but I'm going to shoot it first. Realistically it is probably already more than good enough.

The most important thing is to not get too aggressive and roll an edge, or put any scratches in the chamber.

Another option if you don't want to use a rotary tool is to knock the edges off with a single cut needle file (put some tape on the end to keep from gouging anything) then wrap the same file in a little bit of sandpaper (320, 600, 1000) (i've had really good luck with gator grit for this kind of stuff, the backing is thin and holds up really well)
 
Last edited:
I built the worlds first 5.5 pound AR308 back in 2015, then the first 4.9 pound AR308 (16" fluted barrel) and my lightest now weighs 3.9 pounds with a Faxon 16" 308 barrel. Shoots sub MOA for the first 5 shots, under 1 MOA with 10 rounds of 175 SMKs.I just don't shoot 25 shot strings.

I would NEVER build an AR308 without an adjustable gas system. You need to know the 308 bolt has 4 times the surface area of an AR15 bolt, and usually has a larger gas port in the barrel. The action system of an AR308 is like a 10 pound sledge hammer, BCG @ 18 to 19 ounces, buffer between 3.5 to 10 ounces. That's a lot of weight needing taming.

My actions weight half that amount and hit more like a ball peen hammer of an AR15.

Also I will only use the best muzzle brakes available, a two or 3 chamber brake or a spiral 35 hole similar to the Weatherby brakes.

I have had many 308 BCGs, steel, nitride, JP LMOS, first one to have the Toolcraft titanium carrier and now the JP VMOS aluminum carrier with JP bolt. I love their low drag gas rings.

All my AR308 were under 1 MOA with numerous bullet weights. Best groups are LESS than 1/2 MOA.

Using a super heavy buffer is just a band aid, my buffers weigh less than 1 ounces, none use internal weights.

All my AR308s eject at 2:30 to 3:30. I actually find accuracy slightly better at 2:30.

NO rifle is interesting unless it is accurate!

You saying all the experts and all the highly engineered parts from JP is JUST WRONG. Should not automatically discount all the experts.
AR308@63.55ounces.jpg
 

Attachments

  • 130SOSTc.jpg
    130SOSTc.jpg
    86.2 KB · Views: 43
  • 10rnds175SMK8_13_18.jpg
    10rnds175SMK8_13_18.jpg
    79 KB · Views: 42
  • Varm110gr.jpg
    Varm110gr.jpg
    362.5 KB · Views: 120
  • Like
Reactions: Bender
You're building ultra-light guns with ultra-light parts and ultra-light reciprocating systems. We are approaching the large frame AR from completely different sides. If you're running ultra light reciprocating assemblies, you've got to vent a lot of gas one way or another. I'm building standard/heavy guns with full (or increased) mass reciprocating assemblies. As long as the bolt never gets a run-and-go as it could in a machinegun, the extra carrier & buffer mass can't cause me an issue. The system is still far too low of pressure to overcome the gas rings and the carrier itself is vented. Realistically I'm putting less overall stress on my gun than a pistol length gas system 5.56 with a rifle length gas system 6.5 creedmoor unsuppressed.

Nice shooting and nice guns though.
 
What’s the process to polish the sharp edges of the barrel extension?

I use a Dremel and their felt cones.

Blocking the chamber with a fired case is a great idea.... I have been using foam backer rod.

NOTE !! USING THE FELT CONES creates a bunch of fuzz.... AND IF YOU LET THE BOLT LOCK AND CLOSE on that fuzz ... that sumab____ will lock closed danged tight.

So clean before letting er' rip closed. ( Canned air / compressor )
Then a chamber brush... then do it again ... then double check.. you don't want the red rouge in your chamber or bore.... any how I am putting the cart before the horse.

I use red rouge, with the felt cones... and consider the felt cones to be completely expendable.

Polish the bottom two feed lugs first... allow the felt to abrade away while you are doing the feed ramps.... Eventually the felt will be a perfect tapered fit to use further up the lugs.

Take your time, and just polish. ( you'll soon see why a gunsmith's patience can be kinda short )

Next do the lugs the case drags against when ejecting.

Soon enough you will see the scratches on cases getting smaller and less distinct.

Again... CLEAN the heck out of the chamber and the barrel extension / lugs prior to firing and locking the bolt closed.
 
  • Like
Reactions: DRAM40A1
Finally had time today for a group test after pulling the barrel and resolving the sharp edges in the barrel extension. I will do some shooting on camera when I can get up to the range in good light in order to satisfy any doubters :D. Either way. 5 shots, 100 yards lasered, windy as HELL. Also, surprisingly, the Ares BTR is spooky good in low light.

7043659
 
Last edited:
Casings look much nicer now
No gouges or big dents. Just some contact rubbing the carbon off. (Original on right, today on left)
7043643
 
Last edited: