• Watch Out for Scammers!

    We've now added a color code for all accounts. Orange accounts are new members, Blue are full members, and Green are Supporters. If you get a message about a sale from an orange account, make sure you pay attention before sending any money!

  • The site has been updated!

    If you notice any issues, please let us know below!

    VIEW THREAD

any one else shoot the cbrps bullpup nagant?

erbacon

trash can man
Full Member
Minuteman
Sep 28, 2013
9
0
West virginia
i decided to make my nagant my first project gun. it cost me 125$ for the rifle and couldnt hold a group less then a paper plate at 100 yards. i thought that would be the best place to start learning to gunsmith.
i started with the restocking and put it in the cbrps stock and quickly found a few flaws that i didnt care for after a few quick mods it is almost done.
what other problems have you folks noticed. i couldnt get the scope to zero it was mounted to a plastic carry handle and not only sat way too high off the barrel but had a wondering zero and mounted all kinds of screw it had a set screw the was pushed up against the barrel but it was screwed thru plastic that would easily stress and loosen.
i cut off the upper side rails removed the carry handle and added a scout mount. allowing me to scope it with a normal eye relief scope (the purpose behind the bull pup design.) i dont have tools or money to drill and tap..
after all was said and done it turned out nicely except..... the stock is a two piece stock so there is flex and a hairs worth of play between the front and rear mounting bolts. i plan to fix this by making replicas of the side plates out of sheet steel and welding a cross bar to go up and over the throat of the action and one to go down and around the mag. i also plan to drill and tap 2 more anchors that will bolt securely to the the alum. front half. it only has 1 screw on each side allowing it to fold in half after removing the action. i figure adding 2 more on each side will get rid of any play. does any one else have a way to fix this problem? or am i over looking a much larger problem?
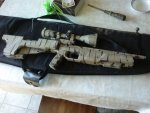
bullpup nagant.jpgnagant before i cut it.jpg the one with the carry handle isnt a nagant. i put my k31 in there just to try it on. but it shows what i have done to the origenal bullpup stock
 
... or am i over looking a much larger problem?
Why was the gun only shooting paper plate size groups before you started all this?
 
the last 2 1/2 inches of the barrel were so worn that the rifling was gone and the crown was nicked like some one dropped it in gravel off the roof of a house. the guy I bought it from didn't have it in a stock and the one he gave my was a tad warped too. not sure how much the stock effected it cause I changed it before I cut the barrel.
 
I'm usually against these types of projects because it's no longer vintage and certainly not a sniper rifle, but what's done is done. So, for the sake of technical discussion, I would also ask the following:

What's the current barrel length?

Is the barrel free floating? If so, from what point?

What measurement does the bore slug to, after being cut?

Is the throat as worn as the crown originally was and what's the freebore with whichever bullet(s) you're using?

What ammo/handloads are you shooting through it?

I'm having trouble seeing exactly how the stock is attached. You say that you believe there is some flex between two parts (I assume they are separate pieces?). How/where is the action attached to this/these, exactly?

These rifles are extremely sensitive in two areas. First, the barrels are thin and don't like to be free-floated. From what I've seen, the best place to cut them, if that's the route you want to take, is at about 20.5" from the front of the receiver. Not so coincidentally, this is exactly where the front band would be on the original stock and where snipers and match shooters would wrap the barrel to improve the harmonics and reduce barrel whip. It's also the same length that they chose their carbine barrels to be. The problem, however, could be that this area of the barrel is not as tight in the bore as the crown would be. Sometimes, this can be worked around with a .312 bullet (or larger, if you run cast bullets), if the bore was tight enough to begin with. Many are not, however.

The second area is the stock inlet/bedding and the tension of the action screws. Even the slightest movement in this area and you'll be stringing shots or throwing wide flyers. If you can feel it wiggling, then this problem is already huge on your example and for it to even have a chance of shooting decent, it will need to be remedied. The scope mount could be a whole different issue, too.

These are the problems with most sporterization projects on these rifles. Most of the time, people go into this with the intent of improving the rifle's accuracy. A majority of the time they will end up shooting far worse than the originals are capable of, because they don't take the time to research the finer points before picking up a hacksaw and a worthless stock and going to town with them. Don't take this as a personal slam, though. If you wanted a more compact rifle, you've certainly got it and I'm sure it's a learning experience. However, it's probably never going to touch a vintage sniper, or even standard infantry configuration 91/30, in terms of accuracy.

John
 
for me the project is simply to learn. if I didn't plan to screw something up along the way I would have used my Rem 700. but I don't foresee me getting it all right on the first try.
I can afford to goof a little with a 100$ gun. if it comes down to it then I learn to rebarrel too.
the barrel is cut to 20 3/4" im pretty sure the barrel measured 28 3/4 to start and I chopped 8". the crown is deep set at a 45 degree angle.
I haven't slugged the bore yet because I don't have access to lead or a smelting tool to make a lead ball. as soon as I do I plan to lap it as well as measure.
I don't reload so I am stuck with factory and am trying different loads to see what works best. wish I could reload but there's too much money involved in getting started. if I ever had it I would invest in it but not yet. I know that a consistent round makes a worlds difference im just not there yet.
the barrel isn't free floated. I have a plastic rise that helps support the barrel about 2 1/2 - 3 inches from the end of the barrel. I also pinned a small leather strap around the barrel to help hold it in the riser and to try and equalize the pressure on the barrel. as soon as I get the time I am going to wrap every three inches or so with rubber banding and see if that helps to deresonate it at all.
I also made an adjustable trigger for it. I drilled a small hole thru the receiver just behind the trigger and tapped it for a 5mm set screw it. the screw is more then out the way and if I wanted to I could adjust it down to a hair trigger. I have it set at about 3 1/2 to 4 lbs. had to use a fishing scale I don't have a scale for testing triggers.
I know it is far from vintage but it is still a nagant action and barrel all though altered some it still has the same properties so I figure this would be the best place to bring it up.
Thomas Edison once said I have not failed ive just found 100 ways it wont work. this is all very new to me and no matter how much you read in a book or watch on the internet until you do it yourself you haven't learned anything. where would modern science be without the gruesome experiments of the middle ages through the 1800s. im learning on my own and without proper tools and equipment.
I do not take your advice as negative criticism. I have lots to learn and would know what Im doing wrong with out being told.
im going to try and get pics of the stock and the inner working this week end. that way you can see what im up against as far as the securing the action.
 
If this were my project, the first thing I would do would be to secure the action so that it's not going to move when shot. After that was done, I would test it without any pressure points/wraps on the barrel to see how it does (with as many different loads as I had access to). If the action is solidly secured, you may be surprised by how well it will shoot with the barrel cut to it's current length. The purpose of wrapping the barrel on a standard 91/30 is because of it's length and the fact that it's thinner at the muzzle end than at the receiver end. From there, you will have a "control" from which to base the effects of any wraps or tension devices on the barrel. All of this is assuming that you have a solid sighting system, however. That could end up being the catch.
 
the sights are solid I used a steel scout mount and everything is Loctite down I used the lowest steel weaver style rings I could get for about 35$ I was told you get what you pay for. and I am running a 3-9 nikon prostaff. I don't see there being any issue with the sights. had it zeroed in at a local shop then put out about 40 rounds down range and am killing grape fruit at 175 yards. i plan on ordering an updated back half for the stock that is squared instead of L shaped and it is spring loaded to help with recoil. as soon as that is ordered and put on then i am going to reinforce it with the steel brackets. i just want to get that in before i measure and cut anything. and as far as ammo i will start diversifying and trying many types and not just the 3 or 4 the store carries. also will spend weekend finding that control group before testing anything
 
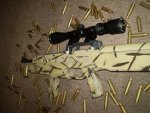
Just finished the rebuild. i added internal struts in the stock to firm it up. i made an adjustable trigger that goes down to about 1 1/2-2 pounds. its stet pretty close to the 2 lbs mark now. also made a muzzle break and threaded the barrel. It kicks a like a .223 now. it is verry comfortable to shoot.
all that needs done is to re sight it in and kill a deer with it
 
Most of the available scope mounts are too high, even the ones you display. Since you already have the rear sight off, you know there is a dovetail permanently a part of the barrel.

A set of common 3/8" mount airgun/rimfire rings will fit onto this dovetail. I have three 91/30's, all affixed with such rings, and friend's for a fourth.

One of mine uses a 1" tube, the others 30mm, mounting Scout style LER scopes. My 32mm objective uses a 1" medium height ring and may work with a low ring. It lowers the scope's optical axis by about an additional 1/4", as compared to the 42mm scope. My 42mm scopes require a 30mm medium height ring, and results in the objective bell/eyepiece bell clearing the handguard/receiver by about 1/8"; this method really gets the scope down there.

Rigidity is mandatory because of the X54R's recoil, and some Airgun Rings are built to a satisfactory standard. Try to find rings that each have two bolts providing compression on the bottom, where the clamp engages the dovetail. I have used this for 1" tube/32mm Objective. and this for 30mm tube/42mm Objective. I see the 1" rings are unavailable, so I would recommend these in their place. Bells larger than 42mm will probably want high profile versions of these recommended rings.

Unless you are a handloader and can develop loads with significantly faster burning propellants, I strongly suggest you do not shorten the barrel. Although the rifle may shoot well, or even better; the muzzle blast and flash, which are already awesome, could become essentially unbearable. Shooters who use surplus ammo with the Carbine versions of the Mosin-Nagant understand this well.

I really do believe the main advantage (for me) to using a Bullpup stock configuration is in how well it reduces the longer barrel's contribution to overall length down to something rather more manageable. I really do treasure the extra length of the 91/30's barrel and how well it contributes to a longer reach and a flatter trajectory.

The muzzles of many 91/30's were counterbored as part of their arsenal refurbishment before being put into long term storage following WWII. This counterboring was done to remedy cleaning rod wear, and can be identified by trying to fit the neck of a fired cartridge into the muzzle. If it fits relatively easily, the chances are good that it was counterbored. Inserting a cleaning rod section into the muzzle several (at least 3) inches pressing it up against the side of the bore and slowly withdrawing it may reveal a 'step' where the bore suddenly becomes wider for the rest of the bore length. The presence of this step would be a good indicator of counterboring. Counterboring does not usually mean the barrel is bad, and usually indicates it will shoot quite a bit better than before it is performed. My 1943 Izshevsk is counterbored and shoots under 1" at 75yd with Prvi-Partizan (PPU) 150gr softpoint ammo. One just needs to ensure that the 'Step' area is kept clean of fouling buildup. If counterbored, the condition of the exterior 'false muzzle' is far less critical to accuracy.

After firing corrosive surplus ammo, I clean from the aft end, use a bore guide, a one piece stainless rod, and Windex until the fouling changes from black to grey, followed by Outer's Gunslick Bore Foam. The final step is a good application of a quality gun oil; I use Hoppe's.

I am impressed with your progress using the Bullpup stock. I have been scheming around building a homemade wooden stock for one of my 91/30's, and these details you have listed can be helpful to such a project.

Greg
 
Last edited:
Ive read about removing the sighgt block but ive noticed with the desing of the stock the scope needs to be raised to allow a good cheek weld. because your cheek is resting just ontop of the bolt. i prefer to be as close to the bore as possible but the bullpup dedign doesnt allow that very well. i intend to do the same trigger mods to a second nagant that way i can swap out for a lil extar barrel length without a barrel change. they are easy to find for about 100 so im not hurting the wallet. my only concern now is the brace i use suport the barrel. with the muzzle break on there is 0 muzzle climb. i think i can safely remove it and leave it fully free floated. im hoping to sight it in and get pics of the nr mods this weekend.
the current muzzle break is very poorly made it is my rough draft.
its had 10 rounds through it and the welds seem to be holding tho.
my vice broke in the middle of drilling the vent holes and i only had parts for one try... cause i goofed the other two :D
i cant migweld for beans lol.
next break i make will have 3 baffles instead of just one. as for the flash...... we are still at the drawing board but i have some good ideas i just need to get a buddy to do the welding next time