

How's it going guys. I plan on bedding my r700 and mcmillan stock but have one question regarding a stress free bedding job. when I torque the action down, the barrel favors to the right of the barrel channel but remains free floated. It's only a matter of OCD on my part but I want to center it as best as possible. If I wrap electrical tape at the end to center the barrel... Will this create stress on the action as the devcon cures?
Gunsmithing Bedding question
- Thread starter SierraSR25
- Start date
You are using an out of date browser. It may not display this or other websites correctly.
You should upgrade or use an alternative browser.
You should upgrade or use an alternative browser.
Chances are the bedding will correct that issue by filling in what is causing the shift. You don't really want to torque it when you apply the bedding, rather just snug the screws a dab. Some don't even do that, but I think it's a good idea. If once you get the rifle bedded and it still shifts just inlet the channel so it is even so your OCC doesn't kick in when you look at it.
Chances are the bedding will correct that issue by filling in what is causing the shift. You don't really want to torque it when you apply the bedding, rather just snug the screws a dab. Some don't even do that, but I think it's a good idea. If once you get the rifle bedded and it still shifts just inlet the channel so it is even so your OCC doesn't kick in when you look at it.
Yeah I hope it does I just want to make sure I get all my questions out of the way before I go ahead and kick this project off. I know not to torque it when actually bedding the rifle, I was referring to how the action sits in the stock as of now.
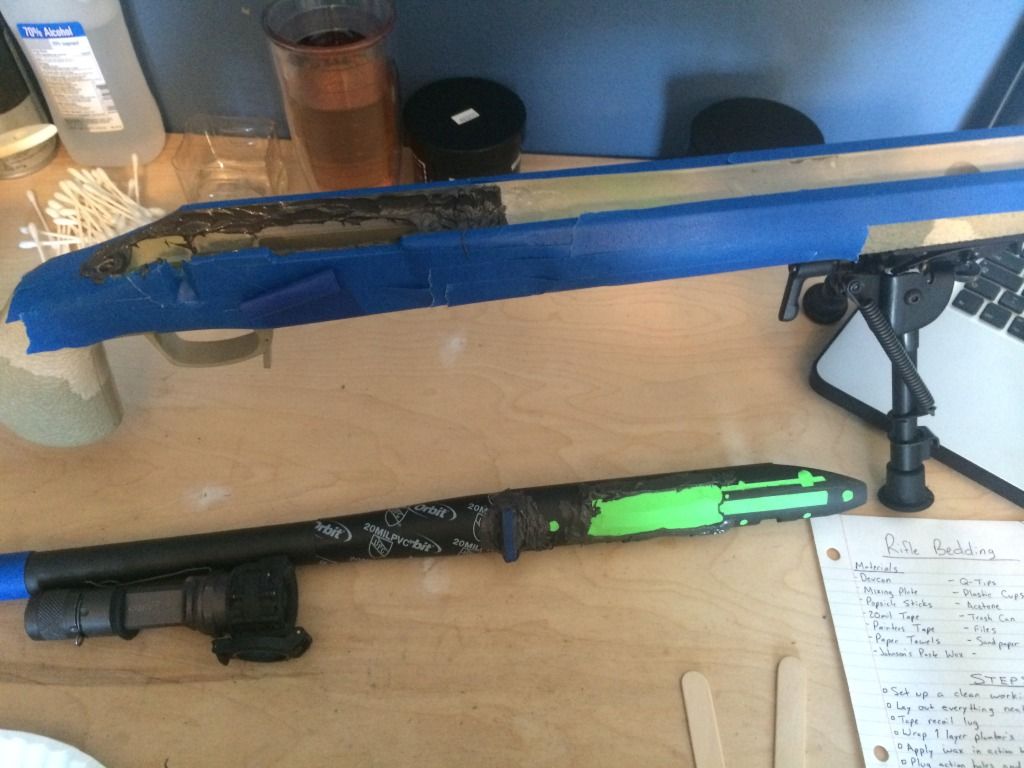
When you do your bedding wrap painters tape around the barrel toward the end of the forend, just enough that it contacts the stock on both sides but doesn't raise the barrel up.
By doing this you'll perfectly center the barrel in the channel and when the epoxy dries you'll be good to go.
Have fun!
Steve
By doing this you'll perfectly center the barrel in the channel and when the epoxy dries you'll be good to go.
Have fun!
Steve
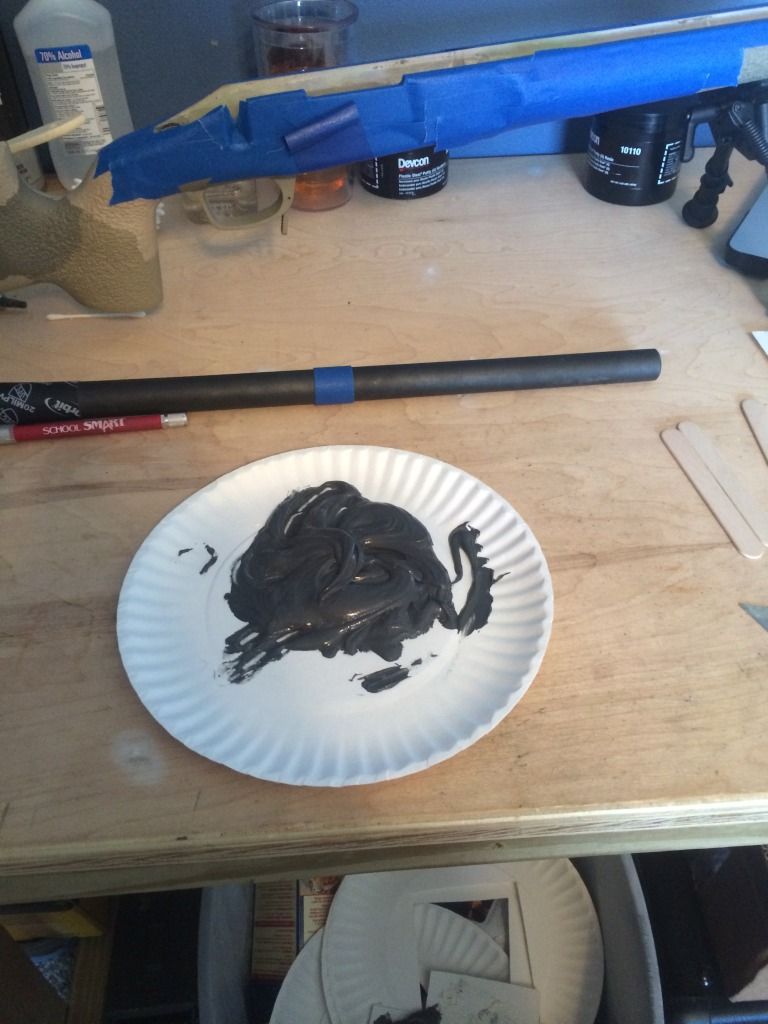
I found it works best if I tighten down the screws to displace the excessive amount of epoxy, then back them off so that they are only there for alignment and use electrical tape to ensure the action doesn't shift and stays stress free
Sent from my iPad using Tapatalk
Sent from my iPad using Tapatalk
This is what I plan on doing. I believe that's what STR did in his videos minus the electrical tape around the action. Thanks for all the help guys, as soon as my stock gets back from Badger I'll throw some pictures up (as long as everything goes well haha)
I found it works best if I tighten down the screws to displace the excessive amount of epoxy, then back them off so that they are only there for alignment and use electrical tape to ensure the action doesn't shift and stays stress free
Sent from my iPad using Tapatalk
Best of luck
Sent from my iPad using Tapatalk
Sent from my iPad using Tapatalk
This is what I plan on doing. I believe that's what STR did in his videos minus the electrical tape around the action. Thanks for all the help guys, as soon as my stock gets back from Badger I'll throw some pictures up (as long as everything goes well haha)
Since you mentioned me, I do use tape to center the barrel when necessary. The one in the video aligned perfectly, so I didn't. Also, when I have to inlet a stock for a bigger barrel, I don't worry too much about the stocks edges being perfectly in line with the barrel. I cut the channel about .080 oversized. I then put 3 layers of .020 thick plumbers tape under the barrel for spacing from the stock. I bed from the action tang to the very tip of the stock. The bedding will fill all the imperfections, and you'll end up with the most uniform fit possible. The bedding will be left proud while it cures, then using a flat 1/4" by 2" flat stock wrapped in sand paper I uniformly sand the top side of the stock. It turns out excellent. Then I paint the stock however I want. Who else does this the same way?? McMillan Stocks.
Last edited:
Since you mentioned me, I do use tape to center the barrel when necessary. The one in the video aligned perfectly, so I didn't. Also, when I have to inlet a stock for a bigger barrel, I don't worry too much about the stocks edges being perfectly in line with the barrel. I cut the channel about .080 oversized. I then put 3 layers of .020 thick plumbers tape under the barrel for spacing from the stock. I bed from the action tang to the very tip of the stock. The bedding will fill all the imperfections, and you'll end up with the most uniform fit possible. The bedding will be left proud while it cures, then using a flat 1/4" by 2" flat stock wrapped in sand paper I uniformly sand the top side of the stock. It turns out excellent. Then I paint the stock however I want. Who else does this the same way?? McMillan Stocks.
Awesome. Yeah I like the plumbers tape you had. I pretty much used your video as a shopping list and went out last week to get some devcon 10110, Johnson's paste wax, .020 plumbers tape and all the other little stuff. Should be a fun project for this weekend!
If I may, please let me suggest the following if you've never tried it before. Start by making sure that everything fits together as it should. Then prepare everything as if you were ready to bed it. That means tape where you need it, release agent where it goes, cleaning tools such as Q tips, rags popsicle sticks, ect. Have everything on the table layed out, and do a dry run step by step in your head a couple of times. If you didn't forget anything, then practice a dry run by pretending to apply bedding compound, and carefully, but without distractions or wasting any time, physically go thru the proccess. It may sound silly, but you'd be surprised how many have forgotten something on their first bedding job, such as putting release agent on the action screws, or the bottom metal if you're using it. The compound gives you pleanty of work time, but the smoother your moves, the less chance of a mistake that will cause a panic mode. Therefore, practicing without mixing is a good training tool. Best of luck, and post a few pics if possible when you're done.
If I may, please let me suggest the following if you've never tried it before. Start by making sure that everything fits together as it should. Then prepare everything as if you were ready to bed it. That means tape where you need it, release agent where it goes, cleaning tools such as Q tips, rags popsicle sticks, ect. Have everything on the table layed out, and do a dry run step by step in your head a couple of times. If you didn't forget anything, then practice a dry run by pretending to apply bedding compound, and carefully, but without distractions or wasting any time, physically go thru the proccess. It may sound silly, but you'd be surprised how many have forgotten something on their first bedding job, such as putting release agent on the action screws, or the bottom metal if you're using it. The compound gives you pleanty of work time, but the smoother your moves, the less chance of a mistake that will cause a panic mode. Therefore, practicing without mixing is a good training tool. Best of luck, and post a few pics if possible when you're done.
Absolutely, that sounds like a great idea. It's probably a good thing my stock has been away and I've had so much time to think about everything and get some good ideas going.
I plan on taking a lot of pictures and hopefully, with a successful bedding job, relieve some second thoughts others may have about bedding even a more expensive stock like a mcmillan.
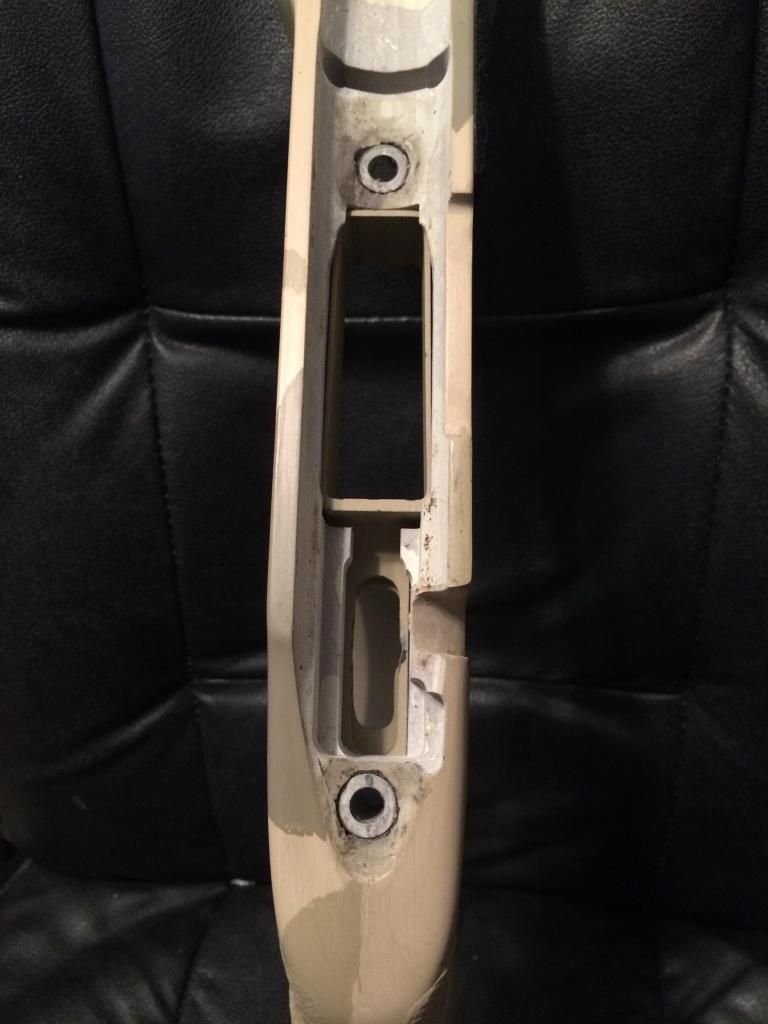
So I was greeted after work by a large box from badger. I had asked them to drill the pillar holes out for me but I guess they went ahead and just bedded the pillars in while they were at it.
Last edited:
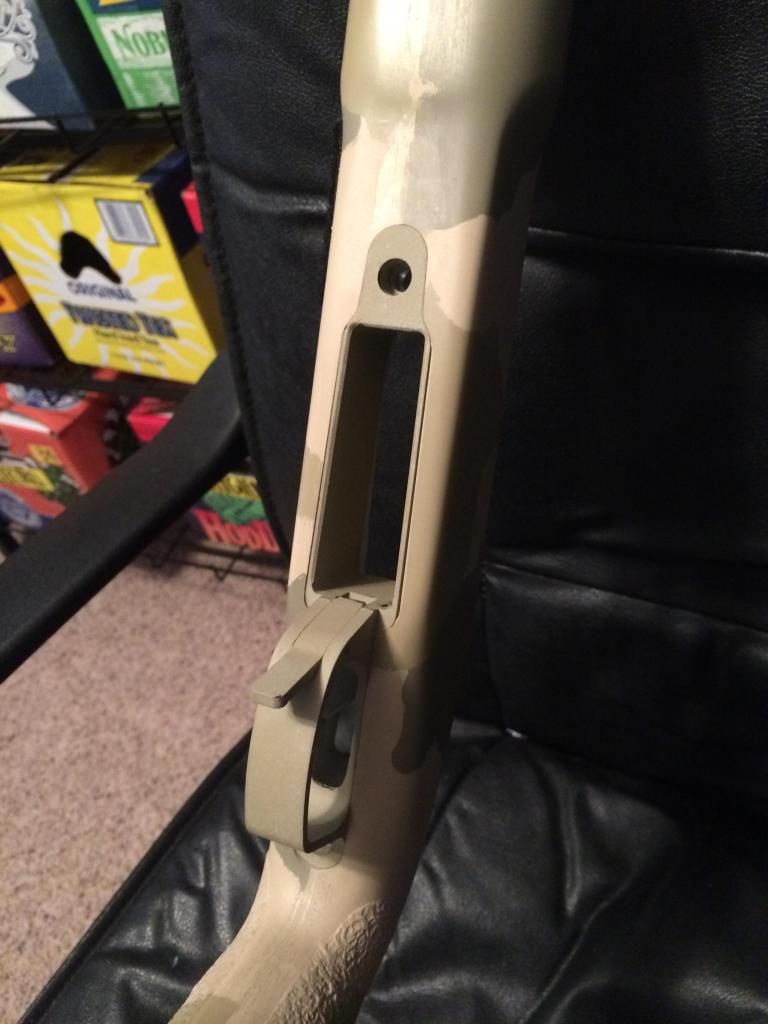
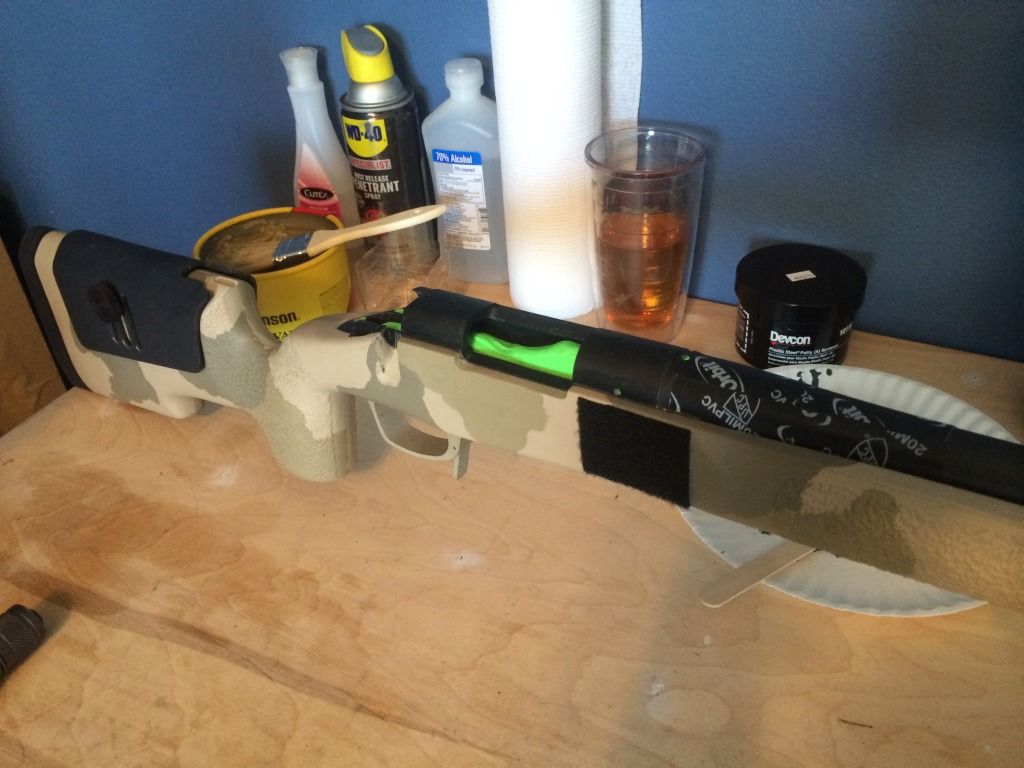
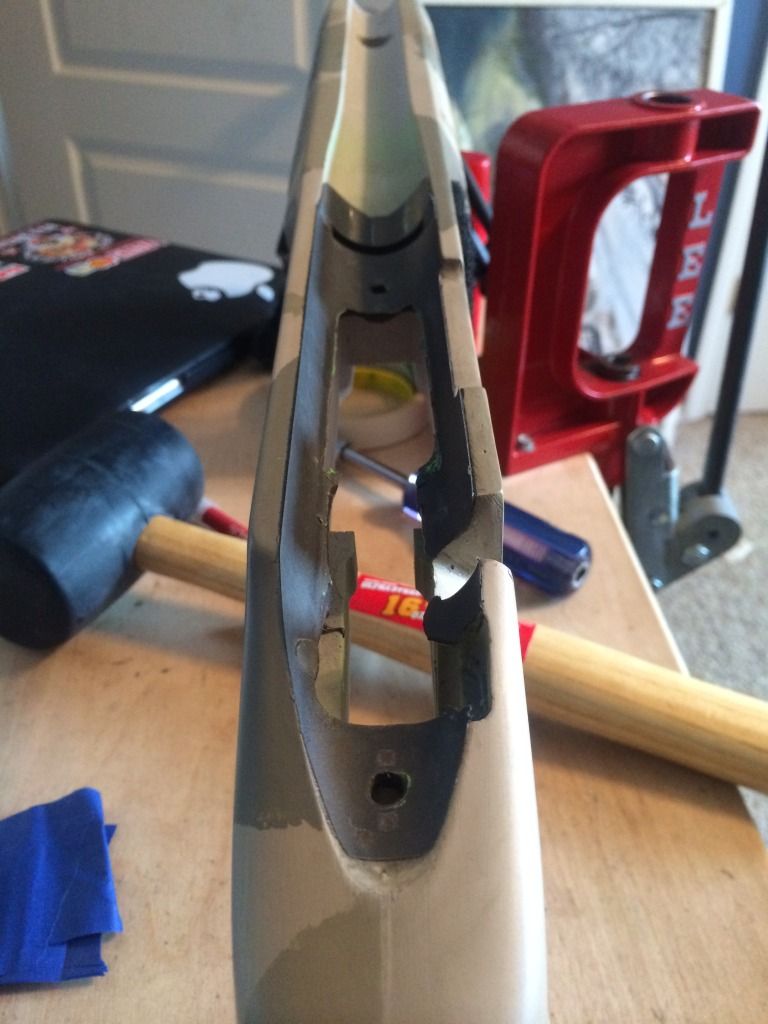
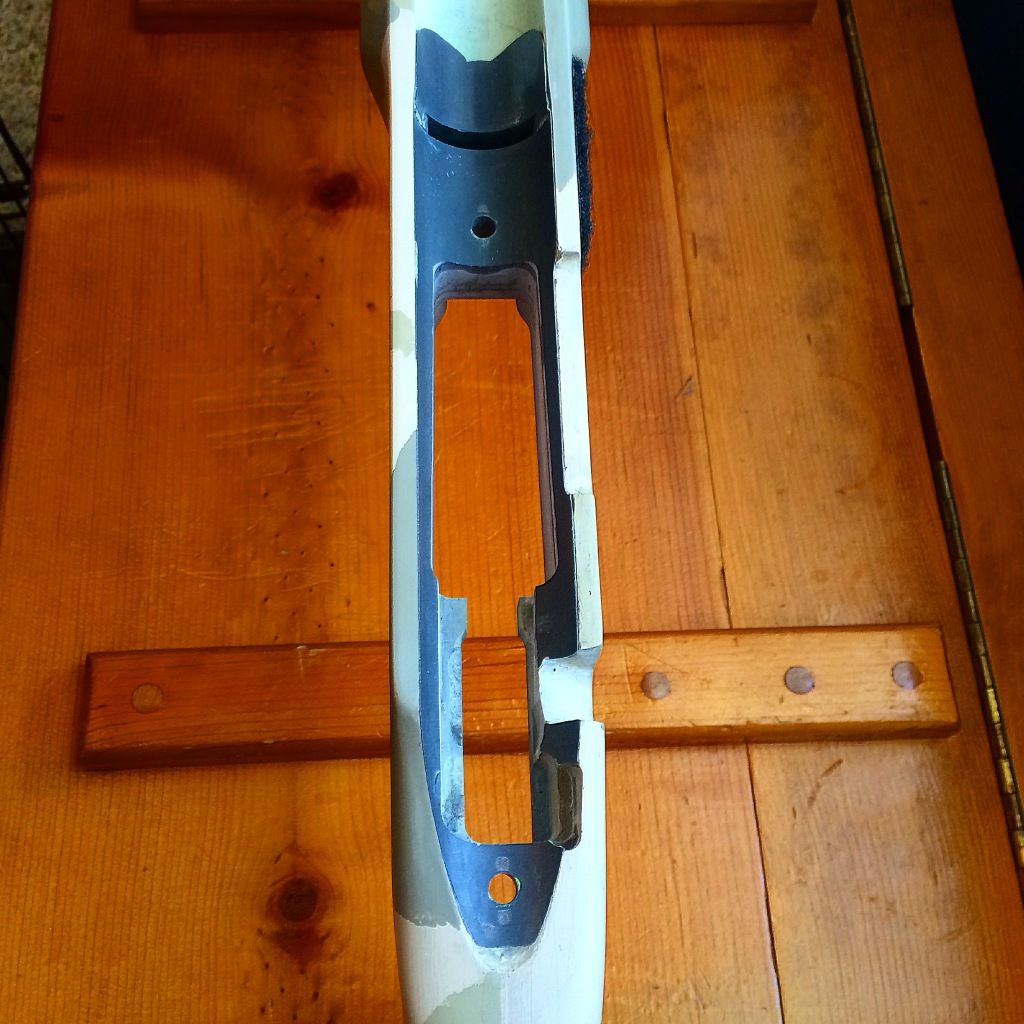
So yesterday I went through the whole process, being very tedious, and this morning I took everything apart. After 6 hours yesterday of curing, I cracked the screws loose and then returned them to their original position. I think either way they wouldn't have given me any trouble. The Johnson's paste wax did a great job and they came out with no problem. The bottom metal also came out with absolutely no hassle, and then comes the action. As a first time doing this of course I was nervous, but after not being able to remove it with my hands.. I gave her a little persuasion with a rubber mallet (only took 2 mild raps with the mallet) and heard the glorious pop. The barreled action lifted right out and everything looks great. I'm still in the process of cleaning everything up but I couldn't resist taking a few pictures to share with the group.

 (now I know how much putty to mix for next time lol)
Nice job!
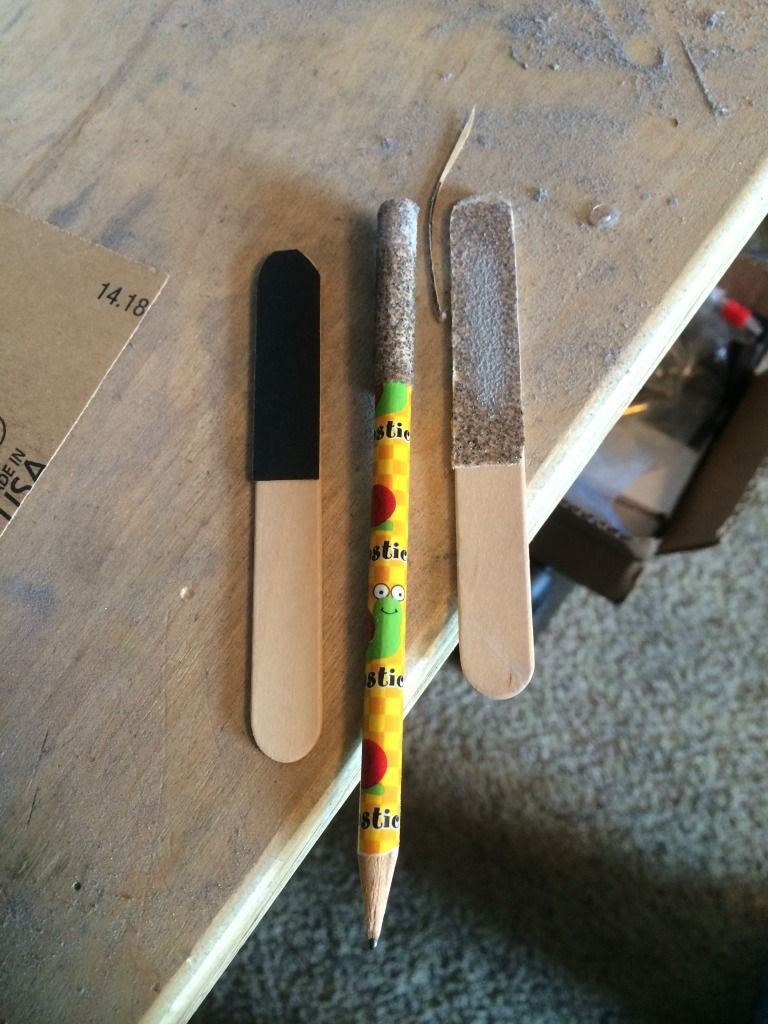
Thanks! I'm really happy with it. I'm not going to say it's perfect, because I got a little eager and chipped some of the bedding.. But for a first time I think its okay. I ended up cleaning the mag well area with a router and a flush trim bit with bearing, and then used some 60grit sandpaper on popsicle sticks and a pencil to get the other smaller, rounder areas.Nice job!
nice job
I think that looks fantastic. Where ever it chipped around the edges is not anything more than cosmetic, and can easly be repaired. Just clean everything up and reapply release agent to the metal, assemble the rifle, and fill the voids even with the edges. Simple.looks good in the pictures though.
I think that looks fantastic. Where ever it chipped around the edges is not anything more than cosmetic, and can easly be repaired. Just clean everything up and reapply release agent to the metal, assemble the rifle, and fill the voids even with the edges. Simple.looks good in the pictures though.
Thank you. I got the gun back together. I'm pretty upset I live 45 minutes from K&M but couldn't participate in the grind next weekend.. I will be there to watch though!
Great job
Sent from my iPad using Tapatalk
Sent from my iPad using Tapatalk
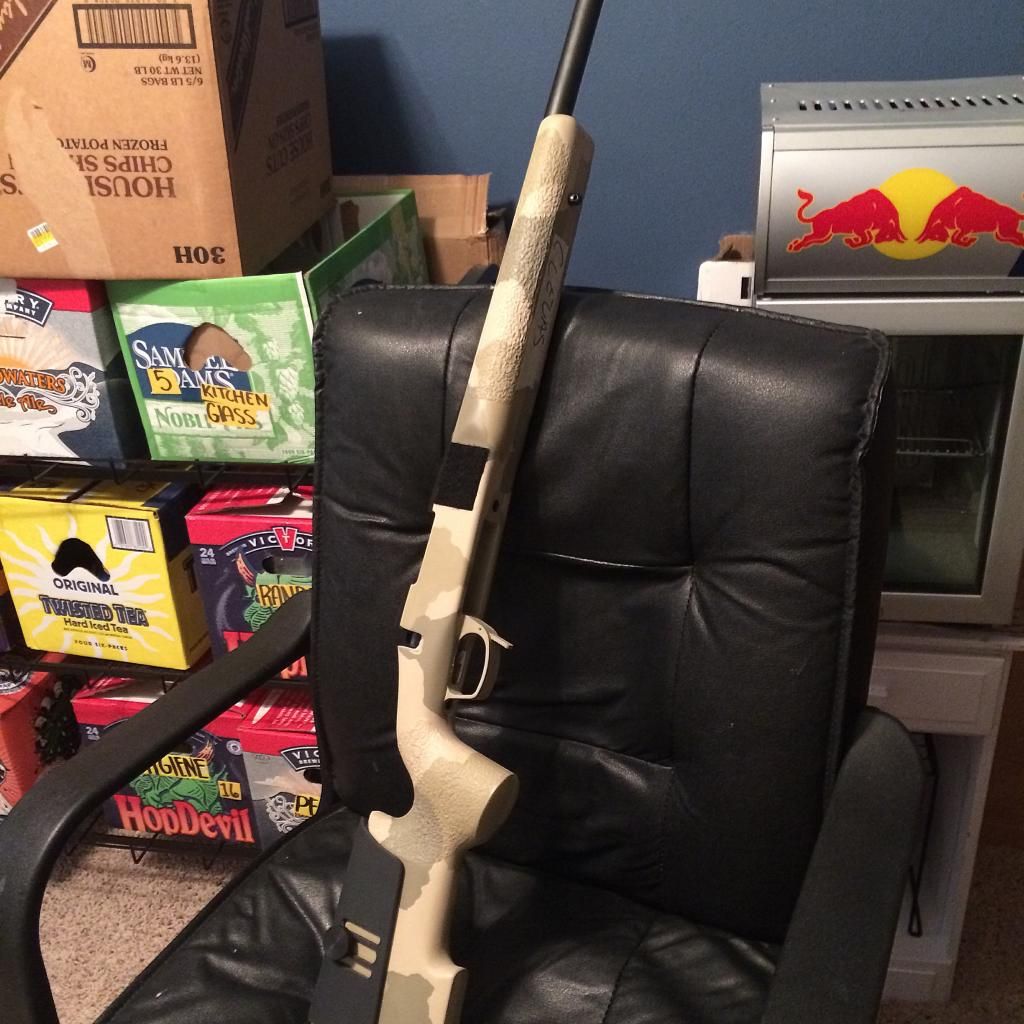
I wrapped a little bit of tape around the barrel to center it. Instead of tightening the screws, I used rubber band and tape to keep the action stress free.
M40A1 Slideshow by smoothy8500 | Photobucket
M40A1 Slideshow by smoothy8500 | Photobucket
I wrapped a little bit of tape around the barrel to center it. Instead of tightening the screws, I used rubber band and tape to keep the action stress free.
M40A1 Slideshow by smoothy8500 | Photobucket
That looks really good. I used a lot of guys ideas and ended up with a really good bedding result. hopefully I'll have some range results this weekend
I wrapped a little bit of tape around the barrel to center it. Instead of tightening the screws, I used rubber band and tape to keep the action stress free.
M40A1 Slideshow by smoothy8500 | Photobucket
That was a very good move
So did the barrel end up centered?
For the most part yes. it's still a tiny tiny bit to the right but I can live with that. Before it was almost touching.
Good deal. I only ask because you first talked about torquing the action screws. Even if you tape it, if you apply too much pressure (by any means) while setting up the barrel will apply pressure to the stock through the tape. Once set-up, you remove the tape and the stock moves back straight (it doesn't flex much, but it will). Sounds like you got it! It takes special attention and a good plan to get it perfect. I re bedded one 3 times to get it right. Learned from my own mistakes.
Glad to hear it worked out. I'm sure you learned a lot too.
Glad to hear it worked out. I'm sure you learned a lot too.
Good deal. I only ask because you first talked about torquing the action screws. Even if you tape it, if you apply too much pressure (by any means) while setting up the barrel will apply pressure to the stock through the tape. Once set-up, you remove the tape and the stock moves back straight (it doesn't flex much, but it will). Sounds like you got it! It takes special attention and a good plan to get it perfect. I re bedded one 3 times to get it right. Learned from my own mistakes.
Glad to hear it worked out. I'm sure you learned a lot too.
Oh yeah I got it pretty close. I'm glad I didn't have to do it 3 times! Lol I definitely learned a lot and it was a good experience. Thanks!
Oh yeah I got it pretty close. I'm glad I didn't have to do it 3 times! Lol I definitely learned a lot and it was a good experience. Thanks!
Don't kill yourself with laughter. I didn't fail three times. I'm bit of a perfectionist; hence precision shooting. I bedded a Tupperware stock the first time, the second was the HS Precision with the barrel slightly canted. It was fine but I didn't like the aluminum Devcon color or the fact the barrel wasn't centered perfectly. The third time in that gun I made sure it would fall into place perfectly with some stock prepping and dyed the steel Devcon. Dye doesn't work too well even with the darker steel Devcon just incase anyone tries. It will never turn jet black and too much die will prevent full hardness. So it was three times for me to be happy with it, but it shot the same each time.
Just didn't want anyone going around thinking ol' Elite_KG glued his action to his stock or anything.....
Yours looks really nice.
Last edited:
Don't kill yourself with laughter. I didn't fail three times. I'm bit of a perfectionist; hence precision shooting. I bedded a Tupperware stock the first time, the second was the HS Precision with the barrel slightly canted. It was fine but I didn't like the aluminum Devcon color or the fact the barrel wasn't centered perfectly. The third time in that gun I made sure it would fall into place perfectly with some stock prepping and dyed the steel Devcon. Dye doesn't work too well even with the darker steel Devcon just incase anyone tries. It will never turn jet black and too much die will prevent full hardness. So it was three times for me to be happy with it, but it shot the same each time.
Just didn't want anyone going around thinking ol' Elite_KG glued his action to his stock or anything.....
Yours looks really nice.
Oh I didn't mean anything by it! I know what you mean though, I chipped the bedding a little bit and it bugs me but hopefully I'll be able to get out and shoot Monday and have some results up. I think the grayish color the devcon turned out looks alright with the desert stock. And thank you!
I know you didn't man..I was just jacking around a bit. Bored on a rainy day. You'll forget about a few chips once you start shooting. You can mix up a small batch and fix the chips. Just apply a tiny little bit in the chip with like a toothpick. Have some release agent or kiwi shoe polish on the action that corresponds to where the chip is and reassemble. Clean up the excess with a-tops and you light solvent of choice. My gun smith uses butches bore shine. I like rubbing alcohol or wd-40. Whichever is handy.
Hope it drives tacks for yah!
Hope it drives tacks for yah!
Very nice job !
It's easy to get overly anal about this shit, minor chips or "holidays" in the epoxy aren't going to make a bit of difference. As long as the action isn't stressed when the screws are torqued, and the action doesn't move in the stock under recoil, minor cosmetics are irrelevant.
Hope it shoots well.
Fantastic job!!!
Very nice job !
It's easy to get overly anal about this shit, minor chips or "holidays" in the epoxy aren't going to make a bit of difference. As long as the action isn't stressed when the screws are torqued, and the action doesn't move in the stock under recoil, minor cosmetics are irrelevant.
Hope it shoots well.
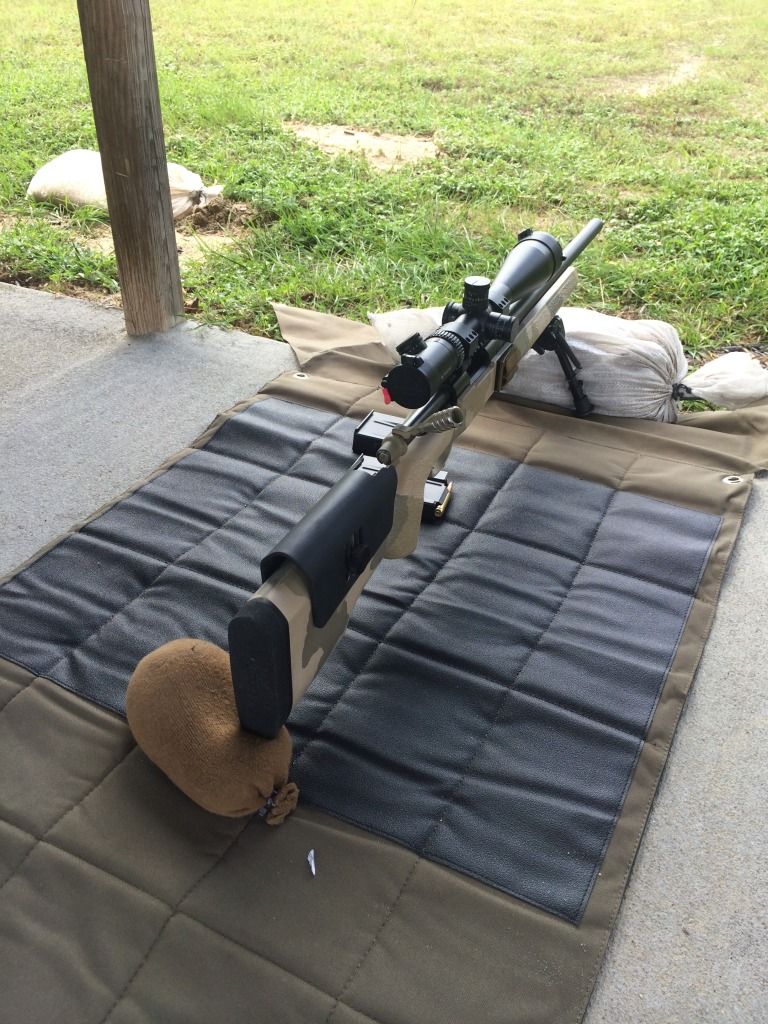
Thanks gents. I'm heading out to the range now so I'll report back with good or bad news haha
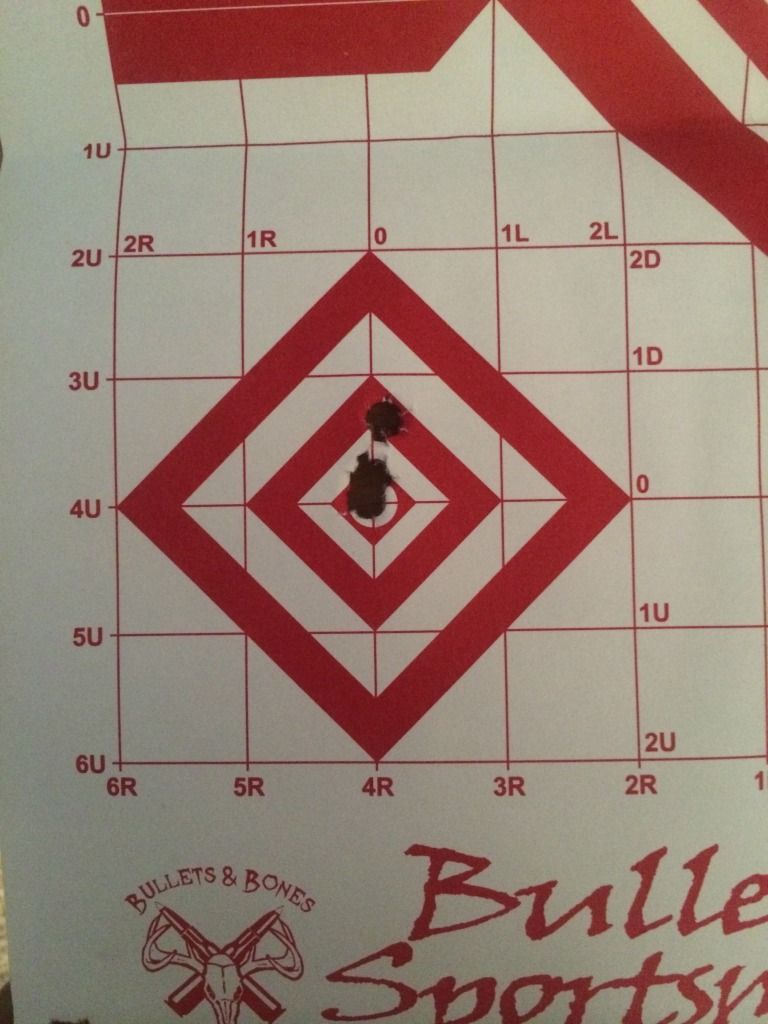
I just got back from the range and I am very happy with the gun and it's performance. It runs smooth and once I got the scope re-zero'd I shot some pretty decent groups. The barreled action is a remington 700 SPS 1:12 and I'm shooting 175gr SMK over 43.2gr IMR 4064 in Lapua brass with Fed 210m primers. I haven't messed with COAL yet but I set all mine at 2.81 for now.
Similar threads
- Replies
- 1
- Views
- 413
- Replies
- 12
- Views
- 1K