The term “makeshift barrel vise” definitely makes me a bit nervous. But otherwise, you need an action wrench, the torque wrench is optional but since you already have it carry on.
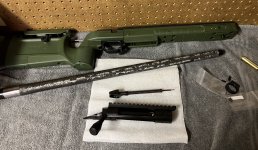
Clamp the shank (thickest metal part, right next to the tenon threads) of the barrel in the barrel vise, with a business card or two wrapped around it to protect the finish. Torque the vise bolts down more than you think you need to; you should be giving it enough elbow grease that you start worrying you’re going to damage the barrel. Don’t clamp the carbon, only the steel shank.
Apply the anti-seize to the tenon threads, then gently wipe away any excess. Try to make sure there’s none on the shoulder of the barrel (the flat face that locks against the action when the action is all the way on).
Thread the action on by hand, all the way til it stops. Make sure the recoil lug is properly aligned as you do this. If anti-seize squirts out, back the action off, wipe off the two flat mating faces, then screw the action back on all the way.
Insert the action wrench into the action, all the way to the breech (beginning of the barrel), then apply the torque wrench and go for it. 75-100 ft-lbs is good. If the barrel starts turning in the vise, stop cranking the action and start cranking those vise bolts/nuts further. Torque wrench on the action wrench, crank til it clicks.
Loosen the barrel vise, gently remove the barrel from the vise, then check headspace with go/no-go gauges. If you don’t have those, you can use factory brass and scotch tape; both methods are described elsewhere.
If headspace is good, install the trigger using the two pins, install the barreled action into the Bravo per the manufacturer instructions, and you’re all done. When I install BA’s into stocks/chassis, I tilt the muzzle up to ensure the recoil lug is snugged against the stock before tightening the action screws.
If headspace is bad, come back here for help. Odds are you are doing something wrong, the Hide will help you troubleshoot. It’s possible the headspace actually is bad, in which case you call your barrel seller up and start a warranty process.
Here’s a video walking through the process:
This video vastly understates how much you’ll have to tighten the barrel vise when he removes the existing barrel; he shows it better around the 9:00 mark, and talks about how he’s cranking those nuts tight.
ETA: It looks like the Origin scope rail extends past the front face of the action; make sure there’s enough room for this to not hit the barrel vise when the action is screwed all the way on. You do NOT want to crank that rail into the vise.