• Watch Out for Scammers!

    We've now added a color code for all accounts. Orange accounts are new members, Blue are full members, and Green are Supporters. If you get a message about a sale from an orange account, make sure you pay attention before sending any money!

First time glass bedding

zxGrizz

Private
Minuteman
Oct 25, 2021
30
15
South Carolina
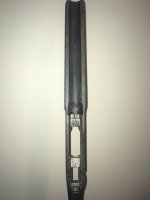
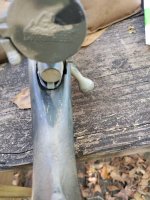
Just did my first glass bed. Decided to try it on my deer hunting rifle first. It's a 1990's weatherby vanguard 270 win. I used original JB weld, plumbers putty, kiwi shoe polish.

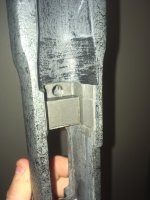
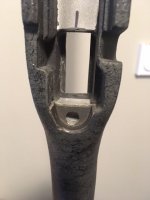
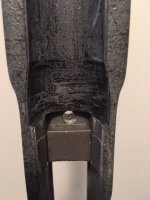
It turned out great except but I'm not happy with a slight crack near the screw hole at the bottom of the recoil lug so I'm going to dremel out all the bedding and do it again.

This rifle is a synthetic stock with no aluminum bedding. I think my problem was me putting to much putty in the action screw hole so when I ran the screw up the hole to hold it in place till I could tape the action down with electric tape I pushed putty between the recoil lug and stock. I also tightened it down to much......sorry for rambling I'll get to my question.

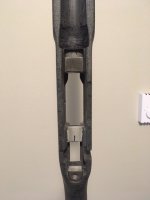
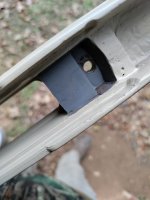
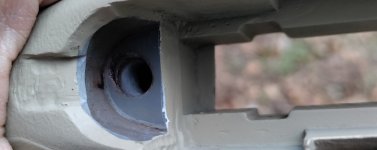
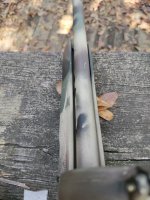
How are y'all getting this plumbers putty out of all the small holes and threads... This stuff everywhere hahaha. I tried goof off, alcohol and acetone. All those did was make a bigger mess. I'm not worried about messing up my paint it's a hunting rifle I beat around all the time haha
 
Qtip and toothpick. I wouldn’t use plumbers putty though. That stuff doesn’t stay where you put it on a good day. I use kiwi neutral shoe polish.
Just a Qtip and a toothpick? I've noticed it left a greasy residue where I put it but that could have been where I had got alittle acetone on it. I might just try paint stripper on the metal but I'm not sure what kind of solvent I could use on the plastic stock.
 
To keep bedding out of places I don't want it in I use Crayola modeling clay. It works great and stays put. I also use kiwi neutral show polish as a release agent. Use fishing line or floss to scrape/cut the clay flush to the action.

JB weld worked ok for me, but the mix had to be perfect otherwise it was either too hard or too soft. I have moved on to Accraglas. The preparation is everything, spend the time to make sure you did everything and have a plan.
 
Just a Qtip and a toothpick? I've noticed it left a greasy residue where I put it but that could have been where I had got alittle acetone on it. I might just try paint stripper on the metal but I'm not sure what kind of solvent I could use on the plastic stock.
Yep, that’s all I use. But if it’s got a greasy residue I’d use a paper towel and wipe it clean. Not sure where/how you are getting grease though…
 
Paint thinner on a q-tip to get the putty off, and I haven’t had any real issues with it. I think I’m a bit confused by your process, though, and I fully understand that’s not what you’re asking, but: why are you putting putty in the action screw hole (I assume in the stock, you mean) if you’re gonna put a screw through it?

For my front action screw hole in the stock for my Howa, same setup with the front action screw in the recoil lug (which I hate), I took a long screw with the same thread patterns as the action screw, cut the head off, and wrapped electrical tape around the screw to act as a spacer in that front screw hole, to keep the front screw centered in that hole. You want basically a snug fit but not a press fit. I then gave both the chopped screw and the inside of the stock screw hole a liberal dose of kiwi. After putting the kiwi on the action as well and buffing it with a paper towel to remove all excess, I hand-threaded the chopped screw into the action, glooped the stock, and aligned the fake action screw into the front hole then pressed it in. I also use electrical tape on the barrel to center it in the channel and ensure a free-float, plus that lifts the recoil lug enough to ensure there’s room for an epoxy layer beneath it, which is what I want. All bearing surfaces should be a least 1/16” of epoxy, is my goal. For the rear action screw I use a kiwi’d countersunk screw and gently torque it, just barely more than finger-tight; the cone of the screw head centers that screw in the stock hole. The rear hole also gets the kiwi.

Fundamentally, you’re gonna have overspill of something into every nook and cranny unless that nook/cranny is full of putty or taped off; anywhere you get overspill, you want it to be epoxy, which you then trim back after it sets (preferably before it sets like a rock). In the case of the action screw holes in the stock, you can’t putty those off, which means you need epoxy to get in there to make sure the surface right around them is full-contact. The kiwi inside the hole lets the overspill break free fairly easily once you pop the action out.

Feel free to shoot me a PM if you wanna chat about how I did the Howa.
 
  • Like
Reactions: zxGrizz
To keep bedding out of places I don't want it in I use Crayola modeling clay. It works great and stays put. I also use kiwi neutral show polish as a release agent. Use fishing line or floss to scrape/cut the clay flush to the action.

JB weld worked ok for me, but the mix had to be perfect otherwise it was either too hard or too soft. I have moved on to Accraglas. The preparation is everything, spend the time to make sure you did everything and have a plan.
Kiwi shoe polish was great. I guess I messed up using plumbers putty. I only used the jb weld because it was easy to get, I actually bought way more than I needed so I filled the front end of my stock with about a inch and a half of it to stiffen it up and I still have about 6 more packs of it hahaha. Oh well it's good stuff. I use it all the time.

I was very careful about my 1:1 ratio and I'm very picky about using "The Best" of the job. I'm 100% fine with in weld bedding on my deer rifle. It's sold all over in nearly every store. i compared the stats to others like devcon and think it'll do just fine.

Honestly I think the rifle will be just fine with the bedding job but like I was saying before I'm real picky about things. It's just 2 small chips/cracks where the screw come up to the recoil lug and I know I can do better 😂.
 
To keep bedding out of places I don't want it in I use Crayola modeling clay. It works great and stays put. I also use kiwi neutral show polish as a release agent. Use fishing line or floss to scrape/cut the clay flush to the action.

JB weld worked ok for me, but the mix had to be perfect otherwise it was either too hard or too soft. I have moved on to Accraglas. The preparation is everything, spend the time to make sure you did everything and have a plan.
Oh and I 100% agree the preparation is important. I had everything planned out(I thought) and was nervous to begin. I had to force my self to just go for it. That's when I started to realize the things I never seen coming 😂. So I learn some valuable lessons for sure.
 
Paint thinner on a q-tip to get the putty off, and I haven’t had any real issues with it. I think I’m a bit confused by your process, though, and I fully understand that’s not what you’re asking, but: why are you putting putty in the action screw hole (I assume in the stock, you mean) if you’re gonna put a screw through it?

For my front action screw hole in the stock for my Howa, same setup with the front action screw in the recoil lug (which I hate), I took a long screw with the same thread patterns as the action screw, cut the head off, and wrapped electrical tape around the screw to act as a spacer in that front screw hole, to keep the front screw centered in that hole. You want basically a snug fit but not a press fit. I then gave both the chopped screw and the inside of the stock screw hole a liberal dose of kiwi. After putting the kiwi on the action as well and buffing it with a paper towel to remove all excess, I hand-threaded the chopped screw into the action, glooped the stock, and aligned the fake action screw into the front hole then pressed it in. I also use electrical tape on the barrel to center it in the channel and ensure a free-float, plus that lifts the recoil lug enough to ensure there’s room for an epoxy layer beneath it, which is what I want. All bearing surfaces should be a least 1/16” of epoxy, is my goal. For the rear action screw I use a kiwi’d countersunk screw and gently torque it, just barely more than finger-tight; the cone of the screw head centers that screw in the stock hole. The rear hole also gets the kiwi.

Fundamentally, you’re gonna have overspill of something into every nook and cranny unless that nook/cranny is full of putty or taped off; anywhere you get overspill, you want it to be epoxy, which you then trim back after it sets (preferably before it sets like a rock). In the case of the action screw holes in the stock, you can’t putty those off, which means you need epoxy to get in there to make sure the surface right around them is full-contact. The kiwi inside the hole lets the overspill break free fairly easily once you pop the action out.

Feel free to shoot me a PM if you wanna chat about how I did the Howa.
I definitely do. There is little info I found on this action. Actually the reason I ended up over torquing the front action screw is because of the strange shape of the lug....
I wanted to have bedding infront of it but yet nothing touching the barrel so I build a damn with putty and put thin layer of putty under the barrel to box it in. I marked off where the stock touched and thought it was flawless. As I put the action in the stock (post in weld) the putty was holding the barrel up... I should of just stopped but that's actually what I think is the reason the putty got between the bedding and stock when I pushed the screw through the putty.

The reason I had put putty in the screw hole was for when I was applying it it would run down the hole...I know rookie mistake.

I like the tape idea I was actually going to run drinking straws around the screws. That a good idea with the screws too. So you was able to push the screws down away from the bedding instead of up?
 
Paint thinner on a q-tip to get the putty off, and I haven’t had any real issues with it. I think I’m a bit confused by your process, though, and I fully understand that’s not what you’re asking, but: why are you putting putty in the action screw hole (I assume in the stock, you mean) if you’re gonna put a screw through it?

For my front action screw hole in the stock for my Howa, same setup with the front action screw in the recoil lug (which I hate), I took a long screw with the same thread patterns as the action screw, cut the head off, and wrapped electrical tape around the screw to act as a spacer in that front screw hole, to keep the front screw centered in that hole. You want basically a snug fit but not a press fit. I then gave both the chopped screw and the inside of the stock screw hole a liberal dose of kiwi. After putting the kiwi on the action as well and buffing it with a paper towel to remove all excess, I hand-threaded the chopped screw into the action, glooped the stock, and aligned the fake action screw into the front hole then pressed it in. I also use electrical tape on the barrel to center it in the channel and ensure a free-float, plus that lifts the recoil lug enough to ensure there’s room for an epoxy layer beneath it, which is what I want. All bearing surfaces should be a least 1/16” of epoxy, is my goal. For the rear action screw I use a kiwi’d countersunk screw and gently torque it, just barely more than finger-tight; the cone of the screw head centers that screw in the stock hole. The rear hole also gets the kiwi.

Fundamentally, you’re gonna have overspill of something into every nook and cranny unless that nook/cranny is full of putty or taped off; anywhere you get overspill, you want it to be epoxy, which you then trim back after it sets (preferably before it sets like a rock). In the case of the action screw holes in the stock, you can’t putty those off, which means you need epoxy to get in there to make sure the surface right around them is full-contact. The kiwi inside the hole lets the overspill break free fairly easily once you pop the action out.

Feel free to shoot me a PM if you wanna chat about how I did the Howa.
Only reason I didn't do the tape around the barrel trick is a few years ago I filed off atleast 1/4 inch off the hole around the end of the stock and 1/8 of the inside of the stock around the sides of the barrel due to the flimsy plastic it's made off and I'd did it unevenly to be honest. It works though lol. I wish I would have knew about bedding back then. I think I'll still wrap the barrel enough to give me atleast 1/16 inch of bedding under the lug.


Did you do any bedding in front of your recoil lug or any around the rear tang? I was worrying about bedding around my rear tang and it becoming a second recoil lug..
 
I definitely do. There is little info I found on this action. Actually the reason I ended up over torquing the front action screw is because of the strange shape of the lug....
I wanted to have bedding infront of it but yet nothing touching the barrel so I build a damn with putty and put thin layer of putty under the barrel to box it in. I marked off where the stock touched and thought it was flawless. As I put the action in the stock (post in weld) the putty was holding the barrel up... I should of just stopped but that's actually what I think is the reason the putty got between the bedding and stock when I pushed the screw through the putty.

The reason I had put putty in the screw hole was for when I was applying it it would run down the hole...I know rookie mistake.

I like the tape idea I was actually going to run drinking straws around the screws. That a good idea with the screws too. So you was able to push the screws down away from the bedding instead of up?

I just let the epoxy flow forward a bit under the barrel then removed it after the fact; I had to, in fact, since I'm running a barrel nut system. If you time it right, you can get at the epoxy before it's fully hardened.

Only reason I didn't do the tape around the barrel trick is a few years ago I filed off atleast 1/4 inch off the hole around the end of the stock and 1/8 of the inside of the stock around the sides of the barrel due to the flimsy plastic it's made off and I'd did it unevenly to be honest. It works though lol. I wish I would have knew about bedding back then. I think I'll still wrap the barrel enough to give me atleast 1/16 inch of bedding under the lug.


Did you do any bedding in front of your recoil lug or any around the rear tang? I was worrying about bedding around my rear tang and it becoming a second recoil lug..

Yeah, there's epoxy surrounding the recoil lug. I put two layers of masking tape on the front face and left/right sides of the lug (with shoe polish on them of course), but left the bottom and rear faces naked so they'd make flush contact when torqued into the stock. That's a fair concern with the uneven barrel channel, but if there's a single even spot in there somewhere you can locate the barrel tape wrap there. It doesn't have to be perfect, it just has to free float honestly, since the bedding compound and the DBM are the only contact points; as long as nothing is too crazy out of whack, the bedding compound will compensate for any minor misalignment of the screw-to-DBM relationship.

Here are some old pics I took, you can see where I had to open up the stock where the barrel nut is. There was a decent amount of epoxy there after the bedding set, but some slow and careful Dremel work took it out, and then I painted and sealed the whole barrel channel since it was a little rough after opening up. Shoot me a PM if you wanna chat via phone one evening this week.
 

Attachments

  • IMG_5839.JPG
    IMG_5839.JPG
    305 KB · Views: 112
  • IMG_5840.JPG
    IMG_5840.JPG
    506.9 KB · Views: 147
  • IMG_5841.JPG
    IMG_5841.JPG
    367.7 KB · Views: 115
  • IMG_6134.JPG
    IMG_6134.JPG
    28.7 KB · Views: 132
  • IMG_6135.JPG
    IMG_6135.JPG
    36.9 KB · Views: 115
  • IMG_6136.JPG
    IMG_6136.JPG
    47.5 KB · Views: 115
  • Like
Reactions: DIBBS and zxGrizz
I just let the epoxy flow forward a bit under the barrel then removed it after the fact; I had to, in fact, since I'm running a barrel nut system. If you time it right, you can get at the epoxy before it's fully hardened.


Yeah, there's epoxy surrounding the recoil lug. I put two layers of masking tape on the front face and left/right sides of the lug (with shoe polish on them of course), but left the bottom and rear faces naked so they'd make flush contact when torqued into the stock. That's a fair concern with the uneven barrel channel, but if there's a single even spot in there somewhere you can locate the barrel tape wrap there. It doesn't have to be perfect, it just has to free float honestly, since the bedding compound and the DBM are the only contact points; as long as nothing is too crazy out of whack, the bedding compound will compensate for any minor misalignment of the screw-to-DBM relationship.

Here are some old pics I took, you can see where I had to open up the stock where the barrel nut is. There was a decent amount of epoxy there after the bedding set, but some slow and careful Dremel work took it out, and then I painted and sealed the whole barrel channel since it was a little rough after opening up. Shoot me a PM if you wanna chat via phone one evening this week.
Nice work. I'll shoot you a pm tonight when I finish working.
 
I grinded out the first bedding job and started over this time I taped the barrel. When I applied the jb weld and put the action and stock together, then loosely tightened the action screws I noticed I didn't put enough jb weld in the rear tang to fill it. I pulled them back apart and added more to the rear and recoil lug and put it back together. I thought for sure I'd messed it up but was very pleased with the results the next day when I checked it.

I seen the in weld made the action scree hole tight and figured I would open them up so it wouldn't rub so hard on the screw and carefully drilled the holes. When I pulled the drill bit back out I grazed the floor of the recoil lug making a small mark in the bedding. I wanted to grind it out and start over but I also wanted to hunt the next day hahaha. Anyways here it is.
 
Not pretty but it works just like the rifle.
 

Attachments

  • IMG_20211030_141312.jpg
    IMG_20211030_141312.jpg
    232.1 KB · Views: 89
  • IMG_20211030_141304__01.jpg
    IMG_20211030_141304__01.jpg
    124.8 KB · Views: 87
When I went to put the bolt in I noticed the front was now higher than the rear causing the rear to sit below the stock about a 1/8 of a inch and even before the bedding the bolt would scrape the check rest when removing. I decided I didn't want to spend another lonely day in my shop waiting on epoxy to dry, daydreaming about hunting and did what any man with buck fever would do.......
 

Attachments

  • IMG_20211101_130132.jpg
    IMG_20211101_130132.jpg
    537.3 KB · Views: 84
  • IMG_20211101_130109.jpg
    IMG_20211101_130109.jpg
    543 KB · Views: 77
  • IMG_20211101_130149.jpg
    IMG_20211101_130149.jpg
    512.6 KB · Views: 73
Quickly hit it with a rattle can and was already sighting it in before the paint was dry. It's shoots alot tighter now that the barrel is floated fully and my first 3 shots grouped looser than I thought so I shot 3 more and they seemed to go further and further high right as I shot. I hung a new target and let my barrel cool down then shoot 3 times giving it 10-15 mins in between the shots and shot the tightest group I've ever shot with this rifle but I was limited to 70yards. I'm still extremely happy with it. I just wish I knew why after only 2 rounds the barrels hot enough to effect the shot so much.....
 

Attachments

  • IMG_20211101_130214.jpg
    IMG_20211101_130214.jpg
    390.4 KB · Views: 66
A couple things I've learned from bedding my own rifles:
1. I will not bed my own rifles anymore; I'll run an internal chassis or pay for someone else to do it with preference being the former.
2. If it's a hole or a trap point it gets either plasticine or tape to keep bedding compound out.
3. I plug the bottom of the stock and use headless screws/bolts in the action to locate it.
4. Anything I don't want bedding to stick to gets release agent. Plasticine, tape, metal, doesn't matter.
5. I use surgical tubing, front and rear, tied off to maintain gentle, constant pressure on the barreled action/stock while the bedding cures.
6. I check, and mark, the height of the action and barrel before I start removing material.
7. I leave a height reference at the rear/tang to locate action (i.e. surface to surface contact).
8. I use a plasticine dam, test fit, to set the height of the barrel in accordance with my height references.
9. When I set the barreled action into the mortise, I verify the height reference is in the correct place.

Bottom line, reference point one, this is a multi-day, multi-hour process that I just don't want any part of at this point. I ground out a bad bedding job from a smith recently... was mid way through the prep work to redo it myself and thought "You know what? Fuck this." I called Manners and sent them the stock. Sucks not having the stock for something like two plus months now... but, thems the breaks.

I've never had a barrel walk as much as you're seeing... and that includes a Tikka T3x with one of my incredibly ugly bedding jobs in the factory plastic stock (which didn't walk at all, but did open up some). I wonder if there isn't some asymmetry or pressure somewhere in the bedding.
 
  • Like
Reactions: zxGrizz
. I check, and mark, the height of the action and barrel before I start removing material.
7. I leave a height reference at the rear/tang to locate action (i.e. surface to surface contact).
8. I use a plasticine dam, test fit, to set the height of the barrel in accordance with my height references
I didn't think to do anything of those and I also don't think I'll bed a more expensive rifle as well. I don't feel confident enough. This rifle was shooting about 3 inch groups at 100 yards and the stock rubbed all over the barrel. This was also before I figured out letting the barrel cool makes a huge difference with this gun. So I figured screw it, it's not like i can make it worse. I also was ready to buy a bell and carlson if I ruined this stock. It was good practice though.

I've never had a barrel walk as much as you're seeing...
The picture of the target is not of the barrel walking, it's just off me sighting it in and how good it shoots now it's free floated. I wasn't sure if I worded it right in the previous post.

But ya basically with my rifle zeroed like it is now my first shot will be spot on then the next will usually be under a inch high right then I start getting some flyers with most of the bullets grouping 2 inch's high right as the barrel gets hotter and hotter... Fine for hunting I guess till I can get me something better. Just not sure what I want yet.

Thanks for sharing lessons you learned all very good tips.
 
I didn't think to do anything of those and I also don't think I'll bed a more expensive rifle as well. I don't feel confident enough. This rifle was shooting about 3 inch groups at 100 yards and the stock rubbed all over the barrel. This was also before I figured out letting the barrel cool makes a huge difference with this gun. So I figured screw it, it's not like i can make it worse. I also was ready to buy a bell and carlson if I ruined this stock. It was good practice though.


The picture of the target is not of the barrel walking, it's just off me sighting it in and how good it shoots now it's free floated. I wasn't sure if I worded it right in the previous post.

But ya basically with my rifle zeroed like it is now my first shot will be spot on then the next will usually be under a inch high right then I start getting some flyers with most of the bullets grouping 2 inch's high right as the barrel gets hotter and hotter... Fine for hunting I guess till I can get me something better. Just not sure what I want yet.

Thanks for sharing lessons you learned all very good tips.
That’s what he means by a walking barrel, a POI shift as it heats up.
 
  • Like
Reactions: zxGrizz
That’s what he means by a walking barrel, a POI shift as it heats up.
Ya I know just wanted to be clear that the 3 shot group and 4 shot group in the picture I posted of the target was not a representation of my walking barrel because ya that would be a pretty bad walk I'd be sending it to weatherby 😂. I might have to anyways I just seen the had a recall on the action I believe.
 
I've never had a barrel walk as much as you're seeing... and that includes a Tikka T3x with one of my incredibly ugly bedding jobs in the factory plastic stock (which didn't walk at all, but did open up some). I wonder if there isn't some asymmetry or pressure somewhere in the bedding.
Cleaned up the barrel chamber the best I could (which was very little) I left a round in the chamber for a year and remember when I pulled it out it had a small green residue ring around where the bullet contacts the neck and had some slight damage to the crown from resting the the gun barrel down on my concrete shop floor..😅. Looking closely I could see tiny burrs so as lightly is a could I removed and smooth it with 0000 steel wool.

Not sure what was truly causing the barrel walk but it's shooting better now.
 
  • Like
Reactions: DJL2
I shot 6 rounds and the wife shot 2 into the same target with maybe a min. between shots same distance,ammo and all.

Wife hit in the middle of the group on the far right and her second shot was the low one below the bullseye. The shot high left nearly cropped out of the picture hidden under that green piece of tape was........all my wife. No way I'd pull a shot that far. She needs to practice more.

Edit: it was me..😂
 

Attachments

  • IMG_20211110_131158__01.jpg
    IMG_20211110_131158__01.jpg
    821 KB · Views: 36
Last edited:
  • Haha
  • Like
Reactions: DJL2 and DIBBS