• Watch Out for Scammers!

    We've now added a color code for all accounts. Orange accounts are new members, Blue are full members, and Green are Supporters. If you get a message about a sale from an orange account, make sure you pay attention before sending any money!

Giraud annealing machine observations

scudzuki

Gunny Sergeant
Full Member
Minuteman
Jul 1, 2012
2,101
154
58
Philadelphia suburbs
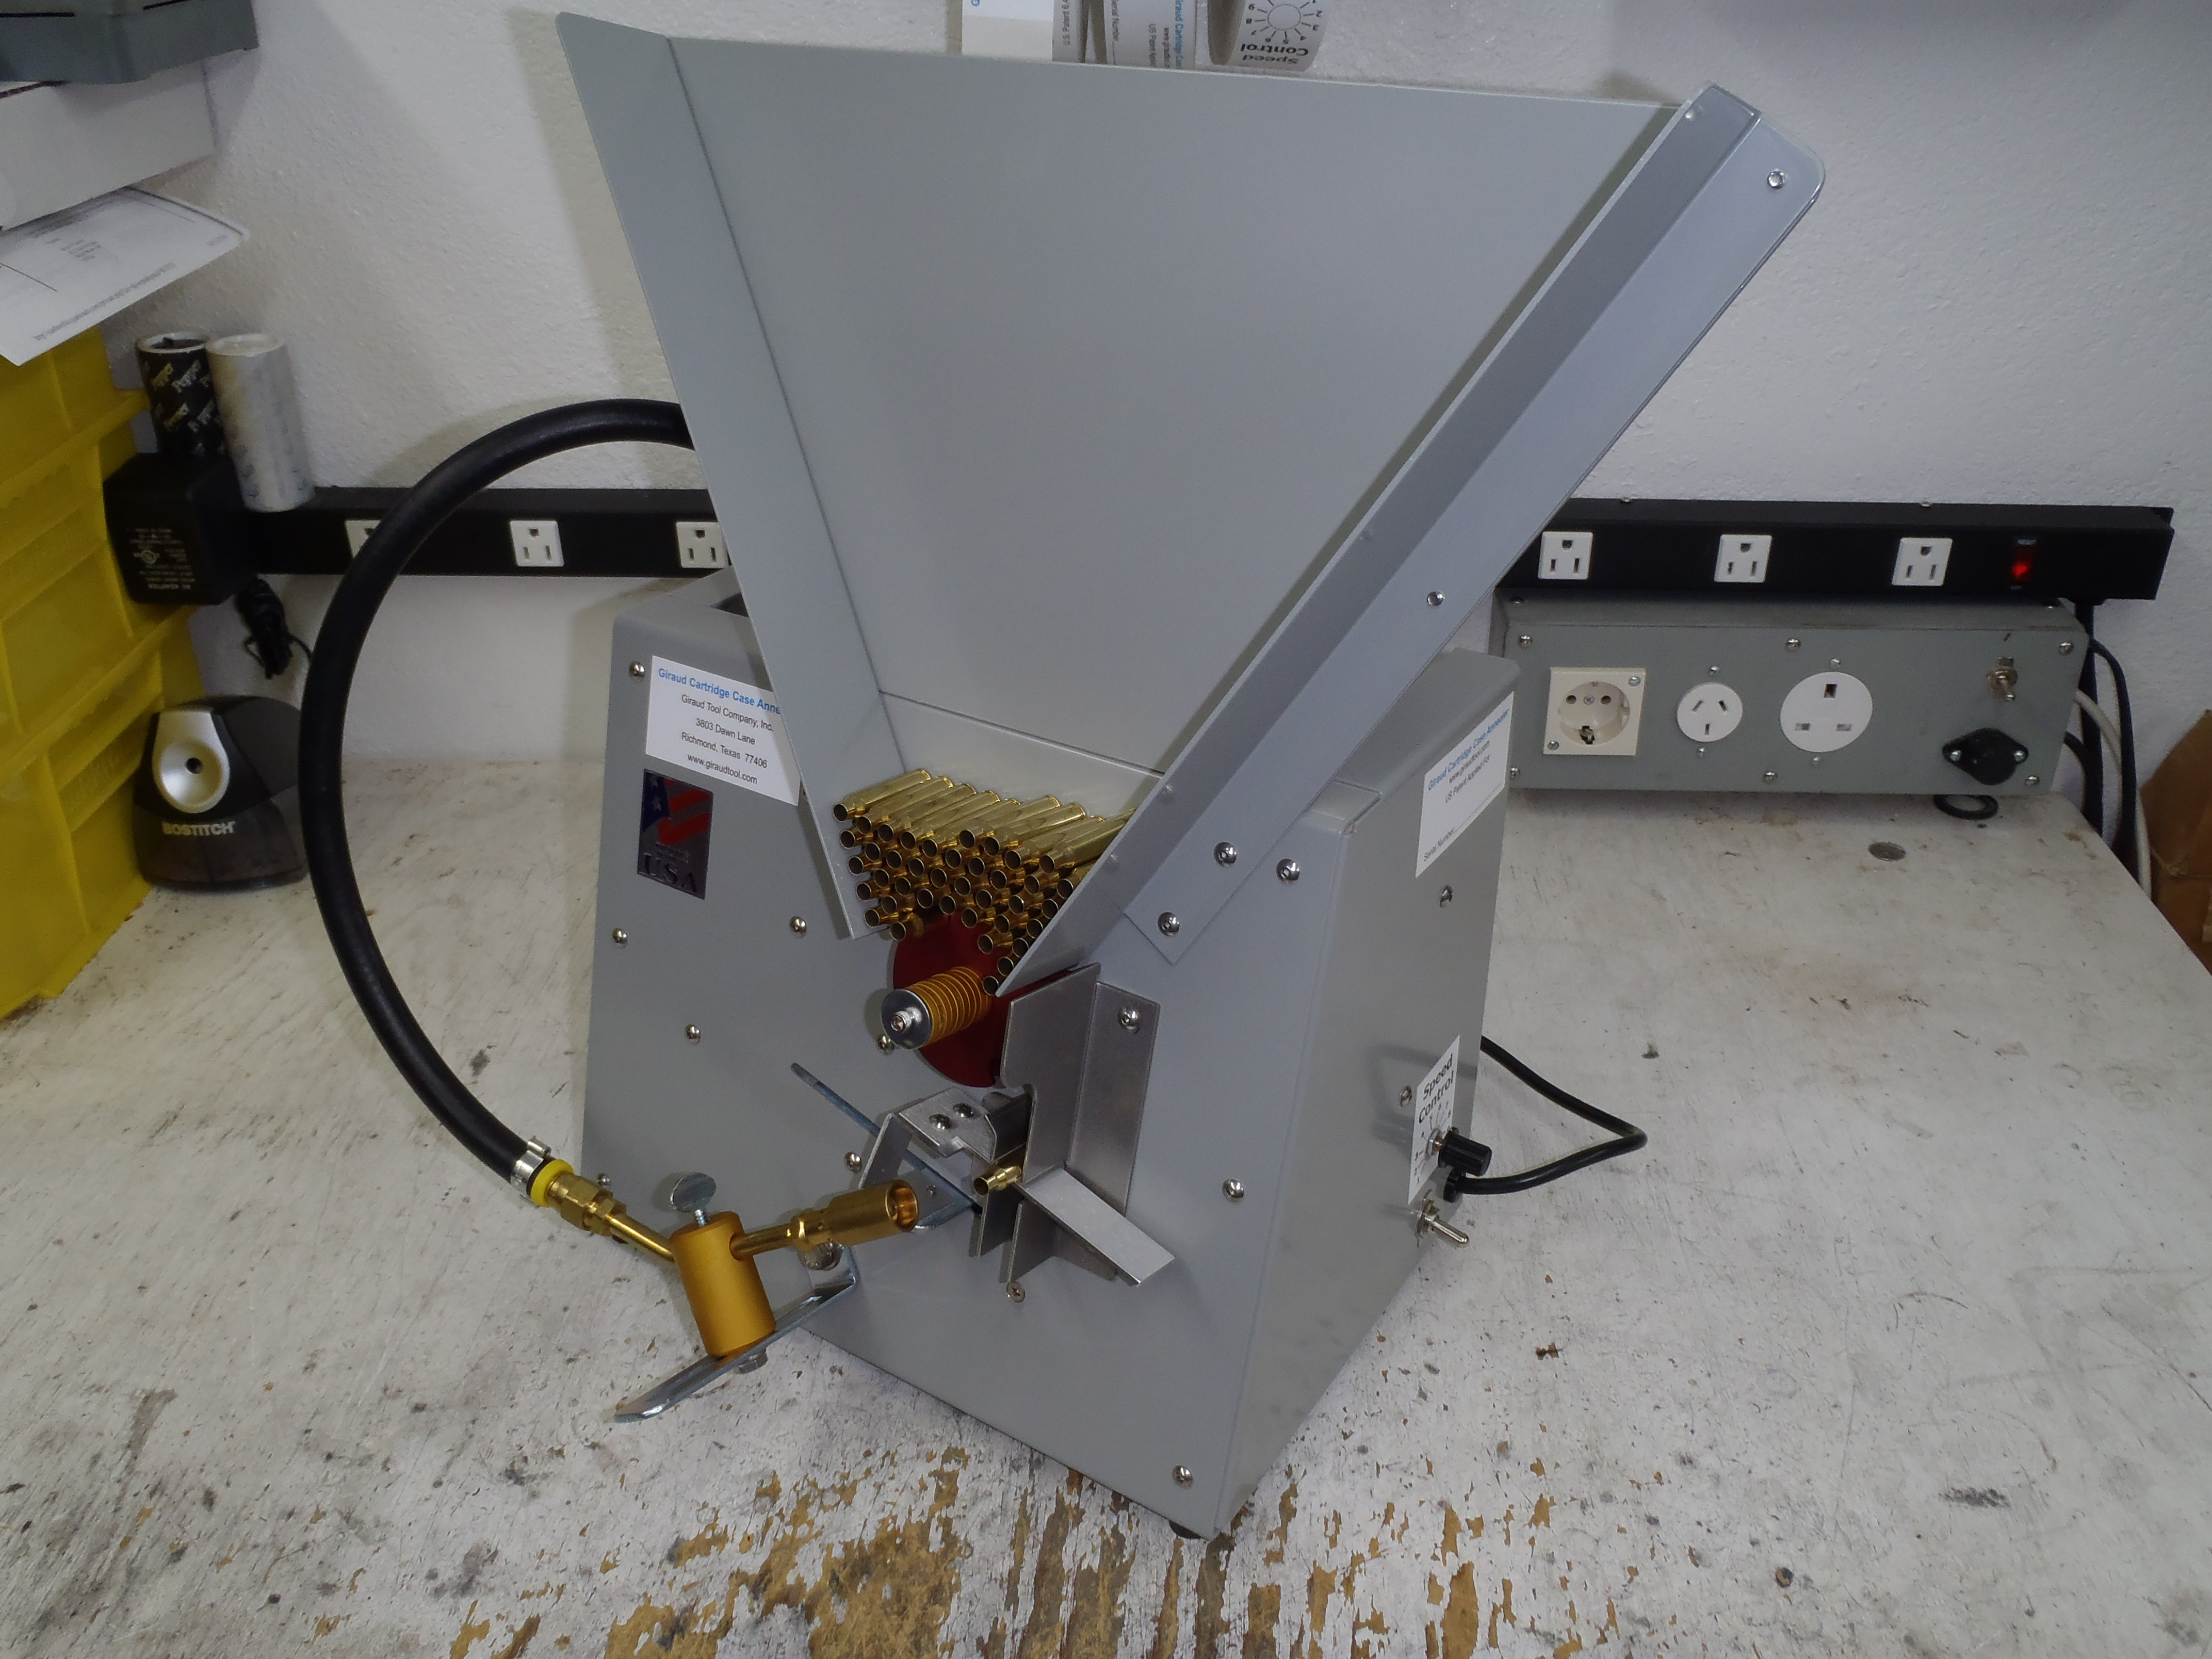
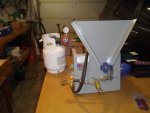
I recently received my new annealer from Giraud.
http://www.giraudtool.com/annealer1.htm
I ordered it a few months back, and in the meantime I had looked up an old friend who coincidentally is now into shooting (BR) and has an annealer, once of the turntable style units.
I considered cancelling my order but I like to have my own equipment, so I let the order stand.
Before I ordered it, I did some (apparently flawed) research and came to the conclusion that the Giraud was the best deal out there on an automatic annealer.
After it arrived, I did some more reading and found turntable units for even less than the Giraud, so I tried to rationalize my choice (ever done this?). I didn't come up with anything, not uncommon :)

I set it up according to the Giraud's guidelines and immediately found a problem during the assembly.
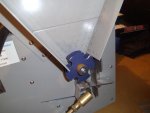
Giraud suggests the tip of the torch be positioned 3/4" from the neck of .308 and .223 cases, which was impossible with the L bracket that holds the torch holder installed as pictured, so I installed it upside down, and was then able to get the torch within 3/4" of the case.

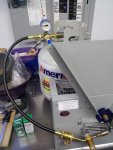
I then set the flame and the cycle time as directed and it seemed as though the necks on the .308 cases I was running were not getting hot enough.
Of course, without Tempilaq or an infrared thermometer with sufficient range, it is impossible to know for sure, so I packed it in for the night.
Giraud neither includes nor offers the 750 degree Tempilaq required to properly setup the machine, maybe for liability reasons, but it sure would have been handy right about then.

I ordered some 750 degree Tempilaq on Friday and it arrived last night.
After applying the heat sensing liquid to the inside of some case necks, I set the flame and cycle time as directed and ran a case.
As I suspected, the heat was too low or the cycle time too short to reach the required temperature.
I had talked to my friend with the turntable style machine with 2 torches and he reported his machine required 4 seconds per case, less than half the cycle time of a Giraud machine set to heat a case for 8 seconds: there is a few second delay between cases, increasing the processing time per case to over 10 seconds.

I increased the flame slightly, which is pretty difficult to do with the tiny opening required for such a small flame, and after a few tries I got the case necks to a temperature that changed the color of the Tempilaq right before dropping the case.

I then piled in 200 cases and realized the biggest benefit of the Giraud over the turntable machines. I sat next to the machine and reloaded while it ran automatically, so even though the cycle time is much longer than a dual burner turntable, I was free to do whatever I wanted (in the same room as the machine, never leaving it unattended) while it churned out the cases.

Halfway through the batch I prepped a case with Tempilaq and slipped it into the process, and it became apparent that something (the flame) had changed as the cases were getting at least a second more heat than they needed even though the speed had not changed. It's possible that the nozzle heating up adds to the heat conducted to the cases after running for a while. A slight decrease in flame (again, not easy to do) seemed to fix it for the rest of the batch.

While the batch ran I loaded up a few hundred rounds of .223 on a progressive, so it was fairly productive time. Again, I see this as a sizeable advantage the Giraud has over its competition. I'm pretty happy with the operation of the machine so far, and I hope to get many years (decades) of use out of it.

During my last bout of research I stumbled across this unit, which actually looks pretty decent for the price. I mention it in case anyone is interested in getting into low volume annealing on a budget. Hell, you could even make your own.
Home Page

Joe
 
Last edited:
Nice write up.
I just got in 2K 556 cases and the Dewalt / Craftsman socket method might not be the best thing anymore.
Doing 70 or 80 308 is one thing but 2000 is another!
I gotta do something ... was leaning towards the turntable ones because of the wait.
 
The automatic feature of the Giraud is what makes it look fantastic. If I bought one Id like it to anneal 30-06, .308 and .223. How much dicking around would there be when switching calibers. Can you witness mark something in order to get back to a previous setting for a caliber change?
 
As with anything in reloading, there's no free lunch. You'll need to tinker with flame and speed each time you fire it up, something always gets bumped or moved. I complained about mine the first few times I used it, my flame was too hot, I regulated mine for use with a bigger tank.
PM, there's a certain amount of change over between calibers, sliding plate and case wheel. Different brass has varying thickness, so time in the flame must be adjusted.
Really, just give it a chance, learn how to run it, it'll come to you, soon you'll be doing by eye and wont look back, and your bottle of Tempilaq will be gone and you wont replace it.
It does pay to have some waste brass on hand to set the machine. Though a thread on 6mm br tried to prove me wrong, overheated heated brass turns black, you may not want to use these cases.
Good luck!
 
  • Like
Reactions: BoomerC
The automatic feature of the Giraud is what makes it look fantastic. If I bought one Id like it to anneal 30-06, .308 and .223. How much dicking around would there be when switching calibers. Can you witness mark something in order to get back to a previous setting for a caliber change?

All 3 cases use the same plate, the .308 and 30-06 use the same wheel, so you will need a different wheel for .223.

Like Milo wrote, you will need to set it up every time, but you can get the cycle time set pretty easily and then it's a matter of fine tuning the flame. Being as a 2 ounce bottle of Tempilaq will paint thousands of rounds and each setup only uses a few cases, if and when mine runs out, I'll still replace it.

Joe
 
I fixed the flame temp consistency issue on my Giraud on long runs by adding a regulator to the propane line. The flame setting no longer "drifts" over the course of the run as it used to do very obviously with the as-shipped non-regulated setup. The pressure gauge on the regulator also makes it very easy to get extremely close to the previous setting the last time you used it and dialed it in.

I've found you do need to give it some warm-up time (motor and flame) of about 10 minutes though before doing final tweaking of flame and cycle time, during that warm up time the flame will change in intensity a bit as the nozzle heats up and the motor & gearbox will also warm up and change speed slightly.

While you can crank the flame and speed way up on the Giraud to increase the cycle time consistency does suffer. A slightly lower flame setting with a slower/longer motor speed will control the final temp of the necks much better and gives you a bigger margin of error.

It is slower than some of the turntable twin-torch machines but being able to load it up and then do other things while it's running is a big benefit... of course, I've seen where guys have rigged Dillon casefeeders to their Bench Source machines.

For reference, here's the regulator I used.

http://www.waresdirect.com/products...kURL=froogle&gclid=CICw2sjU4LoCFe1aMgodSTwA7g

Fits great, it's relatively small and fits perfectly right above the recommended camping-sized propane bottle. Easy to do very fine adjustments.
 
Last edited:
I fixed the flame temp consistency issue on my Giraud on long runs by adding a regulator to the propane line. The flame setting no longer "drifts" over the course of the run as it used to do very obviously with the as-shipped non-regulated setup. The pressure gauge on the regulator also makes it very easy to get extremely close to the previous setting the last time you used it and dialed it in.

I've found you do need to give it some warm-up time (motor and flame) of about 10 minutes though before doing final tweaking of flame and cycle time, during that warm up time the flame will change in intensity a bit as the nozzle heats up and the motor & gearbox will also warm up and change speed slightly.

While you can crank the flame and speed way up on the Giraud to increase the cycle time consistency does suffer. A slightly lower flame setting with a slower/longer motor speed will control the final temp of the necks much better and gives you a bigger margin of error.

It is slower than some of the turntable twin-torch machines but being able to load it up and then do other things while it's running is a big benefit... of course, I've seen where guys have rigged Dillon casefeeders to their Bench Source machines.

For reference, here's the regulator I used.

Goss REGULATOR LP CGA-510 W/GAUGE B HOSE - 328-EP-70G - 328-EP-70G at Wares Direct

Fits great, it's relatively small and fits perfectly right above the recommended camping-sized propane bottle. Easy to do very fine adjustments.

That's a way nicer regulator than the red pile I bought, gonna get one! I do think if a guy bought a bracket and extra torch, one could turn this into one fast machine.
 
Last edited:
I fixed the flame temp consistency issue on my Giraud on long runs by adding a regulator to the propane line. The flame setting no longer "drifts" over the course of the run as it used to do very obviously with the as-shipped non-regulated setup. The pressure gauge on the regulator also makes it very easy to get extremely close to the previous setting the last time you used it and dialed it in.

Ive got one on order that should be ready in a few weeks. Can you please post a picture of what you did so I have an idea of how to set it up. Without seeing the machine im not seeing what you did but it sounds like something that would be a good add on
 
also the link to the regulator you provided shows the out/regulated side to be the left handed tank side? I noticed it had what looked to be 1/4 npt where it attached to reg. , did you just swap em?
 
The inlet & outlet of the regular are 1/4 NPT so you can easily swap fittings. The inlet side has a fine mesh stainless screen to keep any debris out of the regulator.

I went straight up from the shutoff valve Giraud provided into the inlet of the regulator and then used a 90 degree fitting out of the top of the regulator that connects to the torch hose. I had to use hose barb fittings, cut the original hose, and use new clamps to attach it as the top of the tank connector & control valve that Giraud supplies uses some oddball thread pitch, it's not standard NPT and the BSPP fittings I tried didn't fit properly either. I probably should have made a custom close nipple adapter for between the valve and the inlet of the regulator on the lathe out of some brass but the hose splicing has worked just fine for over a year now.

I strongly suggest mixing up some soapy water and testing your new connections for leaks. Even with good Rectorseal pipe sealing compound I had a hard time eliminating little propane leaks from both the inlet & outlet fittings on the regulator.

For reference, I find a propane pressure of about 18psi (after 10 minutes of warm up) is about right for my torch head. I've ran up to 25psi before but noticed some inconsistency in the brass afterwards as small variations in motor speed over the run make a significant difference in final brass temp when running the torch that hot.

Another mod I'm considering is making a larger diameter knob for the motor speed control or an extended pointer for the provided knob. A knob of about 3" diameter combined with a pointer will make fine adjustments (and repeating those adjustments) more precise than the original small knob and should allow you do easily dial back to the same motor speed used for your previous runs. A larger diameter motor speed knob combined with the propane regulator gauge might even be good enough when it comes to process consistency run to run that you'll only have to use one case with Tempilaq to verify the settings are good to go for every run.

Better still would be a motor controller with constant RPM holding ability, I've given some thought to switching to a brushless motor and using a hobby speed controller with governor mode (constant RPM) to precisely hold the motor RPM regardless of how much brass is piled in the hopper. It would be a fairly simple task and not terribly expensive but in my experience the drifting unregulated flame is much more of a problem than the motor speed consistency over long runs. However, accurately controlling the motor speed should allow for a hotter flame / faster cycle time while still being very repeatable.

It's still a damn good machine but a couple of tweaks can make it even better.
 
Last edited:
The Giraud is a great machine, I run anything from .223, 6PDK, and .308 on it. Set up time between calibers isn't too long. Just takes a little experience and magic touch to things. Favorite part in my opinion is the ability to load the hopper and walk away. Keeping in mind to check on it every now and then so you don't mess anything up or burn down your garage. One improvement that I have found to work greatly is changing the hose adapter to fit a 20lbs propane tank, instead of the small 1 pounders. They run out too quickly and the burn rate is inconsistent. We're still working off the first 20lbs tank we started on and have annealed thousands of rounds from it.
-Patrick
 
a picture of the things you guys are talking about would be fantastichttp://www.snipershide.com/shooting/images/icons/icon12.png
 
They are called Throwaway Cylinder Thread Fittings and the threading is 1"-20.
They are available in both male and female with a number of different combinations including 1/4" npt.

Mr. Heater P/N: F273754
1/4" Male Pipe Thread x 1"-20 Female Throwaway Cylinder Thread Fitting.
A71E306C-1BB8-46E1-ABA1-0FC5A51DF007-26606-00000DACB4C51B84_zpsab3f5083.jpg


Mr. Heater P/N: F276140
1/4" Female Pipe Thread x 1"-20 Male Throwaway Cylinder Thread Fitting.
C4708D06-2CA7-4983-887E-D658BB6F020B-26606-00000DACBC0B1569_zps78c1036f.jpg
 
Last edited:
I've been going to get a Giraud annealer for a while now but just haven't called them. I already have two of his trimmers and compared to every other trimmer I've used, I think they're the best.

The ability to load the machine rather than having to hand feed each case seperately is the big draw for me also.

When I emailed Doug about the annealer and asked about using a 21# tank. He told me that the small tanks would last forever and unless I was going to anneal several 100, 000 cases, it would be a waste of time.

I've used a lot of the small throw away tanks so I had my doubts about that being accurate.

I still need to get one as I reload for just about all rifle cases, ranging from .223 all the way through 50 BMG.
 
They are called Throwaway Cylinder Thread Fittings and the threading is 1"-20.
They are available in both male and female with a number of different combinations including 1/4" npt.

Mr. Heater P/N: F273754
1/4" Male Pipe Thread x 1"-20 Female Throwaway Cylinder Thread Fitting.


Mr. Heater P/N: F276140
1/4" Female Pipe Thread x 1"-20 Male Throwaway Cylinder Thread Fitting.

The threads that gave me issue wasn't to the tank itself-- I could have purchased one of the throwaway cylinder adapters you referenced and attached the regulator directly to the propane cylinder but then you no longer have a shutoff valve (unless you add one in between the throwaway adapter and the regulator.)

Giraud includes a valve that attaches to the tank and it's a nice piece. That combined cylinder adapter & shutoff valve has a hose barb fitting screwed into it and a hose attaches to that and then runs to the torch. I wanted to attach the regulator directly to the original adapter & shutoff valve by replacing that hose barb with a close nipple of some sort but the thread pitch of the original hose barb is some oddball size-- neither NPT or BSPP fit properly nor did any of the flare fittings I tried.

What I'll probably do is get a female throwaway to male 1/4 NPT adapter to connect to the tank and then attach a 1/4 NPT male to 1/4 NPT female propane shutoff valve between the throwaway fitting and the regulator inlet. This way the weight of the regulator is supported by brass fittings rather than the way it is now which is supported by the short run of hose from the valve to the regulator inlet.
 
Last edited:
The threads that gave me issue wasn't to the tank itself-- I could have purchased one of the throwaway cylinder adapters you referenced and attached the regulator directly to the propane cylinder but then you no longer have a shutoff valve (unless you add one in between the throwaway adapter and the regulator.)

Giraud includes a valve that attaches to the tank and it's a nice piece. That combined cylinder adapter & shutoff valve has a hose barb fitting screwed into it and a hose attaches to that and then runs to the torch. I wanted to attach the regulator directly to the original adapter & shutoff valve by replacing that hose barb with a close nipple of some sort but the thread pitch of the original hose barb is some oddball size-- neither NPT or BSPP fit properly.

What I'll probably do is get a female throwaway to male 1/4 NPT adapter to connect to the tank and then attach a 1/4 NPT male to 1/4 NPT female propane shutoff valve between the throwaway fitting and the regulator inlet. This way the weight of the regulator is supported by brass fittings rather than the way it is now which is supported by the short run of hose from the valve to the regulator inlet.
Can you please provide a pic of the valve giraud supplied with your annealer.
Mine is a few weeks old and only came with the pre made hose and the shutoff valve on the torch head.

EDIT: He now supplies a different type of hose which is pre made which is why I posted the pic of the adapters.
 
Last edited:
Looks like he's changed the setup.

Here's what my annealer shipped with, I have a very early one (s/n 24):

http://www.pbase.com/texindian/image/139154064.jpg


Looks like this is how they're coming now so he can simply use a female throwaway to male throwaway hose extension:

http://txbrassworks.com/wp-content/uploads/2013/11/Giraud.jpg

Both the early and late setups appear to use the same torch & valve setup, the early ones use a custom hose extension between the torch wand and valve while the later ones keep the torch wand & valve together as one unit and simply use an standard extension hose with throwaway male to throwaway female ends.

FYI, the torch Giraud is using appears to be a Goss GP-9.

http://www.amazon.com/Goss-GP-9-Heavy-Torch-Propane/dp/B00D2ZW21A

From that picture of a newer production unit I see he's added directional arrows to the non-symmetric .223 case feed wheels.


I'm going to change my valve & regulator to this setup so the regulator is supported by brass fittings & the tank.

This connects directly to the tank: http://www.amazon.com/gp/product/B000BQM8IU/ref=oh_details_o00_s00_i00?ie=UTF8&psc=1

This shutoff valve will connect to the throwaway tank fitting and then thread directly into the regulator inlet:
http://www.amazon.com/gp/product/B00D86IEGA/ref=oh_details_o00_s00_i01?ie=UTF8&psc=1

Out of the regulator I'm keeping my existing setup which is a 1/4 NPT male to female 90 degree fitting with a 1/4 NPT hose barb, I simply cut the original hose and attached it to the barb with a standard LPG-service pinch clamp.
 
Last edited:
Mine is in the 600's and here is the setup.
807BCEDE-6922-4EEF-AC5C-4F4CF7DA5E7A-28485-00000DF14BDD7C62_zpsa8c37bbf.jpg


This is the pic on his home page.
It uses a 5/16" female flare fitting of the barbed type.

I will confirm the actual thread type when I go in to my supplier on Monday and post the answer.

Can you please post a pic of the valve he supplied or is it the same valve just located
on the cylinder?

P6120017.JPG
 
Last edited:
Kiba mentions the directional arrows, my 3 sets of wheels don't have them, and to keep cases from dropping down on their base and stalling before landing totally horizontal, I had to use a Dremel to relieve some material off the edges of the wheels. The magnum wheel, just had to do one edge, the 308 wheel, I think all of them.

Not some insurmountable issue, just I hear people talking load and go, well, with my unit, 30% of the cases would have been insufficiently annealed if I wasn't right there pulling them and re-doing.

You guys thinking of regulating your unit, and using a bigger tank, get the 60# regulator, the 40# I bought needs more, I'd say 45-50lbs.
With just minor tweaking, this unit will rock. I rotate a good number of brass through each gun, and only anneal every 3rd-4th time, so I don't break this unit out that often, but if I did it every firing, I'd buy the parts and double torch this puppy. My mag brass is in the flame for 11-13 seconds, 6.5x47 brass, 8-9 seconds, a far cry from that video that shows it spitting them out in five seconds.

If you look at the following picture you will see that there is a 2nd 1/4"x20 bolt higher up which can hold a 2nd torch.

Giraud.jpg


I will eventually add a 2nd torch just for the exercise.

I have seen posts by others stating that they use between 15-18 psi.
 
If you look at the following picture you will see that there is a 2nd 1/4"x20 bolt higher up which can hold a 2nd torch.

I will eventually add a 2nd torch just for the exercise.

I have seen posts by others stating that they use between 15-18 psi.

Thanks, mine must be older, the bolt isn't there. I would've went on the right side if I did it, that might make more sense though.
I run my reg wide open, 38lbs, to me at 15-18 you'd have the valve wide open, here it seems the more you open it, the less control you have over the thing. I guess I can try it, I've really only ran about 5k cases through mine, so experimenting can't hurt!
 
Kiba mentions the directional arrows, my 3 sets of wheels don't have them, and to keep cases from dropping down on their base and stalling before landing totally horizontal, I had to use a Dremel to relieve some material off the edges of the wheels. The magnum wheel, just had to do one edge, the 308 wheel, I think all of them.

Not some insurmountable issue, just I hear people talking load and go, well, with my unit, 30% of the cases would have been insufficiently annealed if I wasn't right there pulling them and re-doing.

You guys thinking of regulating your unit, and using a bigger tank, get the 60# regulator, the 40# I bought needs more, I'd say 45-50lbs.
With just minor tweaking, this unit will rock. I rotate a good number of brass through each gun, and only anneal every 3rd-4th time, so I don't break this unit out that often, but if I did it every firing, I'd buy the parts and double torch this puppy. My mag brass is in the flame for 11-13 seconds, 6.5x47 brass, 8-9 seconds, a far cry from that video that shows it spitting them out in five seconds.

How long ago did you buy your machine?
Maybe they modified the wheel contours since, or maybe your guide rails are out of alignment.

Mine runs flawlessly with the .308 wheels, but I haven't tried the .223. I will try them today.

Joe
 
Based on what I'm seeing here, if I remove the outlet fitting from this

Goss REGULATOR LP CGA-510 W/GAUGE B HOSE - 328-EP-70G - 328-EP-70G at Wares Direct

and replace it with this

Amazon.com - Mr. Heater F273755 1/4" Male Pipe Thread x 1"-20 Male Throwaway Cylinder Thread Fitting

I can use the entire hose and torch assembly that came with my Annealer.

The only pipe thread metioned in the description of the regulator is 1/4 NPT, the same as the male fitting on the throwaway adapter. Even if it's not, $2 worth of pipe nipples or bushings from the local Home depot will adapt them. I'm ordering now.

Joe
 
How long ago did you buy your machine?
Maybe they modified the wheel contours since, or maybe your guide rails are out of alignment.

Mine runs flawlessly with the .308 wheels, but I haven't tried the .223. I will try them today.

Joe

It's 2 years old, I think it's more the case's having little taper, 6.5x47, and 7mm saum, both relatively straight to the shoulder, a .308 case may work fine. As for alignment, it's a square shaft, I guess I could have tried to advance the outer one to the left??? It's a non issue today, and my problems were maybe brought on by the slow speed which it runs????
 
Regarding the feed wheels and cases dropping evenly, I've found that you need to play with spacing of the wheels-- and write down the spacer combination for each caliber when you find what works!

Also, make sure and test with at least a partially loaded hopper. A wheel spacer combination that drops the cases evenly when you're testing by dropping the cases in one by one doesn't necessarily work properly with a fully loaded hopper.

Soon after I received the machine I was using spacer combinations that I tested to work well when single feeding but that same spacer combination would often have delayed drops (which leads to partially annealed cases) or vertical drops against the back wall which would bind and stop the feed wheel when running the machine with a loaded hopper.

Once you find a spacer combination that works reliably with a particular caliber with a fully loaded hopper the machine pretty much runs unattended. Some cases with lots of body taper like .22-250 are problematic, they don't stack too well in the hopper and as the pile gets taller and shifts around during a run they slide out. I have to use blocks and tip the machine back to get .22-250 to stack in the hopper and be stable and to run and feed reliably.
 
Based on what I'm seeing here, if I remove the outlet fitting from this

Goss REGULATOR LP CGA-510 W/GAUGE B HOSE - 328-EP-70G - 328-EP-70G at Wares Direct

and replace it with this

Amazon.com - Mr. Heater F273755 1/4" Male Pipe Thread x 1"-20 Male Throwaway Cylinder Thread Fitting

I can use the entire hose and torch assembly that came with my Annealer.

The only pipe thread metioned in the description of the regulator is 1/4 NPT, the same as the male fitting on the throwaway adapter. Even if it's not, $2 worth of pipe nipples or bushings from the local Home depot will adapt them. I'm ordering now.

Joe

You are correct if you are installing the regulator on a BBQ tank.

If you want to connect to a throwaway cylinder you will also need the female throwaway adapter and some 1/4 npt fittings and elbows to connect to the inlet of the regulator doing away with the CGA 510 fitting on the right.
 
Regarding the feed wheels and cases dropping evenly, I've found that you need to play with spacing of the wheels-- and write down the spacer combination for each caliber when you find what works!

Also, make sure and test with at least a partially loaded hopper. A wheel spacer combination that drops the cases evenly when you're testing by dropping the cases in one by one doesn't necessarily work properly with a fully loaded hopper.

Soon after I received the machine I was using spacer combinations that I tested to work well when single feeding but that same spacer combination would often have delayed drops (which leads to partially annealed cases) or vertical drops against the back wall which would bind and stop the feed wheel when running the machine with a loaded hopper.

Once you find a spacer combination that works reliably with a particular caliber with a fully loaded hopper the machine pretty much runs unattended. Some cases with lots of body taper like .22-250 are problematic, they don't stack too well in the hopper and as the pile gets taller and shifts around during a run they slide out. I have to use blocks and tip the machine back to get .22-250 to stack in the hopper and be stable and to run and feed reliably.

Thanks for this one, I never even considered it. I did look at it, but moving one toward the shoulder would've seemed to make matters worse. Nothing in the instruction papers either, which I usually don't read anyway!
After looking at thumprr's pic of the 223 wheel, I can see how it might work.
 
You are correct if you are installing the regulator on a BBQ tank.

If you want to connect to a throwaway cylinder you will also need the female throwaway adapter and some 1/4 npt fittings and elbows to connect to the inlet of the regulator doing away with the CGA 510 fitting on the right.

Yes I know.
I have a spare 20 lb. tank always at the ready for the gas grill, and it will be re-tasked shortly.

Joe
 
Mine was ordered in .308.
It came with 1 spacer against the chassis, the first (rear) wheel, 3 spacers, the second wheel (front), 4 additional spacers.
It worked flawlessly with 100 cases.

Please post your setup for other calibers and if it came that way from the factory and how well it works.
 
If you look at the following picture you will see that there is a 2nd 1/4"x20 bolt higher up which can hold a 2nd torch.

Giraud.jpg


I will eventually add a 2nd torch just for the exercise.

I have seen posts by others stating that they use between 15-18 psi.

Your picture shows the issue I pointed out in my OP, that the torch tip cannot be positioned closer than 1" with the unit assembled as directed.
If you remove the torch holder form the L bracket, loosen the bolt holding the bracket to the machine, rotate the bracket 180 degrees then retighten the bolt, and reinstall the torch holder on top of the L bracket, you can get the torch much closer to the case. This will put the case neck in the hot part of the flame, a small distance from the blue inner tip of the flame.

Joe

In my limited use I see no reason to bring the torch closer than it already is.
I can barely get the torch turned down enough not to get the brass glowing red.

I may use a regulator to reduce the pressure so that I can more closely regulate flame temp.
I also think that using 2 torch heads will give a more uniform temperature.

At this point all my tests are theoretical since I don't have any tempilaq to confirm my suspicions.

Once I receive my tempilaq I will perform tests to prove repeatable temperatures.

If I am not satisfied with my results I will add the regulator and test again.

If that is not satisfactory I will then add the second torch.
 
Last edited:
In my limited use I see no reason to bring the torch closer than it already is.
I can barely get the torch turned down enough not to get the brass glowing red.

I may use a regulator to reduce the pressure so that I can more closely regulate flame temp.
I also think that using 2 torch heads will give a more uniform temperature.

At this point all my tests are theoretical since I don't have any tempilaq to confirm my suspicions.

Once I receive my tempilaq I will perform tests to prove repeatable temperatures.

If I am not satisfied with my results I will add the regulator and test again.

If that is not satisfactory I will then add the second torch.

It is impossible to follow the guidelines Giraud provides with that setup.
I was able to position the torch 3/4" from the case and adjust the flame to the 1/2" inner blue tip (like Giraud suggests) but it took 11 seconds to heat (using 750 degree Tempilaq) so I goosed it up a tiny bit, maybe another 1/16" of flame. It's not easy to control it that finely, though. The problem with turning it up much higher (or adding a 2nd torch) is that the case goes from hot enough to way too fucking hot very rapidly, like 1/2 second too much could ruin the case.

With a regulator it will be possible to cut the pressure down by a third or so and hold it there, at which point fine adjustment of the flame will be much easier.

I'm not looking to get more speed out of the unit, 6 cases a minute is fast enough for me... I've always got lots to do while a batch runs, charges to weigh, brass to prep, cases to prime, etc. I want to be able to document, reproduce, and tweak my setups rapidly with the least variation case to case (can't be ruining .260 Lapua cases at 1$/ea.).

Joe

I'm in the same boat with 200 Lapua cases ready to be annealed but not before the setup is proven on other brass with similar case neck thickness.

I don't agree with the Giraud instructions to place the flame in the middle of the neck.
I place the flame at the junction of the neck and the shoulder.
The shoulder is thicker and can withstand more heat.
I also ordered 450 degree tempilaq to confirm that I am not overheating the body of the case.
I will hopefully have it by next week.
By then I will have hopefully finished my 2 other projects so that I can concentrate my efforts on this annealer.
 
I place the flame at the junction of the neck and the shoulder.

Me too.
I still can't get the torch close enough to use a reasonable size flame with the L bracket in the pictured orientation.

Even with the long cycle time I use, the body is not getting hot enough to worry about.
I can pickup the cases by the head right out of the machine, so I skipped the 450° Tempilaq.
I guess you can't be too safe, though.

I have a box of scrap cases for setup (loose primer pockets, Berdan primers, etc.).

What concerns me is drift during processing.

Joe
 
I fixed the flame temp consistency issue on my Giraud on long runs by adding a regulator to the propane line. The flame setting no longer "drifts" over the course of the run as it used to do very obviously with the as-shipped non-regulated setup. The pressure gauge on the regulator also makes it very easy to get extremely close to the previous setting the last time you used it and dialed it in.

I've found you do need to give it some warm-up time (motor and flame) of about 10 minutes though before doing final tweaking of flame and cycle time, during that warm up time the flame will change in intensity a bit as the nozzle heats up and the motor & gearbox will also warm up and change speed slightly.

While you can crank the flame and speed way up on the Giraud to increase the cycle time consistency does suffer. A slightly lower flame setting with a slower/longer motor speed will control the final temp of the necks much better and gives you a bigger margin of error.

It is slower than some of the turntable twin-torch machines but being able to load it up and then do other things while it's running is a big benefit... of course, I've seen where guys have rigged Dillon casefeeders to their Bench Source machines.

For reference, here's the regulator I used.

Goss REGULATOR LP CGA-510 W/GAUGE B HOSE - 328-EP-70G - 328-EP-70G at Wares Direct

Fits great, it's relatively small and fits perfectly right above the recommended camping-sized propane bottle. Easy to do very fine adjustments.

That's a genius idea for the dillon case feeder.
 
I got the regulator and 1" throwaway to 1/4 NPT adapter today.
A few minutes with a vise and wrenches plus a few turns of gas pipe tape and the regulator was ready to attach to a 20 lb. propane tank.
After 15 minutes of testing, it seems like the most stable flame came from opening the valve on the torch wide open and regulating the gas down to 10 to 15 PSI depending on heat desired.

I think it's gonna be good now.

Joe
 

Attachments

  • Annealer with 20 lb. bottle.jpg
    Annealer with 20 lb. bottle.jpg
    89.8 KB · Views: 31
Last edited:
I finally received my Tempilaq so I began running a few tests.
Is it just me or is the speed control extremely coarse?

The only logical speeds are found in a very narrow range between 5 and 6 and even then repeatability is hit and miss.

I have an idea on how to rectify this shortcoming and will be posting an update as soon as my part arrives from China.
I hope I don't regret spending a whole $7.00 to test my theory.
If it works the speed control will be 10 times better.
Technically it will be 13.33 times more precise.

Since I suck at keeping secrets I will be replacing the existing potentiometer with a 10 turn pot with an indicating dial.

I also received my Goss propane regulator but I have yet to receive my throwaway adapter.
Once that arrives I should be getting a more repeatable flame temperature.

I have a couple more ideas but those will have to wait until the new year.
 
Last edited:
Just curious, has anyone tried Mapp gas in place of Propane to speed up the heating? If so, did it work well?
 
Thump_rrr, any updates? Curious how your potentiometer worked out.

Success!!!

The new potentiometer works incredibly well.
Most of the useable range is between 5 and 7 as it is on my original potentiometer.
The difference is that now you can make very fine repeatable adjustments and as an added bonus there is a locking knob which prevents knocking it out of adjustment.

The potentiometer is a 20K ohm which can be found on ebay for around $5.00 including the 10 turn dial.
Even though it comes from China it is made by Bourns in Mexico.
The second picture shows the wiring of the new potentiometer.
The last picture shows the original.

The wiper is in the center location on the original potentiometer (green wire) while it is in the rear location on the new potentiometer.


Last edited:
Thank you for the update and I'm glad it's working for you. I've got basic skills when it comes to wiring soldering etc, but very interested in making this modification to my giraud. What initially drew me to this post was I'd noticed some of my pictures in this thread. Glad y'all decided to use them, lol.

Would you mind posting the link to the item(s) you bought, and just a basic run down of how you installed it all?


Sent from my iPad using Tapatalk
 
I live my Bench Source , no wait got it in a week set it up and have used it for a year. Will do about 500 cases an hour pretty easy. No you can't load and forget, but it's not a big deal. I have a Giraud trimmer set up for 10 diff calibers and it is a great machine and great customer service , but didn't want to wait , and very happy with my choice. Good shooting! JVON