• Watch Out for Scammers!

    We've now added a color code for all accounts. Orange accounts are new members, Blue are full members, and Green are Supporters. If you get a message about a sale from an orange account, make sure you pay attention before sending any money!

Gunsmithing Help un-dick my chambering method

Rprecision

Sergeant
Full Member
Minuteman
Nov 9, 2011
802
25
Progressive Hell, CO
I'm a home shop gunsmith, I have had some professional machining education, but don't be fooled this is a hobby for me. I have chambered a total of about 6 guns up until this one all short action chambers. I have had good results. All of my rigs out shoot me by a long stretch, most when I do my part are better than 1/2 moa guns.

Two years ago I started a .300 Win Mag project based on a Stainless Factory 700. I trued the action, and went with a 1 piece PTG bolt that got NP3 treated.

When I chambered the magnum I ended up with some run out in the chamber. Best I could tell it was around .005-007" ish. I was disappointed in how the project turned out, that combined with the lack of components (Still!) put the project in mothball mode. Initial testing was inconclusive as I shot approximately 30 rounds which all printed 1 moa ish. Well now I want to get it back up and running.

If I were to rebarrel the gun, I need to learn what I did wrong the first go around. Let me describe my process. I want to improve my process as much as I can.

1. Warm up lathe for approx 20 minutes
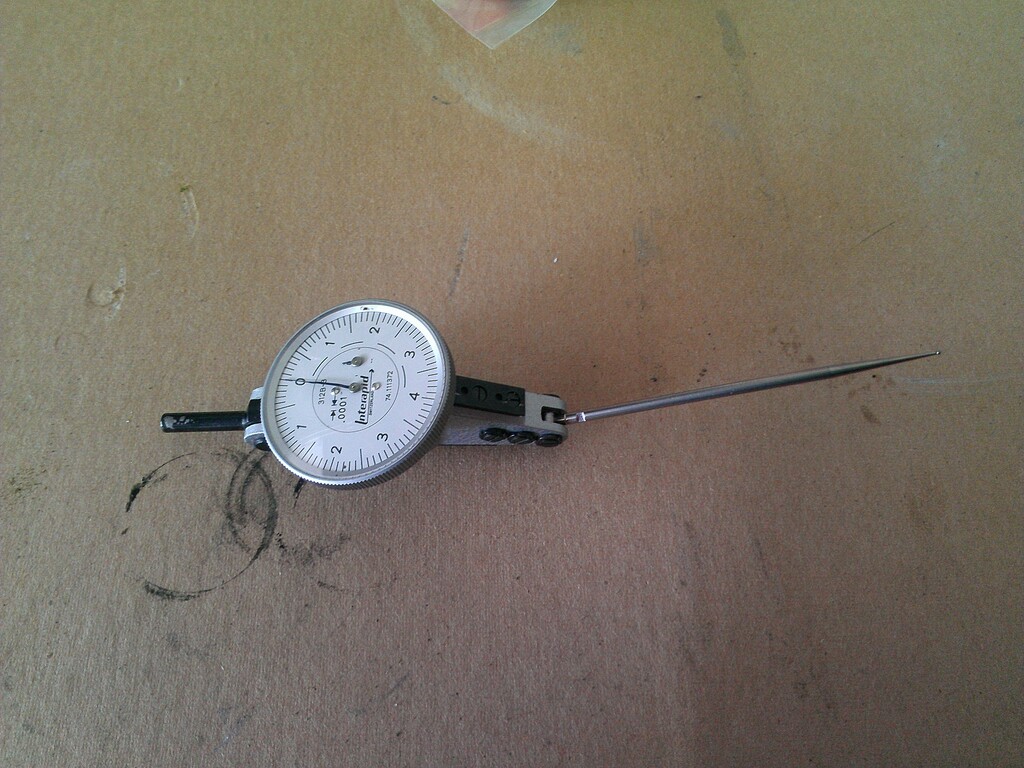
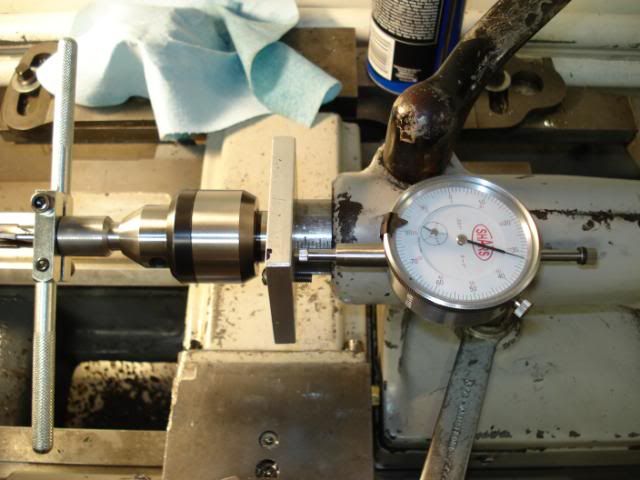
2. Align barrel in lathe with PTG Range Rods zeroing both ends to within .0005" I chamber through the headstock. I use copper penny's between the jaws and barrel and spider.
3. Machine shoulder, threads, counter bore.
4. Cut chamber with PTG Tac Match .300 Finish Reamer. I use the bushing model which I select a bushing to be within .0002" or so.
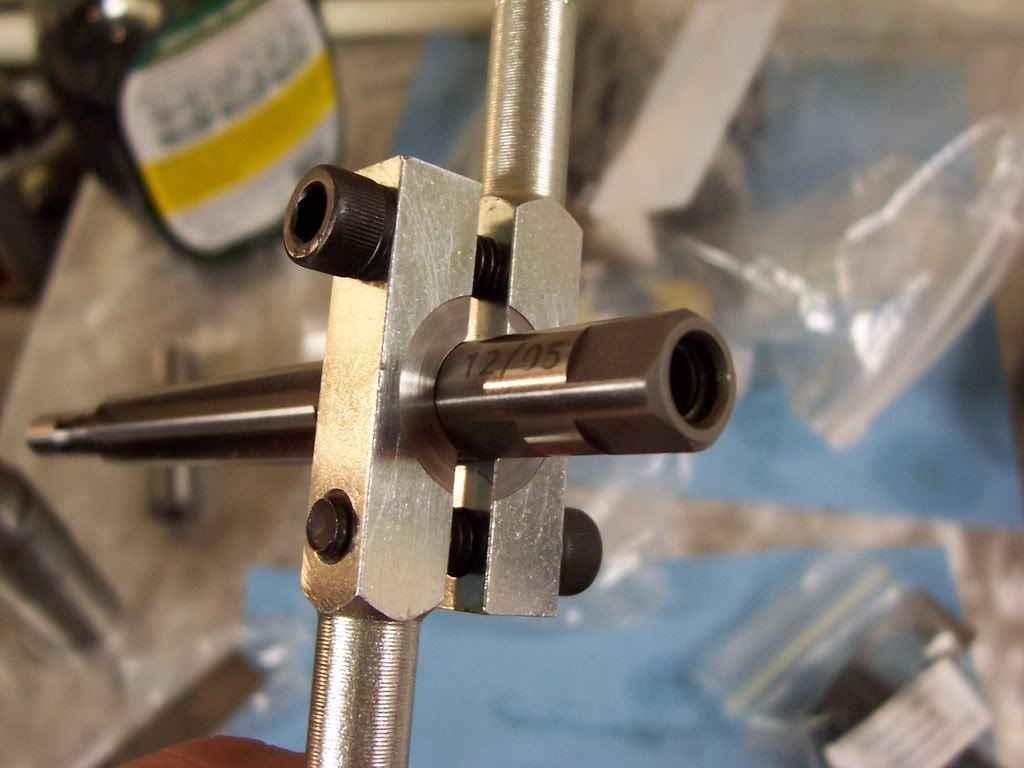
5. I push the reamer with a floating holder which allows for up to .025" of misalignment.
6. The reamer is held by a modified tap wrench which is square to the above floating holder.
7. I cut the Chamber .025-.050" at a time withdraw the reamer and clean everything. Re-oil and repeat.
8. I cut at around 45-60 rpm
9. I cut this until I get within .025 of finish depth. I will then cut .010 and the final few thousands, making sure to clean really good between the last cuts.
10. Double check headspace
11. Flip it around, crown, thread, Etc
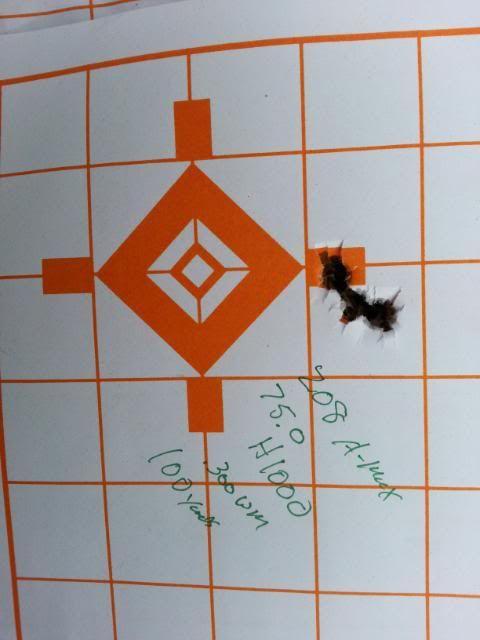
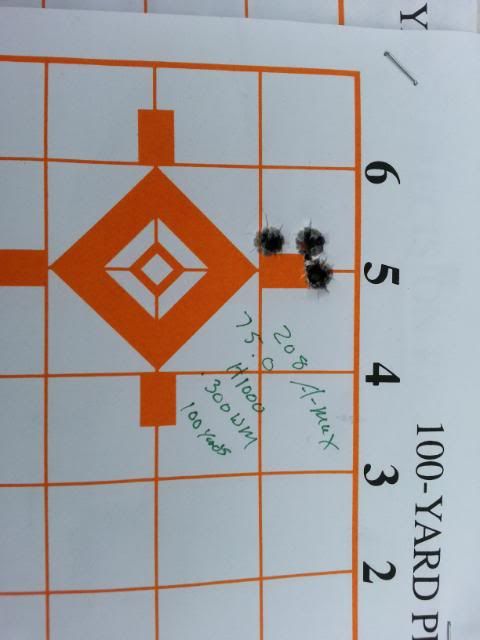
Here's a few shots


Please help trouble shoot my process, methods, etc

I have been thinking it's one thing to do this with a short .308 style cartridge. But for this big of a chamber I could probably drill, true that with a boring bar and then use the finish reamer. Thing is I would have to cut that on a taper to align the reamer and how does the bushing work if it's not in contact until after its cutting the body.

Please be brutally honest, if I'm being a tool here, throw me a bone and school me!

Thanks
 
Ditch the pennies, use something shorter that will allow the barrel to adjust without inducing stress into it. A lot of guys use thick copper wire wrapped around the barrel, I use 1/8" aluminum bent to 90° and only about 3/16" touching the barrel.

Galaxy S3 on tapatalk
 
Last edited:
Use a piece of 6-8 gauge copper ground wire you can get from lowes or wherever and form a ring around the barrel and grab on that. It lets the barrel pivot unstressed. Stop aligning the muzzle end when you are working on the chamber end. You're bending the barrel more then likely to bring them both into alignment. Just worry about the end you're working on. Like this
 
Last edited:
I would also venture to guess by your target pics that the rifle will shoot much better then what you posted. Have you tweaked the load around and played with seating depth? There's nothin there screaming out that it will not shoot. Contrary to some belief that chamber runout has very little to do with accuracy but it's nice for the brass life etc.
 
Except for using a rod I chamber essentially the same way. I use a long stem indicator and rough with core drills. Bartleins are straight-concentric and are hard to set up incorrectly. when are you measuring the run out? If there was a problem with your setup you would have seen/felt it in the reamer handle. Was there any indications of misalignment while chambering? The handle would been wobbling all over the place. I would try a few other bullets before I drove myself off a cliff.
 
your set up don`t look too bad to me......like above said... I use brass 1/8" wire in chuck..... I would sell the floating reamer holder... and use tailstock center to push with..... once set-up...I cut chamber...first...when all is at zero.... then thread etc....being careful not to bend barrel with outboard spider or chuck is important.......Also...using a steadyrest to chamber can give good less stressful results......bartlien,kelbys,obermeyer and I also do it that way on long barrels.....
 
If I were you, I would also pre-bore before running the finish reamer in.
 
Like Killswitch pointed out, it's best to indicate on one end only when using rods. I prefer to cut 3/4 to 1 inch off the end, stick a test indicator just inside each end, dial and then face and then start in with the rod and a pair of indicators.

Honestly, if you are only getting 1moa I would be looking other things that may be contributing to the problem like stock fit or ammo.

Have you tried shooting farther out than 100 yds? I would stretch that beast to at least 500 before jumping to any conclusions.
 
Your groups are not that bad. How is your rifle bedded? Three shots are where your rifle is sighted. A group is at least 5 shots, pay attention to the order. Bad bedding usually shows as double grouping as the action shifts in the bed. #1 here, #2 there, #3 with 1, #4 with 2, etc. Shoot some. 6 shots would barely remove the rotational reamer marks where they join the longitudinal grooves.
 
Ditch the pennies, use something shorter that will allow the barrel to adjust without inducing stress into it. A lot of guys use thick copper wire wrapped around the barrel, I use 1/8" aluminum bent to 90° and only about 3/16" touching the barrel.

Galaxy S3 on tapatalk

Ok, I can see that. I have considered the deflection on both ends before. I usually get everything close and break both ends loose, then indicate the rest in. I will try something different. Is there concern that having such small contact could lead to a change in run out after its set ?

Use a piece of 6-8 gauge copper ground wire you can get from lowes or wherever and form a ring around the barrel and grab on that. It lets the barrel pivot unstressed. Stop aligning the muzzle end when you are working on the chamber end. You're bending the barrel more then likely to bring them both into alignment. Just worry about the end you're working on. Like this

I would also venture to guess by your target pics that the rifle will shoot much better then what you posted. Have you tweaked the load around and played with seating depth? There's nothin there screaming out that it will not shoot. Contrary to some belief that chamber runout has very little to do with accuracy but it's nice for the brass life etc.

I think your right, My plan is to work up a load and see what I can get out of it. Its hard knowing something is not perfect, but I want to give it fair shot first.

Except for using a rod I chamber essentially the same way. I use a long stem indicator and rough with core drills. Bartleins are straight-concentric and are hard to set up incorrectly. when are you measuring the run out? If there was a problem with your setup you would have seen/felt it in the reamer handle. Was there any indications of misalignment while chambering? The handle would been wobbling all over the place. I would try a few other bullets before I drove myself off a cliff.

I measured the run out of the chamber after it was done. The first half of the chambering went fine, with no real indication of problems. The deeper I got I started noticing some movement in the handle.

Initially I indicated everything before threading, double checked it and it hadn't changed before chambering.

When you say you rough with core drills do you bore afterword ? Is there anything different I need to do if I try this method ? I.E. use a looser fitting bushing?


your set up don`t look too bad to me......like above said... I use brass 1/8" wire in chuck..... I would sell the floating reamer holder... and use tailstock center to push with..... once set-up...I cut chamber...first...when all is at zero.... then thread etc....being careful not to bend barrel with outboard spider or chuck is important.......Also...using a steadyrest to chamber can give good less stressful results......bartlien,kelbys,obermeyer and I also do it that way on long barrels.....

I have checked my lathe with a 16" test bar and by all indications I could probably do that without fear of cutting a oversized chamber, however most folks that have good results Float. I suppose this may be more machine specific then method specific

If I were you, I would also pre-bore before running the finish reamer in.

This is kind of where I am leaning. I just don't know the best approach.

Like Killswitch pointed out, it's best to indicate on one end only when using rods. I prefer to cut 3/4 to 1 inch off the end, stick a test indicator just inside each end, dial and then face and then start in with the rod and a pair of indicators.

Honestly, if you are only getting 1moa I would be looking other things that may be contributing to the problem like stock fit or ammo.

Have you tried shooting farther out than 100 yds? I would stretch that beast to at least 500 before jumping to any conclusions.

It is fully bedded with Devcon. Actually the Bedding is the one thing that turned out flawless on this project. I am planning on getting it out in a few weeks and test some loads.

Your groups are not that bad. How is your rifle bedded? Three shots are where your rifle is sighted. A group is at least 5 shots, pay attention to the order. Bad bedding usually shows as double grouping as the action shifts in the bed. #1 here, #2 there, #3 with 1, #4 with 2, etc. Shoot some. 6 shots would barely remove the rotational reamer marks where they join the longitudinal grooves.

I understand the groups are over 3, however with a single pound of H1000 and 100 bullets to work with, its a matter of conservation! I was testing the waters with those groups.

THANK YOU FOR ALL OF THE REPLIES !
 
Last edited:
Groups like that aren't bad as a startiing point. I note you're using H-1000. My experience with H1k is lackluster. I WANT the powder to work for me. I like the Extreme line of powders from hodgdon for their insensitivity to temperature. Alas, I have had less than awesome results from H1k. I prefer Retumbo, H-4831, IMR 7828, RE-22, and RE 25 over the H1k. VV N-165 has also produced some awesome results for me over the years.

Basically, I would tinker with the load before I worry about the barrel.
 
I used to cut chambers with TIR of .0005 or less consistenly but lately i see runout in the .002-.003 range often. I do know i was inducing a lot of stress into the barrel when i was using pennies in my setup. I cut a chamber that showed .003 TIR runout when i knew the setup was perfect. I took the pennies out and put weedeater string in their place and reindicated the bore. The chamber had virtually no runout! I was definitely inducing stress with the pennies. I wont use pennies any longer.
 
Our .02. And flame suit on.
Forget the copper / anti marring set up. A raw barrel is meant to be cut true, finishing is done later. Second, build a flush system through the barrel when chambering. Your floating reamer holder is fine. You stopping at .025 of go is ok, best to get to .010 and do the final cut under power. Once you reach the .010 let the lathe run for a short time (read 10-15 sec) to clean up the shoulder area. Make damn sure on your final cut you have put cutting oil into a clean chamber and the reamer is spotless. Do you have a set up for measuring reamer depth of cut for the last plunge? Hard to describe this online. If you have a question, call or email us.
 
The copper ring for me has absolutely nothing to do with marring anything. It has to do with having a gimble point that is stress free purchase on the barrel. You're not grabbing a barrel with chuck jaws of 1-2" length and not stressing that barrel if you are trying to use an outboard spider as well. That's my thoughts
 
The copper ring for me has absolutely nothing to do with marring anything. It has to do with having a gimble point that is stress free purchase on the barrel. You're not grabbing a barrel with chuck jaws of 1-2" length and not stressing that barrel if you are trying to use an outboard spider as well. That's my thoughts

While I do agree with you that something allowing the barrel to gimble is key, I think he may be hinting at just using something harder than copper to achieve the same thing. Im not sure there is anything to gain from that or not, could be. I think my favorite setup is Gradous' chuck, wire EDM'd 3/8" holes right into the chuck and pressed in brass rod, that is my next project.
 
The copper ring for me has absolutely nothing to do with marring anything. It has to do with having a gimble point that is stress free purchase on the barrel. You're not grabbing a barrel with chuck jaws of 1-2" length and not stressing that barrel if you are trying to use an outboard spider as well. That's my thoughts

+2........ you gotta allow the barrel to pivot............or....use a steady rest.....
 
Groups like that aren't bad as a startiing point. I note you're using H-1000. My experience with H1k is lackluster. I WANT the powder to work for me. I like the Extreme line of powders from hodgdon for their insensitivity to temperature. Alas, I have had less than awesome results from H1k. I prefer Retumbo, H-4831, IMR 7828, RE-22, and RE 25 over the H1k. VV N-165 has also produced some awesome results for me over the years.

Basically, I would tinker with the load before I worry about the barrel.

That's the plan at this point, I found some IMR 7828 and some berger 215's and sierra 210's. I will toy around that here soon.

I used to cut chambers with TIR of .0005 or less consistenly but lately i see runout in the .002-.003 range often. I do know i was inducing a lot of stress into the barrel when i was using pennies in my setup. I cut a chamber that showed .003 TIR runout when i knew the setup was perfect. I took the pennies out and put weedeater string in their place and reindicated the bore. The chamber had virtually no runout! I was definitely inducing stress with the pennies. I wont use pennies any longer.

Pennies = Gone! Next time I will try some large copper wire.

Our .02. And flame suit on.
Forget the copper / anti marring set up. A raw barrel is meant to be cut true, finishing is done later. Second, build a flush system through the barrel when chambering. Your floating reamer holder is fine. You stopping at .025 of go is ok, best to get to .010 and do the final cut under power. Once you reach the .010 let the lathe run for a short time (read 10-15 sec) to clean up the shoulder area. Make damn sure on your final cut you have put cutting oil into a clean chamber and the reamer is spotless. Do you have a set up for measuring reamer depth of cut for the last plunge? Hard to describe this online. If you have a question, call or email us.

Yeah, in the first picture I have a dial indicator that measures the depth. I have it mounted on the tailstock and run the tailstock up to the locked carriage. This has worked very well so far.

I have never flushed, is it a huge mess ? I like the idea
 
I have been a little busy and need to update things.

I have since picked up a new scope for this rig and some new measuring equipment. (Enter a Mitutoyo .0001" Dial indicator)

I have still been chasing reloading components, which as of 2014 is still a pain in the ass...........

I tore everything down mounted the barrel up in the lathe (using 1/16" Aluminum bent at 90 degrees). I was very careful to not induce any stress this go around. I indicated the barrel in using the Gordy Gritters method. I used a Grizzly rod and a tight bushing. I was able to dial the bore in to within .0003" run out for the first 6" ahead of the chamber. After everything was set I took the following measurements:

-Barrel shank run out .0045"-.005"

-Chamber run out 1/16" above the belt .0038"

-Chamber run out 2" above the belt .0006"

So in a perfect world I would love to see these numbers all at .0000" but, it is what it is. If I had access to a brand new tool room lathe maybe that would be a reality. Like life, I have a 1970's Rockwell which has worked a few hours in its life, the lathe was assigned to a Army Mechanized unit.......sigh................

I don't have a lot of practical experience translating these numbers to how things work in the field. Are these numbers fatal? Going to really trash brass?

What do you think?
 
I think your numbers are probably fine for a hunting rifle. In all honesty, lots of "Bubba smiths" don't dial their barrels in nearly as accurately as we do on this forum. Believe it or not, there are lots of "smiths" out there that chuck the barrel in a 3-jaw and push the reamer with a dead center, the guns still shoot (sometimes even well).

IMHO, I would continue to break the rifle in, work on your shooting abilities and your hand loading techniques. Since there aren't any glaring issues with your runout (0.020+), the rifle will most likely settle down and group tighter after a hundred rounds or so. This is what I would do if it were my rifle.

If you can never be comfortable knowing that your chamber has almost 0.004" of runout (thus impacting your shooting accuracy), by all means, chop off the tenon and have another go around - it's just steel.

On a complete side note, you might also consider a floating reamer holder that allows the reamer to float axially as well.
 
Sorry to bust your bubble but those numbers should be tenths not thousandths. That doesn't mean it won't shoot as I always say, The target tells you what's you need to know.
Everyone who chambers barrels should one or two jewelers loupes and they don't cost much money. See link below . It takes about 10 seconds to check the concentricity of the throat in the chamber. I have two. One 4X with a 2 1/2" focal length for 308 length cases and a 3X with a 3 1/2" focal length for magnums. It's very easy to see a few tenths misalignment.

Asco Swiss Watchmakers Eye Loupes
 
I indicate off the grooves in the barrel in two spots I don't like rods for final set up. Get rid of the pennies! Also make sure you are not stressing the barrel it's actually very easy to stress it and you will know because weird things start to happen while indicating the barrel. Light touch is key! I always check the the bore with indicators and bore scope while chambering a bunch of times because things move and you can catch it before it's finished.
 
I think your numbers are probably fine for a hunting rifle. In all honesty, lots of "Bubba smiths" don't dial their barrels in nearly as accurately as we do on this forum. Believe it or not, there are lots of "smiths" out there that chuck the barrel in a 3-jaw and push the reamer with a dead center, the guns still shoot (sometimes even well).

IMHO, I would continue to break the rifle in, work on your shooting abilities and your hand loading techniques. Since there aren't any glaring issues with your runout (0.020+), the rifle will most likely settle down and group tighter after a hundred rounds or so. This is what I would do if it were my rifle.

If you can never be comfortable knowing that your chamber has almost 0.004" of runout (thus impacting your shooting accuracy), by all means, chop off the tenon and have another go around - it's just steel.

On a complete side note, you might also consider a floating reamer holder that allows the reamer to float axially as well.

Well, This aint no hunting rifle, so its getting replaced.

I have a floating fixture, but I should probably look to a better commercial one. any recommendations ?


Sorry to bust your bubble but those numbers should be tenths not thousandths. That doesn't mean it won't shoot as I always say, The target tells you what's you need to know.
Everyone who chambers barrels should one or two jewelers loupes and they don't cost much money. See link below . It takes about 10 seconds to check the concentricity of the throat in the chamber. I have two. One 4X with a 2 1/2" focal length for 308 length cases and a 3X with a 3 1/2" focal length for magnums. It's very easy to see a few tenths misalignment.

Asco Swiss Watchmakers Eye Loupes

Mr. Tooley, I already have a new barrel in hand. My plan is to cut off the chamber on this one and use the rest of the barrel to refine my process. I'm not dicking up another one !

Do you use the Loupes instead of a bore scope or in addition to ?

I indicate off the grooves in the barrel in two spots I don't like rods for final set up. Get rid of the pennies! Also make sure you are not stressing the barrel it's actually very easy to stress it and you will know because weird things start to happen while indicating the barrel. Light touch is key! I always check the the bore with indicators and bore scope while chambering a bunch of times because things move and you can catch it before it's finished.

Pennies are gone!
 
I got a question about the recommendation to indicate the bore directly rather than using a rod.

If you indicate the bore end, you can get zero run out there but what guarantees parallelism between bore axis and lathe axis?

I think indicating a rod (about twice as long as the chamber) close to the barrel face and far out is the better approach. There should be no run-out close to the barrel face (half way point of the rod) AND at the free end of the rod.

Am I on the right track here? I have gotten away several times with indicating barrels directly on both ends (when I did not have a rod) but what if you have a "banana bore" that runs true on the ends but not in between?

PS: I am about to send some parts to a precision center-less grinding place that has a minimum job charge above what the needed parts would cost. Therefore, I was thinking to have a set of rods ground. What diameters would you recommend for 7.62, 6.5, 6, and 5.56 (possibly multiple rods for each caliber)?
 
Last edited:
I got a question about the recommendation to indicate the bore directly rather than using a rod.

If you indicate the bore end, you can get zero run out there but what guarantees parallelism between bore axis and lathe axis?

I think indicating a rod (about twice as long as the chamber) close to the barrel face and far out is the better approach. There should be no run-out close to the barrel face (half way point of the rod) AND at the free end of the rod.

Am I on the right track here? I have gotten away several times with indicating barrels directly on both ends (when I did not have a rod) but what if you have a "banana bore" that runs true on the ends but not in between?

PS: I am about to send some parts to a precision center-less grinding place that has a minimum job charge above what the needed parts would cost. Therefore, I was thinking to have a set of rods ground. What diameters would you recommend for 7.62, 6.5, 6, and 5.56 (possibly multiple rods for each caliber)?

PT&G has all this stuff on the shelf. I prefer the 5 Grizzly rods myself. Covers 17 through 50 cal. https://shop.pacifictoolandgauge.com/index.php?main_page=index&cPath=12_37
 
Well, This aint no hunting rifle, so its getting replaced.

I have a floating fixture, but I should probably look to a better commercial one. any recommendations ?


Mr. Tooley, I already have a new barrel in hand. My plan is to cut off the chamber on this one and use the rest of the barrel to refine my process. I'm not dicking up another one !

Do you use the Loupes instead of a bore scope or in addition to ?


Pennies are gone!

Your reamer set up is just fine. That is exactly the way I've chambered several thousand barrels. YMMV but I have always used a long stem indicator and dialed in the throat and muzzle. If the barrel is so crooked that you feel inclined to do it another way you need to find a different barrel maker. In a nit picking world neither way to set up the barrel is perfect. Understand we are talking about bullet alignment. That being no longer than the bearing surface of the bullet. Do the math. If there is a slight amount of misalignment we can model it but we can't measure it because we don't have the instrumentation to measure the curvature of the bore. We can only measure and inspect concentricity. Anything else is speculation.

In inspecting chambers I only use a loupe. It is very easy to see a tenth or two misalignment.


PT&G has all this stuff on the shelf. I prefer the 5 Grizzly rods myself. Covers 17 through 50 cal. https://shop.pacifictoolandgauge.com/index.php?main_page=index&cPath=12_37

Thanks for the link. The bushings give me an idea about the popular diameters for each caliber.

How tight is the fit between the Grizzly rod and the bushings?

(I still may try the custom ground drill rods since a set of two bushings for each diameter is not exactly cheap and I have to pay the grinding minimum anyway.)
 
Last edited:
Thanks for the link. The bushings give me an idea about the popular diameters for each caliber.

How tight is the fit between the Grizzly rod and the bushings?

(I still may try the custom ground drill rods since a set of two bushings for each diameter is not exactly cheap and I have to pay the grinding minimum anyway.)


save your money. You don't need magic wands.

seriously.
 
Your reamer set up is just fine. That is exactly the way I've chambered several thousand barrels. YMMV but I have always used a long stem indicator and dialed in the throat and muzzle. If the barrel is so crooked that you feel inclined to do it another way you need to find a different barrel maker. In a nit picking world neither way to set up the barrel is perfect. Understand we are talking about bullet alignment. That being no longer than the bearing surface of the bullet. Do the math. If there is a slight amount of misalignment we can model it but we can't measure it because we don't have the instrumentation to measure the curvature of the bore. We can only measure and inspect concentricity. Anything else is speculation.

In inspecting chambers I only use a loupe. It is very easy to see a tenth or two misalignment.

Indicating the ends worked fine for me even on barrel blanks from "budget" sources like Green Mountain.

I am glad that the inexpensive way of inspecting the result with a loupe is recommended by someone who probably has several borescopes laying around.

Still trying to figure out how the OP got that much run out after everything was set up correctly. An undetected crooked bore would be one possibility, especially since he mentioned that the reamer started wobbling as he reamed deeper.
 
The fit on the Grizzly rods is loose enough to get the bushings on and off and allow them to rotate. The way I hold them makes it a non issue. I support it by an o-ring around the rod in a loose fit drill chuck in my tail stock. Gravity lets it ride the bottom of the bore and the tolerance stack is all taken up. With the extra reach I can dial at the throat and 2" farther in on any caliber. It's extremely consistent and repeatable so I have come to trust it. The little wedge shaped range rods are stuck with being limited in reach and go off the, belled out from lapping, ends of the barrel. I completely ignore the chamber area as it is all cut away to line up with the bore in my selected area. Same for the crown. I don't want to dial where the barrel is being cut off. My alignment is based from where the actual crown is and 2" farther back. It has been proven time after time that it's not necessary to get this level of alignment for acceptable accuracy but for me it's something satisfies my OCD approach to barrel fitting.
 
Pretty simple. Healthy human eye has a res of .002 so a 10x loup gives you .0002.

If it looks right it is right...

Yes, OK, understood. But WHAT am I looking for, and where?

For instance, I can take a chamber casting and have a look at the rifling after the throat. I can look at the consistency of that rifling, and determine if some are more/less closer to the mouth? Is this to what you're referring, or is there some way to do it without taking a chamber cast?
 
That's what your looking for. An offset neck to barrel or out of square which will appear as the rifling starting closer or farther from the neck. If the rifling all start in the same place you are pretty good. I use a bore scope with a 90 degree mirror for that. I don't see how you could see that looking from the end with anything.
 
Indicating the ends worked fine for me even on barrel blanks from "budget" sources like Green Mountain.

I am glad that the inexpensive way of inspecting the result with a loupe is recommended by someone who probably has several borescopes laying around.

Still trying to figure out how the OP got that much run out after everything was set up correctly. An undetected crooked bore would be one possibility, especially since he mentioned that the reamer started wobbling as he reamed deeper.

truthfully I think it was a combination of things. I don't think I got the bore running as true as I thought. That combined with holding it way too tight and with a crappy method added up. I rushed the job, it was one of those times where I had too much crap going on and didn't have the wisdom to slow down.

I recall tightening the chuck tight enough to really flatten out a penny. I was inducing a lot of stress.

Its not easy to admit being a tool, nobody likes to fail at something. I really want to improve and am very thankfully for all the help.

I spent some time checking the alignment of my tailstock. Using a 12" testbar it sits about -.0045" low. When the ram is fully extended (2.5") it drifts about -.005" horizontally. I don't see a way to adjust this out without going all Chevy chase with shim stock. Additionally this is only one reading in one spot on the bed.

I am going to chop the chamber off the old barrel and rechamber to evaluate my process. I am going to dial it in off the lands and pre bore this time.

I will post up my results, hopefully this will prove positive and I can move on to the new barrel
 
Your reamer set up is just fine. That is exactly the way I've chambered several thousand barrels. YMMV but I have always used a long stem indicator and dialed in the throat and muzzle. If the barrel is so crooked that you feel inclined to do it another way you need to find a different barrel maker. In a nit picking world neither way to set up the barrel is perfect. Understand we are talking about bullet alignment. That being no longer than the bearing surface of the bullet. Do the math. If there is a slight amount of misalignment we can model it but we can't measure it because we don't have the instrumentation to measure the curvature of the bore. We can only measure and inspect concentricity. Anything else is speculation.

In inspecting chambers I only use a loupe. It is very easy to see a tenth or two misalignment.

Thank you for the feedback

is there any trick to starting the reamer in a pre bored hole lets say .020" under finish diameter. I have never done it this way. It would seem very easy to get crooked right at the start because the rear is not inline but floating. Once its off, everything will follow until the pilot hits the lands.

Thanks
 
Consider preboring using the compound set at the same angle as the body taper. This will allow the reamer to go deeper into the bored hole and allows the pilot to engage the bore as well. Push the reamer with the floating pusher shown above or a good floating holder
 
Don't bore so deep and allow the bushing to sit in the bore. this way you wont be wondering around the bored chamber area. I drill and bore about .700 deep. Lee
PS I think the ground rods are a good idea. Tom Haverkamp makes and uses ground rods to indicate. I have always wanted to. Lee
 
Consider preboring using the compound set at the same angle as the body taper. This will allow the reamer to go deeper into the bored hole and allows the pilot to engage the bore as well. Push the reamer with the floating pusher shown above or a good floating holder

Don't bore so deep and allow the bushing to sit in the bore. this way you wont be wondering around the bored chamber area. I drill and bore about .700 deep. Lee
PS I think the ground rods are a good idea. Tom Haverkamp makes and uses ground rods to indicate. I have always wanted to. Lee

I like both idea's. Being a 300wm is only boring .700 based on keeping the pilot engaged.

My initial plan was to drill 3/8" short, bore to within about .040" of final diameter and ream from there. My concern was the pilot not lining up once it reaches the bore. I guess one way or another it will.

I do like the idea of boring to the same angle as the reamer body. I also thought very slightly chamfering the entrance to the chamber at the same angle as the shoulder angle. This would get cut out by the belt anyhow.
 
if your true to your bore and you should be you will line up just fine. I bore .700 deep just so I can keep the pilot engagued. Ive gone as deep as .900 with no issues, but I stick to the .700 deep. Just for my comfort. Lee
 
yep I guess it would depend on the cal/reamer. I chamber for the 6ppc 75% of the chambers I do. im stuck on that little dude. nothing else like it when it comes to 300 yards and less. lee
 
Picked this bad boy up off Craigslist for $80. Granted it won't read down to .0001 with the long stem, but should work out to .0004-.0005 between the lines. I have a HV Brux I am going to chamber this week and see how well it works. I messed around with it on my tailstock and it seems to work smooth....

picsay-1401485109.jpg.jpg
 
/\ First realize that your not measuring anything. It's not like were cramming things up the rear end of a barrel to learn just how big the bump is between a land and a groove.

All were looking for is movement.

Take this for example:

Years ago I made a big seesaw on a gimble to indicate a barrel. It was a 10" or so long piece of heat treated drill rod. I put a threaded spud on the end that went up inside and on the opposite end I had a test indicator. The gimble was setup to provide a 2:1 resolution. Meaning a .0001 on the stick showed as an indicated .0002".

The idea being if the hairs get split down enough, then there's no more hair. Not even a red one.

Guns didn't shoot any better than how we do it today with a Best Test .00005" resolution indicator. I'll bet that they don't shoot any better or worse than an Ebay purchased .0001" indicator either.

Cause your not measuring. Your dialing out movement, that is all.

Hope this helps and instills confidence. You can only get it so good. Magic wands (sticks) DO NOT repeat. It's been proven over and over and if you get the manufacturers of these wigits in a sound proof room and start waterboarding along with shots of pentithol you'll learn that they can hold roundness and straightness only down to a couple tenths.

So the only person your fooling when you show bad ass You Tube vids of barrels dialed to zero is yourself and the uneducated.

Take this for an example. If you were to magically transport yourself into the clean room where machine tool companies like Mori Seiki, Kitamura, etc build their spindle assemblies you'd see just how much work goes into dialing tenths and millionths. The room has to be environmentally controlled. It has to be a near surgical grade of cleanliness free of lint and any/all forms of solid particulates.

Assembling these spindle assemblies is a very, very controlled and well thought out process. It's how they are able to run at 12-30K rpm for tens of thousands of hours.

I used to work for West Industries in Wi. I worked in the metrology lab inspecting gears for Caterpillar and a few other big diesel power transmission companies. The straight cut gears in a semi truck are a marvel of engineering. Ever stop and think about the load placed on those gears while hauling heavy freight across mountains and smoking hot deserts or frigid tundras?

These things go for a half million miles or so before they have to be overhauled. That is working with tenths and millionths. The shit were doing ISN'T. Unless you've got hones and half million dollar Zeis/Hoffler CMM's in environmentally controlled labs forget it. The temp variance alone will booger your data collection. Never mind K charts that'll show just about every flaw in surface finish.

Just make sure you run your new indicator it at very, very low rpm. Buzzing it will destroy the internals. I go no faster than 10 rpm when dialing in a barrel. Get it as close as you can and get the job done. It'll work fine.

I've yet to see Dave Tooley give someone bad scoop. His process mirrors mine. (in fact I started copying it because my gimbled weight thing is a pain in the ass to setup and dial in. -Doesn't work any better either.)

Hope this helps.

C.
 
Last edited:
Just make sure you run your new indicator it at very, very low rpm. Buzzing it will destroy the internals. I go no faster than 10 rpm when dialing in a barrel. Get it as close as you can and get the job done. It'll work fine.


C.

This is one of the things that has always made me cringe, watching people bounce an expensive DTI over the lands while the lathe is under power. There is no way that can be good for it. In fact, I just had to send my long reach Interapid DTI in for repair because I had it on the magnetic base stuck on the top of my headstock while I was letting my lathe warm up. There was enough vibration with the open chuck to cause a screw in the display face to pop out and lock up the needle.
 
This is one of the things that has always made me cringe, watching people bounce an expensive DTI over the lands while the lathe is under power. There is no way that can be good for it. In fact, I just had to send my long reach Interapid DTI in for repair because I had it on the magnetic base stuck on the top of my headstock while I was letting my lathe warm up. There was enough vibration with the open chuck to cause a screw in the display face to pop out and lock up the needle.
I had this happen to a .0005" Interapid. I just pulled the bezel off and screwed it back in. Nothing on mine locked up and it works fine. I never use my DTI's while under power. I agree, it has to be pretty hard on them with the needle bouncing, lol.
 
Indicator life is based on several things. Land configuration, 5R/canted land type VS conventional. Quantity of barrels you do. I doubt all but a few here will ever wear out an indicator. I've used one Interapid long stem indicator for 20 years. I had to have it reconditioned once. That was after probably 2000+ conventional land barrels. I've easily done 50% more than that since the rebuild that are primarily 5R. I don't lose sleep over using up tools. They make more of them all the time. If you freak out watching the needle jump when you start your set up get a few gage pins to insert into the bore to rough in the setup. They make quick work getting both the breech and muzzle very very close. You can also just back the indicator off the lands while you work on the muzzle. It's no big deal.
In regards to taking a .0001" indicator and changing out the stem. Tried it didn't like it. The reason is to know you have the barrel/throat running within tolerances you want you have to get to zero runout on the indicator because the resolution is out of calibration. It drove me nuts for awhile. Using the correct indicator and stem when it shows 2-3 tenths that what it is and it's time to go to work.
You can take these indicators apart very easily. I've taken mine apart to clean accumulated oil out of the bottom of the face where I've had the occasional drip land on the indicator.
Here's a tip. I get consistent easier to read numbers when my ball is slightly above the centerline.