• Watch Out for Scammers!

    We've now added a color code for all accounts. Orange accounts are new members, Blue are full members, and Green are Supporters. If you get a message about a sale from an orange account, make sure you pay attention before sending any money!

I made a stock

Ledzep

Bullet Engineer
Full Member
Minuteman
  • Jun 9, 2009
    4,156
    4,886
    Hornady
    I posted a couple pics earlier in a different section but figured maybe some folks would like to see how this came together. I think the idea started brewing after someone posted a thread about which rifles look the best. I've always been a huge fan of nice walnut, and go for the M52C/D, Pre-64 M70 target stocks, CG-63's, and dig the L42a1 look... So I mulled it over and found www.cookwoods.com one day and started looking through their selection of gun blanks... Then mulled it over a bit more and called American Rifle Co. and asked (I'm sure to their bemusement) if they had any scrap/prototype XYLO chassis I could buy for cheap to use for a mini-chassis in a wood stock. Turns out they had one and we were able to work out a deal so I pulled the trigger on a $650 Claro walnut blank and got after it... Luckily I have access to an old manual mill and was able to borrow enough tooling to make this not an entirely heinous effort, but I will definitely NOT be doing this professionally... A once-every-5-years kind of pain that takes a while to forget :)

    For pretty much all of the exterior and detail work that wasn't done in the mill, I used files, chisels, and rasps because I've watched people irrecoverably burn up $500-800 blanks on a belt sander... Wasn't in the mood to go there. This is the first time I've done one of these so pretty much every step spiked the anxiety meter...

    Okay picture dump... this may take a few posts.

    Sacrilege:
    KIMG2296.JPG


    KIMG2297.JPG


    Some small amount of milling and filing later... An ARC Mini-chassis!
    KIMG2298.JPG


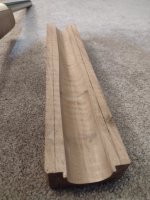
    The chunk of wood and the plan...
    KIMG2305.JPG


    First terrifying cuts out of the way...
    KIMG2307.JPG


    Cleaning up some surfaces to mount it in two vices on the mill for the inlet.
    KIMG2311.JPG


    Inletting:
    Decked the entire top surface to make it all flat/square. Barrel channel inlet mostly completed with a 1" ball endmill. The rest was 3/8 and 1/2" squares to make room for the mini-chassis.
    KIMG2316.JPG


    KIMG2317.JPG


    KIMG2327.JPG


    Begin the file-work.... Some shapes not going to happen on a manual mill.
    KIMG2325.JPG


    Some stuff is easy mill work, though :)
    KIMG2328.JPG


    More Filing... Cut and check, cut and check..
    KIMG2332.JPG


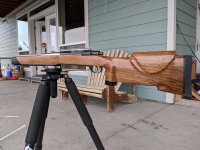
    Some rough shaping knocked out. I slabbed about 3/8" off each side to get close to final width before hitting it with rasps/files. I didn't really have a clear picture of what to do for the grip, so I just kept cutting it away until it fit my hand. Felt where it would contact my hand first, then remove that material until basically my entire palm hit all at once.
    KIMG2336.JPG


    A lot more filing and shaping..... Had a buddy cerakote the mini-chassis and I believe by this point I had it epoxied into the stock. Butt-plate fitting was fun (not..). Kinda at the 90% done, 90% to go stage.

    KIMG2697.JPG


    More to come...
     
    IMG_20211015_214658560_HDR.jpg

    Handguard beginning
    Fits a 1903a3 retainer.
    IMG_20211019_235603421.jpg


    Unfortunately I didn't take many more pictures of the process... Made the handguard and fit an 03a3 barrel band to hold the front end.

    Here's some QD flush cups going on. These eventually got SS escutcheons on the back side epoxied in.

    IMG_20220510_115553904.jpg

    First coat of oil.


    IMG_20220511_215648948.jpg


    And how it sits now...
    IMG_20220720_081513114_HDR.jpg
     

    Attachments

    • IMG_20211019_235648890.jpg
      IMG_20211019_235648890.jpg
      389.8 KB · Views: 229
    excellent work...better than i could do for sure

    funny, "old school" wood stock looks weird with a carbon barrel...i did a double take

    you expect a pencil blued
     
    • Like
    Reactions: Ledzep and 338dude
    I absolutely love the hand guard. Something different than usual, and it really makes the set up, to me. Not saying it would not be great without the hand guard, but now that I’ve seen it on there, it would look like b’dussy without it!
     
    The stock looks fantastic. I can tell you spent a lot of time on the grip area.

    There’s only 1 thing missing.
    Icing I know but the Xylo level that pops out the side of a wood stock would Be tits. Looks like you retained that section of the chassis.
     
    I've made a stock in a similar fashion from an ash tree I milled. FYI Whidden makes a mini chassis that's made for just this sort of thing but they aren't very good at machining things so def check it well before you epoxy it in. I had to send in the first one for a replacement. Also, give "Pro Custom Oil" a try. Brownells carries it. I think it's mostly Tung oil with some driers. It works very well. As a test I used it on a kitchen knife I made and I've used it nearly every day for about 2 years and it's still holding up like the day(s) I applied it.

    I LOVE the upper handguard. It's very CG63-esque. Beautiful work.

    -Dan
     
    That looks very nice. What did you chamber it in? I‘m curious if it’s comfortable with the steel buttplate? Or, perhaps the weight and Area 419 brake are to thank?
     
    Essentially the same results as using Aqua Fortis.
    Except AF still has a ton of acid in it, and once you’re done staining most people then rub the stock with baking soda to neutralize the acid so it doesn’t rust the barreled action that will eventually sit in it. The FeNO3 is neutral, and you don’t have to worry about low Ph. You can also safely mix it with alcohol so it dries really fast.
    ‘But, you are correct. Same (or very similar) results.
     
    Nice work. Mini chassis into a stock. Full free floated ? Also would have put a limbsaver pad on it...
     
    Thanks all!

    Yes, it's fully free floating under the handguard. It's chambered in 6.5 creedmoor. The way it's set up with the rear retaining band I have a .100" spacer that's 1.35" diameter between the barrel and receiver. It lets me run tl3 prefits in the mausingfield.

    The butt plate is from a '98 Mauser and the flat Mauser plates have always fit me well. In 6.5cm with the 419 brake it's comfortable. A thin limbsaver would probably be better but I worry about longevity. Probably not worth worrying about.

    Good tip on the FeNO3. I'll look into that. There are a few things that I might eventually touch up or change but I'm happy with it for now. Gonna get some use out of it. It's right under 12lb as pictured so I'm going to do some NRL hunter comps with it.
     
    • Like
    Reactions: iceng
    Thanks all!

    Yes, it's fully free floating under the handguard. It's chambered in 6.5 creedmoor. The way it's set up with the rear retaining band I have a .100" spacer that's 1.35" diameter between the barrel and receiver. It lets me run tl3 prefits in the mausingfield.

    The butt plate is from a '98 Mauser and the flat Mauser plates have always fit me well. In 6.5cm with the 419 brake it's comfortable. A thin limbsaver would probably be better but I worry about longevity. Probably not worth worrying about.

    Good tip on the FeNO3. I'll look into that. There are a few things that I might eventually touch up or change but I'm happy with it for now. Gonna get some use out of it. It's right under 12lb as pictured so I'm going to do some NRL hunter comps with it.
    Sheeeit Boy, I'm impressed.
    Very nice job indeed. I really like the forend hand guard. Reminiscent of the old Mausers which I've always liked the look of. I like what you've done with the butt stock & pistol grip, functional but classy for that kinda stock.
    Excellent job, really glad it turned out for you.
     
    • Like
    Reactions: Ledzep
    Thanks all!

    Yes, it's fully free floating under the handguard. It's chambered in 6.5 creedmoor. The way it's set up with the rear retaining band I have a .100" spacer that's 1.35" diameter between the barrel and receiver. It lets me run tl3 prefits in the mausingfield.

    The butt plate is from a '98 Mauser and the flat Mauser plates have always fit me well. In 6.5cm with the 419 brake it's comfortable. A thin limbsaver would probably be better but I worry about longevity. Probably not worth worrying about.

    Good tip on the FeNO3. I'll look into that. There are a few things that I might eventually touch up or change but I'm happy with it for now. Gonna get some use out of it. It's right under 12lb as pictured so I'm going to do some NRL hunter comps with it.
    It’s funny how you like the Mauser plate…the most uncomfortable rifle I have is a 1933 matching Mauser.

    I swear that’s why they lost the war…no one wanted to shoot it
     
    • Like
    • Haha
    Reactions: iceng and Ledzep
    Awesome work! Looks great. Be sure to give a range report once you shoot it a bit.

    Also, while it may take away some of the nostalgic look, the KMW Loggerhead hardware would be right at home there if you wanted adjustable cheek weld.

    Function and form.
     
    • Like
    Reactions: Ledzep
    It’s funny how you like the Mauser plate…the most uncomfortable rifle I have is a 1933 matching Mauser.

    I swear that’s why they lost the war…no one wanted to shoot it

    I grew up shooting a lot of the old milsurps and the only ones I specifically remember for pain is the 1903. The damn corner on those is brutal especially prone.

    As far as comb adjustment, I have it fairly high on this as-is. Basically where most "medium" rings put things right in line. The bore centerline extends straight back to the top of the comb. If, down the road, I decide to put something with a 56mm objective I might have to reconsider. There are enough 40-50mm objectives out there I think I'll be okay, though. I think I'll probably end up with a 4-16 ATACR F1 on it some day.

    Hopefully will get some time to do some load work for it in the next week or two. It shoots Hornady 147 match ammo about .8 MOA for 10 shots which is not horrible but I'm going to try a few different things to see if there's not a little better to be had.
     
    Good tip on the FeNO3. I'll look into that. There are a few things that I might eventually touch up or change but I'm happy with it for now. Gonna get some use out of it. It's right under 12lb as pictured so I'm going to do some NRL hunter comps with it.
    Dunno about FeNO3 but if you get a hankering to bring out figuring in wood, consider going old school w alconet root infused oil.

     
    Oils will bring out the figure if it’s there. Colored oils, stains, dyes are for coloring. Only time I use stains or colored stuff is if I have to blend sapwood (gross) or if using kiln dried walnut.

    Kiln dried walnut is purple and needs some orange, red, brown, and maybe some yellow to make it look like air dried walnut.
     
    Well, we all have differing views and opinions....what else is new! haha

    These are alkanet root oil finish stocks made with very high grade walnut and to my eye they are perfect and that dark figuring is dramatically brought out by the alkanet infused oil.

    1658773524719.jpeg
     
    Well, we all have differing views and opinions....what else is new! haha

    These are alkanet root oil finish stocks made with very high grade walnut and to my eye they are perfect and that dark figuring is dramatically brought out by the alkanet infused oil.

    View attachment 7919352
    Beautiful.

    These are English walnut and will be a similar reddish/color once oil is applied.

    4799E331-8B8B-476D-BD57-DAF3F3659768.jpeg


    This is air dried claro walnut with just mineral spirits applied:
    0101D881-E079-417E-936C-B499AEF9640C.jpeg


    I love nice wood (no homo)

    I pull grain and chatoyance by doing a multi-step finish. I start with several coats of thinned finish until it gets a slight build. Then I’ll use stronger coats as needed depending on what look I’m after. Personally, I prefer high gloss like your beautiful gun stocks!
     
    • Like
    Reactions: Ledzep and Baron23
    Beautiful.

    These are English walnut and will be a similar reddish/color once oil is applied.

    View attachment 7919423

    This is air dried claro walnut with just mineral spirits applied:
    View attachment 7919424

    I love nice wood (no homo)

    I pull grain and chatoyance by doing a multi-step finish. I start with several coats of thinned finish until it gets a slight build. Then I’ll use stronger coats as needed depending on what look I’m after. Personally, I prefer high gloss like your beautiful gun stocks!
    Oh no, those guns are not mine. I couldn’t possibly afford that pair. But they are an example of Alkanet infused oil finish and a look that I like very much.

    These are mine, however. And yes, neither are infused oil finished! Lol
    1658786241414.jpeg

    1658786280224.jpeg
     
    I saw this thread a while back and was really impressed by the finished stock. Then I just heard you talking about it on the hornady podcast. Pretty sweet! Excellent work!