Just couldn't go to sleep without knowing the answer, if it's a ring for a Nimrod scope rhat was used on an M-14 it's probably for M-852.
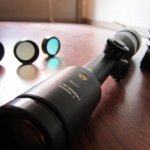
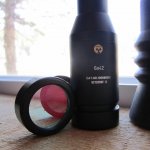
This is one of the Kahles/Photonics 6x42 scopes.

Follow along with the video below to see how to install our site as a web app on your home screen.
Note: This feature may not be available in some browsers.
Just couldn't go to sleep without knowing the answer, if it's a ring for a Nimrod scope rhat was used on an M-14 it's probably for M-852.
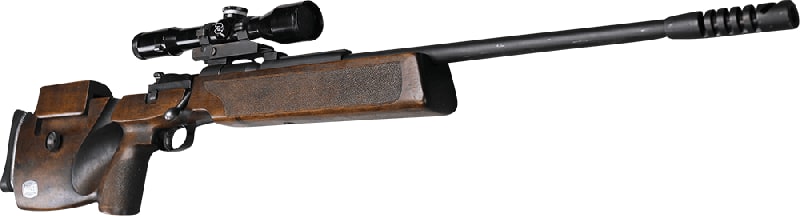
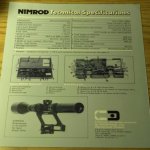
What is the approximate prices for the Italian M66 SP, with the Zeiss adjustable scope.
I may have the ability to buy the complete setup with the issue scope.
תודה על שירותך Gol1
 www.classicfirearms.com
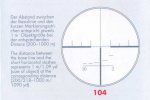
Through the scope shot. The quality of these is really amazing for a 1970s design. Great resolution and I like the reticle.

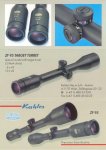
Thanks for this... you must have post it while I was typing this morning! Fantastic info!Good luck with the restoration. For clarification, the scope you have is not the Japanese-made 6x40mm 'Nimrod' scope, which was used by the IDF on M14s from 1984 to around 1994, but rather it is the 6x42mm Swarovski 'Futonic' scope, which was used from 1994 to approximately the 1998-99 when the IDF got their M24s. The M14 sniper/DMR rifles went into reserves until I think the IDF disposed of them in the mid-201Xs. Attached is the brief history. Many of these scopes came into the US via SAI around 1998-99 when the IDF sold some IDF M14 parts to SAI, who made a few hundred commerative IDF M1As in the late 1990s. As for the Nimrod, it was also used on the Galil sniper rifle, and maybe the Mauser 66 as well, but I'm not well versed in the later platform.
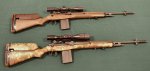
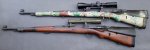
(Note: last picture shows what I think were the predecessors to the much more advanced Mauser M-66 sniper rifle, the old FN-made post WWII K98s that had been chambered in 7.62 NATO around 1958, and fitted with cheek risers and a claw-type scope mount. Top rifle with camo has the 6x40 Nimrod, and the bottom rifle (unpainted wood stock) has the old 4x Wilde-Herrrbrugg scope, which was actually used on the original M14 sniper from the early 1970s until 1984, when the Nimrod's replaced them. Just an fyi post of the early 1950-1970s era IDF Mauser snipers).
I think the more recent 6x Nimrod and 6x Futonic scopes were sold-off by the IDF round 2016, and all those one's I've seen in the US market were refurbished, probably via cleaning them and painting them with that thick black paint to make them look fresh again. Also shown is a painted stock on an IDF M14 sniper/DMR, which shows some of the colors used, etc. Anyhow, the glass on those German-made scopes is actually quite good, so enjoy it(!).
Oh man that is funny! BTW, I know the guy who did that.


You personally know the real life Hoot? Saw a interview of em one time on military channel, seems like a interesting dude..Oh man that is funny! BTW, I know the guy who did that.
Anyhow, sirhr, do you think this is a case of not only a really strong spring but maybe someone didn't foresee hardening these parts enough?
I went through SF scuba school with him in the summer of '83. Great guy. Delta has always had the reputation they have today.You personally know the real life Hoot? Saw a interview of em one time on military channel, seems like a interesting dude..
I know you’ve said you’ve gotten to work with the d-boys a few times when you were in...did you meet em while in the Army?
Also, not to go off track.. but did Delta have the same ultra-elite reputation back then, that they have nowadays?
Thanks for the reply on hardening. I wouldn't think that as anal the Germans are about manufacturing, that they would not have hardened the individual pieces the way they did. As you noted, and the proof is in the parts, it is the heavy spring.Sand... more when I get on a keyboard.
for now... pix and I will update with text when I get on laptop.
But success. Safety works like new. Removed .011” from safety engagement point on sear. That was measured, btw. Used depth gauge to determine how much to take off.
This is the sear that you will remember from above. I figured out how much to remove by assembling the rifle without the firing pin spring and then measuring the point at which the sear engages and the point at which the safety engages. Found that it was .010" off. And so cut .011" out of the end. I was going to do it with a file. But it was harder than woodpecker lips. Then I was going to try a small drum on a dremel, but that has lousy control and I have a thing about using dremels on good guns (they turn them into bad guns in a hurry...). So set this in the mill and using a 1/4" ballnose carbide endmill that I happened to have lying around, I got the radius re-cut and removed exactly .011". Followed that by a polishing with 600 paper and a slight radius at the top to help the engagement.
I also went over the whole sear with stones and 600 paper on a flat block. Cleaned all the burrs flat. Much better.
View attachment 7383872
With all that done, I reassembled with the mainspring in place. Its a lot of pressure to put it together. I imagine Mauser had a fixture. I used an arbor press and a small aluminum cored round to protect the firing pin. With everything in place, the safety snicks into place perfectly and works like it left the factory! I bet it takes a lot of heavy rounds to wear out a fine Mauser like this. And I bet the IDF snipers trained hard and fired a lot of heavy rounds! Fortunately, the bore looks nice and if it had to be re-barreled... is simple enough to do.
Safety off...
View attachment 7383874
Safety off. Note the 'Glock-style' safety on the safety. Rather ingenious little device for a rifle. Even if it did wear out!
View attachment 7383877
Finished action. Watch for scale (@MarinePMI will appreciate it.)
View attachment 7383875
Scope finished, though I had the caps on the wrong turrets when I took this picture. Fixed now. it came out well, though a slightly more 'yellow' tan would have been more in keeping with IDF camo, this fits the bill. Once the rings come in, I can mount this and I figured out how to set the turrets for the zero. This is a wicked nice scope!! I'd like a bit more magnification, but this one fits the bill for now. Thanks again @buffalowinter. Hope I managed to do right by it!
View attachment 7383876
So until I get a range report, probably next Sunday, this is where we are. Mechanically functional. Scope I like. Ammo ready (match-grade full length re-size... though 150 not 168. I bet this thing likes 168). But after I fire form some cases I'll load with 168 and it will all be good!
Bet this thing drives tacks!
Cheers,
Sirhr
PS. @sandwarrior I don't call into question the hardening. The parts had hard in the logical places and soft in the logical places. And in some cases, like the sear, they did a really good job of hardening selectively so it's not too brittle. Hardening is an interesting balance. Too hard and your part breaks and is brittle. Too soft and it pounds out. Honestly, my guess is that these rifles were used hard for decades. In some tough conditions. Any rifle has a lifetime of service or an MTBF... and the safeties on these simply seem to have reached their lives. When the M66 was designed, it was as a hunting rifle (they even made an Africa Version) and then a target rifle. Not as a military-grade sniper rifle that shoots a lot more (heavy) rounds than most target rifles. And in more difficult conditions. So don't think there is an issue with hardening. Likely many other rifles would have 'died' long before this one did!
They’re the same way with cars. My dads a mechanical engineer and as a side job/hobby, a auto mechanic. He can work on anything but he prefers Mercedes diesels, that’s the only type of car he’ll own. Lol and he has like 5 of the damn things.Thanks for the reply on hardening. I wouldn't think that as anal the Germans are about manufacturing, that they would not have hardened the individual pieces the way they did. As you noted, and the proof is in the parts, it is the heavy spring.
Most everything I've seen from them is like that, i.e. precision tooling, old mausers, etc. Some would call it over-engineered. I call it FULLY engineered.
Amazing piece sirhr!View attachment 7387051
c. 1988 Harris Bipod mounted up. Scope in place. Mount all secure-like and ready to go!
Once I get the rifle zeroed at 100, I can dismantle the turrets and set the zero. The way they are designed, you can take them right down, slip the center lugs, and then have the rifle exactly on zero for 100, with BDC for 800. And wind calls left and right. They also lock, which is a really cool feature! You turn the outer ring to release them. Then change your POI, then turn the outer ring back down to lock the rings. Surprised that did not catch on. It's not fast... but no turret covers to lose!
It's a fantastic package.
Anyone want a free Pic rail for a Mauser 66? I milled one additional slot in the original rail and, Bob's your Uncle, have a perfect mount. So I don't need it. Those original rails are harder than a honeymooners pecker, btw. Used a carbide mill and even that was having a fun time taking .100 out of it.
Cheers,
Sirhr
Usually we only used the ammunition boxes which we called honeycomb, no cartridge carrier was officially issued but many soldiers used improvised ammo belts we made or on the unit level.View attachment 7430817
He shoots... he scores!!! The crowd goes wild....
Ok, not so much. But sniped this on eBay this afternoon. $150ish including shipping from EU. Basically new correct Protecto Kaddy case for an M66 IDF Sniper. Now to snag a cleaning kit and a sling have the whole package!
Did the IDF shooters (or anyone for that matter) use any kind of cartridge wallet back then? Or was that a later tacticool innovation.
Cheers,
Sirhr
Now to snag a cleaning kit and a sling have the whole package!
Hadn't even thought of a cleaning kit! Which cleaning kit is correct for the 66SP? Metal or tin box? Contents?
Thanks,
Trog

IDF Israeli Mauser, Israeli K98 Cleaning Kit | eBay
Very Nice Condition Surplus IDF K98 Cleaning Kit. Complete your Israeli K98 with this very cool military issue, Hebrew marked, IDF Israeli Mauser K98 cleaning kit.www.ebay.com
I bought one of these. I am guessing that, given the era, a plastic box is about right?
One left. Buy fast... unless Gol differs.
Cheers,
Sirhr
Interesting bit of kit.I've had my eye on it since reading your post.
I'll wait a second to see what Gol says, might have to buy piece by piece.
Oh, and while probably not period correct (per Gol's earlier comment), these might be fun:
It's two reloads of the magazine/chamber. Multiples of four aren't normal, so it might be correct for the 66 after all.
actually I don't remember what cleaning equipment we had, but I do know that the cleaning rod's we had were Parker Hale with black handle and yellow coating of the rod, I dont remember for sure if we got them with the M14's or the SP.
anyway I think everything in that period was improvised.
Sorry I can't be more helpful
^^^ this!You're amazingly helpful. We'll happily take what we get.
Thanks.
actually I don't remember what cleaning equipment we had, but I do know that the cleaning rod's we had were Parker Hale with black handle and yellow coating of the rod, I dont remember for sure if we got them with the M14's or the SP.
anyway I think everything in that period was improvised.
Sorry I can't be more helpful
exactly, but the idiots brought them with an "eye" so we had to pull them and not push.


