• Watch Out for Scammers!

    We've now added a color code for all accounts. Orange accounts are new members, Blue are full members, and Green are Supporters. If you get a message about a sale from an orange account, make sure you pay attention before sending any money!

Incipient Case Head Separation?

wilsonmj88

Supporter
Supporter
Minuteman
Aug 11, 2020
7
5
I would like to preface this question by saying I am brand new to reloading and I am erroring on the side of caution.

I have just finished de-capping and cleaning my brass. I noticed faint, but distinct, lines on my brass as shown in the picture below. All ~500 cases I have processed seem to have this line. I am concerned that this incipient case head separation that I have read about in my reloading manual.

This seems unlikely however since this is only once fired brass from a stock rifle. Is this incipient case head separation or am I just being paranoid? If it isn’t separation, what could it be for my knowledge. Here is some additional information to help answer the question.
- Caliber: 6.5 Creedmoor
- Once fired Lapua Brass from factory Berger ammunition (140gr Target Hybrid)
- Fired from a bone stock RPR.
- Only ran through a decapping die. I am not really seeing how the decapping die could make these marks.
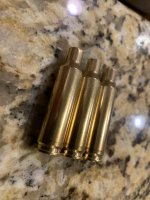
DB648231-A902-44AB-9BC6-E2F598DBD11D.jpeg
 
Are the lines on the brass at the lowest point the resizing die touches the cases?
 
For peace of mind, you can make yourself a tool to check. Get a paper clip, straighten it out enough so it can reach the bottom of the case. Make a small 90 degree bend on the end of the straight section. Scrape the inside wall with your new tool. You're feeling for a dip in the wall instead of a smooth transition. If you can feel an obvious valley, toss the brass. If it's smooth, keep it.

Here are some examples:

YjQuanBn


LmpwZw
 
I have not yet ran these through resizing. I have only decapped this brass so far. The decapping die has a good amount of clearance around the case and the line is a bit below lowest point of the die.
2711CC52-A529-40F8-9F80-948DF733FC39.jpeg
 
Something else to try, take out your bolt, stick a fired case in the chamber. See if that line is where the wall stops touching the case.
 
The pics are not detailed enough for anyone to know for sure. Based on what I see, you have nothing to worry about, especially given (1)"once fired" lapua and (2)every piece shows the same stretch marks. The brass must stretch and that is exactly where one would expect, hence discoloration. If you want a little peace of mind, check headspace.
 
With very excessive headspace cases can separate very quickly.... but as mentioned above- that looks like where the brass made contact with the barrel. The case head is thicker and it doesn't expand out and "grip" the barrel. Often times you get a line like that. It never hurts to check though.
 
Thanks for the help everyone.

Took a shot with the paper clip tool. I didn’t feel a valley but I did feel something. I decided to sacrifice a piece or brass. There seems to be a “step” at the location where the wall meets the internal radius. This is the same spot where the external ring is. The wall isn’t any thinner at this location. It looks to me to be a manufacturing artifact.

I ordered a headspace gauge as a check. It is on its way.

84AE29CE-C35F-4E7D-B37C-C22D970382E6.png
 
Looks normal to me- the paper clip test that @1588 gave you is the best way to test for incipient head separations. On the first firing there's no way you have a problem unless your rifle has drastically excessive headspace. Using a paper clip you can readily feel when the section of brass in front of the case web gets a thinner groove of stretched brass.

When setting your sizing die you need a tool to measure how much you are sizing your fired cases. There are several tools available but the ones I use are the Hornady Headspace Comparator (along with the associated Bullet Comparator to measure cartridge base to bullet ogive length), and precision case gauges like the RCBS Precision Mic or the Whidden Case Gauge. The RCBS and Whidden gauges are made for each specific cartridge and will let you measure both how much you're bumping your case shoulders back and they measure your case shoulders relative to SAAMI minimum. The Hornady Comparator is most useful for measuring how much your bumping your case shoulders back.

You will need to adjust your sizing die and to check it regularly. I check how much I'm sizing my case shoulders when I start a batch of reloading. You DON'T want to just run your sizing die down until it touches your shell holder.

Most of us bump our case shoulders back somewhere in the .002" to .003" range. Doing this I just got 8 reloading from Hornady 6.5 Creedmoor brass before my cases had significant incipient head separations and it was time to discard that batch of brass.

Excessive sizing will drastically reduce your case life because the brass will be stretching much more every time you fire it. I once didn't check my die adjustment for years and with a new batch of Lake City brass I was bumping my shoulders back .010" and my cases got incipient head separations by the 3rd loading.
 
Thanks for the help everyone.

Took a shot with the paper clip tool. I didn’t feel a valley but I did feel something. I decided to sacrifice a piece or brass. There seems to be a “step” at the location where the wall meets the internal radius. This is the same spot where the external ring is. The wall isn’t any thinner at this location. It looks to me to be a manufacturing artifact.

I ordered a headspace gauge as a check. It is on its way.

View attachment 7784002
What you're seeing is simply the lowest part of the case that expanded out to chamber diameter. All cases do it to some degree. It tends to be more pronounced visually in combos with larger chambers and/or slimmer brass.
 
If you’re going to toss them let me know. I’ll dispose of them for you.

(Dibs)
 
From the chamber as stated above

Where you cut the case head off is generally where it will split. Not where your “step” is

The paper clip is a good way to detect it. I had it on some 308 brass. I think Winchester but may have been hornady. About 10-15 firings on it. Didn’t look right and paper clip told the story. Was a touch higher than where you cut yours. Tossed the brass and started over
 
Last edited:
  • Like
Reactions: KZP
Minimal case growth and reasonable pressures throughout it’s life.
I figured that!!

I know a guy who loaded hot. Blew the case head in 3 loads on a Thompson center barrel. Went after it with a flat head screwdriver and vise grips.

That barrel was FUBAR
 
  • Wow
Reactions: Steel head
I have had a few off-the-shelf rifles that would leave this mark, the cylindrical ring near the base. I'm not sure why but the brass wasn't compromised. 500 pieces of brass fired one time? Seems unlikely to me but do your due diligence and check it out. Then go load them
 
the important question for the OP is what’s your initial case growth from boltface to datum on first firing?

That and reasonable sizing subsequently are the key to keeping case head separation gremlins under control.
 
Last edited:
  • Like
Reactions: NH4X
Wilson. Not the question but if you don't have a set of hornady head space gages, set of Redding competition shell holders and a bullet comparator you might think about purchasing them. Well worth what they cost.
 
Thanks for the information everyone. Very helpful. This is my first time reloading so I am still buying tools as I am going through the process. Headspace gauge and comparators are in the mail.
 
What you're seeing is simply the lowest part of the case that expanded out to chamber diameter. All cases do it to some degree. It tends to be more pronounced visually in combos with larger chambers and/or slimmer brass.

This is the actual answer.

Your chamber is a tiny bit fatter at the rear and your case body has expanded outward to try and fill that space.