Join the Hide community
Get access to live stream, lessons, the post exchange, and chat with other snipers.
Register
Download Gravity Ballistics
Get help to accurately calculate and scope your sniper rifle using real shooting data.

Install the app
How to install the app on iOS
Follow along with the video below to see how to install our site as a web app on your home screen.
Note: This feature may not be available in some browsers.
You are using an out of date browser. It may not display this or other websites correctly.
You should upgrade or use an alternative browser.
You should upgrade or use an alternative browser.
Gunsmithing just some pictures from this weekend's shop time.
- Thread starter 300sniper
- Start date
Re: just some pictures from this weekend's shop time.
and a quick video showing the range rod before chambering: http://www.youtube.com/watch?v=dSsloXwL5co
and a quick video showing the range rod before chambering: http://www.youtube.com/watch?v=dSsloXwL5co
Re: just some pictures from this weekend's shop time.
Looks great ! Your own personal build ?
Kirk R
Looks great ! Your own personal build ?
Kirk R
Re: just some pictures from this weekend's shop time.
<div class="ubbcode-block"><div class="ubbcode-header">Originally Posted By: ackleyfan</div><div class="ubbcode-body">Great pics,how bout some pics of your pillar bedding jobs! </div></div>
i only have one picture of a pillar bedding job and it is a crappy one from a cell phone. i use aics stocks for the most part so i don't do a whole lot of bedding.
Re: just some pictures from this weekend's shop time.
What poor bastard does that stock belong to?
What poor bastard does that stock belong to?
Re: just some pictures from this weekend's shop time.
<div class="ubbcode-block"><div class="ubbcode-header">Originally Posted By: Roccafella</div><div class="ubbcode-body"> What poor bastard does that stock belong to? </div></div>
i don't know but i heard the bottom metal inlet job was totally hacked

<div class="ubbcode-block"><div class="ubbcode-header">Originally Posted By: Roccafella</div><div class="ubbcode-body"> What poor bastard does that stock belong to? </div></div>
i don't know but i heard the bottom metal inlet job was totally hacked
Re: just some pictures from this weekend's shop time.
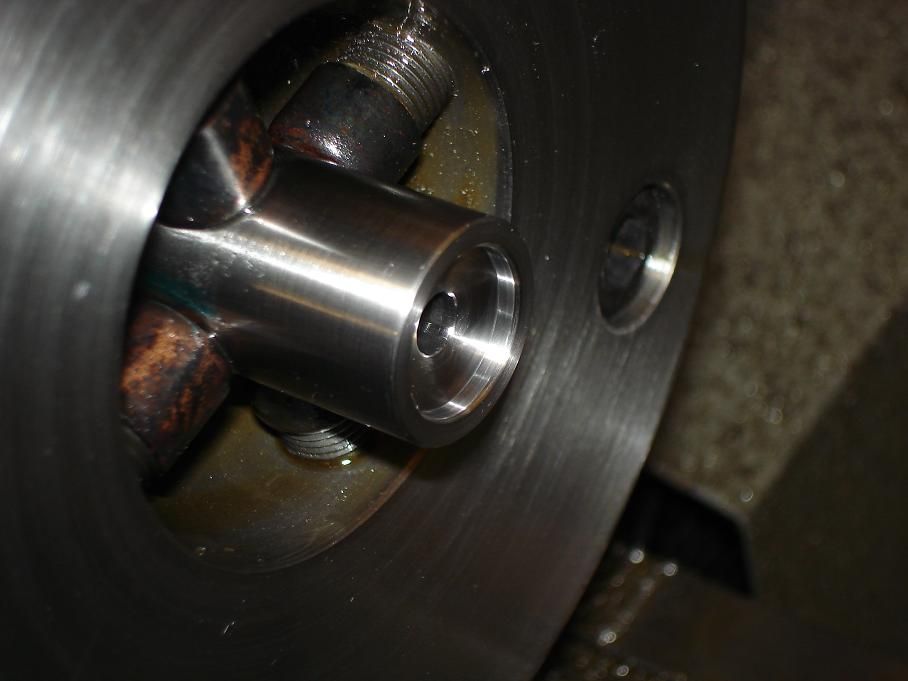
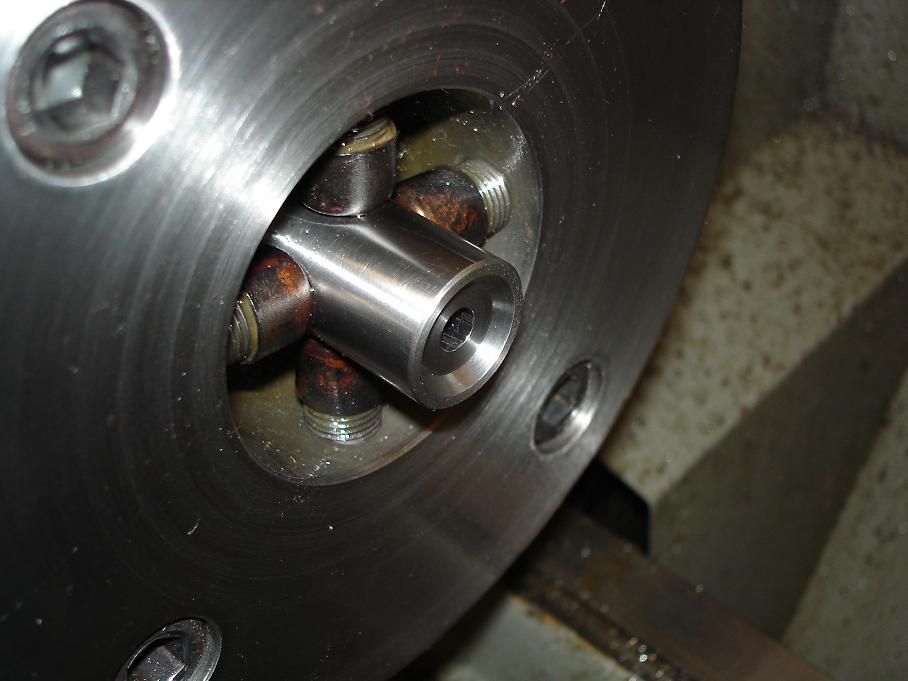
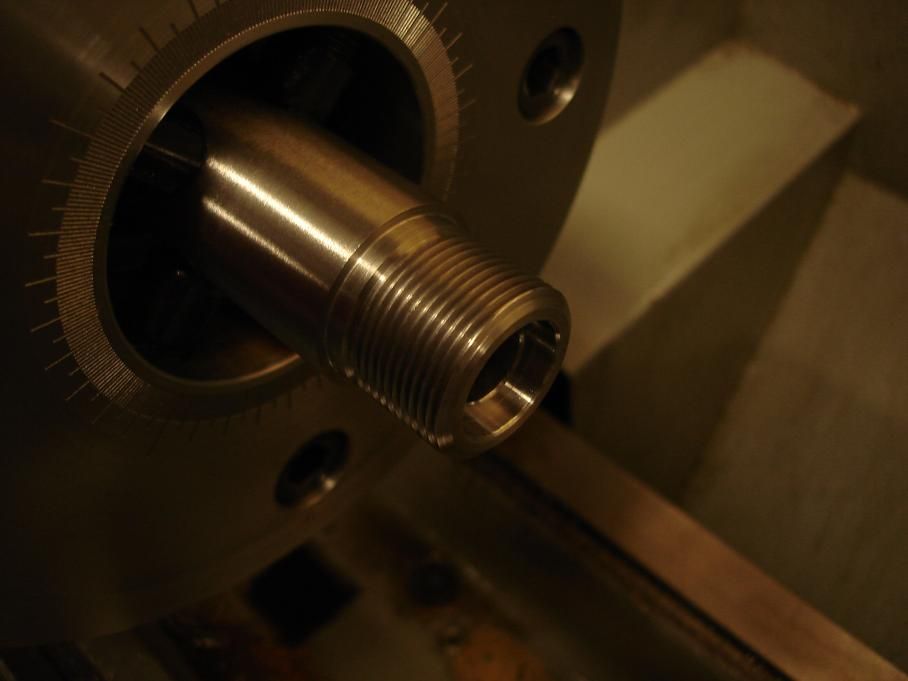
<div class="ubbcode-block"><div class="ubbcode-header">Originally Posted By: coelk</div><div class="ubbcode-body">who makes that chuck you are holding the barrel in?
How does it compair to the standard 4 jaw chuck? </div></div>
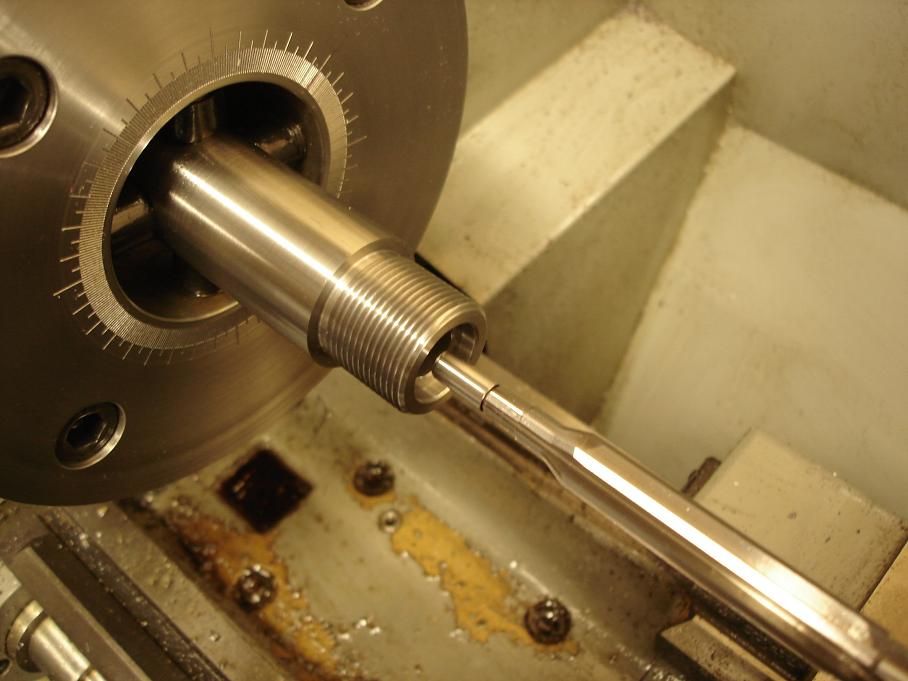
i made it. for dialing in a barrel with a rear spider, it works great. it doesn't replace a standard 4 jaw chuck for doing non-barrel work though because it does require support at the other end of the spindle.
<div class="ubbcode-block"><div class="ubbcode-header">Originally Posted By: coelk</div><div class="ubbcode-body">who makes that chuck you are holding the barrel in?
How does it compair to the standard 4 jaw chuck? </div></div>
i made it. for dialing in a barrel with a rear spider, it works great. it doesn't replace a standard 4 jaw chuck for doing non-barrel work though because it does require support at the other end of the spindle.
Re: just some pictures from this weekend's shop time.
Yeah good thing there are no undercarriage pics floatin around. That could be embarrassing.
Yeah good thing there are no undercarriage pics floatin around. That could be embarrassing.
Re: just some pictures from this weekend's shop time.
<div class="ubbcode-block"><div class="ubbcode-header">Originally Posted By: Roccafella</div><div class="ubbcode-body">Yeah good thing there are no undercarriage pics floatin around. That could be embarrassing. </div></div>
no one would believe anything said/posted by someone that quotes meatloaf in his signature
Re: just some pictures from this weekend's shop time.
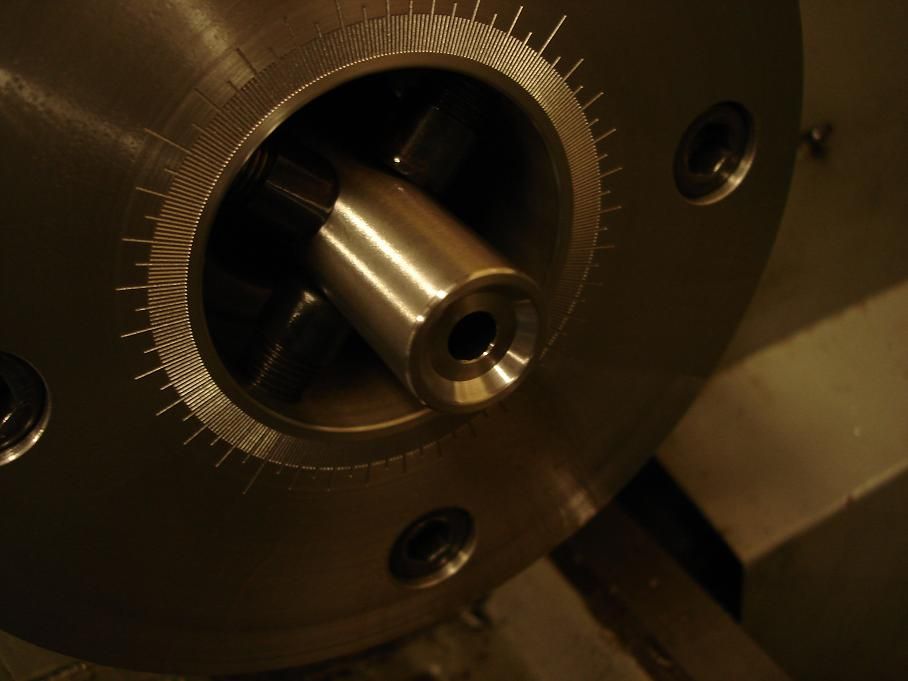
Now that looks like my idea of a great weekend but you are supposed to let the end of the indicator touch the rod so that the needle wiggles a little when you rotate it

Looks like another quality build in progress, keep us posted how it shoots.
Now that looks like my idea of a great weekend but you are supposed to let the end of the indicator touch the rod so that the needle wiggles a little when you rotate it
Looks like another quality build in progress, keep us posted how it shoots.
Re: just some pictures from this weekend's shop time.
Nice machine too, looks like mine
 . Well mine is cleaner, lol
Nice machine too, looks like mine
Re: just some pictures from this weekend's shop time.
<div class="ubbcode-block"><div class="ubbcode-header">Originally Posted By: keydiverfla</div><div class="ubbcode-body">Nice machine too, looks like mine
. Well mine is cleaner, lol </div></div>
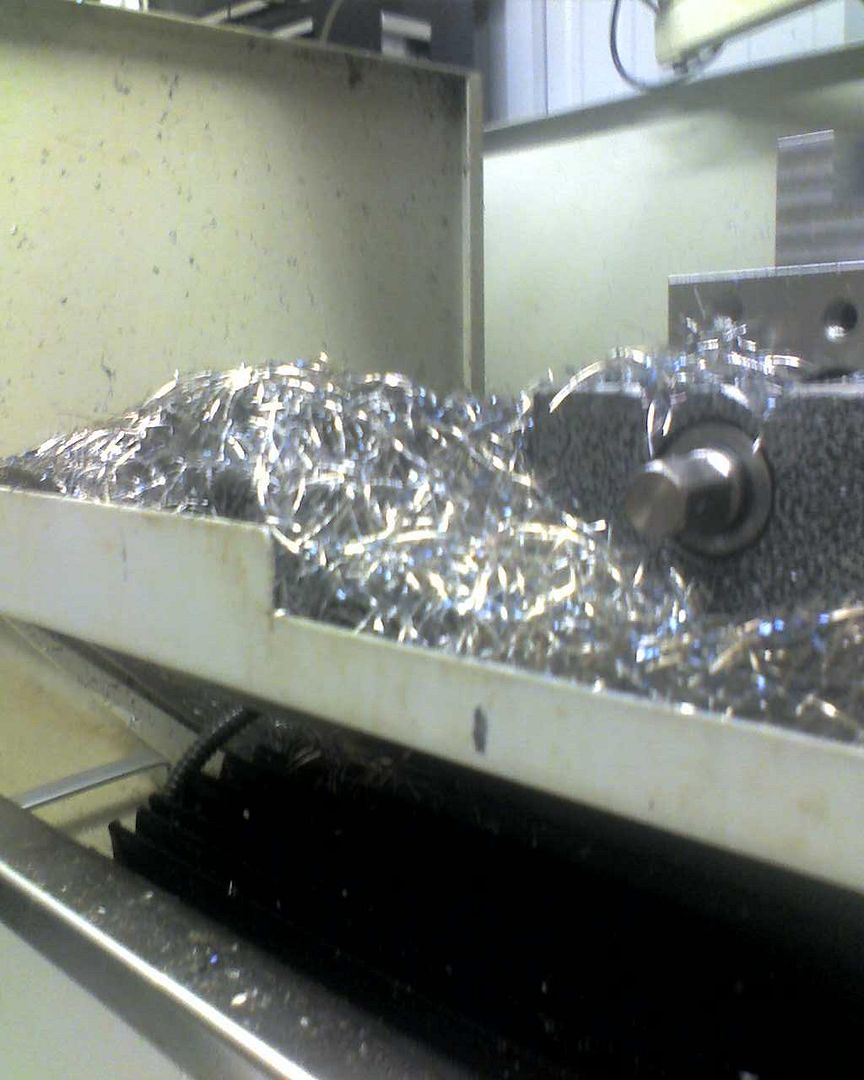
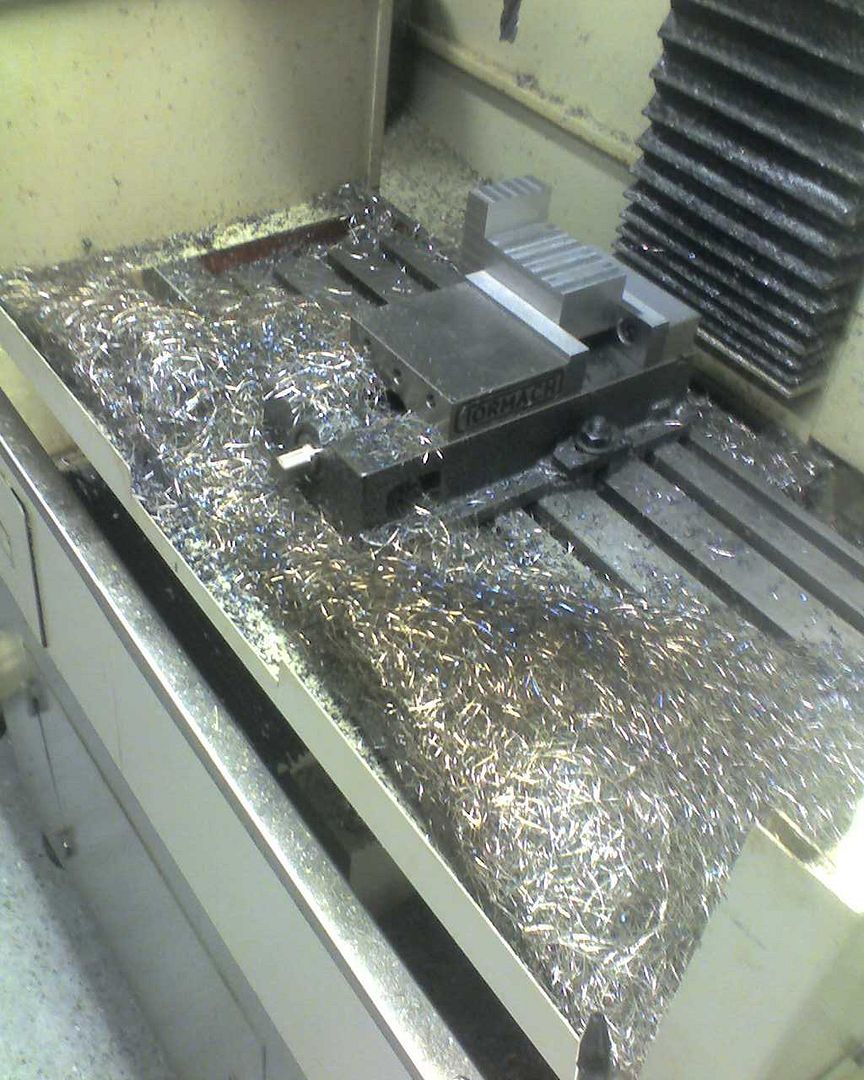
yeah, it needs a serious cleaning. so does my mill. i scooped out about 8 lbs of 1018 steel chips this weekend after one project.
40 minutes worth of chips from a 1/2" endmill:

<div class="ubbcode-block"><div class="ubbcode-header">Originally Posted By: keydiverfla</div><div class="ubbcode-body">Nice machine too, looks like mine
yeah, it needs a serious cleaning. so does my mill. i scooped out about 8 lbs of 1018 steel chips this weekend after one project.
40 minutes worth of chips from a 1/2" endmill:
Re: just some pictures from this weekend's shop time.
That is crazy lot of chips...
So 300sniper, are you taking on truing jobs yet?
That is crazy lot of chips...
So 300sniper, are you taking on truing jobs yet?
Re: just some pictures from this weekend's shop time.
<div class="ubbcode-block"><div class="ubbcode-header">Originally Posted By: SoCalPete</div><div class="ubbcode-body">That is crazy lot of chips...
So 300sniper, are you taking on truing jobs yet?
</div></div>
nope, not yet.
<div class="ubbcode-block"><div class="ubbcode-header">Originally Posted By: SoCalPete</div><div class="ubbcode-body">That is crazy lot of chips...
So 300sniper, are you taking on truing jobs yet?
nope, not yet.
Re: just some pictures from this weekend's shop time.
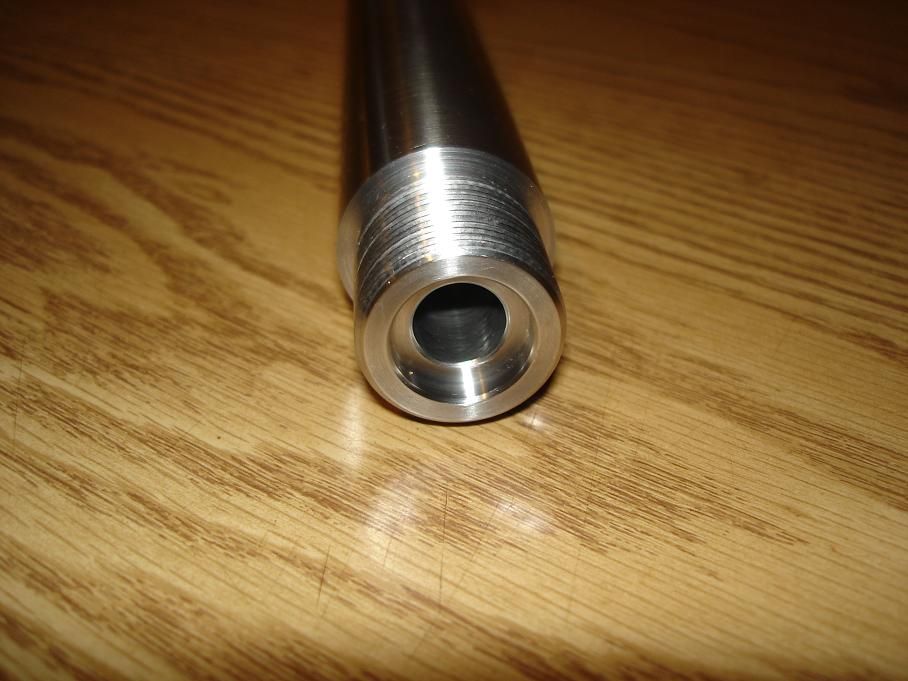
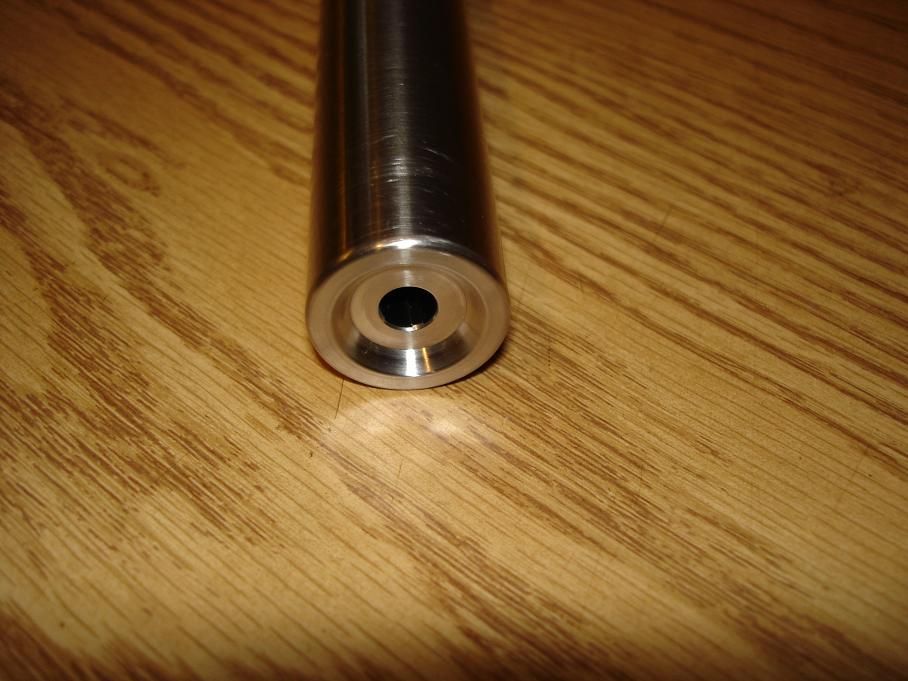
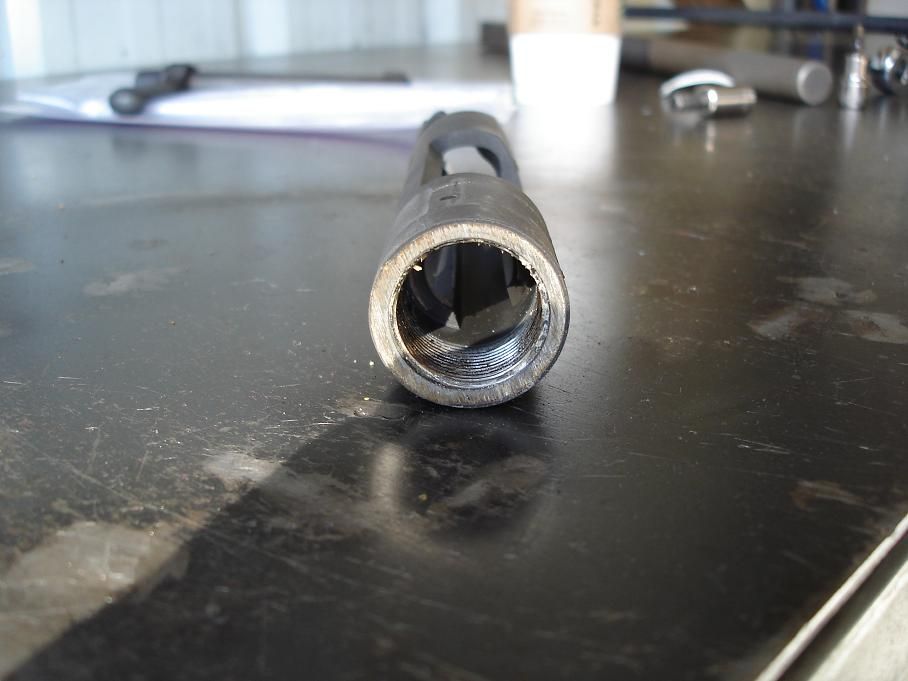
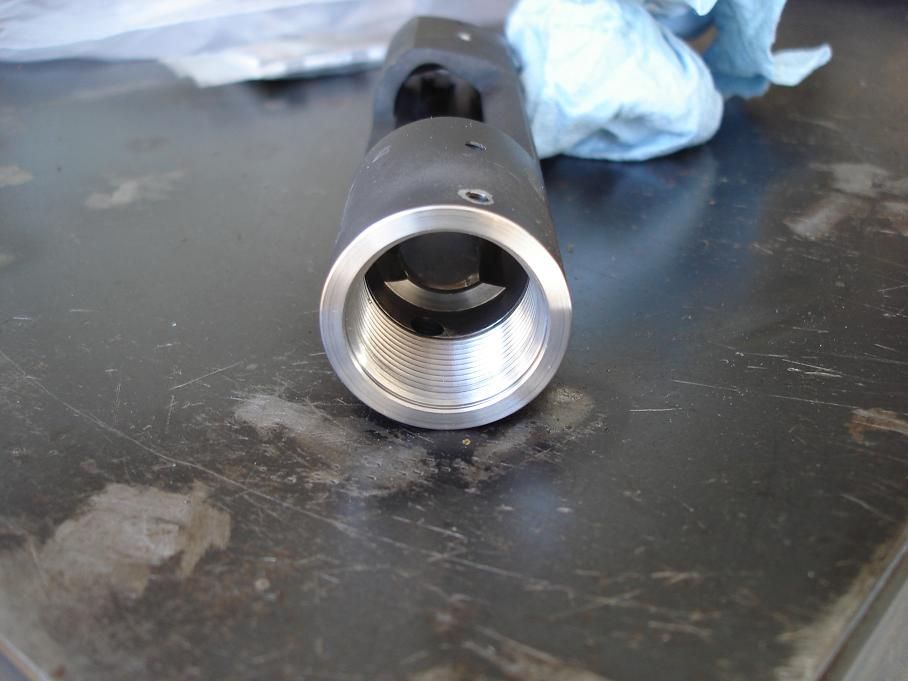
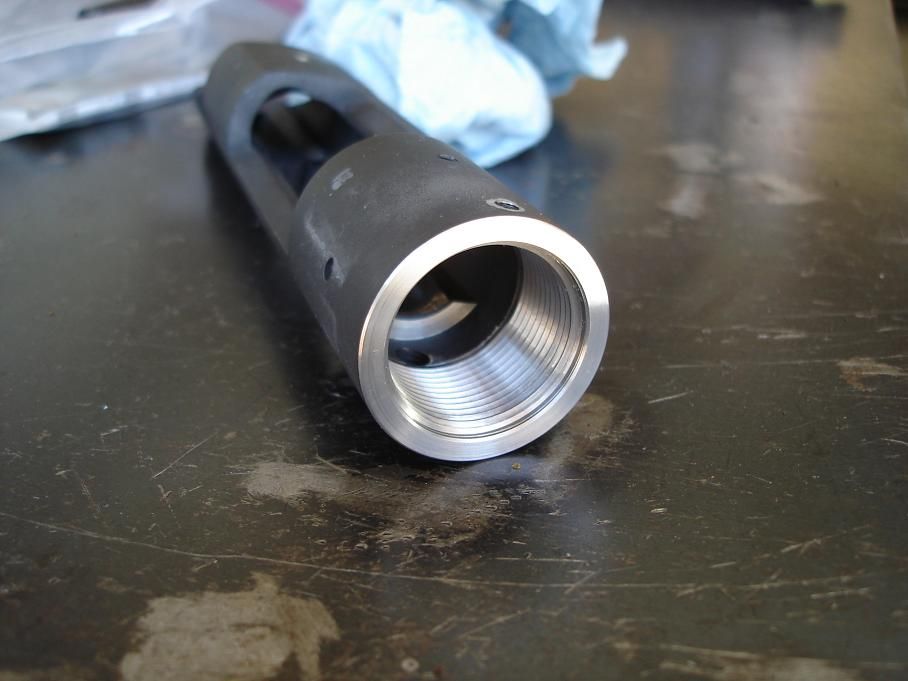
here's a few pictures from a project this morning.
this is the finish left by the cutting tool.
here are a couple after a light polish.
here's a few pictures from a project this morning.
this is the finish left by the cutting tool.
here are a couple after a light polish.
Re: just some pictures from this weekend's shop time.
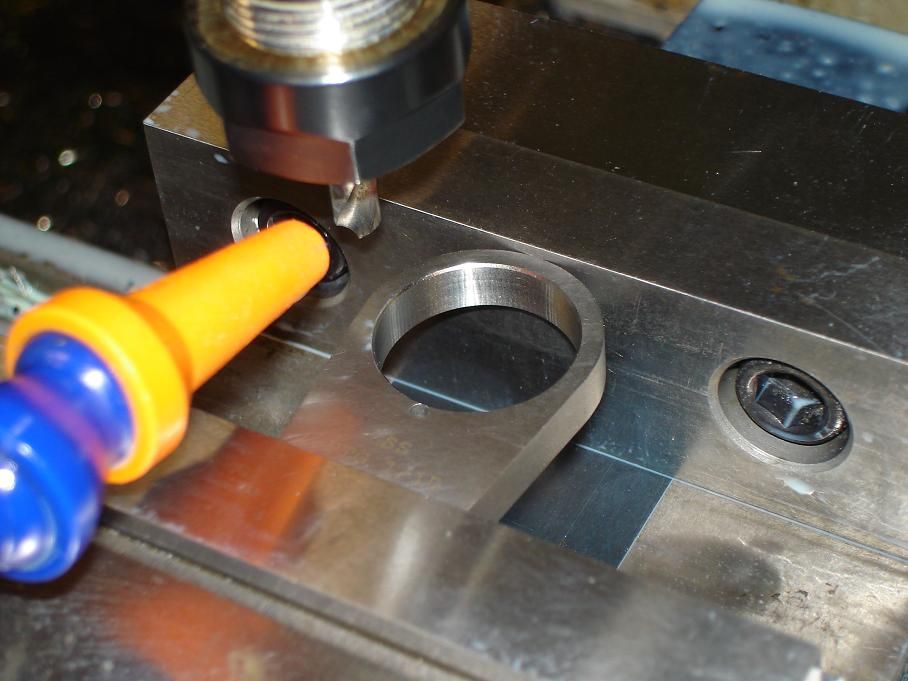
What are you doing the lug? opening the hole up or making the side parallel? If making parallel, dont you hit the vise?
What are you doing the lug? opening the hole up or making the side parallel? If making parallel, dont you hit the vise?
Re: just some pictures from this weekend's shop time.
<div class="ubbcode-block"><div class="ubbcode-header">Originally Posted By: cm92</div><div class="ubbcode-body">What are you doing the lug? opening the hole up or making the side parallel? If making parallel, dont you hit the vise? </div></div>
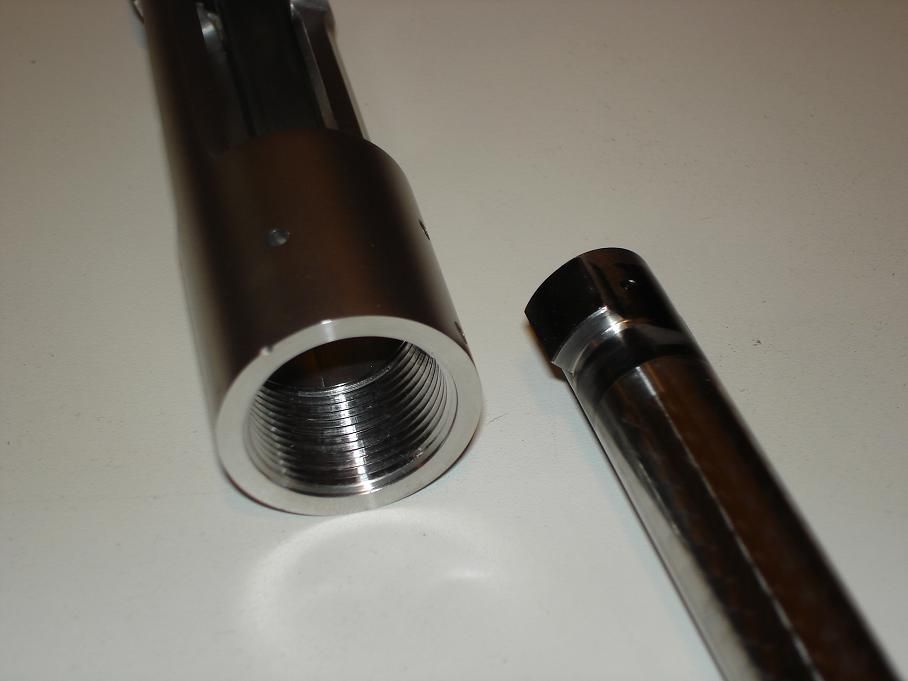
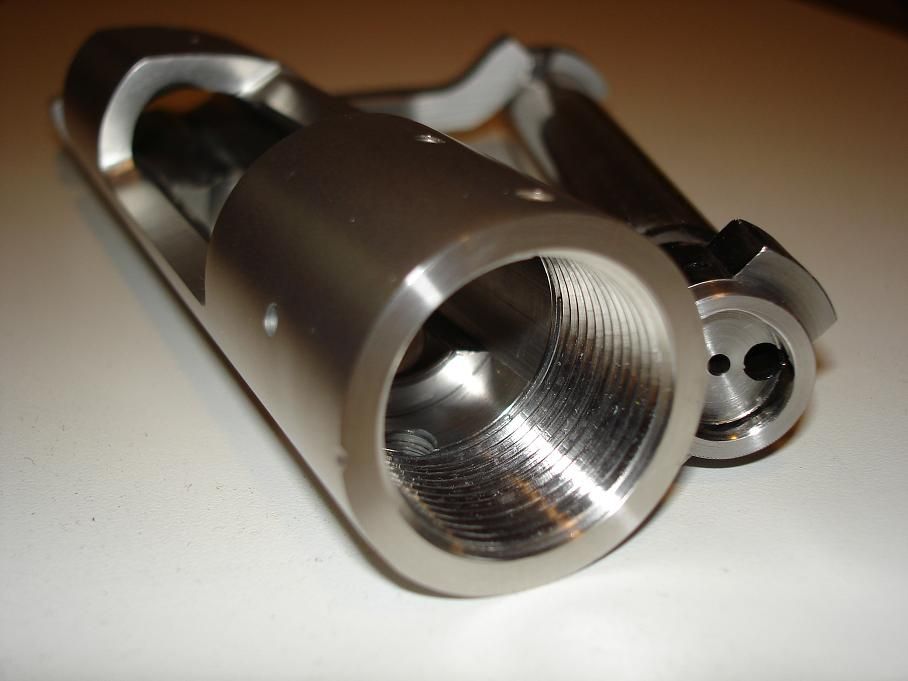
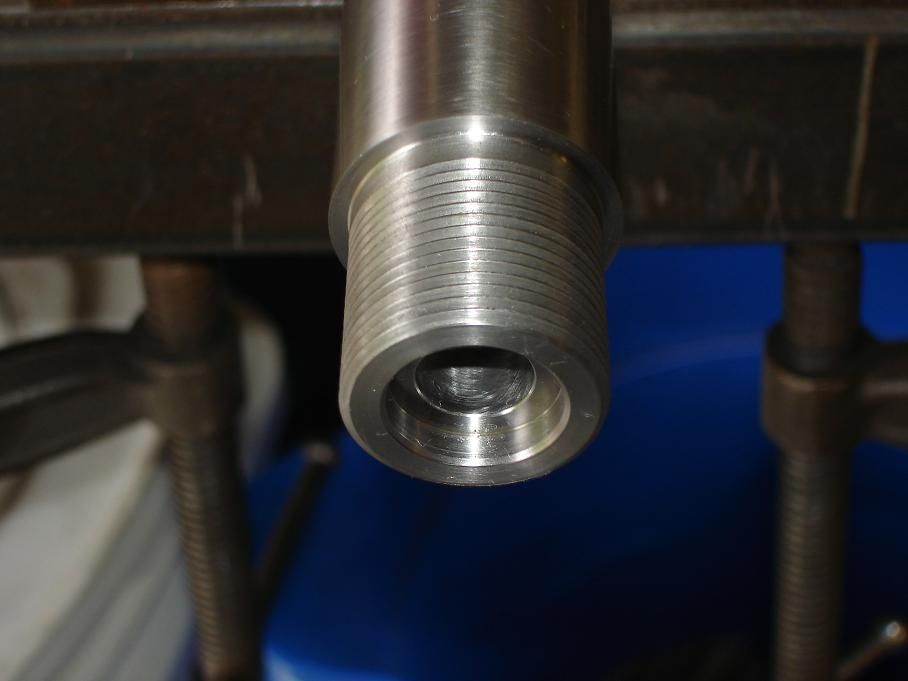
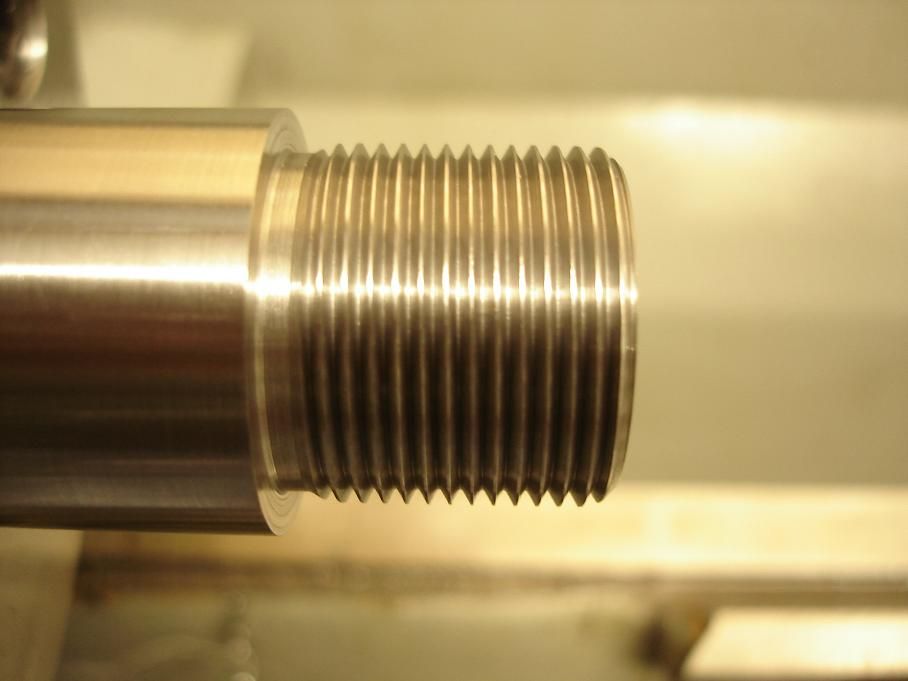
that was a ptg lug and was flat as can be. i opened the hole up for the new larger barrel tenon used on a trued remington receiver. i also added a chamfer to the side that faces the barrel shoulder so i don't have to worry about removing any radius left by the turning tool.
<div class="ubbcode-block"><div class="ubbcode-header">Originally Posted By: cm92</div><div class="ubbcode-body">What are you doing the lug? opening the hole up or making the side parallel? If making parallel, dont you hit the vise? </div></div>
that was a ptg lug and was flat as can be. i opened the hole up for the new larger barrel tenon used on a trued remington receiver. i also added a chamfer to the side that faces the barrel shoulder so i don't have to worry about removing any radius left by the turning tool.
Re: just some pictures from this weekend's shop time.
That's why I run roughing (corncob style) roughers. At least one of those sharp pointy bastards is gonna find a way
to stab me in a finger.
That's why I run roughing (corncob style) roughers. At least one of those sharp pointy bastards is gonna find a way
to stab me in a finger.
Re: just some pictures from this weekend's shop time.
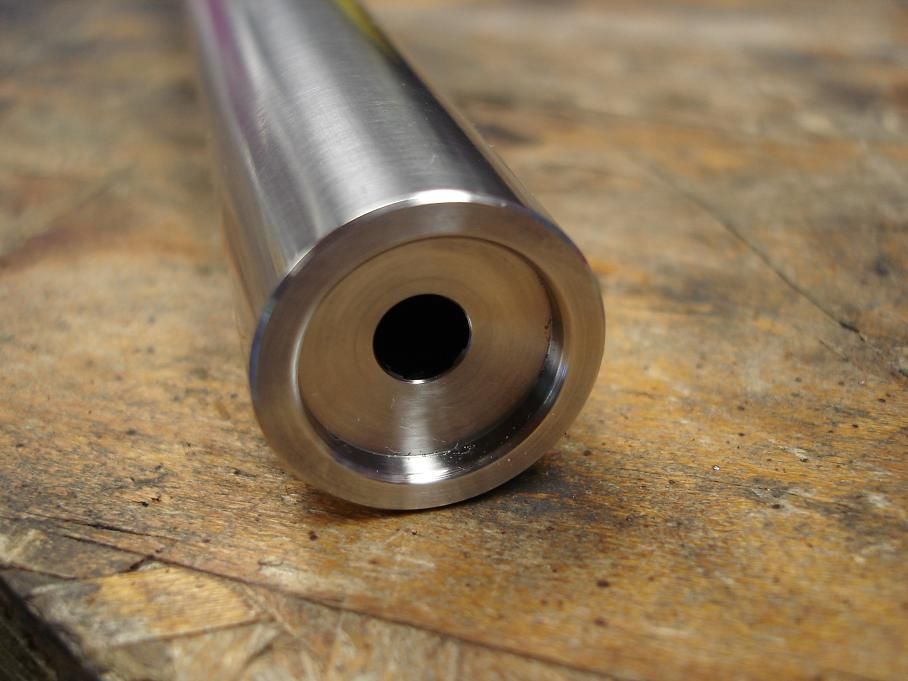
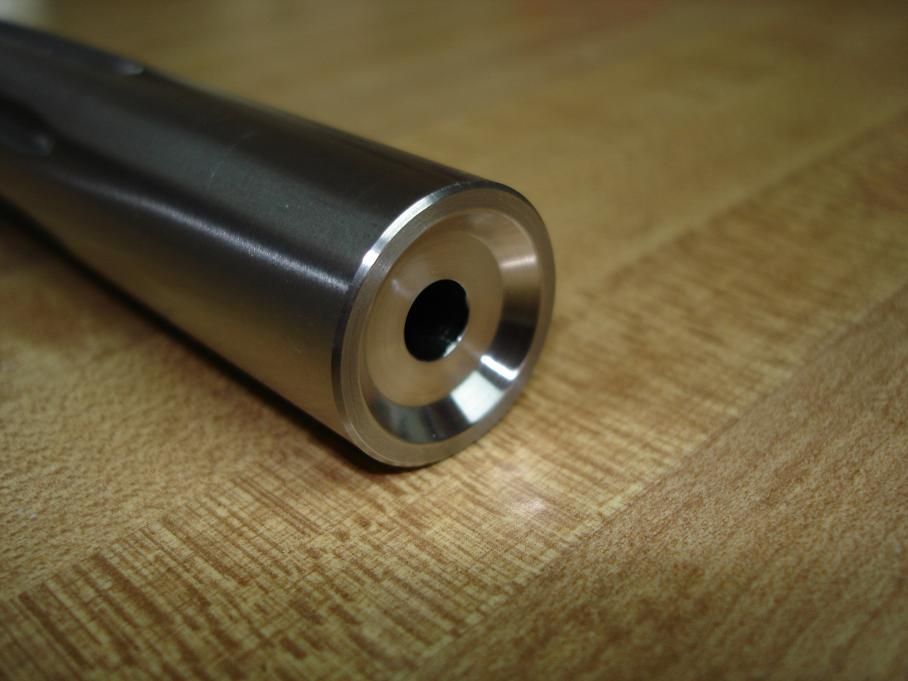
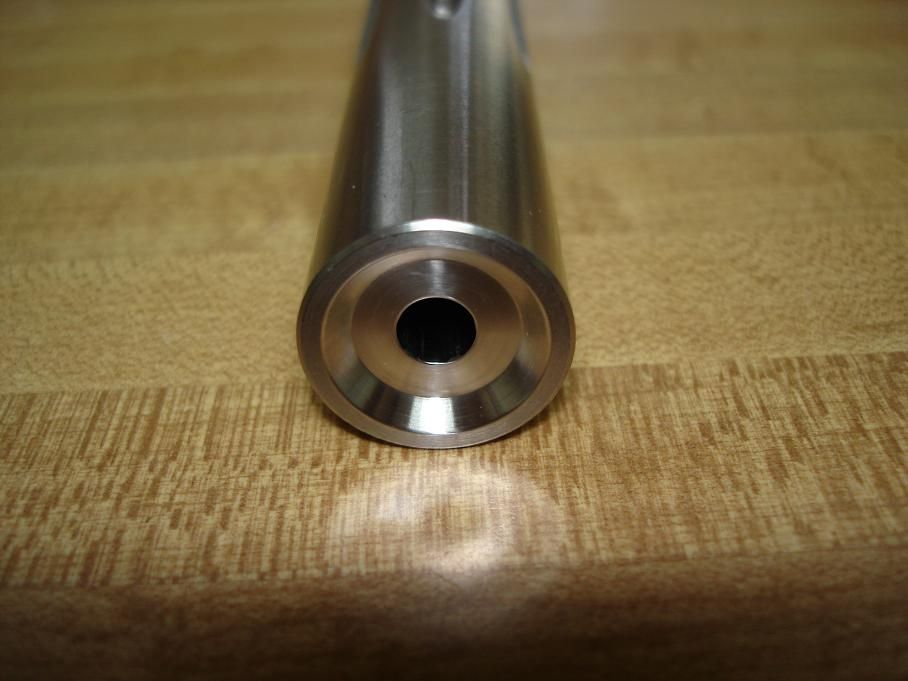
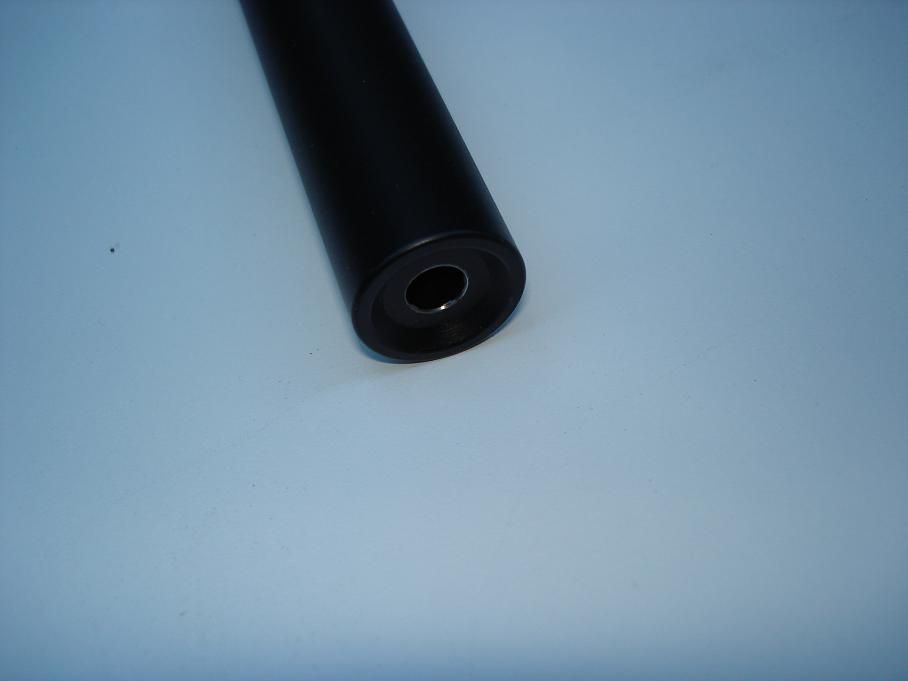
How sharp should the edge of a crown be? It looks like you put a small radius on it or is that just the shine?
Do you have to pull the barrel off the action to touch up the crown using your method of indicating them in?
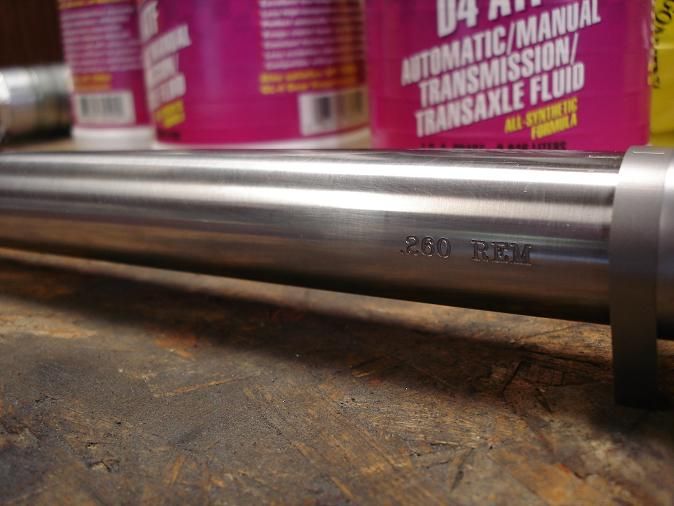
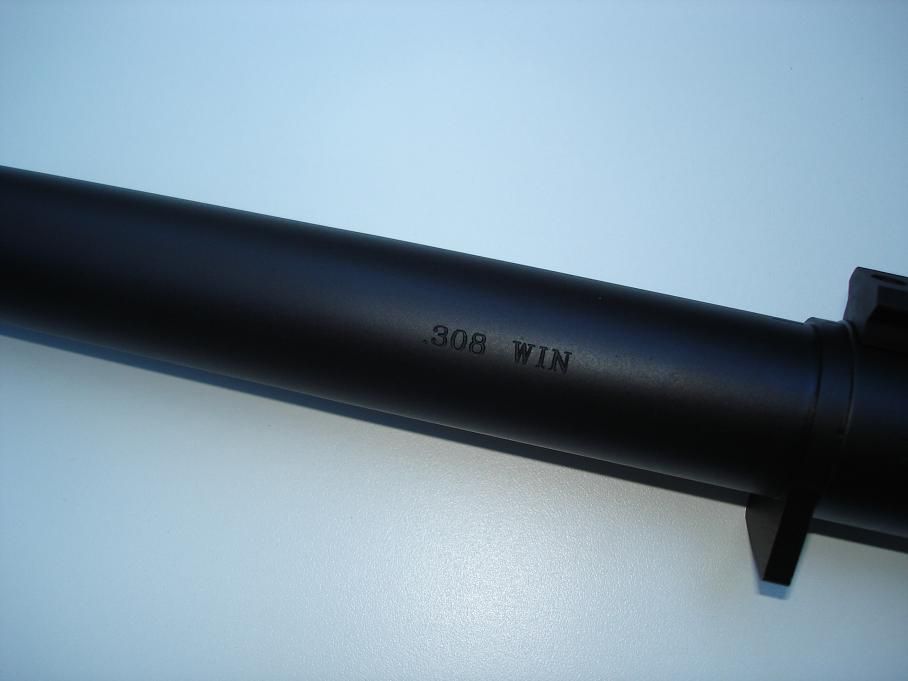
300sniper [img said:http://img.photobucket.com/albums/v654/300sniper/rifle%20tools/260-2muzzlecrown2.jpg[/img]
How sharp should the edge of a crown be? It looks like you put a small radius on it or is that just the shine?
Do you have to pull the barrel off the action to touch up the crown using your method of indicating them in?
Re: just some pictures from this weekend's shop time.
<div class="ubbcode-block"><div class="ubbcode-header">Originally Posted By: AJ300MAG</div><div class="ubbcode-body">
That's why I run roughing (corncob style) roughers. At least one of those sharp pointy bastards is gonna find a way
to stab me in a finger. </div></div>
that was more of an experiment than anything. i was trying radial chip thinning and it really worked well, even with my small machine. running 60 ipm in 1018 with a 1/2" 4 flute endmill .010" radial doc and 1" axial doc was something i hadn't done before. i was surprised how much material i was able to remove in a short time.
it doesn't matter what the chips look like, i always find a way to get them stuck in me, usually under a finger nail
Re: just some pictures from this weekend's shop time.
<div class="ubbcode-block"><div class="ubbcode-header">Originally Posted By: mdesign</div><div class="ubbcode-body">
How sharp should the edge of a crown be? It looks like you put a small radius on it or is that just the shine?
Do you have to pull the barrel off the action to touch up the crown using your method of indicating them in? </div></div>
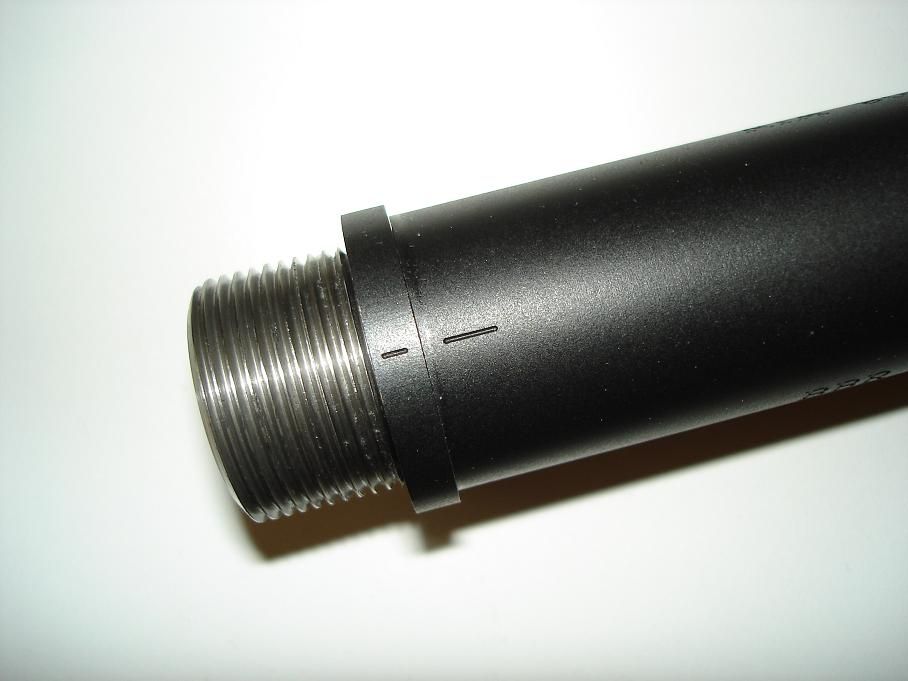
i have been putting a 60* included angle to just break the edge at the crown. some people leave them sharp but i feel this gives a bit more protection during cleaning.
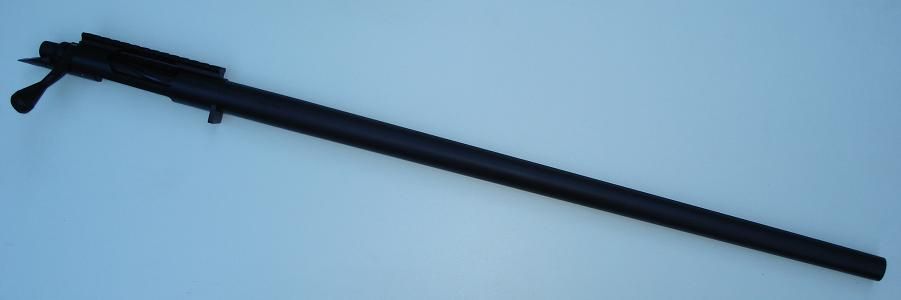
in my lathe, i can do muzzle work on a barrel as short as 19" from the recoil lug without removing it from the receiver.
<div class="ubbcode-block"><div class="ubbcode-header">Originally Posted By: mdesign</div><div class="ubbcode-body">
How sharp should the edge of a crown be? It looks like you put a small radius on it or is that just the shine?
Do you have to pull the barrel off the action to touch up the crown using your method of indicating them in? </div></div>
i have been putting a 60* included angle to just break the edge at the crown. some people leave them sharp but i feel this gives a bit more protection during cleaning.
in my lathe, i can do muzzle work on a barrel as short as 19" from the recoil lug without removing it from the receiver.
Re: just some pictures from this weekend's shop time.
Right into the pad of my trigger finger... the day before a match. Started doing AUTOCAD/programming work on Fridays. Boss will walk by, ask "shooting tomorrow huh".
Right into the pad of my trigger finger... the day before a match. Started doing AUTOCAD/programming work on Fridays. Boss will walk by, ask "shooting tomorrow huh".
Re: just some pictures from this weekend's shop time.
Thanks 300.
The crown on my rifle was turned using a steady rest without being indicated and I was just wondering how true it might actually be using your method of crowning a barrel. It's 26 inches long so it would probably have to come off the receiver.
Thanks 300.
The crown on my rifle was turned using a steady rest without being indicated and I was just wondering how true it might actually be using your method of crowning a barrel. It's 26 inches long so it would probably have to come off the receiver.
Re: just some pictures from this weekend's shop time.
<div class="ubbcode-block"><div class="ubbcode-header">Originally Posted By: mdesign</div><div class="ubbcode-body">Thanks 300.
The crown on my rifle was turned using a steady rest without being indicated and I was just wondering how true it might actually be using your method of crowning a barrel. It's 26 inches long so it would probably have to come off the receiver. </div></div>
If using a 90 degree crown, no chamfer, you might get away with that. Chamfer it and it's another story all together.
Re: just some pictures from this weekend's shop time.
<div class="ubbcode-block"><div class="ubbcode-header">Originally Posted By: mdesign</div><div class="ubbcode-body">Thanks 300.
The crown on my rifle was turned using a steady rest without being indicated and I was just wondering how true it might actually be using your method of crowning a barrel. It's 26 inches long so it would probably have to come off the receiver. </div></div>
in my lathe, i can do muzzle work on barrels as short as 19" from the lug and any length longer than that without removing the receiver (well i'd probably run out of room after about 12 feet or so
)
<div class="ubbcode-block"><div class="ubbcode-header">Originally Posted By: mdesign</div><div class="ubbcode-body">Thanks 300.
The crown on my rifle was turned using a steady rest without being indicated and I was just wondering how true it might actually be using your method of crowning a barrel. It's 26 inches long so it would probably have to come off the receiver. </div></div>
in my lathe, i can do muzzle work on barrels as short as 19" from the lug and any length longer than that without removing the receiver (well i'd probably run out of room after about 12 feet or so
Re: just some pictures from this weekend's shop time.
<div class="ubbcode-block"><div class="ubbcode-header">Originally Posted By: wnroscoe</div><div class="ubbcode-body"><div class="ubbcode-block"><div class="ubbcode-header">Originally Posted By: mdesign</div><div class="ubbcode-body">Thanks 300.
The crown on my rifle was turned using a steady rest without being indicated and I was just wondering how true it might actually be using your method of crowning a barrel. It's 26 inches long so it would probably have to come off the receiver. </div></div>
If using a 90 degree crown, no chamfer, you might get away with that. Chamfer it and it's another story all together. </div></div>
It's chamfered......thats what got me thinking when I saw the close up of the crown.
Re: just some pictures from this weekend's shop time.
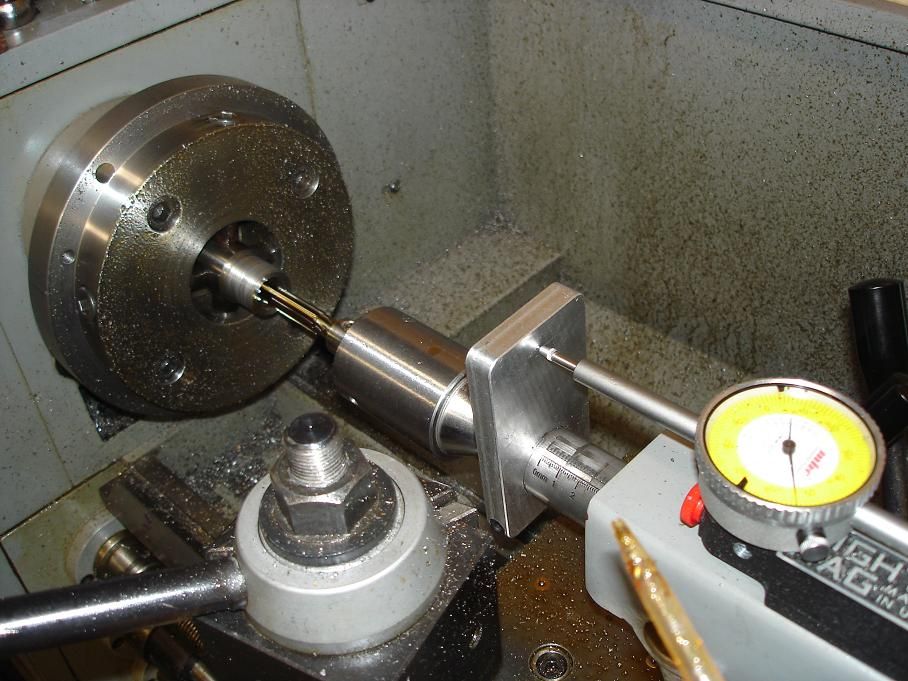
Hey 300 S Im curious,are you using a floating reamer holder or a center. It looks like a holder of some type can you tell me about your setup. I want to chamber with the bbl thru the headstock but my tailstock is about .005" high. I dont have a floating hoder so Im looking for some suggestions. I was also thinking to drill out some matl and bore the hole straight before reaming but im not sure on the reamer holder/ pusher type TIA Tony
Hey 300 S Im curious,are you using a floating reamer holder or a center. It looks like a holder of some type can you tell me about your setup. I want to chamber with the bbl thru the headstock but my tailstock is about .005" high. I dont have a floating hoder so Im looking for some suggestions. I was also thinking to drill out some matl and bore the hole straight before reaming but im not sure on the reamer holder/ pusher type TIA Tony
Re: just some pictures from this weekend's shop time.
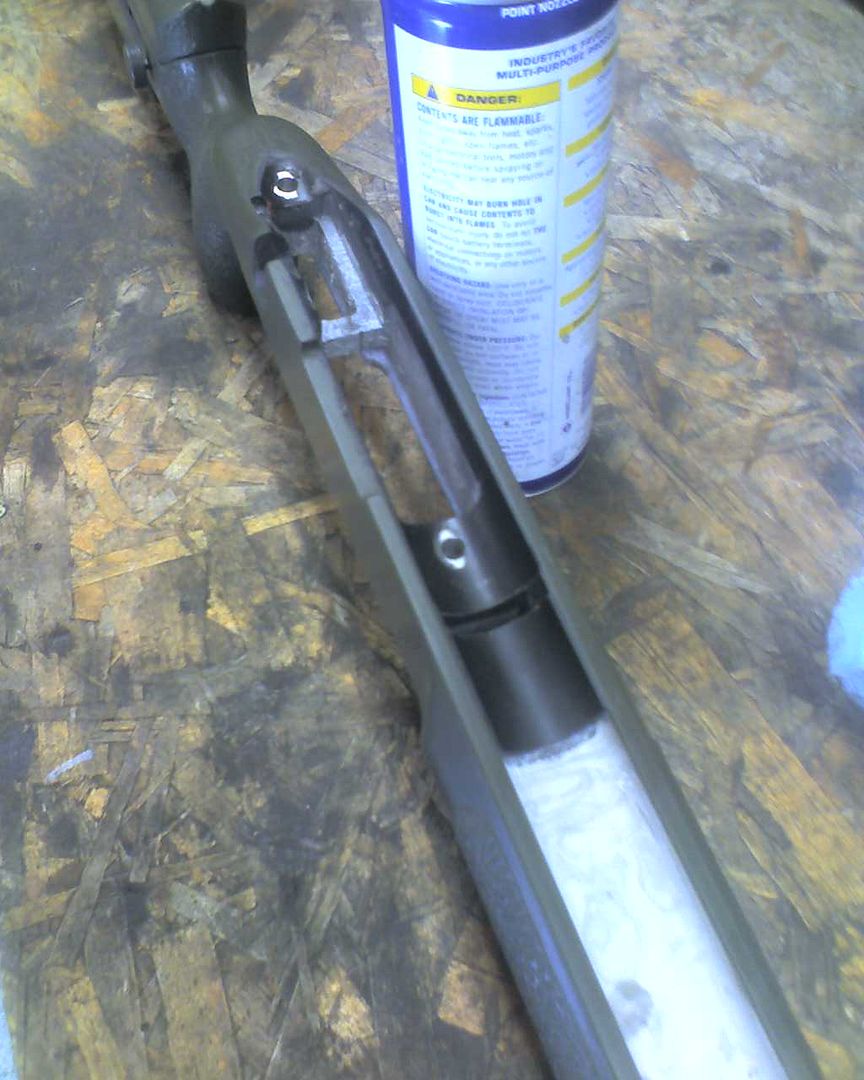
and some sort of bedding block i made for someone yesterday.
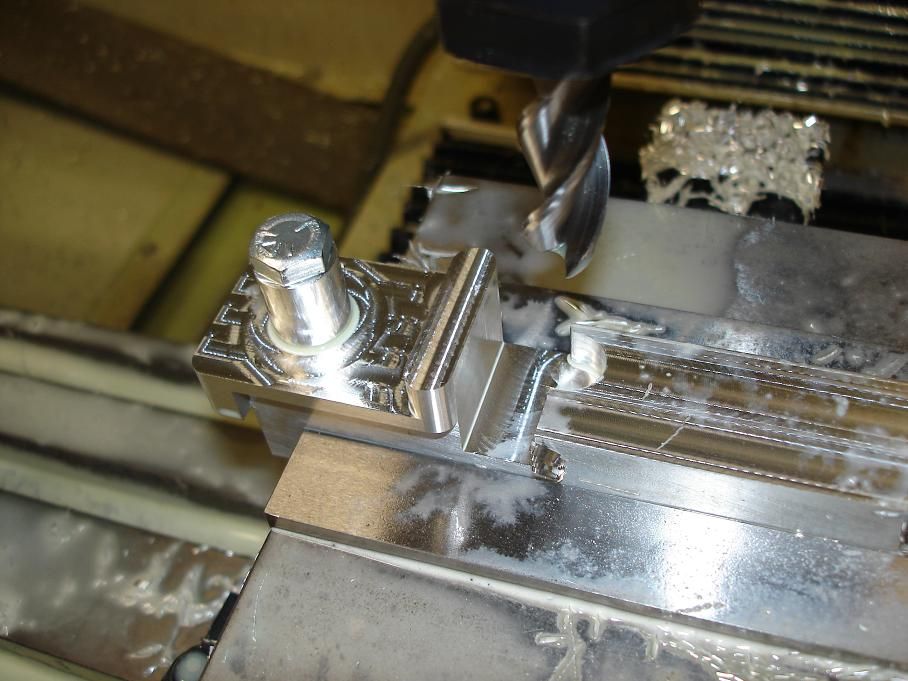
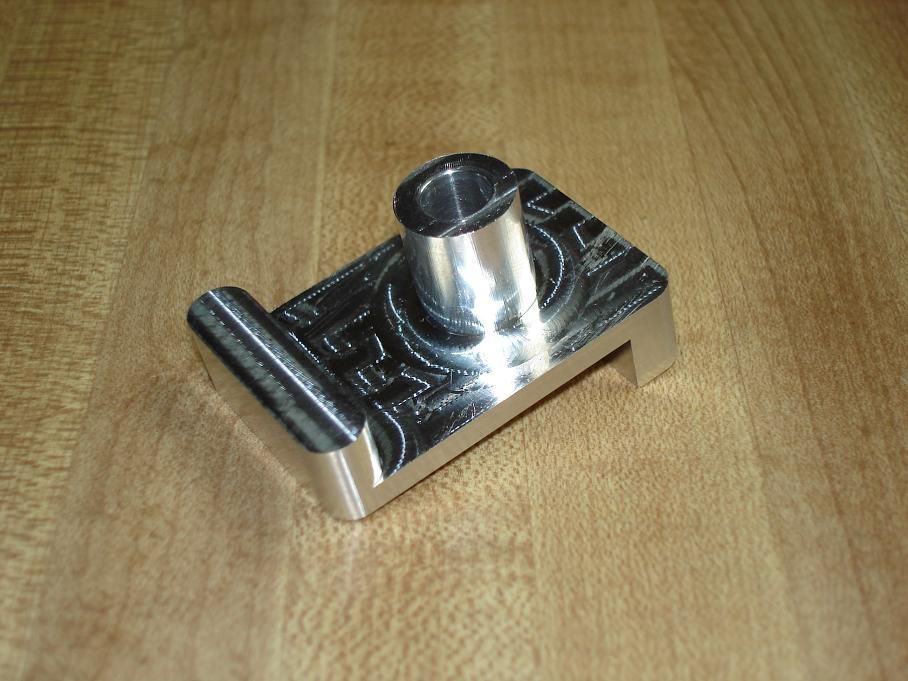
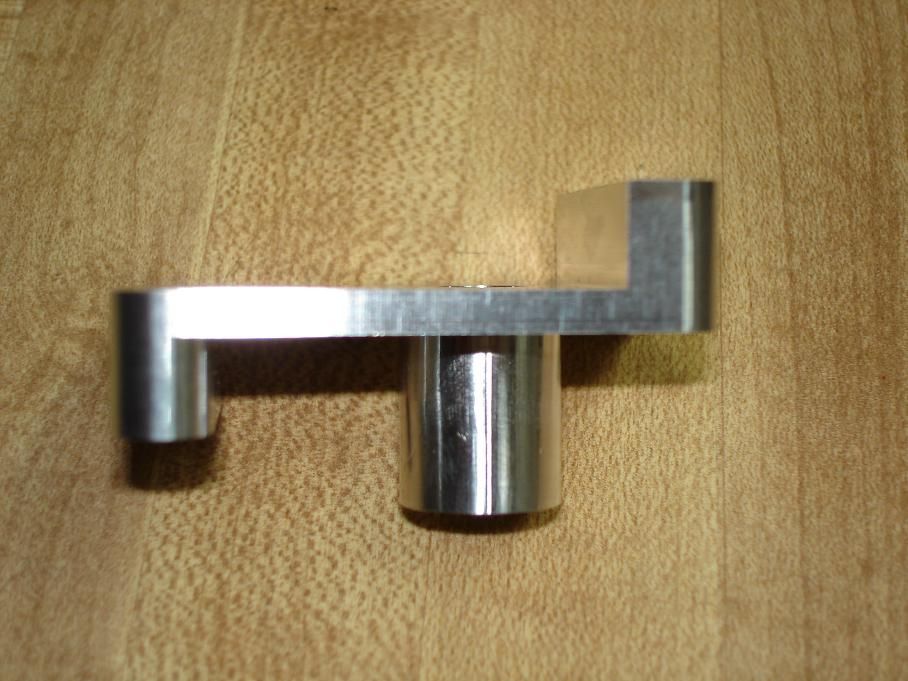
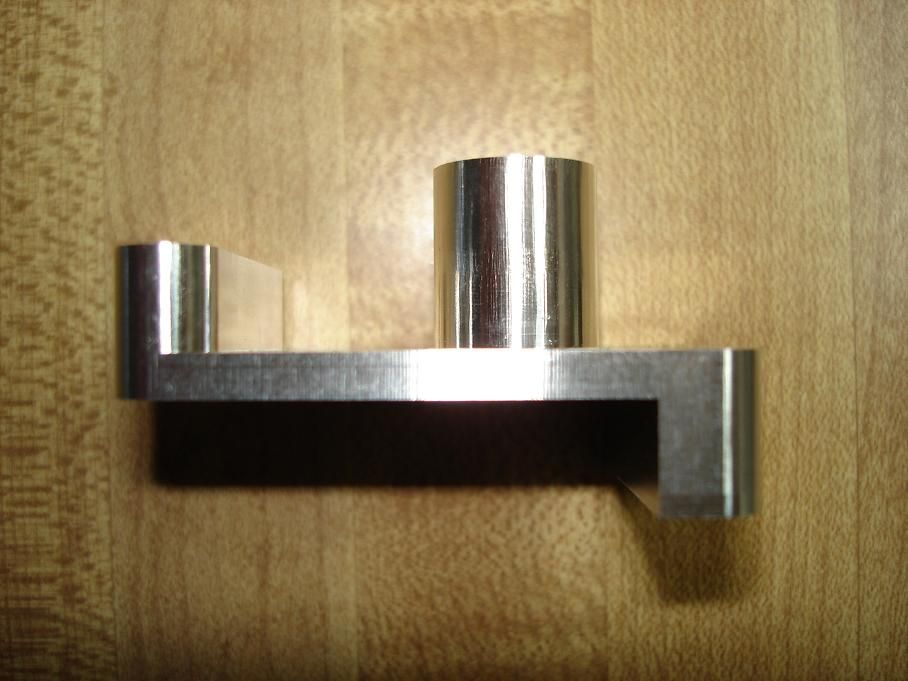
and some sort of bedding block i made for someone yesterday.
Re: just some pictures from this weekend's shop time.
<div class="ubbcode-block"><div class="ubbcode-header">Originally Posted By: 73 fastback</div><div class="ubbcode-body">Hey 300 S Im curious,are you using a floating reamer holder or a center. It looks like a holder of some type can you tell me about your setup. I want to chamber with the bbl thru the headstock but my tailstock is about .005" high. I dont have a floating hoder so Im looking for some suggestions. I was also thinking to drill out some matl and bore the hole straight before reaming but im not sure on the reamer holder/ pusher type TIA Tony </div></div>
i just recently started using the jgs reamer holder and love it so far. don't hold me to it but i believe it will compensate for the tailstock being high. i'd call them and verify.
Re: just some pictures from this weekend's shop time.
Awesome work 300! I enjoy reading your gunsmithing threads. Keep up the great work dude!
Awesome work 300! I enjoy reading your gunsmithing threads. Keep up the great work dude!
Re: just some pictures from this weekend's shop time.
fresh out of the oven from curing the flat black moly resin.
fresh out of the oven from curing the flat black moly resin.
Re: just some pictures from this weekend's shop time.
Can't wait for the rest of the build. Outstanding posts, all of them !
Lee.
Can't wait for the rest of the build. Outstanding posts, all of them !
Lee.
Re: just some pictures from this weekend's shop time.
Wow, and I thought I made a lot of chips running production jobs, too bad 1018/anything scrap isn't worth anything.
Wow, and I thought I made a lot of chips running production jobs, too bad 1018/anything scrap isn't worth anything.
Re: just some pictures from this weekend's shop time.
Really, thanks for sharing your photos, opinion and all the time and effort that went into it. I read it and I enjoy it!
What do you use to make your witness marks and scribing on the barrel?
I noticed you did the same on the front of your chuck...nothing like stacking the deck in your favor.
Your photos show and tell much!
Re: just some pictures from this weekend's shop time.
<div class="ubbcode-block"><div class="ubbcode-header">Originally Posted By: Go Figure</div><div class="ubbcode-body">Really, thanks for sharing your photos, opinion and all the time and effort that went into it. I read it and I enjoy it!
What do you use to make your witness marks and scribing on the barrel?
I noticed you did the same on the front of your chuck...nothing like stacking the deck in your favor.
Your photos show and tell much! </div></div>
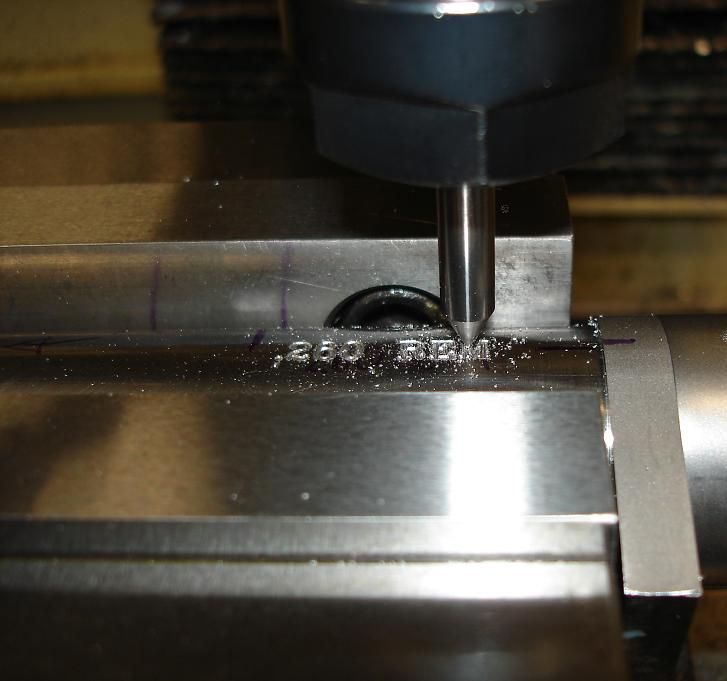
thanks. i enjoy doing the work and am glad to hear others enjoy reading about it.
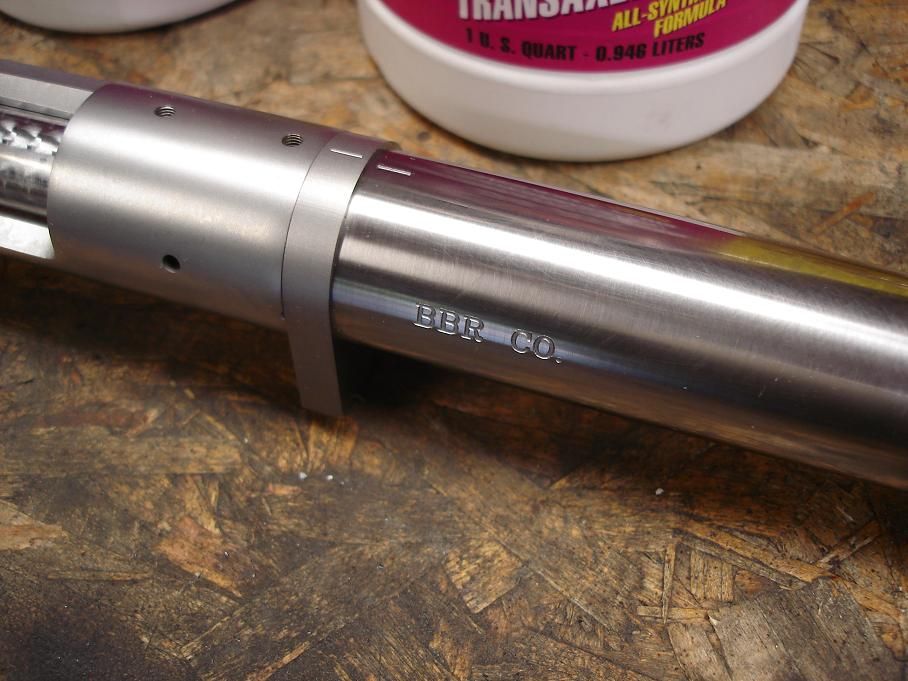
the witness marks were done with an engraving tool in the mill.
<div class="ubbcode-block"><div class="ubbcode-header">Originally Posted By: Go Figure</div><div class="ubbcode-body">Really, thanks for sharing your photos, opinion and all the time and effort that went into it. I read it and I enjoy it!
What do you use to make your witness marks and scribing on the barrel?
I noticed you did the same on the front of your chuck...nothing like stacking the deck in your favor.
Your photos show and tell much! </div></div>
thanks. i enjoy doing the work and am glad to hear others enjoy reading about it.
the witness marks were done with an engraving tool in the mill.
Re: just some pictures from this weekend's shop time.
300
What is the technique for engraving on a manual mill? I am soon going to get a mill and have much to learn about it, but the marking of things as you have done is a top priority.
Thanks
Dave
300
What is the technique for engraving on a manual mill? I am soon going to get a mill and have much to learn about it, but the marking of things as you have done is a top priority.
Thanks
Dave
Re: just some pictures from this weekend's shop time.
<div class="ubbcode-block"><div class="ubbcode-header">Originally Posted By: crumpmd</div><div class="ubbcode-body">300
What is the technique for engraving on a manual mill? I am soon going to get a mill and have much to learn about it, but the marking of things as you have done is a top priority.
Thanks
Dave </div></div>
i use cnc. doing text on a manual mill would be just about impossible. doing straight lines could be done though. i did the degree marks on my spider chuck with it stationary but it could be done on a manual mill with an indexer.

Re: just some pictures from this weekend's shop time.
remington's finish machine work:
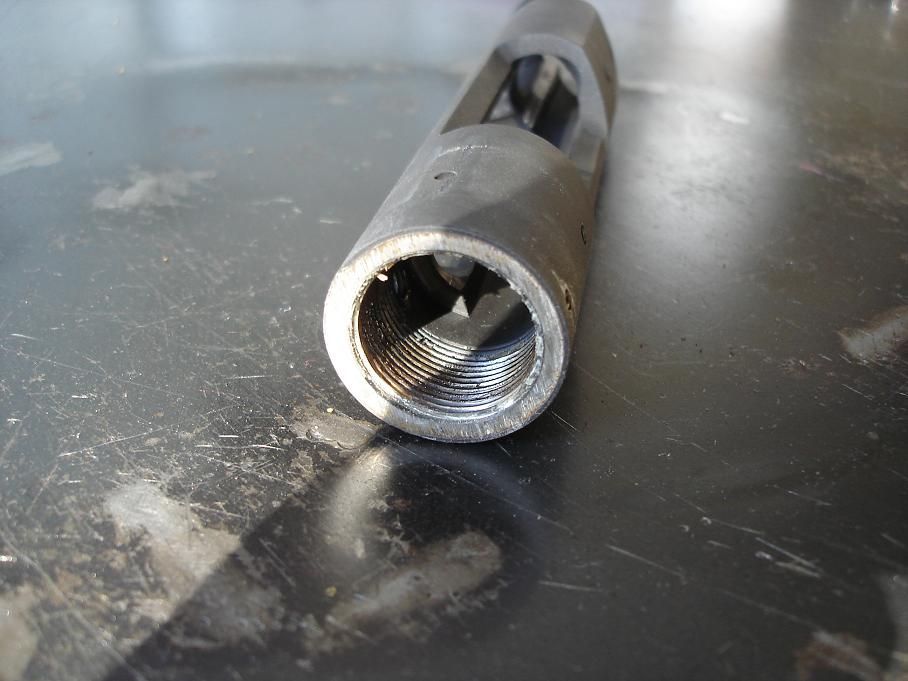
my finish machine work:
i broke my 1/16" punch this morning using it for something it wasn't designed for so i wasn't able to disassemble and true the bolt.
remington's finish machine work:
my finish machine work:
i broke my 1/16" punch this morning using it for something it wasn't designed for so i wasn't able to disassemble and true the bolt.
Similar threads
- Replies
- 20
- Views
- 816
- Replies
- 35
- Views
- 4K
