• Watch Out for Scammers!

    We've now added a color code for all accounts. Orange accounts are new members, Blue are full members, and Green are Supporters. If you get a message about a sale from an orange account, make sure you pay attention before sending any money!

Lapua brass failure - UPDATE

ReaperDriver

Sergeant
Full Member
Minuteman
  • Sep 5, 2009
    1,331
    167
    59
    Vegas Baby!
    I loaded up about 80 rounds Sat night and Sun morning to go to the range today (Sun) to work on refining some dope as well as just shoot some long range steel. Gameplan was to start at the 100 yd range and verify zero and then move to the 500m steel range to tweak 200, 300, 400 and 500m dope for my gun since it had just come back from a custom smith getting a new chamber, truing, threaded barrel, FTE brake, etc.

    Here are the facts:

    GUN: .308 SPS Tactical, 20", Factory barrel but just recently rechambered and trued and blue-printed
    Load: 175 SMK/44.6 Varget/Lapua brass (probably 10-12 reloadings on the brass)/Fed 210
    Environmentals: 100F, 3250 MSL, 7% RH
    Load session: I loaded in two batches with different round counts on the brass. I had about 30 primed cases from a previous session that I never got around to shooting, so I loaded them up last night. I also pulled an additional 50 cases with 1-2 more loadings on them and full length resized, prepped and primed them to then finish up charging and seating bullets this a.m.

    Background: I received the rifle back from the Smith about 3 weeks ago and I re-worked up my 175 SMK/Varget loads from my previous pet load. Previous accurate load in the factory chamber was 45.0. New load ended up being 44.6 and it chrono'd about 2615 when I did the original workups last week. That load shot fine with no pressure signs, but it was definitely on the "hot" side. Note that when I did those workups it was early in the am and the temp was about 70-75F.

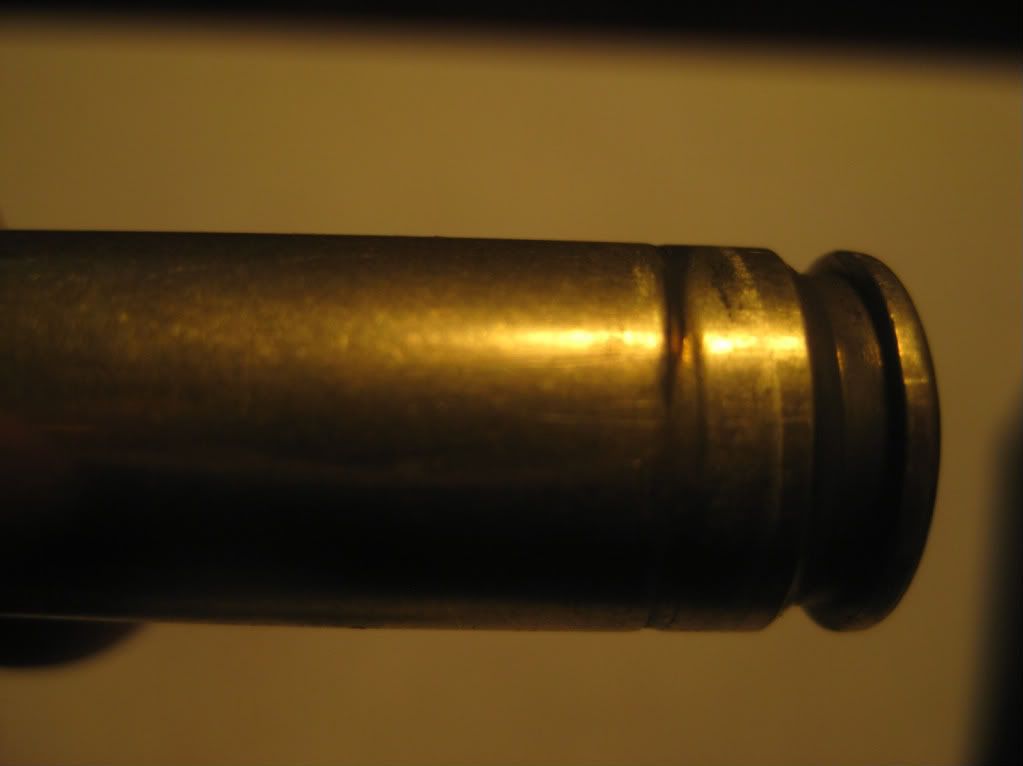
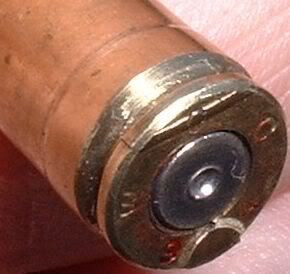
    OK, fast forward to today and I start shooting my 1st 5 rounds to verify zero before going to the longer range steel. 1st round fine - hits the bull. 2nd feels like bolt is a bit sticky and accuracy sucks. 3rd round I have to hammer the bolt handle with my hand to get it to open. Case looks like this:

    IMG_1518.jpg


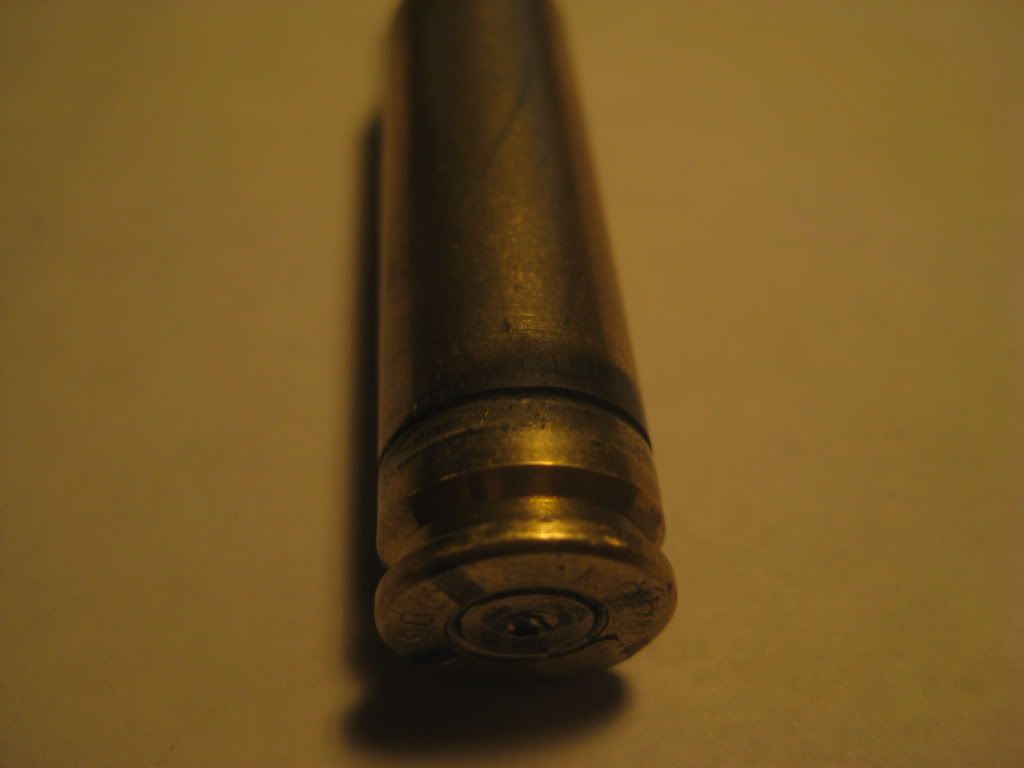
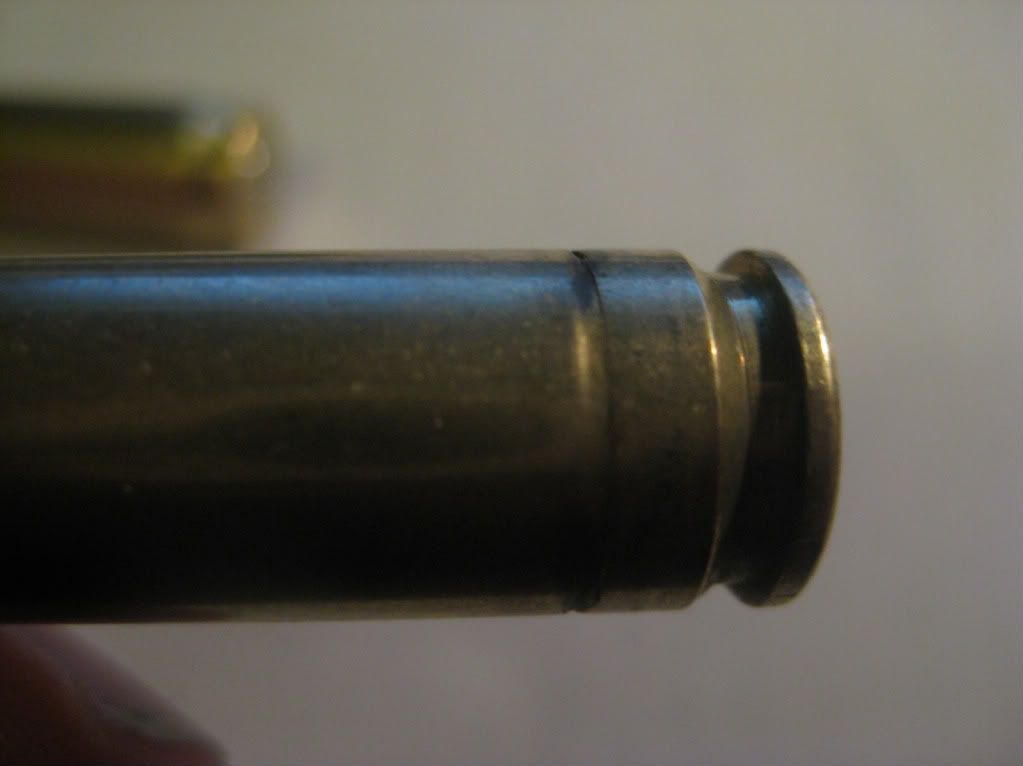
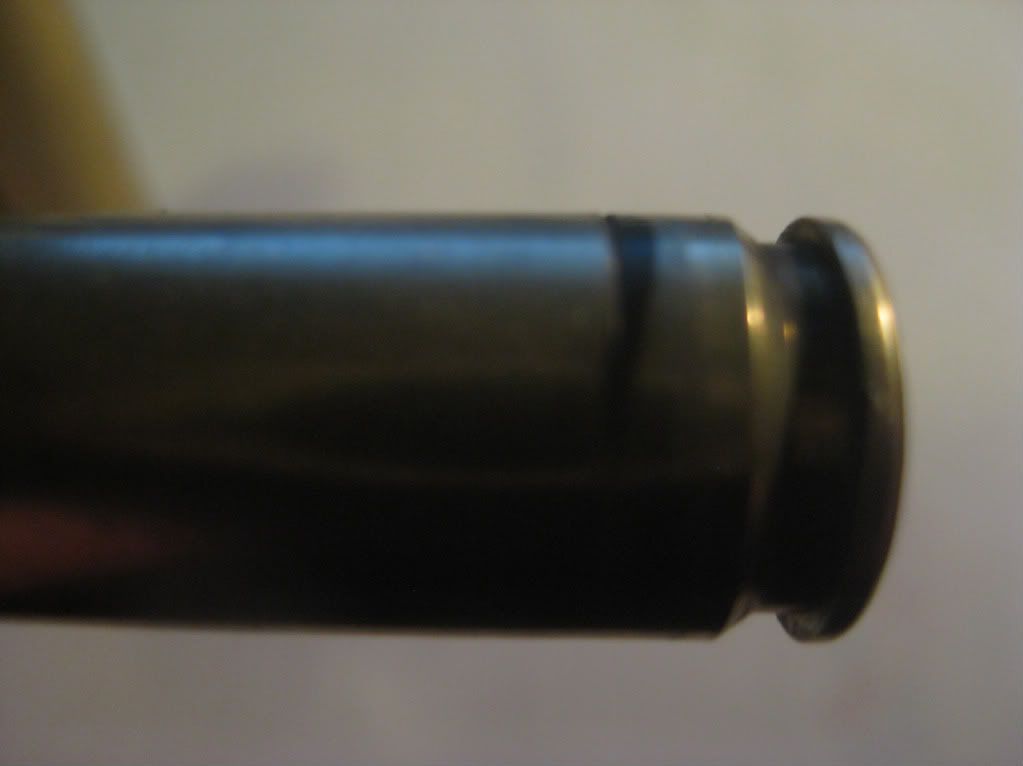
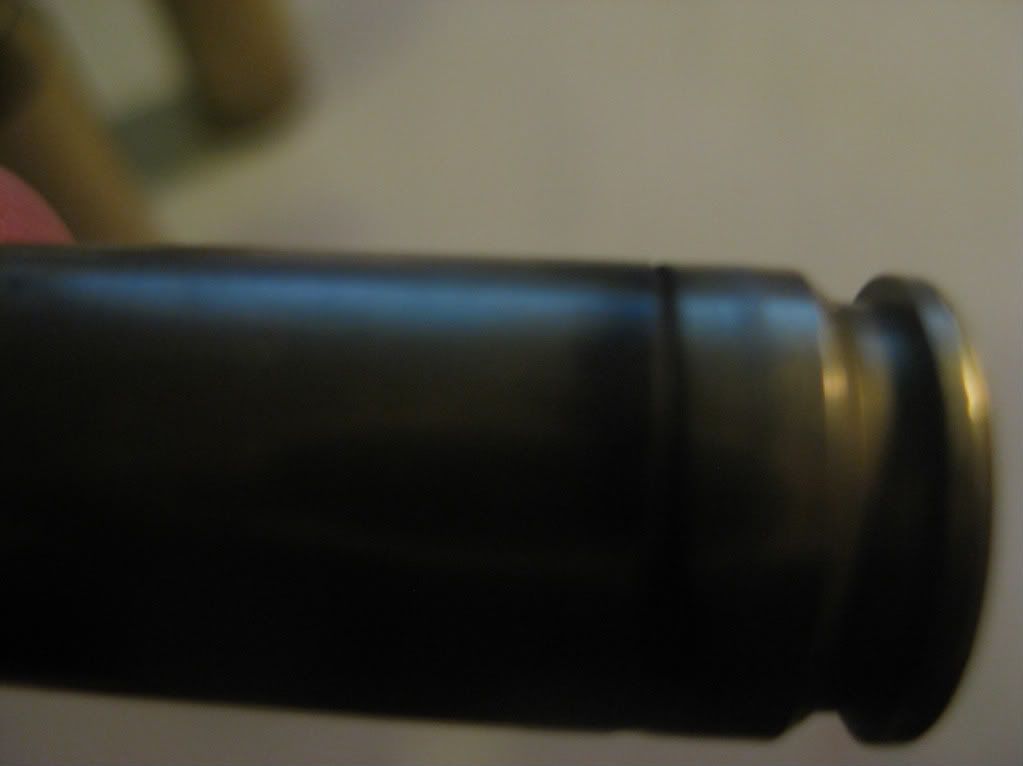
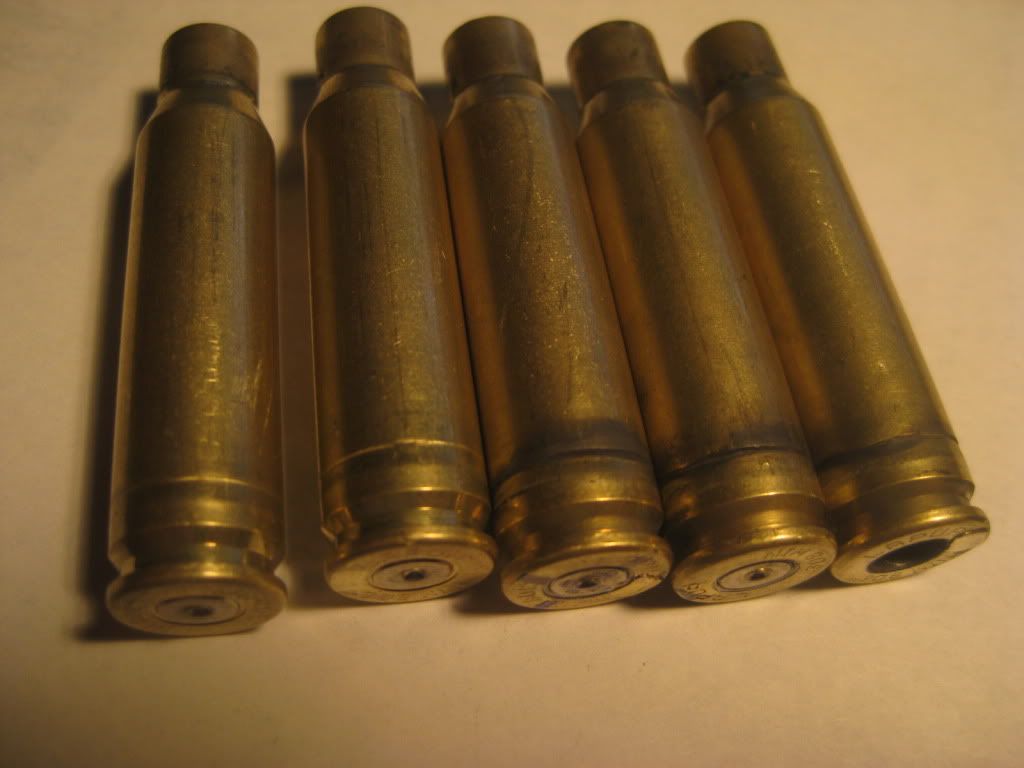
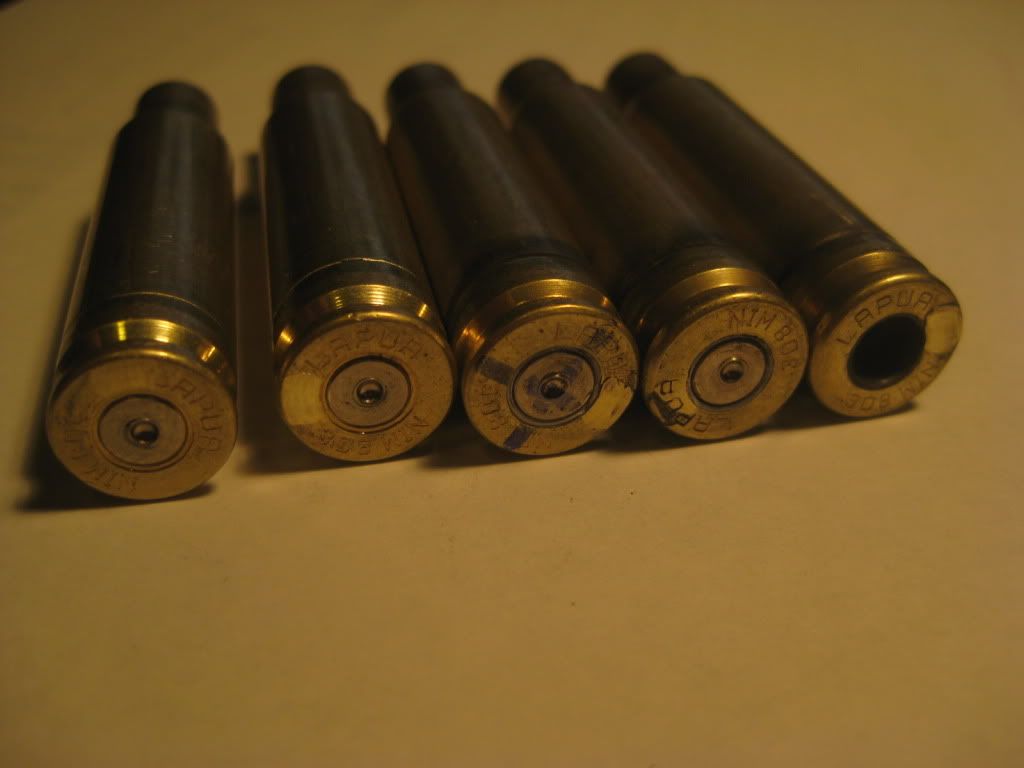
    Note I had it marked to throw away because the primer pocket was getting pretty loose. So figured the case was bad and shot the next two with the same result. On the 5th and final one the primer came out when it ejected off the bolt face. Needless to say I didn't shoot anymore of that batch. Here is the string of 5 in order:

    IMG_1516.jpg


    IMG_1517.jpg


    The above were from the higher round count brass. I later tried a couple of the batch of 30 that were left over from the previous session. They shot fine with no issues and no pressure signs except maybe <span style="font-style: italic">just </span>a hint of a sticky bolt from time to time.

    The 1st thing I thought of was uh oh, I must have over-charged the 2nd batch by mistakenly typing in 45.6 instead of 44.6 on my chargemaster or something like that. So as soon as I got home, I pulled all the bullets from the 2nd batch of 50 and re-weighed a random sample to see if I screwed up. Fortunately they were all exactly 44.6 as they should have been.

    So I have 4 theories:
    1) The brass was just at the end of its life and ready to fail.
    2) The extra 30 degrees of temp pushed the load into the "over-pressure" range and caused the brass to fail
    3) The tighter custom chamber is less tolerant of pressure spikes than the sloppy Factory Rem chamber used to be?
    4) All of the above

    What say the hive? I didn't keep a perfect record of the number of times the brass had been loaded, but it was somewhere around 10-12 loadings. I always FL resize with a Redding Comp FL bushing die if that means anything. I have lately been marking the occasional case to throw away as I noticed the primer pocket getting loose, but I've only been seeing a couple now out of every 50 on each load session.

    Thanks in advance!
     
    Re: Lapua brass failure - Help me diagnose please

    How much did you bump the shoulder back when you FL sized the case?
     
    Re: Lapua brass failure - Help me diagnose please

    My guess is all of the above. 44 grains under sierra 175's on my savage 24" barrel is as hot as I would ever like. But by your velocities I'm guessing you have about a 20"(?) barrel so your charge may not be as hot.
    Sure, there are several people that have totally lost count of how many reloads they've gotten out of their lapua brass and may be approaching 20 or more. But 10 to 12 reloads, especially loaded near book max, is more than I would expect.
    I say get some more brand new lapua brass and fire away. I'd also consider neck sizing only to reduce unnecessary stress on the case body, and anneal the neck every 3-4 reloads.
     
    Re: Lapua brass failure - Help me diagnose please

    <div class="ubbcode-block"><div class="ubbcode-header">Originally Posted By: ReaperDriver</div><div class="ubbcode-body">
    So I have 4 theories:
    1) The brass was just at the end of its life and ready to fail.
    2) The extra 30 degrees of temp pushed the load into the "over-pressure" range and caused the brass to fail
    3) The tighter custom chamber is less tolerant of pressure spikes than the sloppy Factory Rem chamber used to be?
    4) All of the above
    </div></div>

    1) How many loadings were on them?
    2) It is very possible.
    3) Yes, you would want to reestablish your load after changing your chamber specs.

    <div class="ubbcode-block"><div class="ubbcode-header">Originally Posted By: Bacarrat</div><div class="ubbcode-body">How much did you bump the shoulder back when you FL sized the case?</div></div>

    I agree, you may have been over working the brass. Do you know how much you were bumping/pushing back?
     
    Re: Lapua brass failure - Help me diagnose please

    +1 on checking how much your bumping the shoulders back. Over working the brass when full length sizing can eventually lead to case head separation.

    Have you checked the headspace on the rifle after getting it rechambered?? Those primers look really really flat. True, flattened primers could be from overpressure, but it could also be from excessive headspace, which might also be the cause of your case head separations especially with a hot load.

    I never take headspace for granted. I had a custom gun built by a reputible smith and the headspace was WAY too long. I fired the rifle and after 5 reloads I started getting case head separations. Primers were really flat as well. Initially I thought they were pressure signs, but I checked the chamber on some headspace gages, and it closed easily on a field gage. Lessoned learned the hard way. See if you can find a local smith with headspace gauges, just to be sure.
     
    Re: Lapua brass failure - Help me diagnose please

    You have classic insipient separation from case fatigue which can be brought on by excessive chamber size and excessive sizing. But first a few questions:

    1. what was diameter of fired cases from old barrel at the base measured .200" up from rim. Most likely it was .472/.473 or bigger.
    2. what is diameter of fired cases from new barrel?
    3. What is diameter of these cases new and unfired? I suspect it is .465" where LC Match brass is .468"
    4. What is diameter of FL sized cases? I suspect the die sized them to .468".
    5.You are also going to need a micrometer case gage to determine shoulder movement here. I prefer the MO Gage but the RCBS Precision Mic will work. They are both the same price range but I like the MO Gages. MCS 166 Pocono Rd. Brookfield, Conn. 06804 203-775-1013.

    I would also recommend a L.E. Wilson Case Gage for 308 as well. I have both and use both.

    These gages will measure where your shoulder is before and after firing. Headspace range can be from zero to .006" if kept in SAAMI recommendations but can run .010" longer before a field service gage will close.

    The term "tight chamber" means different things to different folks. Some it means little or no shoulder movement, others it means little or no body movement radially.

    Going on the theory that brass is expanded on firing and forced back on resizing making it brittle and hard you will get there eventually. It kind of depends on how you are set up.

    The next theory is rather simple but most folks never grasp it which is "If it don't move it can't wear out." Thusly the least amount of movement on firing and or sizing depends on how long your brass will "take it".

    My "tight chambers" give tremendous brass life of at least 100 reloads but my cases don't expand over .002" on firing in my match rifles. That includes body and neck expansion. I headspace my rifles so that fired cases don't have shoulder movement over .002" either.

    Next I have multiple sets of dies as there is a big variation in the dimensions of sizing dies. No I didn't order them this way but got multiple used sets at flea markets, ebay, gun shows etc I have them marked and pick the die that sizes them about .001" smaller than fired case and the shoulder is set back .001 to .002" on sizing which is determined by my MO Gages.

    The cases will tend to warn you if they are being overworked and it shows up when you trim them. If you are trimming and you take off say .005" length the brass has to come from somewhere to get there and it comes from right where your cases separated.
    I can FL size cases the way I do it and trim them maybe after 5 reloads. The trimmer won't even remove stock all the way around the mouth, just here and there.

    Can you determine is this is about to happen, Yep, it is easy. Take your case tray outside and stand with your back to the sun so that the sun light passes your ear and goes to the bottom of the cases. If you see a black ring at the base corresponding with the separation ring you have you are getting ready to lose each case. It starts light and goes heavier.

    Some guys bend a piece of wire 90 deg and "feel" the "groove" being formed but sunlight is the fastest for me. Look at the groove on the cases you have for a gage of the drop dead point.

    My custom 308 reamers cut base dimension at .469 to allow me to use commercial and LC Match brass. My FL die sizes them to .468 thusly the body doesn't move over .001" when fired. On the few factory chambers I do have, I take a die and chuck it in lathe and polish it out to size at .470-.471. Thusly the .473 as fired cases don't get moved over .002 on sizing.

    You should be able to use a case until the primer pockets get loose and then get Wolf primers and load them some more as they are larger than ours. Commercial cases are not as tough as LC Match thusly the heads will open up. The hotter you load the cases the faster they open and they are shot.
     
    Re: Lapua brass failure - Help me diagnose please

    Anything that needed to be said, has most definitely been said. You've been given some great information here, to which this thread should be a "sticky".

    That's my opinion, anyways.

    Make that, a "sticky" in another sub-forum of "Do's and Don't's of Reloading".
     
    Re: Lapua brass failure - Help me diagnose please

    Yup, you have just found out the limits of your case life with your *old* barrel and resizing methodology.

    It might be instructive to compare fired cases from the old barrel and your new. If no difference in headspace, then you now know that life is 10-11 loadings. (Note to some helpful posters above--READ THE FABULOUS POST and note ALL FACTS before you ask questions that were answered in the OP!!!) That's not excellent, but not bad, and still pretty economical with the high price of Lapua brass.

    And, IME, bullet impact goes UP like 1.5-2 MOA when a case lets go like that. Most are not "incipient", but partial separations on this firing. Not as dangerous IME as some say it is, because of the "skirt" of brass remaining to keep the chamber sealed, but still a sobering warning of the NEED for eye protection at all times. As I understand it, a little grit on the outside of the case, a scratch, or other small "event" would be all it would take to turn one of those into a gas leak of unpredictable severity.

    But if your primer pockets are getting a bit loose with LAPUA brass after 10-12 firings, then I also strongly suggest getting some good estimates of the true chamber pressure, based on your actual velocities from that fairly short barrel. 2615 from a 20-inch doesn't sound out of line to me, but it needs to be checked with your fired cases water capacity and all other variables input correctly. Seriously.
     
    Re: Lapua brass failure - Help me diagnose please

    Most likely the causes above but this same thing happened to me recently with a "custom chamber", but on first firings. Look inside the the chamber for ridge, when I looked in mine sure enough there was a ridge. I went from .472 to .468 with a ridge in between it was very visable. Worth a look maybe, surprized the hell out of me.
     
    Re: Lapua brass failure - Help me diagnose please

    <div class="ubbcode-block"><div class="ubbcode-header">Originally Posted By: Bacarrat</div><div class="ubbcode-body">How much did you bump the shoulder back when you FL sized the case? </div></div>

    This
     
    Re: Lapua brass failure - Help me diagnose please

    The pictures are highly indiative of oversizing.

    I suggest a careful and through measurement of the fired cases, and the sized cases, especially the absolute dimensions of the sholder (body to shoulder; shoulder datum line; sholder to neck).

    For this you will need a Hornady (n.e. Stoney Point) case measurement tooling, or an RCBS case micrometer.

    You might also want to check the new chamber with a no-go gauge.
     
    Re: Lapua brass failure - Help me diagnose please

    Thanks all for the input. I will measure the cases as best I can when I get home. I have sized cases as well as fired cases from old AND new barrel, and I'll compare as you all have suggested. I just recently measured the shoulder bump between fired and sized at the shoulder datum line and IIRC, it was about .0015-.002 on the old barrel. It seemed like the new barrel was about the same or slightly less.

    I do notice that occasionally, I get a round that chambers a bit stiff - maybe one out of every 10. But just barely. Its not like I have to force the bolt handle down to close it, just a bit stiffer than the others. I wonder if my shouldlers are a bit too long for the new chamber because I never reset my FL die after I got the rifle back. I did however, check a random sample of about 10-15 FL sized cases BEFORE i finished loading them as soon as the rifle came back just to make sure they would chamber fine. They did, so I left the FL die set as before.
     
    Re: Lapua brass failure - Help me diagnose please

    Headspace problem is my guess...hard seating may be the chamber bullet seat, not the shoulder. Read the sticky on determining the OAL at the beginning of this thread. Find the right OAL and then load a new piece of brass to that OAL. Fire the sucker. Then, Back your sizing die out one turn. Resize the brass and try it back in the chamber. Keep doing it one sixteenth of a turn at a time. You will find a setting where it gets hard to chamber, then about one or two clicks more, it will ease up. When it just feels like a tiny bit of touch or resistance...set the die lock ring there. Try loading that OAL and die setting where you found the touch. I'll bet you get 10 or more loadings before you get a separation. JMHO
     
    Re: Lapua brass failure - Help me diagnose please

    <div class="ubbcode-block"><div class="ubbcode-header">Originally Posted By: ReaperDriver</div><div class="ubbcode-body">probably 10-12 reloadings on the brass </div></div>

    Thats the problem........well, part of it anyway. You're pushing the shoulder back too far and what you have is classic case head seperation. Reset your FL die and rock on.
     
    Re: Lapua brass failure - Help me diagnose please

    What everyone said above AND:

    be sure to check your distance to the lands. 44.6gr Varget is not a mild load under 175's (heck 44.8 used to be bordeline hot in my rifles with 168's) and if you have less room to (or are at) the lands in your new leade then your pressure curve will be completely different. I know you said the ones from a different batch of brass were fine......

    You should rework up any time you have changed chamber dimensions.
     
    Re: Lapua brass failure - Help me diagnose please

    <div class="ubbcode-block"><div class="ubbcode-header">Originally Posted By: sobrbiker883</div><div class="ubbcode-body">

    You should rework up any time you have changed chamber dimensions. </div></div>

    I did re-work up (Read my OP). I started back at 43.8 and worked up in .2 gr increments. I actually got back to 45.0 in the new chamber when I got the beginnings of pressure signs and accuracy fell off. That's how I ended up at 44.6.
     
    Re: Lapua brass failure - Help me diagnose please

    OK, here's the deal. I just spent the last 45 min measuring my brass in various ways and I broke them down into:

    1) Fired brass from the original chamber
    2) Fired brass from the batch that shot fine in the new chamber (probably 1-2 less loadings)
    3) Fired brass that failed (see pics above)
    4) FL sized Unfired from the same batch that failed (I pulled the bullets)

    <span style="font-weight: bold">Case length</span>: All but the failed brass had just been trimmed and the post firing length was 2.0010-2.0015. The failed brass had been trimmed the previous loading but was still within max length from 2.0075-2.011.

    <span style="font-weight: bold">Base </span>(measured at the spot where the cases failed): ALL <span style="text-decoration: underline">including </span>the sized unfired and all the combinations of fired cases were .4705-.4710. Even the brass with the cracks were .4705.

    <span style="font-weight: bold">Shoulder</span>: The difference between the FL sized cases to the rest were measured at the shoulder datum line:

    1) original chamber: +.00965
    2) new chamber (brass with 1-2 less firings): +.0109
    3) new chamber (failed brass): +.0085

    So I'm not sure what those numbers are telling me.

    ETA: I'm going to try to go back through and answer some of the other specific questions as best I know them.
     
    Re: Lapua brass failure - Help me diagnose please

    <div class="ubbcode-block"><div class="ubbcode-header">Originally Posted By: Niles Coyote</div><div class="ubbcode-body"><div class="ubbcode-block"><div class="ubbcode-header">Originally Posted By: ReaperDriver</div><div class="ubbcode-body">
    So I have 4 theories:
    1) The brass was just at the end of its life and ready to fail.
    2) The extra 30 degrees of temp pushed the load into the "over-pressure" range and caused the brass to fail
    3) The tighter custom chamber is less tolerant of pressure spikes than the sloppy Factory Rem chamber used to be?
    4) All of the above
    </div></div>

    1) How many loadings were on them? <span style="color: #CC0000">I'm guessing 10-12. But I changed the way I cycled brass about halfway through this batch and it could have been > 15 on some, less on others.</span>2) It is very possible.
    3) Yes, you would want to reestablish your load after changing your chamber specs. <span style="color: #CC0000">I did that</span>

    <div class="ubbcode-block"><div class="ubbcode-header">Originally Posted By: Bacarrat</div><div class="ubbcode-body">How much did you bump the shoulder back when you FL sized the case?</div></div>

    I agree, you may have been over working the brass. Do you know how much you were bumping/pushing back? </div></div> <span style="color: #FF0000">I thought originally only .002, but apparently much more than that (more like .008 to .01)</span>
     
    Re: Lapua brass failure - Help me diagnose please

    <div class="ubbcode-block"><div class="ubbcode-header">Originally Posted By: ReaperDriver</div><div class="ubbcode-body">Here are the facts:

    GUN: .308 SPS Tactical, 20", Factory barrel but just recently rechambered and trued and blue-printed </div></div>

    Me thinks you and your gun smith may need to have a nice quiet conversation. Your barrel may become a 19.75" tube.

    Just thinkin' out loud
    whistle.gif


    Cheers,

    Doc
     
    Re: Lapua brass failure - Help me diagnose please

    <div class="ubbcode-block"><div class="ubbcode-header">Originally Posted By: MitchAlsup</div><div class="ubbcode-body">The pictures are highly indiative of oversizing.

    I suggest a careful and through measurement of the fired cases, and the sized cases, especially the absolute dimensions of the sholder (body to shoulder; shoulder datum line; sholder to neck).

    For this you will need a Hornady (n.e. Stoney Point) case measurement tooling, or an RCBS case micrometer.

    You might also want to check the new chamber with a no-go gauge. </div></div>

    I will need to find and/or borrow the above. I was able to measure the differences in shoulder datum lines from case to case (shoulder bump) but not the absolute numbers.
     
    Re: Lapua brass failure - Help me diagnose please

    <div class="ubbcode-block"><div class="ubbcode-header">Originally Posted By: sobrbiker883</div><div class="ubbcode-body">What everyone said above AND:

    be sure to check your distance to the lands. 44.6gr Varget is not a mild load under 175's (heck 44.8 used to be bordeline hot in my rifles with 168's) and if you have less room to (or are at) the lands in your new leade then your pressure curve will be completely different. I know you said the ones from a different batch of brass were fine...... <span style="color: #FF0000">I'm 99.99% sure I'm not in the lands. For one, I checked a laoded round before shooting them and there were no rifling marks on the bullet. Two, the 175SMKs are seated to 2.815, so that would have to be one helluva short throat at that length.</span>

    You should rework up any time you have changed chamber dimensions. <span style="color: #FF0000">I did</span> </div></div>
     
    Re: Lapua brass failure - Help me diagnose please

    <div class="ubbcode-block"><div class="ubbcode-header">Originally Posted By: doc76251</div><div class="ubbcode-body"><div class="ubbcode-block"><div class="ubbcode-header">Originally Posted By: ReaperDriver</div><div class="ubbcode-body">Here are the facts:

    GUN: .308 SPS Tactical, 20", Factory barrel but just recently rechambered and trued and blue-printed </div></div>

    Me thinks you and your gun smith may need to have a nice quiet conversation. Your barrel may become a 19.75" tube.

    Just thinkin' out loud
    whistle.gif


    Cheers,

    Doc </div></div>

    Doc, I hope that's not the case. What makes you think that, BTW? More and more I'm beginning to think either over-worked brass or incorrect die setup or both. In the limited time I've had the gun, when it was shooting well, it was SHOOTING WELL. I'm hoping there's nothing wrong with the chamber and its just me not understanding how to set up the sizing die for the new dimensions. I'm interested in other POVs however in the event there is more to it than that.

    Doc, I'm going to go back and re-read your reloading 101 post about how you set up your FL dies....
     
    Re: Lapua brass failure - Help me diagnose please

    <div class="ubbcode-block"><div class="ubbcode-header">Originally Posted By: ReaperDriver</div><div class="ubbcode-body"><div class="ubbcode-block"><div class="ubbcode-header">Originally Posted By: doc76251</div><div class="ubbcode-body"><div class="ubbcode-block"><div class="ubbcode-header">Originally Posted By: ReaperDriver</div><div class="ubbcode-body">Here are the facts:

    GUN: .308 SPS Tactical, 20", Factory barrel but just recently rechambered and trued and blue-printed </div></div>

    Me thinks you and your gun smith may need to have a nice quiet conversation. Your barrel may become a 19.75" tube.

    Just thinkin' out loud
    whistle.gif


    Cheers,

    Doc </div></div>

    Doc, I hope that's not the case. What makes you think that, BTW? More and more I'm beginning to think either over-worked brass or incorrect die setup or both. In the limited time I've had the gun, when it was shooting well, it was SHOOTING WELL. I'm hoping there's nothing wrong with the chamber and its just me not understanding how to set up the sizing die for the new dimensions. I'm interested in other POVs however in the event there is more to it than that. </div></div>

    The reason I mention it is if you look at the brass (in your pictures) all the separations result in the front of the brass being ABOVE the back end. In partial CHS the crack will be level if the chamber is cut correctly. It will be just a "crack". YOU have a "step". IMHO the tube wasn't true in the lathe and the a$$ end of the chamber is too big. That would also account for the over pressure you are seeing because you can't get a clear measurement of headspace when the gauge is laying SIDEWAYS in a loose chamber.

    If it shot well before and the only thing you did was "true" the tube........

    Cheers,

    Doc
     
    Re: Lapua brass failure - Help me diagnose please

    <div class="ubbcode-block"><div class="ubbcode-header">Originally Posted By: doc76251</div><div class="ubbcode-body"><div class="ubbcode-block"><div class="ubbcode-header">Originally Posted By: ReaperDriver</div><div class="ubbcode-body"><div class="ubbcode-block"><div class="ubbcode-header">Originally Posted By: doc76251</div><div class="ubbcode-body"><div class="ubbcode-block"><div class="ubbcode-header">Originally Posted By: ReaperDriver</div><div class="ubbcode-body">Here are the facts:

    GUN: .308 SPS Tactical, 20", Factory barrel but just recently rechambered and trued and blue-printed </div></div>

    Me thinks you and your gun smith may need to have a nice quiet conversation. Your barrel may become a 19.75" tube.

    Just thinkin' out loud
    whistle.gif


    Cheers,

    Doc </div></div>

    Doc, I hope that's not the case. What makes you think that, BTW? More and more I'm beginning to think either over-worked brass or incorrect die setup or both. In the limited time I've had the gun, when it was shooting well, it was SHOOTING WELL. I'm hoping there's nothing wrong with the chamber and its just me not understanding how to set up the sizing die for the new dimensions. I'm interested in other POVs however in the event there is more to it than that. </div></div>

    The reason I mention it is if you look at the brass (in your pictures) all the separations result in the front of the brass being ABOVE the back end. In partial CHS the crack will be level if the chamber is cut correctly. It will be just a "crack". YOU have a "step". IMHO the tube wasn't true in the lathe and the a$$ end of the chamber is too big. That would also account for the over pressure you are seeing because you can't get a clear measurement of headspace when the gauge is laying SIDEWAYS in a loose chamber.

    If it shot well before and the only thing you did was "true" the tube........

    Cheers,

    Doc </div></div>
    Oh, I see what you mean. I need to go back and examine the brass. I never paid attention to the "step" you're talking about.

    And when I said it shot well, I meant AFTER it came back. It did shoot well before, especially for a factory gun, but the test group the smith shot after the work showed significant improvement. Overall, I have not shot it as consistantly well since it came back - but I chalked that up to a different scope mount 34mm vs the old 30mm and the resulting change in cheek weld as well as just finding a new load that the "new" rifle likes. However, I did shoot some of the better 5-shot groups ever one I settled on the 44.5 load. Mmmmm.... I wonder if that inconsistancy is at least partially attributed to the chamber being as you describe?
     
    Re: Lapua brass failure - Help me diagnose please

    <div class="ubbcode-block"><div class="ubbcode-header">Originally Posted By: doc76251</div><div class="ubbcode-body">

    The reason I mention it is if you look at the brass (in your pictures) all the separations result in the front of the brass being ABOVE the back end. In partial CHS the crack will be level if the chamber is cut correctly. It will be just a "crack". YOU have a "step". IMHO the tube wasn't true in the lathe and the a$$ end of the chamber is too big. That would also account for the over pressure you are seeing because you can't get a clear measurement of headspace when the gauge is laying SIDEWAYS in a loose chamber.


    Cheers,

    Doc </div></div>

    Doc,

    I went back and re-examined the brass for the "step" you mention and honestly I don't see it. I wonder if maybe the angle in the previous pics were deceiving. Here are some pics with hopefully a better angle - so tell me what you think. I also ran my finger across the crack adn couldn't feel any distinctive step either. But that's far from scientific of course.... I'm not saying there's not the step you describe, but to my untrained eye and touch - I couldn't see one.

    IMG_1523.jpg


    IMG_1520.jpg


    IMG_1521.jpg


    IMG_1522.jpg
     
    Re: Lapua brass failure - Help me diagnose please

    Excessive headspace on brass is likely culprit for case head separation. I expect you have pushed the shoulder to far when sizing.
     
    Re: Lapua brass failure - Help me diagnose please

    <div class="ubbcode-block"><div class="ubbcode-header">Originally Posted By: wfv56</div><div class="ubbcode-body">Excessive headspace on brass is likely culprit for case head separation. I expect you have pushed the shoulder to far when sizing. </div></div>

    It appears that is the consenus. I'm not disagreeing, but how does bumping the <span style="font-style: italic">shoulder </span>cause CHS? I would have thought the failure would occur in the neck/shoulder area if that were the case. I'm just trying to understand the mechanics of why that happens.

    ETA: After re-reading doc's reloading 101, I'm going to go back and re-set up my sizing die IAW his instructions. That's how I originally did it about a year ago, but I never went back and re-set them when the rifle came back with the different chamber dimensions. I'll start there and if I don't get satisfactory results, I'll probably then invest in some of the measurement kit he suggests in his reloading 201 sticky. Thanks all for all the great info.
     
    Re: Lapua brass failure - Help me diagnose please

    The mechanism for case separations a bit forward of the case web/head area starts with the fact that thinner brass up front expands and seals (think high-pressure metal gasket!) first, the parts rearward on the case body seal later on a super-fast time line, and then finally somewhere in front of the web, the case body is so thick, that last little bit just doesn't expand out to seal for very long at all.

    IME, the last .1 inch/2.5 mm of the case wall doesn't contact the chamber wall at all. Since the cartridge case is normally driven forward against the chamber shoulder by the firing pin if not already there courtesy of a plunger ejector, a short-sized case is STUCK up there by gas pressure, but the case head and that first little bit of thick case wall is free to move backwards. So it does. And when it does, the brass tends to thin in a very localized ring of only about 0.5 mm/.02 wide.

    My first batch of .308 brass lasted only three firings because of that. I was just sizing it for a semiauto, not paying any attention to how LONG my fired cases were. Using the depth stick on dial calipers on a case head sticking up from a Wilson gage is a bit troublesome for accuracy, but I think the shoulder was getting set back .015 or so back then.

    I don't do that any more.

    For very consistent shoulder setback, you need to be very consistent with your case lube. It's not just press flex, but also some resistance and springiness in the brass itself. Enough short on lube to make sizing resistance noticeably greater almost always equals a slightly longer resized case, and I've had that make the difference between easy-in and can't extract it easily if I don't take the shot.

    Thus, I believe that sizing *enough* is actually more important for a manually-operated rifle. The semiautos just cram those slightly longer rounds in and fire and eject them (within some limits) just fine. It's funny to watch a bolt gunner fight to close the bolt, then yank three times to eject after the round keeps the bolt from closing. By that time, I've taken my shot...

    I just can't recommend accepting slightly long rounds for a semi-auto as a practice, because IMO it slightly increases the chances of the legendary (but less-often reported these days) out of battery slam-fire. The closed-bolt events are most likely a slightly different cause.
     
    Re: Lapua brass failure - Help me diagnose please

    wfv56 said:
    Excessive headspace on brass is likely culprit for case head separation. I expect you have pushed the shoulder to far when sizing.

    Anytime I've seen so many head failures in so few rounds it was always a head space problem. It could be as a result of any of the posted reasons.
     
    Re: Lapua brass failure - Help me diagnose please

    Lands depend on the reamer used. My Rock is cut with an Obermyer reamer made for SMK's, and 175 SMK's are only jumping .010-.015" if seated to 2.820

    Sorry I didn't savvy the part where you worked up.

    When the new chamber was cut, did the smith do so without setting the barrel back?
     
    Re: Lapua brass failure - Help me diagnose please

    If it has not been checked please look a photo 1 & 2 of the close ups, to me it looks odd, the compressed area at behind the seperation in photo one, then in frount in #2 . As I mentioned and "Doc" addressed the subject also, is the area behind the seperation Dia. larger than in frount of the seperation by a large margin?

    I looks very much like the bad chamber I just had to deal with that myself, if it is not then all the usual suspects. Its the radius bend that looks odd, what would cause that in a chamber?
     
    Re: Lapua brass failure - Help me diagnose please

    <div class="ubbcode-block"><div class="ubbcode-header">Originally Posted By: sobrbiker883</div><div class="ubbcode-body">
    When the new chamber was cut, did the smith do so without setting the barrel back? <span style="color: #FF0000">No, I am pretty sure it was setback as part of the process</span></div></div>
     
    Re: Lapua brass failure - Help me diagnose please

    <div class="ubbcode-block"><div class="ubbcode-header">Originally Posted By: Unsichtbar</div><div class="ubbcode-body">If it has not been checked please look a photo 1 & 2 of the close ups, to me it looks odd, the compressed area at behind the seperation in photo one, then in frount in #2 . As I mentioned and "Doc" addressed the subject also, is the area behind the seperation Dia. larger than in frount of the seperation by a large margin?

    I looks very much like the bad chamber I just had to deal with that myself, if it is not then all the usual suspects. Its the radius bend that looks odd, what would cause that in a chamber? </div></div>

    I will go back and measure the diameter immediately in front of and behind the split. when I measured the diameter yesterday, I only measured right AT the split, not on either side.
     
    Re: Lapua brass failure - Help me diagnose please

    If there is a big difference like .472 to .685 or something like that on either side, shine a flashlight in the chamber to see if there is a ridge in there.
     
    Re: Lapua brass failure - Help me diagnose please

    <div class="ubbcode-block"><div class="ubbcode-header">Originally Posted By: Unsichtbar</div><div class="ubbcode-body"> also, is the area behind the seperation Dia. larger than in frount of the seperation by a large margin?

    </div></div>

    Nope, I just measured all 5 cases that failed and the worst deviation was .004 from immediately in front of the crack to immediately aft of the crack. Another case was .003. The other 3 cases all showed zero change from in front to behind. So, I'm hoping that rules out a chamber issue. I think it might have just been an optical illusion from the pic's perspective.

    I'm going to go back and re-set up my sizing die and see if I can get the headspace correct. I wonder now if I should chuck the remaining Lapua brass (probably about 125 or so left) and start over just to be on the safe side? Or just try to work the headspace issue and keep loading them until they finally give out?
     
    Re: Lapua brass failure - Help me diagnose please

    <div class="ubbcode-block"><div class="ubbcode-header">Originally Posted By: Grump</div><div class="ubbcode-body">The mechanism for case separations a bit forward of the case web/head area starts with the fact that thinner brass up front expands and seals (think high-pressure metal gasket!) first, the parts rearward on the case body seal later on a super-fast time line, and then finally somewhere in front of the web, the case body is so thick, that last little bit just doesn't expand out to seal for very long at all.

    IME, the last .1 inch/2.5 mm of the case wall doesn't contact the chamber wall at all. Since the cartridge case is normally driven forward against the chamber shoulder by the firing pin if not already there courtesy of a plunger ejector, a short-sized case is STUCK up there by gas pressure, but the case head and that first little bit of thick case wall is free to move backwards. So it does. And when it does, the brass tends to thin in a very localized ring of only about 0.5 mm/.02 wide.

    </div></div>

    GREAT EXPLANATION! Thanks Grump, that makes perfect sense.
     
    Re: Lapua brass failure - Help me diagnose please

    The answer is E: all of the above

    The pics show classic CHS and insipient CHS. The are multiple signs of overpressure as well, including flattened and cratered primers in all 5 brass, ejector marks in 4, blown primer pocket...I think you've got your money's worth after 10-12 reloads, especially if you're pushing them hard. Would definitely double check the true headspace of the newly chambered barrel and adjust dies accordingly for .002"-.003" setback of the shoulder. Neck sizing or such maybe ok for benchrest shooters, but for a field bolt gun or gas gun, you want reliability and no hiccups in feeding and chambering. More than that will lead to premature case failure from CHS. Would recheck the rest of your batch of brass carefully with the paper clip hook to check for thinning at the casehead. May need to rework-up the load, even though 44.6 Varget is a common load with 175, it is clearly way overpressure in your gun. Just my observation...
     
    Re: Lapua brass failure - Help me diagnose please

    I'll pile on.

    In this case, the flattened primers are not an indication of excessive pressure. However these are classic signs of Case Head Separation or Imminent CHS.

    CHS like this is due to excessive headspace (caused by a variety of reasons: long chamber, improper setup of sizing die, etc). Upon firing in an excessive headspace situation:

    1) The FP pushes the case forward, creating a gap between the casehead and boltface. If headspace is too excessive, primer may fail to ignite (thank God).

    2) Pressure builds inside the case. The thinnest part of the brass swells and conforms to the chamber. The thinnest parts being the shoulder and body are below the shoulder. This part of the case grips the chamber walls and creates a Morse Taper type arrangement.

    3) The casehead is still hanging free at the end, the pressure within the case is building and pushes the primer out of the pocket until it hits the boltface. (Primer is protruding and balloning from the pocket).

    4) Pressure builds some more until the plastic limit of the brass is reached. At that point the case stretches at the point where the brass is thick enough not to expand to the chamber (about .200" ahead of the extractor groove).

    5) The case is stretched, the casehead comes back to the boltface. Recall the primer was protruding. When the casehead comes back the primer does not get pushed back evenly into the pocket. Some gets rammed back in and the excess is flattened around the pocket, giving the APPEARANCE of excessive pressure.

    You repeat this cycle to greater or lesser degrees and it eats up you brass.
     
    Re: Lapua brass failure - Help me diagnose please

    <div class="ubbcode-block"><div class="ubbcode-header">Originally Posted By: buffybuster</div><div class="ubbcode-body">I'll pile on.

    In this case, the flattened primers are not an indication of excessive pressure. However these are classic signs of Case Head Separation or Imminent CHS.

    CHS like this is due to excessive headspace (caused by a variety of reasons: long chamber, improper setup of sizing die, etc). Upon firing in an excessive headspace situation:

    1) The FP pushes the case forward, creating a gap between the casehead and boltface. If headspace is too excessive, primer may fail to ignite (thank God).

    2) Pressure builds inside the case. The thinnest part of the brass swells and conforms to the chamber. The thinnest parts being the shoulder and body are below the shoulder. This part of the case grips the chamber walls and creates a Morse Taper type arrangement.

    3) The casehead is still hanging free at the end, the pressure within the case is building and pushes the primer out of the pocket until it hits the boltface. (Primer is protruding and balloning from the pocket).

    4) Pressure builds some more until the plastic limit of the brass is reached. At that point the case stretches at the point where the brass is thick enough not to expand to the chamber (about .200" ahead of the extractor groove).

    5) The case is stretched, the casehead comes back to the boltface. Recall the primer was protruding. When the casehead comes back the primer does not get pushed back evenly into the pocket. Some gets rammed back in and the excess is flattened around the pocket, giving the APPEARANCE of excessive pressure.

    You repeat this cycle to greater or lesser degrees and it eats up you brass. </div></div>

    Another great explanation! That makes really good sense with what I'm seeing here.

    It appears that I definitely had the die set up incorrectly. If I'm doing my measurements on FL resized vs fired brass (see above) correctly - then it appears I was bumping the shoulder back about .008 to .009 rather than the desired .001-.002. Prior to receiving the rifle back from the custom shop, I was trying to get ahead as much as possible and I prepped my 1st batch of brass in anticipation of getting the rifle and wanting to go shoot it and re-work up the loads again. So I FL resized with the original die setting and got the brass all the way through being primed. I held off on powder and bullets thinking that maybe the cases would be TOO LONG and would not chamber given that I expected the "new" chamber to be tighter than the original factory chamber. So my plan was to run a random sample of the resized, primed brass through the gun and see if it would chamber easily and if not, then I could always resize it again before doing powder and bullets. As it turned out, they all chambered very easily, so I never thought about it again. Little did I know that the cases were OVERSIZED, not undersized. Live and learn, I guess.

    Fortunately, all it ended up costing me was about 125 well used Lapua cases. I did the paper clip trick in a random sample of the rest of the lapua I had that has been through the gun and they ALL showed signs of thinning at that point about .200 above the extractor groove. I assume that even if I resize them and shoulder bump them correctly for the headspace, those pieces are now toast?

    One last question.... would I be right in assuming that the imminent CHS phenomenon (even if they didn't actually split yet) would cause some sticky bolt movement along with the extractor marks and flattened primers? That would explain a lot of things on some previous firings.

    Cheers all for the great help!
     
    Re: Lapua brass failure - Help me diagnose please

    "Fortunately, all it ended up costing me was about 125 well used Lapua cases. I did the paper clip trick in a random sample of the rest of the lapua I had that has been through the gun and they ALL showed signs of thinning at that point about .200 above the extractor groove. I assume that even if I resize them and shoulder bump them correctly for the headspace, those pieces are now toast? "

    YES, the brass is TOAST. Pitch the brass that you find the signs of thinning at the casehead. Remember, the brass is one of the cheapest part of the round, even if you're using Lapua brass--spread out say 10 reloads, its still only ~5 cents a shot. Its not worth the risks of the case shoulder being stuck, flame damage to the chamber, or in worse case, complete case rupture.

    "One last question.... would I be right in assuming that the imminent CHS phenomenon (even if they didn't actually split yet) would cause some sticky bolt movement along with the extractor marks and flattened primers? That would explain a lot of things on some previous firings."

    Francis, while BB maybe partially correct, I would still believe when you're having a sticky bolt along withe the other signs such as flattened primers, extractor marks, and blown primer pockets, I'd be extremely careful as those all signs of excessive pressure. If it was just a case of slightly undersized brass, you shouldn't see all those signs...if you load brand new NIB brass, its generally a bit undersized and the first time its fires, it is fireformed to your chamber to some degree. You probably didn't have these excessive pressure signs with brand new brass, did you?

    Be careful. The brass, like the bullet and barrel, is an expendible part of shooting, but hands and eyeballs are not.
     
    Re: Lapua brass failure - Help me diagnose please

    If you do want to use them...a bit of thinning may not make them completely "toast"...but just resizing them won't correct the short headspace condition. Anneal the necks, wire brush then lube the inside of the necks and expand them to .33 I.D.or above, then resize in your FL die to create a "false shoulder" that will give you the resistance needed to prevent the firing pin driving the case forward and creating a separation. Then load and fire and you shouldn't get this separation....at least for a while. Keep an eye on that shiny line forward of the case head. You can, with experience, tell when separation is imminent. Neck sizing will definitely increase the case life. Trade off is ease of feeding and bolt closure. Setting up the FL die is the key to longer case life. JMHO
     
    Re: Lapua brass failure - Help me diagnose please

    1AR15BlueDot18Gr33VmaxDSCF0027.jpg


    I only get that ring in front of the web from a singularly hot load, but I would not be surprised if it can be done with many lesser loads.
     
    Re: Lapua brass failure - Help me diagnose please

    <div class="ubbcode-block"><div class="ubbcode-header">Originally Posted By: ReaperDriver</div><div class="ubbcode-body"><div class="ubbcode-block"><div class="ubbcode-header">Originally Posted By: buffybuster</div><div class="ubbcode-body">I'll pile on.

    In this case, the flattened primers are not an indication of excessive pressure. However these are classic signs of Case Head Separation or Imminent CHS.

    CHS like this is due to excessive headspace (caused by a variety of reasons: long chamber, improper setup of sizing die, etc). Upon firing in an excessive headspace situation:

    1) The FP pushes the case forward, creating a gap between the casehead and boltface. If headspace is too excessive, primer may fail to ignite (thank God).

    2) Pressure builds inside the case. The thinnest part of the brass swells and conforms to the chamber. The thinnest parts being the shoulder and body are below the shoulder. This part of the case grips the chamber walls and creates a Morse Taper type arrangement.

    3) The casehead is still hanging free at the end, the pressure within the case is building and pushes the primer out of the pocket until it hits the boltface. (Primer is protruding and balloning from the pocket).

    4) Pressure builds some more until the plastic limit of the brass is reached. At that point the case stretches at the point where the brass is thick enough not to expand to the chamber (about .200" ahead of the extractor groove).

    5) The case is stretched, the casehead comes back to the boltface. Recall the primer was protruding. When the casehead comes back the primer does not get pushed back evenly into the pocket. Some gets rammed back in and the excess is flattened around the pocket, giving the APPEARANCE of excessive pressure.

    You repeat this cycle to greater or lesser degrees and it eats up you brass. </div></div>

    Another great explanation! That makes really good sense with what I'm seeing here.

    It appears that I definitely had the die set up incorrectly. If I'm doing my measurements on FL resized vs fired brass (see above) correctly - then it appears I was bumping the shoulder back about .008 to .009 rather than the desired .001-.002. Prior to receiving the rifle back from the custom shop, I was trying to get ahead as much as possible and I prepped my 1st batch of brass in anticipation of getting the rifle and wanting to go shoot it and re-work up the loads again. So I FL resized with the original die setting and got the brass all the way through being primed. I held off on powder and bullets thinking that maybe the cases would be TOO LONG and would not chamber given that I expected the "new" chamber to be tighter than the original factory chamber. So my plan was to run a random sample of the resized, primed brass through the gun and see if it would chamber easily and if not, then I could always resize it again before doing powder and bullets. As it turned out, they all chambered very easily, so I never thought about it again. Little did I know that the cases were OVERSIZED, not undersized. Live and learn, I guess.

    Fortunately, all it ended up costing me was about 125 well used Lapua cases. I did the paper clip trick in a random sample of the rest of the lapua I had that has been through the gun and they ALL showed signs of thinning at that point about .200 above the extractor groove. I assume that even if I resize them and shoulder bump them correctly for the headspace, those pieces are now toast?

    One last question.... would I be right in assuming that the imminent CHS phenomenon (even if they didn't actually split yet) would cause some sticky bolt movement along with the extractor marks and flattened primers? That would explain a lot of things on some previous firings.

    Cheers all for the great help! </div></div>

    While you could salvage some of that brass by neck up and resizing back down to create a false shoulder to correctly headspace off of, (or seat the bullets hard into the lands) at best you're looking at 1 or 2 more loadings before they're totally toast. They'll never be Tier 1 brass again, so it's not worth it in my opinion.

    The sticky bolt is from the ejector swipe. But the ejector swipe is not from excessive pressure. Your ejector swipe is from the fact that the casehead had about 0.010" of a running start before slamming into the boltface. With correct headspace,as there is no movement, the 50Kpsi chamber pressure remains as Potential energy at the casehead/boltface. With excessive headspace of ~0.010" you convert that Potential energy into Kinetic energy and the casehead slamming into the boltface extrudes a bit of the casehead into the ejector tunnel, causing ejector swipe.

    If you didn't experience CHS in some cases, this is because those cases had thick enough walls to stretch without fracturing OR the headspace wasn't as excessive as the ones that split.

    If you get ejector swipe with correct headspace, then you've begun to exceed the plastic limit of the hardened casehead... that's bad news.

    Reaper, one of these days I'll make it out to the Vegas matches..
     
    Re: Lapua brass failure - Help me diagnose please

    OK, so to close the loop on this issue - I went back and followed DOC's reloading 101 die setup instructions to the letter using some once fired WIN brass that I had been wanting to workup some practice loads with for a while anyway. Not owning a headspace gauge, I used Doc's trick of backing the FL die all the way out until the bras wouldn't chamber and then worked back down in small increments until it would just chamber easily. I did FL resizing on all with full brass prep, including trimming to 2.005. I also took a couple of people's advice and necked the cases down in two steps - 1st .339 and then finally to .332 (WIN brass).

    I went to the range yesterday and shot my workups and got all the way back up to my original sweet spot with ZERO over-pressure signs. No flattened primers, no sticky bolts, not nuthin'. And accuracy was the best I've had BY FAR since I recieved the gun back from the custom shop. I think the worst group I shot was about 0.57, most of the others were in the 0.3-0.4 range (I'll get pics up later).

    After sizeing and before shooting them, I measured the shoulders with a .40S&W case at teh shoulder datum line so I could measure the shoulder bump after firing. ALL the fired cases ended up being bumped exactly .0025. So Doc's trick works like a champ.

    So the BL: it looks like the issue WAS headspace. So thanks to all for the excellent help and advice. PROBLEM SOLVED!
     
    Re: Lapua brass failure - Help me diagnose please

    How often were you checking the inside of the cases for a step?
    I would take what you learnt from this and apply it to everything you load for. Check all your set ups to be safe.
     
    Re: Lapua brass failure - Help me diagnose please

    <div class="ubbcode-block"><div class="ubbcode-header">Originally Posted By: AUJohn</div><div class="ubbcode-body">How often were you checking the inside of the cases for a step?
    I would take what you learnt from this and apply it to everything you load for. Check all your set ups to be safe. </div></div>

    Until it was pointed out to me, never. I now use the "paperclip" trick on all my cases I'm reloading for now.

    Along the same lines of setting up the die for correct headspacing.... how do you do that for gas guns? Same way as Doc's method of die trial and error until the case chambers? I can see how it would be much harder to feel the resistance of the bolt closing in a gas gun vs a manual bolt gun. Are there any gas gun specific tricks for this, or do I just need to break down and buy a HS gauge for my precision AR?