• Watch Out for Scammers!

    We've now added a color code for all accounts. Orange accounts are new members, Blue are full members, and Green are Supporters. If you get a message about a sale from an orange account, make sure you pay attention before sending any money!

Gunsmithing Modifying inletting on a KRG Bravo

Odysseus1911

Piled higher and Deeper
Full Member
Minuteman
Feb 14, 2019
578
1,210
Arkansas
Wanting to build a rifle on the 7 Sherman Max (basically a 7 SAUM improved) in a Tikka T3 action. Purpose will be primarily long range steel, but I want it to double as a hunting rifle, so I'm thinking I don't want an exposed aluminum chassis because they're cold in the winter, and I don't want a chassis that weighs 6 or more lbs. A KRG Bravo looks about perfect.

Long loading the 7 Sherman Max takes you out to 3.2 inches or so, which is fine because the T3 can be easily modified to run the longer AICS mags. However, KRG made their T3-inletted Bravo magwell only long enough for the short mags, so even if you modified the receiver to accept the longer mags, the chassis still won't. The Remington LA Bravo chassis does have the longer magwell and accepts the long AICS mags. So how difficult would it be to mill out the receiver bedding area on the Rem 700 inletted chassis enough to fit the T3? (It doesn't have to be a perfect fit, just big enough not to bind because I'll glass bed it afterwards, anyway)
 
It would be virtually impossible. What you could do is get a T3 then buy a Rem 700 trigger guard and use that, only holding it on with the rear action screw. Then you could open up in the inlet in the T3 backbone. You could get to 3.45" magwell length doing that. Of course you could inlet the magwell forward but then the rounds would get hung up under the action. I don't know what mag you would use, there's some intermediate length ones out there in the works.
Good luck,
Justin

Thank you for the reply. Of course, you could always decide to inlet one of your fine chassis for the long action T3/T3x, hint, hint. ;) Several aftermarket bottom metals already exist that allow it accept long AICS mags, so I’m pretty sure the market is there. The Tikka crowd seems to buy a lot of your short action chassis, but everyone running a T3 long action and wanting a chassis has to go to MDT. Maybe you’re missing out on a section of the market??
 
Thank you for the reply. Of course, you could always decide to inlet one of your fine chassis for the long action T3/T3x, hint, hint. ;) Several aftermarket bottom metals already exist that allow it accept long AICS mags, so I’m pretty sure the market is there. The Tikka crowd seems to buy a lot of your short action chassis, but everyone running a T3 long action and wanting a chassis has to go to MDT. Maybe you’re missing out on a section of the market??
Did you ever tackle the Tikka LA/KRG bump and grind?
 
Bumping this thread...

Any news on re-working KRG short action chassis of developments on KRG new SKU that fits medium action magazines for Tikka? Cheers.

@Massoud
 
  • Like
Reactions: K2e2vin
I've thought about holding the trigger guard with the single screw. Does the R700 trigger guard allow the XM or 3.56 LA magazines?
 
@Massoud could you please provide information on how much (mm or /inch) backwards the magazine latch will settle with REM 700 guard than with original T3 guard. I'm thinking my head off on how to make XM magazines fit to bravo since I already have them for MDT T3 bottom metal. It's still a +100€/$ hit or miss with that trigger guard.
 
Why not just buy a proper R700 action like a Origin or Coup De Grace for a couple hundred $$ more instead of dealing with some half assed fuckery? You get a better machined action too and with more trigger and chassis options.
 
Hi redneck! Sorry for not clarifying I'm from Europe and proper actions here cost more than a comp ready T3 + all the hazzle with gun licences :) that's why I'm having 4 different cal barrels for my T3 and would love to use my .284 win and long throated .260rem with KRG as well!
 
For your information, I have succesfully made modifications to make XM magazines work. After some field testing I'll write a new thread with detailed pictures. I only have a dremel and file so no need for fancy mills (of course you could get more professional work quality but most alterations aren't visible).

Instead of spending 150 on new trigger guard which beforehand I wouldn't even know to help to make things easier I used that amount to buy a used spare TRG 21 skeleton and modified that without making visible alterations/ruining my existing trigger guard. Only visible alterations was making room in Bravo rear stock for backing up trigger guard 7-8mm.

It's of course doable on KRG T3 skeleton which doesn't require other work concerning inletting T3 to TRG skeleton but they are so close it was pretty straightforward and now I can switch between my CTR magazines with shorter cartridges and XM for longer.

In short you have to file magazine opening 7-8mm backwards, drill a second hole to rear stock 7-8mm back from rear action screw and sink a threaded counter part to rear stock for trigger guard rear attaching screw. And for the rear action screw make a countersunk sinking to rear stock aluminium pillar and use a shorter countersunk type action screw (so triggerguard will fit over rear action screw).

All in all this would be very easy alteration commercially by just making new CNC profile to skeleton for longer magwell and a new trigger guard. No need for new plastic molds or anything so I'm just curious why KRG haven't exploited the market on this one.
 

Attachments

  • IMG_20230318_011450_copy_595x1086.jpg
    IMG_20230318_011450_copy_595x1086.jpg
    178 KB · Views: 93
Can you share the link to your new thread?
 
Can you share the link to your new thread?
Hi! I have been pretty busy lately and work is still in progress. Just got the bedding block back from cerakote after modifications. I noticed that the plastic trigger guard isn't rigid enough being tightened only from the rear end so I eventually ended up ordering aluminium trigger guard & extended latch abroad and it hasn't arrived yet. Will post link when everything is done.
 
  • Like
Reactions: ma smith
Sorry for keeping you guys waiting, but I've finally had time to assure this is 100% reliable :)

Here's some photos and explanation on this project.
Parts used:
- TRG-21/22 skeleton
- KRG Bravo rear stock
- KRG Bravo forend
- KRG aluminium T3 Trigger guard
- KRG extended magazine catch

Things I modified:

- Skeleton:
1. Because I used TRG skeleton instead of T3 Bravo skeleton, I had to make a couple of millimeters widening on front action screw towards rear action screw (TRG action screw spacing is couple of millimeters shorter than T3 but they're so close it's plain and simple). Of course if you use T3 skeleton you don't need to touch these action screw holes. (photo no 1 shows action screw spacing)

1.jpg

2. Magwell filing. TRG magwell starts couple of millimeters rearward compared to T3 magwell, so I filed around 3-4 millimeters on each end to make room for around 7 millimeters longer XM magazine. Of course if you use T3 skeleton you only file it from the rear. (photo no 0)

0.jpg

3. On the TRG skeleton there's holes only for the TRG forend but you need some kind of fastening if you're using KRG forend. I decided to make 3 attaching holes spacing the same as MDT Arca rail so I can secure it securely to skeleton and It'll also squeeze the forend tightly on the skeleton. I used KRG fasteners from the other side. (photo no 6 & 7). Skip this if you're using KRG skeleton.

6.jpg
7.jpg
4. Milling new slot for T3 recoil lug. TRG's recoil lug is more rear so had to mill slot for the T3 lug and then I bedded everything with Acraglas. Before bedding the skeleton went to aluminium oxide blasting so bedding will attach to aluminium like hell and it'll be ready for cerakote after bedding. (photos 8 & 9)
8.jpg9.jpg

Voila! Skeleton after cerakote on photos 10 & 11.
10.jpg11.jpg

- Oother parts:
1. T3 Trigger housing. Since KRG triggerguard needs to come rearwards, you need to make room for it. The T3 aluminium trigger housing will allow some 5 millimeters filing before the attaching screw. I also had to use different kind of trigger attaching bolt and cut it to make room. This is shown on photo 1.
1.jpg

2. KRG trigger guard. You also need to make room for the trigger guard to come rearwards towards the trigger housing by filing the guard itself. This is shown on photo 2. It's coloured in red so I noticed where I need to file more.

2.jpg
3. Rear stock. You need to mill room to the pistol grip for backing up the trigger guard. My dremeling skills doesn't do honor but hey this is for use not for exhibition! I you also need to drill new hole around 7mm rearwards from the rear action screw to secure the trigger guard. Of course the trigger guard needs some threaded counter part so I milled a slot for KRG counter part to the top of rear stock. For the actual rear action screw you need to make countersunk and use countersunk bolt so it'll stay flat beneath the trigger guard. (photos 3, 4 and 5)
3.jpg4.jpg5.jpg

That's it! Now you need to assemble the whole puzzle :)
1. Insert action to bare skeleton, fasten front action screw
2. Slide rear stock on skeleton and fasten rear action screw which will hold it secure. You can also fasten the top bolt which secures rear stock from the top
3. Slide forend and fasten it
4. Insert trigger guard and tighten it from the rear bolt

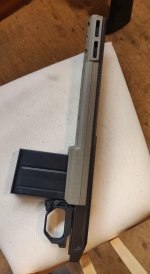
Voila! Final product shown on photo, It's a .284win and rounds shown on XM magazines are loaded to 81,5mm with 180 Lapua Scenars. Very light to carry and capable long range rig! XM magazine takes 10 rounds.


final1.pngXM with 284win.jpg


I still need to do final touch which is camo paint with stencils when I have next free time!

Final words, If I were able to do this with a dremel, drill and a file I think anyone could do it. Of course getting the magazine 100% right means annoying 1 millimeter trials and errors to get it perfectly right which took some time and figuring out couple of things. And use the extended magazine catch which will allow for custom filed fit! Usually sleeping over night helps alot with planning.