Join the Hide community
Get access to live stream, lessons, the post exchange, and chat with other snipers.
Register
Download Gravity Ballistics
Get help to accurately calculate and scope your sniper rifle using real shooting data.

Install the app
How to install the app on iOS
Follow along with the video below to see how to install our site as a web app on your home screen.
Note: This feature may not be available in some browsers.
You are using an out of date browser. It may not display this or other websites correctly.
You should upgrade or use an alternative browser.
You should upgrade or use an alternative browser.
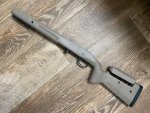
My first attemp at sponge camo.
- Thread starter coyotehunter223
- Start date
Decided to give my new (to me) t6a a facelift. Found the sponges at hobby lobby( in the art section) . Just used rustoleum camo paint army green, forest green, earth brown, and black for the basecoat. Ran over it with two coats of rustoleum matte clear.
Attachments
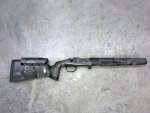
I'll preface with the fact that I'm very much a form over function type of guy.
Camo is simply breaking up the outline of the object. To think of it simply, you can't screw it up so long as you don't end up with a repetitive pattern that keeps an outline.
I took the plastics off and masked anything important. I then let my kids loose with a sponge and a palate of krylon. They had a great time and it kept my adult (read patterned and organized) brain from interfering with the overall concept behind camo in the first place.

Do not worry about screwing up. It's camo, it's disorganized, the less pattern there is the better!
Camo is simply breaking up the outline of the object. To think of it simply, you can't screw it up so long as you don't end up with a repetitive pattern that keeps an outline.
I took the plastics off and masked anything important. I then let my kids loose with a sponge and a palate of krylon. They had a great time and it kept my adult (read patterned and organized) brain from interfering with the overall concept behind camo in the first place.
Do not worry about screwing up. It's camo, it's disorganized, the less pattern there is the better!
I'll preface with the fact that I'm very much a form over function type of guy.
Camo is simply breaking up the outline of the object. To think of it simply, you can't screw it up so long as you don't end up with a repetitive pattern that keeps an outline.
I took the plastics off and masked anything important. I then let my kids loose with a sponge and a palate of krylon. They had a great time and it kept my adult (read patterned and organized) brain from interfering with the overall concept behind camo in the first place.
View attachment 7302683
Do not worry about screwing up. It's camo, it's disorganized, the less pattern there is the better!
That is awesome that your kids were involved - looks great!
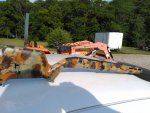
Here's my 1st attempt this past week on my KRG Bravo I just picked up used on the forum. Got really freaking bored at home and I hate FDE so I put together a quick vid...
I'm a rookie here, so please this is an amateur vid that I put together. Total footage was like 1.5h, consolidated down to 5 min roughly. The entire job took 1 day then left it alone for another 24h. Having a heat gun is key! The BA mounted in the stock is my Vudoo for reference with a cerakote grey barrel.
Turned out ok... ?


*Lighting is 'warm' in my living room, not very good for taking pics. The clear coat really makes a huge difference In bringing out the colors. I'll take better ones when the damn sun comes out in SF.
I'm a rookie here, so please this is an amateur vid that I put together. Total footage was like 1.5h, consolidated down to 5 min roughly. The entire job took 1 day then left it alone for another 24h. Having a heat gun is key! The BA mounted in the stock is my Vudoo for reference with a cerakote grey barrel.
Turned out ok... ?
*Lighting is 'warm' in my living room, not very good for taking pics. The clear coat really makes a huge difference In bringing out the colors. I'll take better ones when the damn sun comes out in SF.
issuer, nice job on the paint! I was just going to ask if anyone had painted a Bravo chassis. I was curious to see what it looked like painted. Looks like you remove the trigger guard/mag pieces. I guess you could paint those as well. Did you have the sand the stock or did you just wipe it down with alcohol prior to painting? Do these paint jobs with a clean coat typically hold up well or do they eventually flake or rub off?
Thx @45ACP223 I did not sand it down prior to painting. You could, but the chassis takes paint really well. I just used some cleaner in my kitchen, you could use any degreaser as well. I did clear use clear close and highly recommend it as it holds up well and gives the colors used the depth to it. Check out the video, if you have 5 min ?. Give it Like!
I'll preface with the fact that I'm very much a form over function type of guy.
Camo is simply breaking up the outline of the object. To think of it simply, you can't screw it up so long as you don't end up with a repetitive pattern that keeps an outline.
I took the plastics off and masked anything important. I then let my kids loose with a sponge and a palate of krylon. They had a great time and it kept my adult (read patterned and organized) brain from interfering with the overall concept behind camo in the first place.
View attachment 7302683
Do not worry about screwing up. It's camo, it's disorganized, the less pattern there is the better!
Somehow, I missed your photo when I scanned this thread the first time. You have a Bravo stock also, and the camo paint is awesome! Can't believe the kids did such a great job! Has that kind of worn in look to it.
Also, for you Bravo stock owners, what is the purpose of the single screw in the rear of the aluminum backbone, just behind the action? The instructions say to tighten it up last, but I'm not sure the purpose of it????
That screw secures the butt stock. There's a slight amount of play until you tighten it, so you can get the fit right.
Yeah, the kids dabbed, smeared, etc randomly until they were happy.
Mike, I thought it appropriate to post up my 1st Camo Job with yours since they're both B&C A2's. I think it turned out just fine. Next time I'm gonna do like Moose did and just use large pieces of sponge.
This is the Hide built 7MM I put together from over the counter Remington 700 pieces bought here to prove a point. Only thing not stock parts is the Holland Lug and the Trigger. And of course the Stock. For a new factory pulled Barrel and factory Action, it'll keep up with the top shelf stuff.

God I hate A2's.
 They're ugly as hell, but I had to stay under $900 to put this thing together and got it for a song.
Larry,
I think your stock turned out really good looking. The pattern you did should look great out in the boonies.
I think your stock turned out really good looking. The pattern you did should look great out in the boonies.
Larry,
I think your stock turned out really good looking. The pattern you did should look great out in the boonies.
I can see me leaving it on a Stump when I forget I brought two sticks to an overwatch spot.
 Thx Mike, your's inspired me to do it. Actually kept looking at a couple pics of yours I saved for reference. Hell, I even like the blue n white in it.
 I just did mine last weekend, you guys inspired me lol
Did a chassis today. Its glossier than I wanted but the clear gloss really made the colors pop.


Well, my two cents says, DIY sponge camo is the absolute best bang for the buck! I did my Ruger Precision a couple of years ago and plan to do my magazines to match. Hope I don't loose any of them during my prairie excursions.
For anyone wondering, Home Depot carries Behr Ultra paint that you can have mixed into basically any color you want. It adheres exceptionally to plastic, polymer, fiberglass, etc. and realistically does not even need clear coat to enhance the durability. Highly recommend it for this application.
Here is an MC3 Legend I just did based loosely on the Manners Midnight style. Black base coat, dark and light grays sponged on and no clear coat:

Here is an MC3 Legend I just did based loosely on the Manners Midnight style. Black base coat, dark and light grays sponged on and no clear coat:
View attachment 7311139
I just did mine last weekend, you guys inspired me lol
Man that looks really good and thanks for posting. I have a FDE Bravo that I've been thinking of doing this to but I was having trouble imagining what it would look like. Now I know, nice work.
I use Acrylic Enamel model paint with Frosted Glass clear coat to cut the sheen. I've done quite a few this way andhave had Montana Extreme solvent get on them without peeling or melting.
Man that looks really good and thanks for posting. I have a FDE Bravo that I've been thinking of doing this to but I was having trouble imagining what it would look like. Now I know, nice work.
Find the rifles/stocks that you like the pattern style first.
Then decide which colors you want.
When you look closely at the stocks, you can see the order that the colors are applied.
Here you go.
FDE base coat from B&C with the webbing left intact, then the first sponge application.
In this case, I applied black first because I wanted it to have dark areas vs shadows.
Added olive green.
You'll notice as I go I used more colors than most. I did that because I wanted it to look like a specific camo.
Cream color added.
Two heavy coats of matte clear and it's done.
The other stock next to it was done at the same time. I alternated colors so it could dry just enough not to smear.
Both stocks completed in under an hour.
I've got an old HS Fiberthane ADL stock that I will do next. It will probably get the midnight camo treatment.
I also broke out the paint over this crazy time. Gave the MPA a facelift with alumahyde 2. No clear.

Well, I finally got off my ass and started. I put the base coat of Aervoe Field Drab on my Bravo. Now I need to figure out what other colors to add. Even the first coat looks better than the original plastic FDE to me. The color is almost a perfect match to the B5 Coyote.

Out at the range today with my Savage .22
Sponge painted Boyd’s stock. This thing is a blast when the big guns are cooling down.
S

Sponge painted Boyd’s stock. This thing is a blast when the big guns are cooling down.
S
Picked up a new Bergara rimfire, too windy to zero the scope today so I painted the stock.

Ok, round 2. I switched gears and tried some good stencils. It looked technically fine but it just looked unnatural. One round of Citristrip later and I sprayed the Aervoe base coats for a sponge job. I’m using an tutorial from another site and laid down a couple of contrasting stripes. This is supposedly going to create a better breakup once the colors are sponged on. We’ll see. I’m going to blend a couple spots just a bit then start sponging tomorrow.
Edit: 1st sponging applied
Ok, I added dark brown and OD then sponged on more field drab and I’m done. The colors are dark and hard to see in the lighting. I’ll see if this grows on me. If not I’m going back to just field drab and black or just field drab and no camo. I’ll get a better picture when it’s back together and light outside. Wherever I end up with it, the process is a fun learning experience.


Done:


Edit: 1st sponging applied
Ok, I added dark brown and OD then sponged on more field drab and I’m done. The colors are dark and hard to see in the lighting. I’ll see if this grows on me. If not I’m going back to just field drab and black or just field drab and no camo. I’ll get a better picture when it’s back together and light outside. Wherever I end up with it, the process is a fun learning experience.
Done:
Last edited:
@A-Rob What color was your basecoat? That’s a nice in-between of desert sand and coyote brown.
Looks nice in the pic.
That’s my favorite do-all color, Aervoe Field Drab. Cerakote has it too and has a bunch of good pictures in their gallery.
Edit: after using Aervoe for several years I’m impressed with its toughness, however I don’t like many of the color options. After the Aervoe dries I’ll finish the sponging with a little Krylon camo brown and olive. Both are dark and should work good with the Field Drab and black for breaking things up.
I think the hardest part of this sponging is knowing when to stop. It also helping me to take a picture and then look at it to see what’s missing. For some reason that works better than looking directly at it to keep everything random. I’ll post the finished rifle when everything has dried in a few days.
Last edited:
I’ve never considered doing my own but the results y’all are having is amazing
It's really easy with sponges, the black and white one above I did last week with a drywall sponge I cut into pieces and then used a pair of needle nose pliers to pick out bits of sponge to simulate a sea sponge. Worked well!!
Anyone use Alumahyde matte clear or one of the matte clears for wheels? I just wanted to add a little protection from cleaners but I want to keep a very flat finish.
Bumping this back up.
Did three more stocks over the last month.
458 Bushmaster for a friend.
I have no idea why it came out so dark, but he loves it and doesn't want it changed.

Another pic of the 450 BM and also an old H-S Precision ADL stock.
I need to get a pic of this in the grassy areas because it looks great out there and awful in the house.

Lastly, another 450BM that I did for another friend after he got his mitts on the one above.

Rebecca has a 300 BO and I offered to paint hers. She said no thanks. After seeing the last one, she decided she might want it painted.

Did three more stocks over the last month.
458 Bushmaster for a friend.
I have no idea why it came out so dark, but he loves it and doesn't want it changed.
Another pic of the 450 BM and also an old H-S Precision ADL stock.
I need to get a pic of this in the grassy areas because it looks great out there and awful in the house.
Lastly, another 450BM that I did for another friend after he got his mitts on the one above.
Rebecca has a 300 BO and I offered to paint hers. She said no thanks. After seeing the last one, she decided she might want it painted.
I have an old Springfield 67H that I want to do this to. most of the blue is worn off and the wood is gouged and in horrible shape. The action is tight and the barrel spotless. Was obviously beat up but rarely shot.
Any reccomendations on filling the wood? Just rgular wood filler? Maybe just paint over the gouges and not worry about it.
If you want the patch to last a long-time clean the gouges out well to remove dirt/oil and fill with JB Weld (or your favorite Epoxy that can be sanded) allow to dry overnight. Then sand the patches until it is even with the stock and then paint.
M1Army
My contribution to the thread.
I acquired a Remington 700 .308 barreled receiver Police version with the heavy barrel in excellent shape. Then I picked up a used Bell & Carlson Remington 700 BDL Varmit Tactical Stock that I wanted to paint so I decided to use the sponge technique. I used a combination of alumahyde II and Aervoe paint for the sponge colors and sprayed Duracoat Satin Clear Coat for additional protection.
M1Army
Last edited:
After I dyed my Bravo OD I really wanted to give the sponge camo another try and I’m real happy with the results.

I tried sponge painting on a KRG W3 Gen 5. It turned out good for my liking, but if I did it again, I would do something like Manners Midnight with orange added.


I tried sponge painting on a KRG W3 Gen 5. It turned out good for my liking, but if I did it again, I would do something like Manners Midnight with orange added.
View attachment 7418169
View attachment 7418167
personally, I think that looks bad ass and wouldn’t change up anything.
Similar threads
- Replies
- 19
- Views
- 2K
- Replies
- 1
- Views
- 435
- Replies
- 4
- Views
- 301
