• Watch Out for Scammers!

    We've now added a color code for all accounts. Orange accounts are new members, Blue are full members, and Green are Supporters. If you get a message about a sale from an orange account, make sure you pay attention before sending any money!

My M70 WiP Project Rifle - a saga

DJL2

Tiger 33A
Full Member
Minuteman
Oct 16, 2013
1,141
887
OCONUS - Land of Kimchi
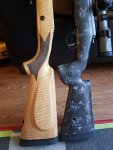
A year or so ago I bought a beautiful Winchester M70 Super Grade Maple in .30-06 (I think it was a 2018 SHOT special). Sure, the parts were sourced from all over and it was assembled in Portugal, but it's still an American icon - and the new production is a wonderful homage to the Pre-64 with the exception of the MOA trigger module. However, I don't really buy rifles because they look pretty.

After spending a fair amount of time with the rifle, I had fired Hornady 178 ELD-X, CM Sports 167 Lapua, Hornady 165 SST SF, Cu Creek 208 ELD-M, Federal 150 Blue Box...perhaps some other fodder. Unfortunately, my M70 didn't shoot anywhere near as good as it looked - a 2 MOA gun that occasionally fired a 1 MOA group, even after bedding (which made no difference - the factory glue gun job might have been ugly, but was apparently adequate). At this point, I was committed to and waiting on a McMillan stock with a custom LOP...

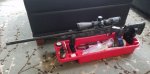
Next, the rifle went to an almost local smith (Whidden Gun Works). The action seemed "true" and I had previously lapped the lugs. That left installation of a new barrel. I was pretty stoked to see Bartlein release CF barrels, so that's what I ordered. The "red" color is incredibly subtle and I think it's quite nice. I was surprised to learn, as this is my first CF barrel, that they have "character" - places where the CF isn't even and smooth along the exterior. The original stock needed significant relief to get the much thicker barrel in. Overall, the weight has remained at ~9.5 lbs. When it returned, I fired the first 41 rounds "as in" with a pressure point at the tip of the stock.

The CM Sports ammo produce a couple almost decent groups. The SST ran at 3030 fps with pretty decent SD, but I've yet to find a rifle in any caliber that shoots well with it. I did realize how awful the stock trigger is, but had forgotten and finally ordered a Timney to replace it. At this point, I'm on a mission born of pure stubbornness to get my M70 to a point where it will out shoot a stock Tikka T3x. Having spent enough money to buy a Seekins PH2 (or 3x Tikka T3x) with cash left over for ammo, I certainly see the appeal turn key packages or those for which pre-fit barrels are available.

A note on heat transfer - my MSv3 went on for the SST, stayed on for the CM sports ammo...and 20 shots later the strap had partially melted/deformed and the bayonet dropped right off the front of the rifle. Yes, -06 burns more powder than 6.5 CM - but I've parked my MSv3 on the end of my SOTIC for entire shooting sessions with no issue. Initial impression is the Bartlein CF has no problem at all shedding heat...

I get the sense that the original maple, while attractive, is likely going to need a lot more TLC and I'm just not sure I'm up to that. I did got after it pretty aggressively with sandpaper and the Dremel to get the barrel floating, although just barely enough for a piece of cardstock. Sadly, my trip to the range today was cut short. I think I'll get the trigger swapped and head to the range one more time to get a sense of its potential before I park it in the safe to await its new stock. Gotta get some pics up once I figure out how to internet good.
 
I purchased one in 270, mine hasn’t shot the greatest. But honestly I bought it cuz it was beautiful and I had to have it.
 
The McMillan and a good bedding job along with a trigger tune up should remedy your problems, a MCARBO spring kit will help if you are worried about adjusting the stock trigger to low.
 
Here she is at present. I think the Bartlein CF actually looks really classy and compliments the maple well. I went with gray cerakote and had it done on the action for consistency. Still sort of breaking the action in post cerakote, but it's getting smoother. It's a close match to the scope, so it's a weird sort of two-tone thing going on between the not-quite matching bottom metal, scope knobs/rings, barrel.

20200620_184757.jpg
 
Well, after just about an even six months, my McMillan Game Scout arrived.

The good news is that it fits me really well and looks great. It readily earned my wife's seal of approval. The not-so-good news is that it is a tight fit on the rifle, definitely not free floating my Bartlein.

On the bright side, after using sand paper to open the inlet on the factory stock, I'm reasonably confident I can do this one as well. The inside needs some TLC / finishing work anyway, so I'll just add this on. It's also a great excuse to bed the rifle.

It's wearing a Timney set at 1.5 lbs now because I got tired of "fighting" the factory trigger after shooting my other rifles.

I found that H4350 at right about book max almost exactly duplicated the CM Sports load with the 208 ELD-M @ ~2600 fps. I did a batch with SF powder and ended up @2670 fps and similar SD (nothing I'm posting here in the land of sub-five or go home). The factory SST SF 165 runs ~3040 fps, so my bbl is just a bit on the quick side. H4831 was a NO-GO, got pressure well below book max according to both my shoulder and the cases/primers. Ruined a few bullets pulling the rest of that ladder.
 

Attachments

  • 20200818_145326.jpg
    20200818_145326.jpg
    499.9 KB · Views: 80
Last edited:
I made a run at bedding it last night/yesterday. I was sick enough not to go to work in person, so I thought "this is the perfect time for some highly detailed oriented work" (side note: highly detail oriented work is a challenge for a kid that struggled to color in the lines). I tried a more liquid bedding compound with a longer cure time, so I'll be interested to see the results. On the bright side, the stock will hide small mistakes capably because of how closely the bedding and the stock color match, so there's that! I opted to full-length bed.

The McMillan stock came "bedding ready" in the sense that not much material removal was required if my assessment was correct (probably could have done it with just hitting the rear of the recoil lug recess, honestly). I occurred to me that part of the reason the barrel wasn't free floating is that with a "bedding ready" stock, there's no built in height reference for the front and that as I removed material from the barrel channel, the whole action would just move lower. I set height for bedding by wrapping several pieces of tape around the barrel where it protrudes from the stock - hopefully, that will give me a small/near float once it cures. I left the stock "as in" under the tang as a rear reference point - there's plenty of space for compound under/around the lug at the rear tang.

I'm far from an expert at bedding things, so tomorrow will either be a "I'm starting to get the hang of it" sort of day or a "<cries into whiskey>" sort of day.

ETA: it's been a long day so that whisky will be on the rocks. At some point I might get into all the ways this bedding job didn't go right, but not just now.
 
Last edited:
  • Like
Reactions: moosemeat
Here she is now.

I'll mention a couple things on bedding.

1. The release agent struggled a little on the cerakote, but only about the top line. A fingernail, vigorously applied, was enough to fix it.

2. I used a generous amount of compound, but still ended up "short filled" under the ejection port and at the front corners of the action.

3a. Attention to detail. I didn't see a couple splotches of compound on the stock exterior as I was pulling tape and wiping things down. The stock now has a couple spots with extra texture.

3b. Up close, the top line looks terrible - just not clean and even.

3c. Bedding ready everywhere but under the bolt release. Using the rear tang inlet as shipped for the rear height reference there is a good, thick layer of bedding. I failed to block off enough space under the left side of the receiver and made an absolute mess of things removing bedding and patching the stock in this area to actually get the rifle functional. The right amount of bedding under the bolt release is zip, zero, nada.

This ended up being a really, really expensive way to learn different ways to botch a M70 bedding job. If I can get it to the range, I'll be able to see if it's as functional as it is ugly.
 

Attachments

  • 20200828_142532.jpg
    20200828_142532.jpg
    288.5 KB · Views: 89
If you’re willing, post some pics of the finished job. I’m sure some of us will be able to give you some tips on how to make the next time go a little bit smoother.
 
I will do so. I've been working to choke down what's left of my pride first. If nothing else, maybe some soul will see it and NOT do some of the things I did. I meant to take photos of the prep work...neglected to do that.
 
I have a .30-06 New Haven model that I'm going to be turning into another .280 AI as soon as I can source a barrel for the project. These guns really shine in long action calibers. If done well, you'd be hard pressed to find a better base to build off of when it comes to a mountain/LR hunting gun.
 
Here she is now.

I'll mention a couple things on bedding.

1. The release agent struggled a little on the cerakote, but only about the top line. A fingernail, vigorously applied, was enough to fix it.

2. I used a generous amount of compound, but still ended up "short filled" under the ejection port and at the front corners of the action.

3a. Attention to detail. I didn't see a couple splotches of compound on the stock exterior as I was pulling tape and wiping things down. The stock now has a couple spots with extra texture.

3b. Up close, the top line looks terrible - just not clean and even.

3c. Bedding ready everywhere but under the bolt release. Using the rear tang inlet as shipped for the rear height reference there is a good, thick layer of bedding. I failed to block off enough space under the left side of the receiver and made an absolute mess of things removing bedding and patching the stock in this area to actually get the rifle functional. The right amount of bedding under the bolt release is zip, zero, nada.

This ended up being a really, really expensive way to learn different ways to botch a M70 bedding job. If I can get it to the range, I'll be able to see if it's as functional as it is ugly.

One of the best tips I've heard when bedding an action has been to do all the prep work (masking off, release agent, clay in critical areas) and then use a heat gun to warm the epoxy so it's runnier and will flow more easily into crevices.

I have a mill, so clearing material from the stock is easy both before application and after the compound has cured. It leaves a nice sexy finished product.
 
Well...here we are...like a train wreck...you know it's gonna be awful, but you cannot stop yourself from looking anyway. First photo is the result of not having anywhere near enough clearance via plasticine. I don't have a mill...this was files, sand paper and a Dremel...done by a six year old...with Parkinsons...nope, wait...that was me. Oof. It's not really the focal point, but you can see the top line didn't finish cleanly here as well. You might be thinking "Bro...that bedding looks real thick based on what I'm seeing fore of the action screw." This is where I note that I didn't actually remove any material there...the stock just had a lot of spots that were "loose."
20200903_170312.jpg


It's probably possible to do an uglier job of things...but you'd need to make a deliberate effort, I'd reckon. It's not obvious when assembled...but you can see it from the right angle if you look closely. I mentioned the top line already. You can also see at the bottom where I had to remove the layer of bedding between the stock and the magazine well is a hot mess. It ended up breaking out unevenly while I was attempting to remove it with hand tools. You can also see the front of the action and barrel junction...more on that in the next photo.
20200903_170348.jpg


Just when you think it can't be worse, it's like a late night infomercial - but wait, there's more! The compound was, I thought, pretty runny. It overflowed, as expected, in several places. I thought it would fill in the action/barrel junction...I was wrong. I obviously should have painted compound onto the action there. I did some removal work on the numbers...those were crisp when I broke it out. How 'bout that knox bedding, eh? If you look, you can see where I dammed the barrel channel because there's a nice clean line in the bedding there...which it completely ignored a flowed forward to create the horror show you're looking at. Clearly plenty of extra compound here, and somehow still not enough where needed/wanted. Well done!
20200903_170408.jpg


My wife did a great job of scheduling family activities last weekend...but, she's not feeling good today, so I might just get this thing out tomorrow to see if it's functional or not.
 
Well...here we are...like a train wreck...you know it's gonna be awful, but you cannot stop yourself from looking anyway. First photo is the result of not having anywhere near enough clearance via plasticine. I don't have a mill...this was files, sand paper and a Dremel...done by a six year old...with Parkinsons...nope, wait...that was me. Oof. It's not really the focal point, but you can see the top line didn't finish cleanly here as well. You might be thinking "Bro...that bedding looks real thick based on what I'm seeing fore of the action screw." This is where I note that I didn't actually remove any material there...the stock just had a lot of spots that were "loose."
View attachment 7415345

It's probably possible to do an uglier job of things...but you'd need to make a deliberate effort, I'd reckon. It's not obvious when assembled...but you can see it from the right angle if you look closely. I mentioned the top line already. You can also see at the bottom where I had to remove the layer of bedding between the stock and the magazine well is a hot mess. It ended up breaking out unevenly while I was attempting to remove it with hand tools. You can also see the front of the action and barrel junction...more on that in the next photo.
View attachment 7415346

Just when you think it can't be worse, it's like a late night infomercial - but wait, there's more! The compound was, I thought, pretty runny. It overflowed, as expected, in several places. I thought it would fill in the action/barrel junction...I was wrong. I obviously should have painted compound onto the action there. I did some removal work on the numbers...those were crisp when I broke it out. How 'bout that knox bedding, eh? If you look, you can see where I dammed the barrel channel because there's a nice clean line in the bedding there...which it completely ignored a flowed forward to create the horror show you're looking at. Clearly plenty of extra compound here, and somehow still not enough where needed/wanted. Well done!
View attachment 7415347

My wife did a great job of scheduling family activities last weekend...but, she's not feeling good today, so I might just get this thing out tomorrow to see if it's functional or not.
That is absolutely NOT a train wreck. If you have a drill press or a mill, cleaning that up is easy. If you only have hand tools, you can use a dremel but I've found that a good sharp set of chisels (I mean razor sharp carpentry chisels) is a much easier and cleaner way of cleaning up bedding compound than a rotary tool that bites into things and makes a mess.

With a sharp chisel and some patience, you can clean up the inside line of compound, almost like putting a chamfer on the inside edge of compound to get things even on the stock line. It won't affect fitment or function, but it will make it easier on the eyes if you're worried about that.
 
Yeah, that’s not that bad at all for a first attempt. It seriously could have gone SO much worse. Go really slow on your clean up around the exposed edges of the stock so nothing else chips out. Ugly stuff below that line might hurt your pride, but it won’t make a bit of difference in how it shoots. You have plenty of good contact surface there as it is. Get your clearance surfaces cleaned up with files, rasps, a Dremel, whatever. Then redo your release compound, and use either a bit more of your bedding compound, or bondo spot filler to touch up the chips on the top edge if they’re visible. Once that sets up semi-hard use a non marking knife (I sharpen a piece of plexiglass I have) to cut a clean straight line through the compound along the top of the stock. When it’s cured pull the stock and touch up your paint.
(Posting from phone I’ll clear this up from the PC if this doesn’t make sense)
 
Looks functional to me. Not bad at all for your first go.
 
I need to replace my chisels. Their points didn't survive my PCS. I might just take a run with the JB once I resupply. I'm concerned about clearance / fit though. If it does shoot, I might leave it out of fear. I noted the same thing with the Dremel - it likes to bite. That created some challenges when I was removing material for the bolt release. I actually used the last of my JB to patch that area once already when I saw that I hit Fiberglass and not just bedding.

I appreciate the assistance. Humbling experience for sure.
You don't need to replace them, sharpen them up and take your time. Honestly though, it looks good to me, take it out and shoot it.
 
I had some CM Sports ammo left over, so I spent some time this past weekend turning 167 grain Lapua Scenar/Brass into once fired Lapua brass. The time spent with my bow versus my rifles lately was evident. That being said, it produced the following:

1. .76 MOA group (5 shots), lateral stringing, vertical dispersion was .40"
2. .92 MOA group (5 shots), just a pretty lousy bit of shooting, honestly...but, did have three go pretty tight
3. .64 MOA group (5 shots), 3 shots into nearly the same hole
4. 1.44 MOA group (5 shots), 2nd shot was a called flyer...I just came apart completely. Best 4 were on target at .66 MOA, horizontal stringing again.

I was working the zero at this point...looked like about a .5 mil shift in windage and elevation from going over to the new stock/bedding. The good news is that I didn't utterly ruin the rifle. The bad news is that based on how I was shooting I really don't know what it's actually capable of. The stock really does handle very nicely, so I don't have an excuse there. Beyond the shooting, the stock actually enables better bolt manipulation for me, too.

I'll see about the chisels...the blades are in rough shape. I've got a bench stone(s), might be able to rehab them.
 
  • Like
Reactions: mensajd
if you're shooting 3/4" and having a rough day it sounds to me like the stock and bedding job are a win.
For the chisels, if you don't have coarse bench stones already just pick up a few pieces of 220, 320, 600 grit wet/dry sand paper and a piece of glass, or a flat (ground) tile or slate. splash a little water on the glass or slate, press a piece of sand paper onto until it sticks, and sharpen on that. then move to your stones. if you don't have fine sharpening stones buy some finer paper, 1000, 2500 grit (can find it at auto parts stores) and finish on that. use "pull" strokes, where the edge of the chisel is trailing so you dont dig into the paper. if you want to get crazy with it you can buy lapping film as well and put a literal razors edge on them, or your knives. will get you everything you need to sharpen for less than the cost of one good stone which is perfect if you don't do a lot of it.
 
Its not perfect, but ive saw alot worse that "did the job". Honestly, a m70 is not the best action to get your feet wet on learning to bed. A rem is really easy and almost idiot proof to learn on. Tikka and savage are a little trickier, couple small tricks need applied on those. A howa and m70, mainly due to flat bottom receiver, trigger area, and all the built in mechanical locks, are tricky to get a perfect bed job. For future use, I suggest pro bed 2000. It has the consistency of tooth paste, and can be thickened if desired. Also comes with paste wax as a release agent, this stuff is the best. Ive partially stuck actions/masking tape on lugs when ive used Acra release gel, kiwi shoe polish, and cooking spray. The wax is consistently good and predictable. A variable speed dremel and light touch with small and large fine sanding drum can do a nice on clean up. A decent drill press and an x/y table also make clean up of inletting easy( drill press isnt stiff enough to do metal mill work, but is fine with machining bedding slowly).
 
  • Like
Reactions: DJL2
if you're shooting 3/4" and having a rough day it sounds to me like the stock and bedding job are a win.
For the chisels, if you don't have coarse bench stones already just pick up a few pieces of 220, 320, 600 grit wet/dry sand paper and a piece of glass, or a flat (ground) tile or slate. splash a little water on the glass or slate, press a piece of sand paper onto until it sticks, and sharpen on that. then move to your stones. if you don't have fine sharpening stones buy some finer paper, 1000, 2500 grit (can find it at auto parts stores) and finish on that. use "pull" strokes, where the edge of the chisel is trailing so you dont dig into the paper. if you want to get crazy with it you can buy lapping film as well and put a literal razors edge on them, or your knives. will get you everything you need to sharpen for less than the cost of one good stone which is perfect if you don't do a lot of it.
I would recommend 400/1000 grit diamond stones if you don't want to invest in some water stones. If you use glass, make sure you use float glass instead of plate glass and spend a few bucks on a strop. Lapping compound and mink oil on a strop leaves a crazy sharp edge and helps remove those burrs.
 
  • Like
Reactions: DJL2 and Vodak