I have a medium size PRS tripod that I would like to paint camo. I am a little concerned that the foam padding on the legs might melt if it's spray painted (like regular styrofoam does). Can anyone confirm whether these are safe to spray paint?
Join the Hide community
Get access to live stream, lessons, the post exchange, and chat with other snipers.
Register
Download Gravity Ballistics
Get help to accurately calculate and scope your sniper rifle using real shooting data.

Install the app
How to install the app on iOS
Follow along with the video below to see how to install our site as a web app on your home screen.
Note: This feature may not be available in some browsers.
You are using an out of date browser. It may not display this or other websites correctly.
You should upgrade or use an alternative browser.
You should upgrade or use an alternative browser.
PRS Tripod and krylon?
- Thread starter BravoSix
- Start date
Re: PRS Tripod and krylon?
Thanks guys. There is a pick in this month's SAR that shows one painted. I just wanted to make sure that regular krylon was OK. I will keep it light on the foam section to be on the safe side.
Thanks guys. There is a pick in this month's SAR that shows one painted. I just wanted to make sure that regular krylon was OK. I will keep it light on the foam section to be on the safe side.
Re: PRS Tripod and krylon?
Cut the foam off or wrap the foam sections in white athletic tape then paint.
Painting directly on the foam won't look very good. Plus it will take a lot of coats to match the bare sections of the legs.
Cut the foam off or wrap the foam sections in white athletic tape then paint.
Painting directly on the foam won't look very good. Plus it will take a lot of coats to match the bare sections of the legs.
Re: PRS Tripod and krylon?
I painted the whole thing including foam with a Krylon and Alumahyde II and it has all done well over the last year. Use it often hunting and shooting. The foam took paint fine and it isn't a perfect match to the legs but it blends real good in the areas I use it.
I painted the whole thing including foam with a Krylon and Alumahyde II and it has all done well over the last year. Use it often hunting and shooting. The foam took paint fine and it isn't a perfect match to the legs but it blends real good in the areas I use it.
Re: PRS Tripod and krylon?
I used masking tape on the foam area when I painted, then later covered the foam with McNett camo wrap.
I used masking tape on the foam area when I painted, then later covered the foam with McNett camo wrap.
Re: PRS Tripod and krylon?
You're thinking of Styrene mate. Pretty sure padding foam doesn't melt.
You're thinking of Styrene mate. Pretty sure padding foam doesn't melt.
Re: PRS Tripod and krylon?
I want to paint my PRS tripods too. Did you guys paint the plastic parts too? Did painting affect the smoothness of the bearings / clamps? And did you prep the surfaces by cleaning with alcohol or scuffing with steel wool?
I want to paint my PRS tripods too. Did you guys paint the plastic parts too? Did painting affect the smoothness of the bearings / clamps? And did you prep the surfaces by cleaning with alcohol or scuffing with steel wool?
Re: PRS Tripod and krylon?
Just paint the whole thing... Don't obviously try and get paint on the ball itself but even if you gave it a spray you shouldn't be running into too many dramas as it's a set and forget type deal.
Don't be too concerned about leg smoothness, it hasn't been an issue on any of the tripods we've painted so far.
Re: PRS Tripod and krylon?
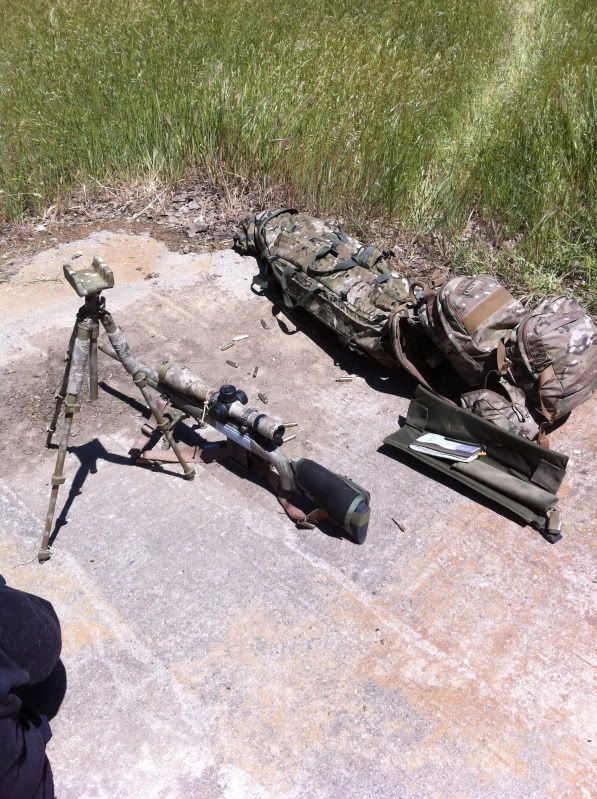
An example of one I painted in a want-a-be multicam pattern can be seen in the Gearhead section of the new Surefire Combat Tactics magazine. It is kind of hard to see the pattern in the picture but I guess that means I did a decent job, as it blends pretty well with the surroundings. I did not remove or tape over the foam just applied several light coats of tan to break up the black a little and it turned out pretty well. Here is the picture in the field.

Well Gentlemen here is a tutorial on how I paint the tripods. The following is but a way not the only way. Tape off the rubber feet and the rubber coated center column tension collar, the paint does not stick to the rubber very well. With a medium Scotch brite pad or 220 grit sandpaper lightly rough up all surfaces to be painted to include the plastic parts. Do not mess with the ball head itself (we will cover how to get any paint off of it later), and I suggest locking it in place with the QD plate attachment square with the center column. Once everything has been roughed up wipe it all down with a damp cloth to remove any sanding dust. After it has dried completely work the legs in and out to make sure you do not have any dust trapped in the legs, and then wipe the entire tripod down again with a clean dry cloth. Extend the legs all the way out insuring they are at their stops and locked, the center column should be at its lowest height and snugged up with the tension collar.
I bolt the tripod upside down on a piece of plate, large enough to span the top of a large trash can and drilled and tapped with a 1/4"x20 hole, this set up allows me to put it up on a trash can and freedom to work all the way around the tripod without moving it. The legs are opened to the first notch but do not push the leg angle locks in, as they should be all the way out to allow paint to completely cover them. Spray several light coats of Krylon Fusion camouflage paint until completely covered, do not go too heavy as it will make the tripod hard to deploy and wear your paint job off much quicker. With it still upside down (and paint completely dry) loosen the center tension column and carefully raise the leg assembly on the center column to allow you to paint the rest of the center column. At this point I open the legs so they are almost straight out and unlock the leg section locks leaving them open. Paint all the newly exposed areas of the locks and center column. Once it has dried carefully lock the leg locks back fold the legs to the first notch and turn it right side up and touch up any spots you may have missed with it upside down. Allow the tripod to dry overnight. With a clean dry cloth rub the entire tripod down really well to remove any paint dust. Be careful to not go too heavy on the center column or it will bind in the leg assembly collar. As for the ball head barely loosen the quarter turn lever and with a twisting motion rotate the ball head within the housing and this will remove any paint on it.
If you want to go with a camo pattern like a multicam pattern I suggest you start with the darkest color first (I use dark brown) and apply spots where you want them not too many just enough to help break up the outline. I use adhesive labels cut into random shapes with no straight edges, lots of curves, ranging in size from ¼” to 1” overall length and width. Place your cut out shapes over the spots you have painted. With your next color I used a lighter green camo paint made by Rustoleum, I again painted spots with some of them overlapping my previous spots allowed them to dry and applied another layer of stickers over these new spots. You can repeat this process for as many colors as you wish. After the brown then green I applied my final coat of tan and let it all dry completely before removing the stickers. Touched up any missed spots and once dried wiped it down. You can also do a really nice digital paint job following the same procedure as above but using the small rectangular price tag labels that are about ¼” by ½”.
Another pattern that can be done relatively easily is apply your dark base coat first and allow to completely dry. With a piece of mesh material like a laundry bag (1/4” holes or there about) lay it over the legs and paint over that with your lighter color/s giving you a spotted pattern that blends pretty well.
Choose a dry warm day and preferably paint in the sunlight to achieve best results. The final result will be a reflection of your prep work, patience, and creativity. Good luck and if you should have any questions please do not hesitate to ask. Paint them and let’s see them. I will try to do a couple and get some pictures as they progress as examples.
An example of one I painted in a want-a-be multicam pattern can be seen in the Gearhead section of the new Surefire Combat Tactics magazine. It is kind of hard to see the pattern in the picture but I guess that means I did a decent job, as it blends pretty well with the surroundings. I did not remove or tape over the foam just applied several light coats of tan to break up the black a little and it turned out pretty well. Here is the picture in the field.
Well Gentlemen here is a tutorial on how I paint the tripods. The following is but a way not the only way. Tape off the rubber feet and the rubber coated center column tension collar, the paint does not stick to the rubber very well. With a medium Scotch brite pad or 220 grit sandpaper lightly rough up all surfaces to be painted to include the plastic parts. Do not mess with the ball head itself (we will cover how to get any paint off of it later), and I suggest locking it in place with the QD plate attachment square with the center column. Once everything has been roughed up wipe it all down with a damp cloth to remove any sanding dust. After it has dried completely work the legs in and out to make sure you do not have any dust trapped in the legs, and then wipe the entire tripod down again with a clean dry cloth. Extend the legs all the way out insuring they are at their stops and locked, the center column should be at its lowest height and snugged up with the tension collar.
I bolt the tripod upside down on a piece of plate, large enough to span the top of a large trash can and drilled and tapped with a 1/4"x20 hole, this set up allows me to put it up on a trash can and freedom to work all the way around the tripod without moving it. The legs are opened to the first notch but do not push the leg angle locks in, as they should be all the way out to allow paint to completely cover them. Spray several light coats of Krylon Fusion camouflage paint until completely covered, do not go too heavy as it will make the tripod hard to deploy and wear your paint job off much quicker. With it still upside down (and paint completely dry) loosen the center tension column and carefully raise the leg assembly on the center column to allow you to paint the rest of the center column. At this point I open the legs so they are almost straight out and unlock the leg section locks leaving them open. Paint all the newly exposed areas of the locks and center column. Once it has dried carefully lock the leg locks back fold the legs to the first notch and turn it right side up and touch up any spots you may have missed with it upside down. Allow the tripod to dry overnight. With a clean dry cloth rub the entire tripod down really well to remove any paint dust. Be careful to not go too heavy on the center column or it will bind in the leg assembly collar. As for the ball head barely loosen the quarter turn lever and with a twisting motion rotate the ball head within the housing and this will remove any paint on it.
If you want to go with a camo pattern like a multicam pattern I suggest you start with the darkest color first (I use dark brown) and apply spots where you want them not too many just enough to help break up the outline. I use adhesive labels cut into random shapes with no straight edges, lots of curves, ranging in size from ¼” to 1” overall length and width. Place your cut out shapes over the spots you have painted. With your next color I used a lighter green camo paint made by Rustoleum, I again painted spots with some of them overlapping my previous spots allowed them to dry and applied another layer of stickers over these new spots. You can repeat this process for as many colors as you wish. After the brown then green I applied my final coat of tan and let it all dry completely before removing the stickers. Touched up any missed spots and once dried wiped it down. You can also do a really nice digital paint job following the same procedure as above but using the small rectangular price tag labels that are about ¼” by ½”.
Another pattern that can be done relatively easily is apply your dark base coat first and allow to completely dry. With a piece of mesh material like a laundry bag (1/4” holes or there about) lay it over the legs and paint over that with your lighter color/s giving you a spotted pattern that blends pretty well.
Choose a dry warm day and preferably paint in the sunlight to achieve best results. The final result will be a reflection of your prep work, patience, and creativity. Good luck and if you should have any questions please do not hesitate to ask. Paint them and let’s see them. I will try to do a couple and get some pictures as they progress as examples.

Re: PRS Tripod and krylon?
+1 for camoform from McNett, plus tons of krylon. You can re-tape and wrap as many times as needed for cheap.
+1 for camoform from McNett, plus tons of krylon. You can re-tape and wrap as many times as needed for cheap.
