• The Shot You’ll Never Forget Giveaway - Enter To Win A Barrel From Rifle Barrel Blanks!

    Tell us about the best or most memorable shot you’ve ever taken. Contest ends June 13th and remember: subscribe for a better chance of winning!

    Join contest Subscribe

RCBS 6.5 Creedmoor Die - worrisome ring on brass...

SMTGWKD

Private
Full Member
Minuteman
Mar 3, 2017
419
107
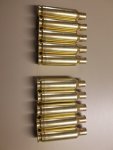
Check out the following picture of once-fired brass (different boxes of factory Hornady 147 ELD) and let me know your thoughts... the 5 cases on the top were full length resized using one die that ended up having a defective depriming pin. I ended up exchanging that die and the new die seems to leave what looks like a pressure ring on All the cases it has sized thus far (5 cases on the bottom).

Worrisome? Or don't worry about it?

20170402_102557.jpg
 
It could be just a dirt / grime ring but how much are you sizing back? Hard to tell from photo

do you know your shoulder measurement from before to after?

had to turn up brightness.

You might need a small base die. Doesn't look like it's sizing all the way but the only way to know is check if you can chamber.

doesnt look like a sign of case head separation but you can double check with a paper clip running down the inside of the case. If it feels like you're hitting a dip then it is.
 
Last edited:
I just looked at my brass and it has the same ring but not quite as pronounced . To me it looks like that is were the bottom of the sizing die stops. I set the shoulder back .002 and am 7th firing without issue. I am using Redding Type S Match 3 die set.
 
I checked again and the fine line you see on the new die sized brass is exactly where the bullet was flared from the first firing in the chamber. You can see the slight difference in hue on the top brass, but the lower brass that is similar to what I've seen on my .308 sizing; however, the lower ones that were sized with the new die all seem to have that fine line right where the hue changes. Can't really "feel" it with a fingernail or paperclip and there is no evidence of case issues on the inside - more of a concern that the new die may be working/overworking the brass differently than the first one.

For comparison, I looked at some unfired Hornady brass that I just sized and cut and it doesn't have either the hue change or the same fine line.

When I'm sizing, I'm following the RCBS directions by lowering the press handle (raise the press all the way) - screw down the die till it contacts the press - raise the handle/lower the press - screw down the die another 1/6th turn so the press has a very slight "pop" at the bottom of the resizing process.

I've never tried just bumping back the shoulder - only full length sized - in the past...but I'm definitely open to any suggestions for improving my case life!
 
"I've never tried bumping the shoulder...."

stop.

Get a 40 s&w case and use that as a poor mans case comparator

or

order Hornady case comparators.

stop sizing anything until you get one or the other.

If you have any just fired cases save them. You need to know how much you're sizing. Over sizing will lead to case failures sooner and more abruptly.

Read the sticky above regarding sizing cases
 
Looks like the new die sizes the bottom of the case less than the old die. Can you measure the case diameter at the ring old vs new die?

Just before, after, and right on the ring I get the following measurements:

Re-Sized Case - Old Die: .465"/.467"/.465"
Re-Sized Case - New Die: .465"/.467"/.465"
New Factory Brass: .465"/.464"/.465"
Once-Fired Case: .467"/.469"/.466"
 
"I've never tried bumping the shoulder...."

stop.

Get a 40 s&w case and use that as a poor mans case comparator

or

order Hornady case comparators.

stop sizing anything until you get one or the other.

If you have any just fired cases save them. You need to know how much you're sizing. Over sizing will lead to case failures sooner and more abruptly.

Read the sticky above regarding sizing cases

I assume by "how much" I'm sizing you mean the shoulder, correct? If not, and you're referring to the diameter of the case - especially at the base - the measurements are in my post above. I'm open to any and all feedback.

I began reloading for my .308 - I only neck sized for the first few firings until I had to trim the case neck and decided to just full length size so I could use my Giraud trimmers universally on prepped brass.
 
When you body size or Fl size a case , you will eventually bump the shoulder.

The shoulder is where the point where the case mouth slopes down and widens to the diameter of the body (hence shoulder).

You start sizing the shoulder when you screw the FL die to the point where the case shoulders make hard contact with the die. (take a look at a google photo of a die cutaway).

so if you screw the die down too much you're sizing your shoulders way too much and you start crushing your die down (think stomping on a coke can).

The proper way to FL size a case is to precisely size the case where you just push the shoulders down 1-2 thousandths of an inch from its fired spec.

That is why you measure a fired case.

Example:
fired case from case head (primer pocket area) to the shoulders measures 3.672" on your comparator tool (40 SW case or Hornady case comparator)

you screw the die down little by little until you size snd messier the sized case at 3.671 or 3.670. (1-2 thousandths bump)

you CANNOT get this measurement by just taking calipers from case head to the case mouth (top of neck) it HAS to be measured at the shoulder area.

Thank you for the insight. I actually understand this process - just haven't thought it necessary after I called RCBS and they gave me the "screw till it touches, then add a 1/6th turn" answer (quoted from their directions I came to find out). Your description certainly makes sense - I'll look into comparator tools tomorrow as I'm very interested to see where I've been sizing each caliber using the RCBS data. So far my hand loads have been very accurate using the FL process - I can only assume they may tighten up even further using this additional step.
 
Proper full length sizing isn't mainly for accuracy it's to prevent premature case failure.

You want to size as little as possible so you're not stressing the case to the point of failure.

Its different for many die/press combinations but the general "have die touch the shell holder then back off or turn additional a quarter" can size your case more than you need to .

Worst case scenario you break off your case inside your die and then you'll have fun getting it out or sending it back in; followed by case head separation after you pull the trigger.

most likely scenarios is youre brass doesn't last but a few firings