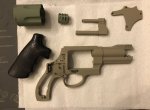
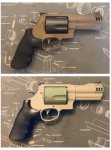
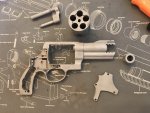
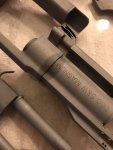
I obtained this little cannon second hand from someone who obtained it second hand. He told me he had never fired it. So I don’t know who did the coating on it, or what was used exactly. I was told it was cerakote but I have no idea.
What I do know is it was done very, very poorly. It was very uneven and had a huge run on the right side of the barrel.
I was glad that I decided to do the refinishing before taking it to the range and attempting to fire it. As it had been reassembled improperly.
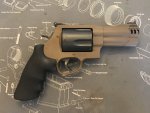
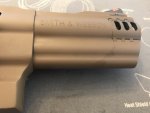
My first clue was that the muzzle brake was installed upside down, effectively making it a recoil amplifier. That didn’t give me the warm and fuzzies.
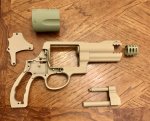
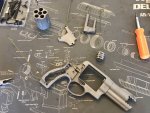
Then I realized while dry firing that the hammer would cock, and release, strike the firing pin, and then rattle back and forth.
So it was assembled well enough to likely fire....but well enough to not blow up? I don’t know. I wouldn’t want to chance it with 500 mag.
Turns out the end of the mainspring was rattling around inside the frame.
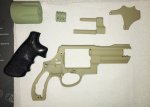
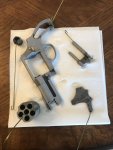
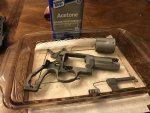
Anyhow, put this all together and I didn’t trust the finish that was on there. I originally planned to just sand and rough it up a bit before recoating, but now I was convinced I had to sandblast it and strip it down to bare metal entirely.
Problem was I didn’t own a sandblaster. So I went to harbor freight and bought a cheap unit and 25 lbs if 70 grit aluminum oxide. Wow, that was a filthy job. But it worked well and gave me a good surface.
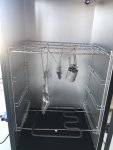
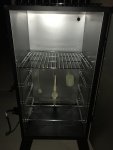
I scrubbed and degreased it a few times but then I let it pre heat in my “cerakote oven” for an hour to leach out any remaining oils. My cerakote oven is a cheap Masterbuilt electric smoker that I got specifically for heating firearm parts. I prefer not to use my food oven for non food projects.
As you can see in the 8th picture a lot of oil leached out after preheating so it got a final degreasing in an acetone bath before being sprayed.
I heated it up again so the paint would go on a warm surface. I hung all the parts with pieces of metal coat hangers on clothing rack outside for spraying.
I did about 4 light coats on each part, waiting 4 minutes between each coat. With the Vegas weather being very mild with low humidity, 4 minutes seems just about perfect.
After I was finished spraying I let the parts air dry for about 20 minutes before moving them back to the oven.
Cured them at 300f for about an hour and a half, then let them cool for a half hour.
I’ll post finished pics in the follow up below.
What I do know is it was done very, very poorly. It was very uneven and had a huge run on the right side of the barrel.
I was glad that I decided to do the refinishing before taking it to the range and attempting to fire it. As it had been reassembled improperly.
My first clue was that the muzzle brake was installed upside down, effectively making it a recoil amplifier. That didn’t give me the warm and fuzzies.
Then I realized while dry firing that the hammer would cock, and release, strike the firing pin, and then rattle back and forth.
So it was assembled well enough to likely fire....but well enough to not blow up? I don’t know. I wouldn’t want to chance it with 500 mag.
Turns out the end of the mainspring was rattling around inside the frame.
Anyhow, put this all together and I didn’t trust the finish that was on there. I originally planned to just sand and rough it up a bit before recoating, but now I was convinced I had to sandblast it and strip it down to bare metal entirely.
Problem was I didn’t own a sandblaster. So I went to harbor freight and bought a cheap unit and 25 lbs if 70 grit aluminum oxide. Wow, that was a filthy job. But it worked well and gave me a good surface.
I scrubbed and degreased it a few times but then I let it pre heat in my “cerakote oven” for an hour to leach out any remaining oils. My cerakote oven is a cheap Masterbuilt electric smoker that I got specifically for heating firearm parts. I prefer not to use my food oven for non food projects.
As you can see in the 8th picture a lot of oil leached out after preheating so it got a final degreasing in an acetone bath before being sprayed.
I heated it up again so the paint would go on a warm surface. I hung all the parts with pieces of metal coat hangers on clothing rack outside for spraying.
I did about 4 light coats on each part, waiting 4 minutes between each coat. With the Vegas weather being very mild with low humidity, 4 minutes seems just about perfect.
After I was finished spraying I let the parts air dry for about 20 minutes before moving them back to the oven.
Cured them at 300f for about an hour and a half, then let them cool for a half hour.
I’ll post finished pics in the follow up below.
Attachments
-
 68D49DFC-6545-49BE-81D3-DA6589E9CB52.jpeg826.6 KB · Views: 103
 -
 5BA5F1C9-8742-4573-9A6E-04229240F2A9.jpeg345 KB · Views: 97
 -
 6E8719F5-5C0D-4AA3-8139-5C9EA0D94E01.jpeg1 MB · Views: 102
 -
 04CEEE31-01AE-4D4A-8AF4-6D5C38A0D338.jpeg873.7 KB · Views: 101
 -
 18B4CAB8-A9FF-4F47-B625-655A99C8D42F.jpeg875.4 KB · Views: 95
 -
 0CDB7118-6D3C-45F6-8EE0-1B76EAAC5F45.jpeg454.5 KB · Views: 96
 -
 11E81E2A-9012-4024-B678-ECC949699C9C.jpeg278.4 KB · Views: 103
 -
 DE246EDE-1CB3-48EE-AC4F-D798BFCBC9EB.jpeg342.4 KB · Views: 91
 -
 4BBFBDC3-D776-4F70-9AC7-8FBDCB3ACA87.jpeg486.7 KB · Views: 94
 -
 27741A62-65D7-4827-8136-47B4DE0E1AAF.jpeg228.2 KB · Views: 88