• Watch Out for Scammers!

    We've now added a color code for all accounts. Orange accounts are new members, Blue are full members, and Green are Supporters. If you get a message about a sale from an orange account, make sure you pay attention before sending any money!

Ultimate KRG Bravo upgrade

jbell

Gunny Sergeant
Supporter
Full Member
Minuteman
  • Jan 16, 2010
    7,408
    4,510
    45
    Lewiston, ME
    After spending about 6 months with two Vudoo V-22's in the KRG Bravo chassis that I built for my daughters I have personally grown to love the Bravo. So much so that I have sold all my other chassis and stocks. In this time I have added the weighted spacer in the butt for balance and the minimalist spigot to get the bipod a bit closer to the bore center and slightly further out, I keep thinking about adding the adjustable butt assembly but just haven't yet. These additions have really improved the function of the Bravo but I have always been a fan of being able to set the cheek piece off center slightly to allow a more vertical head position, something I think a lot of shooters overlook in their rifle set up. I feel it is one of the most critical aspects of building a reliable and accurate positions. The lack of this adjustment in the Bravo has been bothering me since the first time I set them up. I have been pondering how to resolve this complaint for a while and have had a few ideas but one evening while on the KRG site it hit me! Here is the simple solution:

    Order these two items from KRG, yes I know they are not listed to work with the Bravo but they do!
    IMG_20210217_180757214.jpg


    Next remove your cheek piece and remove the plugs in the top covering the screws for the cheek piece rods. I used a small drill bit and they pulled right out. A 3mm Allen key removes the screws and the rods pull out.
    IMG_20210217_180343248.jpg


    IMG_20210217_180541783.jpg


    Install the rods on the Adjustable Cheek Piece Mount. I used a little dot of Loctite 242 on the rod screws.
    IMG_20210217_180935363.jpg


    IMG_20210217_181329294.jpg


    Then mount the Overmold Cheek Piece to the mount. As you can see there are several mounting options with many holes in both the new cheek piece to adjust fore and aft position and in the base to adjust side to side position and even the angle. You also have two profiles of the cheek piece to choose from depending on which way you mount it.
    IMG_20210217_182746364.jpg

    IMG_20210217_182801137.jpg

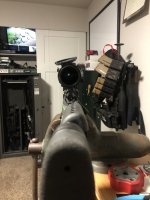
    Here are a few pictures of it mounted on the rifle with some examples of the positions.
    IMG_20210217_182204666.jpg

    IMG_20210217_182214557.jpg

    These are the extreme angle there are positions with less of an angle.
    IMG_20210217_181647626.jpg

    IMG_20210217_181639798.jpg

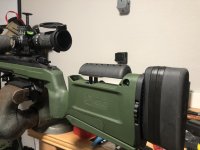
    This is before, straight in line with the scope.
    IMG_20210217_180210842.jpg

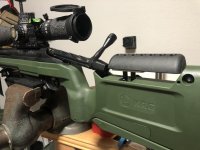
    And after now it's offset to the right for a right handed shooter

    IMG_20210217_181626388.jpg


    I haven't had a chance to shoot it yet as I just installed it but I have to say it's a very nice upgrade. The Overmold Cheek Piece is a very comfortable soft rubber which should be great at keeping your face from melting in the hot sun or freezing in the bitter cold. While dry firing I find it's very easy to maintain a consistent stock weld as the rubber is slightly tacky as opposed to the slippery plastic of the original.

    After I installed the first which I was taking these pictures I decided to see how long it takes to change out. So with the tools and rifle on the bench I started the clock by the time I had it installed on the rifle a whopping 3 minutes and 23 second had passed. So to say it's an easy upgrade is a bit of an understatement.

    For like $70 shipped I highly recommend this so far guys. If I find any issues with it after we shoot it for a while I'll update this thread but I wanted to get the word out ASAP as I think this should be the FIRST thing you do to upgrade your Bravo (lockers before lights guys...)
     
    Looks good. Nice work on problem solving. Does it offer good stability?
     
    Well I haven't shot it yet (it's dark here) but yeah I think it's better than the original by a mile!
     
    • Like
    Reactions: Familydude
    Good call. It looks like there is a bit more room between the cheek piece and the bolt. Is that the case? On my howa I need like another 1/8 inch to pull the bolt without moving the cheek rest. This could be a two birds, one stone solution.
     
    Very nice! I covered mine with adhesive foam but I may go this route on my next Bravo! Thanks Jesse!
     
    Good call. It looks like there is a bit more room between the cheek piece and the bolt. Is that the case? On my howa I need like another 1/8 inch to pull the bolt without moving the cheek rest. This could be a two birds, one stone solution.
    This is what im thinking, even with the little divot in the cheek rest on a long action it still hits.
    Let me go see how much room I can get, stand by...
     
    I moved it to the aft most position and from the center of the rear action screw (same on my Vudoo as it will be on all other R700 pattern actions) to the front of the cheek piece there is 5.300”. It seems like a LOT of room to me. This is all the way back.

    IMG_20210217_195446878.jpg


    IMG_20210217_195503159.jpg
     
    • Like
    Reactions: sam4886
    Is the hole pattern on the cheek piece the same as the original as in you can screw the studs directly to it? Or do you actually need the cheekpice mount?
     
    I have that offset plate on one of my 180-Xrays and it's freaking awesome

    @Massoud might wanna take a look
     
    Is the hole pattern on the cheek piece the same as the original as in you can screw the studs directly to it? Or do you actually need the cheekpice mount?
    You need both pieces if you want any adjustability
     
    You need both pieces if you want any adjustability
    It seems you could still get the forward and backward adjustment, you'd just be missing offset. This cheek rest is a bit narrower and already asymmetrical so the side to side might not be needed by some. I'm sure it's really nice to have though.

    Too bad about that big hole that is normally at least a little covered by the original cheek piece. Maybe some creative filler and JB weld or bondo could cover that up.
     
    It seems you could still get the forward and backward adjustment, you'd just be missing offset. This cheek rest is a bit narrower and already asymmetrical so the side to side might not be needed by some. I'm sure it's really nice to have though.

    Too bad about that big hole that is normally at least a little covered by the original cheek piece. Maybe some creative filler and JB weld or bondo. could cover that up.
    Correct, you could do the fore and aft I think. Personally I don’t care what it looks like if it works...
     
    • Like
    Reactions: Anonymoose
    Very nice, JB. I have my 22 magnum in a KRG Bravo and really like it. I've added a few things since I first got it and it's surprising (not really) how functional the chassis is. Great job....

    MB
     
    I moved it to the aft most position and from the center of the rear action screw (same on my Vudoo as it will be on all other R700 pattern actions) to the front of the cheek piece there is 5.300”. It seems like a LOT of room to me. This is all the way back.

    View attachment 7560016

    View attachment 7560017


    That's more than enough room for sure. Thanks! I've got a bunch of wheel weights stuck in that hole that gets exposed anyway, so no biggie. I've told myself I'd fill it in with some epoxy some day.
     
    • Like
    Reactions: jbell
    Moving the cheek piece over or off set only allows u to shoot to one side. What if u have to shoot weak side. Drop check piece down and shoot with your head straight up and get behind your rifle. Eliminates the need for the offset
     
    Moving the cheek piece over or off set only allows u to shoot to one side. What if u have to shoot weak side. Drop check piece down and shoot with your head straight up and get behind your rifle. Eliminates the need for the offset
    I see what you are saying and understanding the concept however doing so creates a less positive stock weld, you start almost floating your head. The less positive your stock weld is the more likely you are to not be looking perfectly down the center of your scope or sights if that is the case. With these modern scopes that have a very forgiving eye box your eye can be slightly off center and not have any obvious shadowing, of course if your looking at the sight picture in a very detailed manner you will notice it (but not always if your hyper focused on the center of the image).

    If you are shooting larger targets for hits (think PRS style COF) rather than shooting for score than in most instances it will not matter b/c all that is needed is a hit. However if your after the upmost consistency in POI from shot to shot then having a vertical head position with your eye perfectly centered behind the scope while using the least amount of muscle effort to do so is key.

    As far as shooting support side there are 2 things that come to mind right off. First being it usually would be in a competition like PRS where only hits matter, so there is room for error. But second with the design of this system you could simply turn the thumb wheel 1/4 turn and pull the cheek piece out, turn it around and now your ready for support side in about 5-6 seconds. Of course it may not be perfect because our faces are not absolutely symmetric but it will be close enough for that.

    With all that said, if you had rather run your check piece lower then by all means. I am not selling anything, or attempting to benefit from this thread in any way. Nor am I trying to say if your not using an off center cheek piece your doing it wrong. I don’t give a shit what others do. I am simply trying to pass along a little info that may help some people who like this chassis.
     
    I don't have a problem with the chassis. Lots of people use them and it is an easy upgrade from a cheap flimsy factory stock to a more solid mag feed system. And yes competition shooting is what I was referring to as far as shooting from weak side, though I think everyone should shoot weak side at least once in a while to become a more rounded shooter. But getting straight behind the gun in s a necessary, helps manage recoil, keeps your sight picture so follow up shots are fast and accurate, helps eliminate vertical stringing by putting to much cheek pressure on the rifle. And eliminate the hinge effect u get when shooting with your body slightly offset.
     
    • Like
    Reactions: jbell
    KRG just confirmed to me this will work with the short 700. Placing my order now.
     
    Last edited:
    Nice! I'm torn on what to do with the bottom of the buttstock. I like the angled bottom for precisely dialing in elevation on the bag. I also like the idea of the hook adapter plate.
    I like the looks of the hook but it just wasn't practical. Maybe it's me but my bag always rode half in the hook and half on back of it. In the hook was too low and forward recoil would litterally hook the bag and slowly move it forward to where I was constantly repositioning it. Keep in mind this is a 300PRC. I even upgraded bags to a PU 3D ELR. Same story. With the angle bag rider the bottom of the stock is level while prone on a bag and I have the whole length of the stock to position it.
     
    I like the looks of the hook but it just wasn't practical. Maybe it's me but my bag always rode half in the hook and half on back of it. In the hook was too low and forward recoil would litterally hook the bag and slowly move it forward to where I was constantly repositioning it. Keep in mind this is a 300PRC. I even upgraded bags to a PU 3D ELR. Same story. With the angle bag rider the bottom of the stock is level while prone on a bag and I have the whole length of the stock to position it.
    Right on. makes sense especially for a 300PRC.
     
    Wish they had a modified mag release. Not a fan of the current one and took it off.
     
    I believe the tooling costs to offer a plug for that big space in the top might be probibitive for KRG to offer. I keep hearing about 3D printers. Could someone make these? Wouldn't have to be pressure bearing, just a cosmetic piece. Showed my buddy my new offset cheek rest. All he said was that hole looks terrible😦
     
    I keep being impressed with how KRG keeps coming out with little upgrades and modifications to make their rifles even more modular, adjustable, and ergonomic. I absolutely love all my W3s and Bravos! I don't even know that I want to move my cheekpiece, but I think I'll buy one of those adjustable pieces just to play with it and see if there is some other position I like better.
     
    • Like
    Reactions: rijndael
    I believe the tooling costs to offer a plug for that big space in the top might be probibitive for KRG to offer. I keep hearing about 3D printers. Could someone make these? Wouldn't have to be pressure bearing, just a cosmetic piece. Showed my buddy my new offset cheek rest. All he said was that hole looks terrible😦
    How about someone make some CNC steel plugs that are removable? Sure would be nice to have another weight tuning option! If it was made correctly, it could be used for people using the cheekpiece you are using, or the standard Bravo cheekpiece.
     
    • Like
    Reactions: CK1.0
    Nice! I'm torn on what to do with the bottom of the buttstock. I like the angled bottom for precisely dialing in elevation on the bag. I also like the idea of the hook adapter plate.

    You might as well try one for $10, you might like it.

    My hand is always back there grabbing/squeezing my rear bag if I'm shooting off a bench or prone, and I grab the hook a lot off of barriers/obstacles/props, so I dig having the hook, but it's not deal-braking and stock is fine too really.
     
    • Like
    Reactions: Anonymoose
    That is awesome! We'll try to add a plug for that hole to our next mold if we can. Thank you guys very much for your business and enthusiasm :)
    Justin

    Since you mentioned molds...

    Please consider adding a couple more pairs of m-lok slots per side for the forends? I run a pair of m-lok weights up front and it would be nice to have the option to move them around a bit and/or try them further back towards the receiver, some guys might want to run more than just one pair of weights...

    You guys probably should make your own mlok weights to sell us while you're at it lol.
     
    • Like
    Reactions: basman
    Works awesome set rearward I don’t even have to move it for bolt removal on my seekins. Thanks for sharing
     

    Attachments

    • 269407D5-EFAF-496C-9686-30D38ABD8F69.jpeg
      269407D5-EFAF-496C-9686-30D38ABD8F69.jpeg
      384.7 KB · Views: 241
    • 702FFFF9-6765-4278-8199-678722FC7A3A.jpeg
      702FFFF9-6765-4278-8199-678722FC7A3A.jpeg
      334.6 KB · Views: 253
    • A28948F2-59EE-48C7-8CA5-D91B081F8FA6.jpeg
      A28948F2-59EE-48C7-8CA5-D91B081F8FA6.jpeg
      389.3 KB · Views: 342
    • Like
    Reactions: jbell
    20210318_142617.jpg
    It's not perfect but it's usable. Made from moldable plastic pellets. I have the overmolded cheekpiece coming and I didn't like the idea of having that big unfinished looking hole there.
     
    • Like
    Reactions: Pomyluy
    Neat! Have a link to what those are? Not heard of them.
    Do a search for InstaMorph. This was honestly a pain in the ass to do. This stuff doesn't cut or machine very well so it was a lot of reheating and forming over and over.
     
    • Like
    Reactions: 6.5SH
    Do a search for InstaMorph. This was honestly a pain in the ass to do. This stuff doesn't cut or machine very well so it was a lot of reheating and forming over and over.
    That's cool, sort of a plastic counterpart to this:
     
    Any updates on plugs? Just got my cheekpiece and it feels awesome but looks out of place. I'm a function > form kinda guy but I still want my stuff to look decent. I would love a piece that somehow went from the front where the hole is to the back, covering the cheekpiece post hole in the process.

    I guess I should buy my own 3d printer...