• Watch Out for Scammers!

    We've now added a color code for all accounts. Orange accounts are new members, Blue are full members, and Green are Supporters. If you get a message about a sale from an orange account, make sure you pay attention before sending any money!

  • Site updates coming next Wednesday at 8am CT!

    The site will be down for routine maintenance on Wednesday 6/5 starting at 8am CT. If you have any questions, please PM alexj-12!

Gunsmithing Breaking Radius on barrel tennon for recoil lug?

ugsly

Sergeant
Full Member
Minuteman
May 10, 2005
725
3
39
Oregon Linn County
Ive been using a very small boring bar with a fine tip. It has worked decent, but the very front of the tip broke off. I know some grind their own, what else are you guys using to get in there and break the radius for the recoil lug to sit flush against the barrel?

Thanks guys,
Kc
 
Disclaimer: I'm neither a gunsmith nor a machinist (though I have a 30+ year experienced machinist as a mentor) and have yet to do my first build, but I've been practicing for months now doing tenons and muzzle threads on 416 and 4140 bar stock.

I use a HSS or cobalt tool blank ground to a sharp edge and honed razor sharp with just enough of a radius on the tip to see it with a loupe. I use this to true up the shoulder surface after the tenon diameter is right and I just run it in about 2 thou more than the tenon diameter on my final pass. It leaves a barely perceptible notch in the tenon at the shoulder and the lug fits true and flush. I sharpen the tool before every shoulder cut as it will dull very quickly.
 
i usually chamfer my lugs and leave the raduis at the tenon/shoulder junction.

edit: i'd really like to see aftermarket receiver manufacturers using a monolithic receiver/lug use a slightly longer counterbore and a chamfer at the id of the receiver face.
 
The VNMG carbide inserts that I use for facing the barrel shoulder have a 0.015" radius at the tip, which leaves a correspondingly small fillet. When I open up the recoil lug to the barrel shoulder diameter, I just touch the corner of the ID and a sufficient radius is generated. Of course, a moment or two with a file or deburring tool will also do the trick.
 
It all depends on the recoil lug or the receiver face with integral lug. If you get a surface ground aftermarket lug from PTG, it will be VERY sharp with no radius. That is when you should exaggerate the chamfer on the tenon. Using a .030 thousands width parting tool does a good job when you drop the corner of the shoulder surface down about .010-.015 thou.
 
Last edited:
I leave the tool nose radius on the barrel and I put a chamfer on the recoil lug while I am opening the diameter of the hole in it for trued up threads.
 
Use a parting tool to make it square. Easy peasy. Leave the lug alone. You are making MORE work for yourself. I think I just let out one of the tips n tricks thingies

or just plunge your turning tool into the tenon at least the tool nose radius depth when you face the shoulder. no need to use more than one tool.
 
As 300 just said. Under cut the shoulder slightly. No need to make this complicated.
 
I have ran my cutter in to under cut the shoulder slightly, I seem to always get a light chatter on the tool. I used to run a grooving tool and break the radius, worked good just was too wide I thought. I have a different grooving tool with .019 & .027 wide inserts coming. They're a full radius cutter (if I understand correctly) so it should work very well for breaking the radius for the lug and timing of barrels.
 
Best practices dictates that you remove the offending sharp edge on the lug to clear the radius in the corner of the journal; a sharp internal corner is a stress riser. Of course there is little likelihood that a barrel is going to break off at the tenon, but it only takes a few minutes more to do it the right way (to my way of thinking).

Joe

Is having the root diameter of the threads the minor diameter of the part following "best practices"?

I'm thinking that if stress risers/stress concintration was a true concern, reducing a short section to a diameter smaller than the root of the thread between the thread and shoulder, and then radiusing into the shoulder would be the best.

But like you mentioned, the joint will never even be close to loaded to the point of failure.

If I understand your question; of course the root diameter of a male thread is less than the major diameter, that's unavoidable. Threads would have no effect without depth (and the resulting engagement with mating threads). A proper tool for chasing threads has a small nose radius to increase the strength of the tool with the peripheral (pun intended) benefit of decreasing the likelihood of a stress riser forming at the thread root.

Removing the fillet at the junction of the journal and the face IS avoidable, though, so why not?

Joe
The root of the thread should not be the minor diameter of a stressed fastener. Look at head bolts and bolts that hold a steering box to the frame to get an idea of what I'm trying to describe.
 
I'm not trying to reinvent the interface of the barrel and receiver. I understand the reason why some fasteners are made as you describe, but necking the barrel down is not the way to achieve what they are doing there; the thread diameter would be increased from where it is now to achieve that, and the receiver diameter increased to suit.
If you want to neck down the diameter of the tenon behind the threads, then have at it, but it's not going to make that interface any stronger; you will reduce the sectional area of the barrel, which is definitely not making it stronger.
You're not one of those people who believes that a fluted barrel is stronger than a non fluted barrel of the same diameter, are you?

Joe

You brought up stress risers. If you were really concerned with the fatigue life of the tenon, yes, reducing a section behind the threads and then radiusing to the shoulder will make it better. Same way reducing an axle shaft diameter slightly less than the root of the drive splines does. Increase the ultimate strength? No. Increase the fatigue life of the part, sure.

The thing is, the barrel tenon we are talking about is so big compared to the stress that will be put on it, it's NEVER going to fail. I'm sticking with the fact that plunging your turning tool into the tenon a tool nose radius depth will not change that. If it were a highly stresses fastener, then I'd think differently.

and for the record, you are not loosing ultimate strength of the part by reducing the diameter behind the threads. the root diameter of the threads is already the weakest spot AND it is in a bunch of concentrated stress risers.
 
Last edited:
If you like a radius on the shoulder, use one.
Doing so does a couple things for you. Should the barrel ever want/need to be set back, it will allow the smith to push the shoulder ahead and continue the threads w/no interuption. Not a bad thing imho.

The challenge becomes of what to do about ensuring the lug is seating firmly against the shoulder. The corner radius prevents this as it gets in the way. Boring/chamfering lugs in a mill is a biche. Lugs vary greatly in style/size. Devoting the time to make special jaws for each type eats at the bottom line.

The need is real though because its very easy to distort a lug if you just slap it on some parallels and go to work on it.

What to do?

I faced this a long time ago and the lathe proved the best answer for me.

I made a fixture that allows me to bore the lug very quickly w/o all the labor pains of the mill. It also allows me to chamfer the lug to provide the clearance needed. It clamps w/2 screws and a bridge. Location is achieved with a plug that slides through the lug and registers into a hole. Mount the lug, locate w/the plug, hold the plug/lug firmly with the side of the tool post and lock the carriage. Tighten the screws, remove the plug, and bore/chamfer your hole.

Problem solved in 2 minutes flat. Less than that if you have a tool room lathe that uses collets. -it becomes a load and go setup.

Our turning tool uses a .015R on the tool. I like it because of the mirror finish it leaves at the aggressive speeds/feeds it use when profiling barrel tennons.

Hope this helped.

C.
 
If you want to neck down the diameter of the tenon behind the threads, then have at it, but it's not going to make that interface any stronger; you will reduce the sectional area of the barrel, which is definitely not making it stronger.


Joe

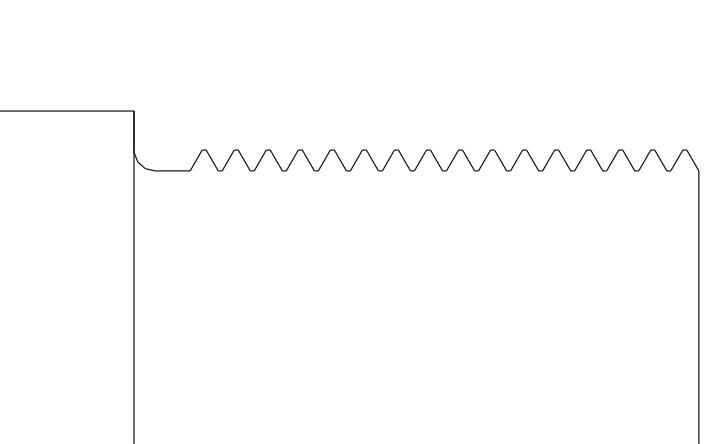
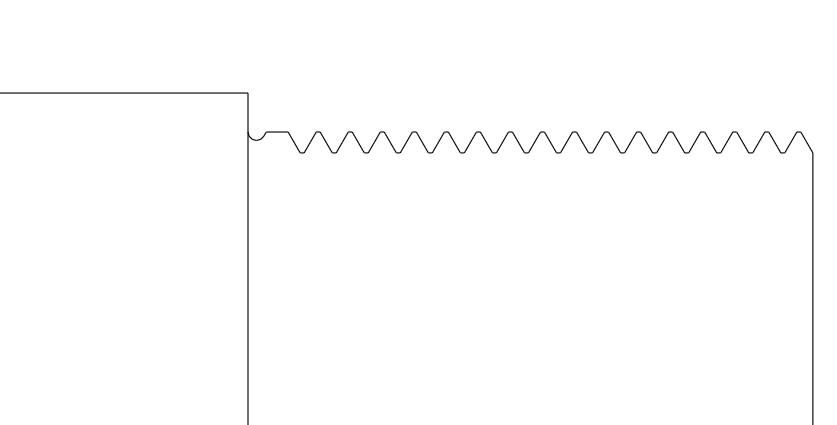
for shits'n'giggles:

both would have the same ultimate strength, right? which one has a better flow of stress? one has a .015" radius to the shoulder and the other has a .035". both have the same minor diameter.


yours:


mine:


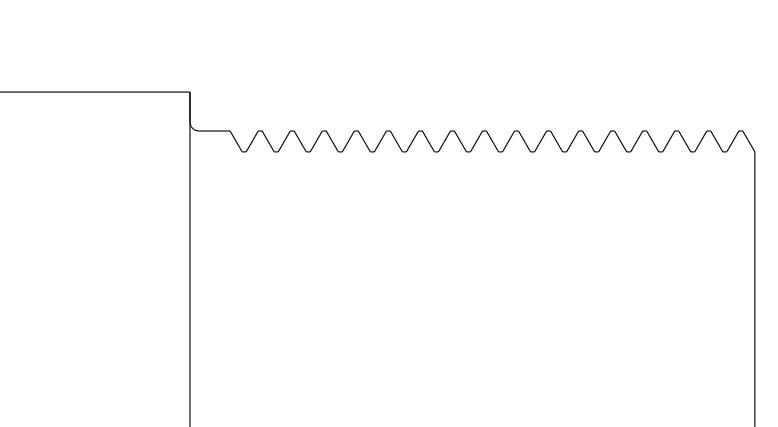
edit: here's one more. this is probably the easiest and most common method. i'm pretty sure the joint is still safe from failure.

 
Last edited:
I just pointed out that if one had the choice to eliminate the radius and put a sharp corner where a hub intersects a flange (NEVER a best practice) or grind a little chamfer on the lug to eliminate the interference, that one might as well do it the right way.

Your introduction of a cylinder head bolt or stud as an example of proper fastener design muddied the water a bit since the applications are totally different; a fastener provides clamping force and resistance to loosening through stretch. In effect it is acting like a powerful spring to accommodate thermal growth in the components it is clamping. This is why it is necked down, to control the tensile strength of the bolt. Meanwhile, the steel fastener screws into an aluminum engine block. The female threads in the cylinder block are the weak link, not the male threads on the fastener. That is why the threads are a larger diameter than the body of the bolt.

I'm not interested in giving a dissertation on faster design here. I am a formally trained machinist and moldmaker with decades of experience in multiple manufacturing disciplines. You are free to finish your barrel tenons any way you choose, but I'll always do it MY WAY, the right way.

Joe
are you sure about that? i am formally trained in nothing and have decades of experience in breaking things. i think your idea of the reasoning behind reduced shanks on a highly stressed fastener is flawed. they are reduced to improve the flow of stress across the fastener.

seriously, reducing the shank of a bolt somehow makes the female threads stronger? is that really what you are saying? a 1/2-20 thread is a 1/2-20 thread, no matter if the shank is reduced to the minor diameter or not. the engagement into the female thread is the same if the shank is a reduced diameter or not.

and again, all this is moot. the barrel tenon will NEVER fail in it's service life due to the loads put on it and it's physical size no matter what method used. one more thing to keep in mind, chamfering the lug .015" will leave you with .194 sq.in of bearing area between the barrel shoulder and lug whereas a reduced shank or plunged tool will leave .245 sq.in. does it matter? don't know but it may be something to think about if you want to get all engineery on the joint.
 
If you feel 2 minutes of your time is a waste to make a shoulder that doesn't look like a factory job. Used to do it that way.

i think most of our work stands apart from oem remington, regardless of method used at the shoulder/tenon transition.

by the way, how sharp is the left edge of your parting tool if you look at it under a microscope? is there absolutely zero radius? is it dead nuts perpendicular to the tenon when you are feeding it? is there zero deflection while feeding it against the shoulder? how tight can you keep it to the shoulder? how much slip fit do you allow between your lug and tenon? and most of all, how come there are no smilies on this site anymore?