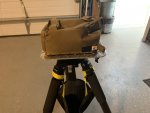
This was more of an excuse to design and build than anything. I've barely used it, but it's been a fun build and I actually want to improve it even though I don't have much use for it:

You can kind of see where I'm going with this, aim at an object with the spotter, shift over to the rangefinder, and use the base to adjust your point of aim to wherever you were looking through the spotter.
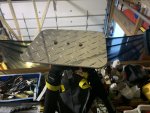
I started off with these cheap clamps:
https://www.amazon.com/gp/product/B00KYEO70Q/ref=ppx_yo_dt_b_search_asin_title?ie=UTF8&psc=1
And I made a jig to drill holes to mount them onto my bases:

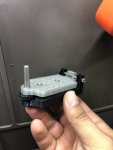
Next step was the "aiming" base, and I was inspired by the older Elcan optics.

Left and right adjustments in the front, and up and down is in the back.


Went through a few design changes getting things to line up and settled back on this one:


Video of it in action here:
I plan to release the files on this, but I'm not completely happy with it yet. I'm going to add a swivel to both adjustments so you can get the full range of motion without putting stress on the parts, and I'm going to make it bigger overall for greater stability. I want the plate to hug the clamps. I might do something to make the aluminum plate look less like scrap... but that might be stretching it for me. I definitely want to make a remote fire for the rangefinder so it doesn't move as much when ranging distant objects as well.
You can kind of see where I'm going with this, aim at an object with the spotter, shift over to the rangefinder, and use the base to adjust your point of aim to wherever you were looking through the spotter.
I started off with these cheap clamps:
https://www.amazon.com/gp/product/B00KYEO70Q/ref=ppx_yo_dt_b_search_asin_title?ie=UTF8&psc=1
And I made a jig to drill holes to mount them onto my bases:
Next step was the "aiming" base, and I was inspired by the older Elcan optics.
Left and right adjustments in the front, and up and down is in the back.
Went through a few design changes getting things to line up and settled back on this one:
Video of it in action here:
I plan to release the files on this, but I'm not completely happy with it yet. I'm going to add a swivel to both adjustments so you can get the full range of motion without putting stress on the parts, and I'm going to make it bigger overall for greater stability. I want the plate to hug the clamps. I might do something to make the aluminum plate look less like scrap... but that might be stretching it for me. I definitely want to make a remote fire for the rangefinder so it doesn't move as much when ranging distant objects as well.