First Custom Build, but there's a problem?

308plinker

Zero SD
Full Member
Minuteman
Jan 23, 2013
128
32
55
Tennessee
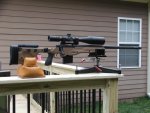
Well shooters, I finally broke down and put together my first custom bolt gun. I bought all of the components and let Jim Ruiz and the team at Predator Custom do the Smithing. I picked her up Saturday, and am totally impressed! There is one issue however, the bolt release button isn't working. The spring is attached, as the button retracts and has tension on it. But try as I may, no release. The boys at Predator did a Ceramic paint job and painted the bolt/action/and barrel. Anyway, here is my idea of a "Dream Build":
Remington 40X Short Action (.308)
PTG one piece bolt with badger knob and fluting by Twisted Barrel
M16 Extractor
Bartlein 5R 26" 1-11.25" twist Heavy Varmint (water jet fluting by Predator Custom)
AICS 2.0 Chassis
Victor Skins
Ken Farrell one piece steel base
Seekins 6/4 rings
AI 10rd Magazine
Nightforce NXS 10-42X56 Scope
Threaded for custom brake, thread protector for shooting F
Ceramic Matte paint done by Predator Custom
All smithing done by Predator Custom Shop (highly recommended!)
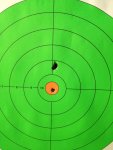
That's pretty much the build, and I just pray she's a shooter. Glass is coming Tuesday, so we'll find out this week!
 

Attachments

  • DSCF5260.jpg
    DSCF5260.jpg
    92.1 KB · Views: 18
Last edited:
According to Jim Ruiz it has. He says he doesn't trust traditional milling, too many factors that can affect performance. I will say this, the edges of the flutes are sharp enough to cut skin!
 
I don't know who does water jet fluting for Predator Custom, but Jim sublets the work to a shop in Knoxville. As for my bolt release, turns out the front trigger housing pin was too long. Took me a while to figure it out. I would tap the pin out of the way, freeing up the bolt release lever. But as soon as I would torque the action to the chassis, the lever seized again! I ended up taking a sheet of 400 grit sandpaper and filing down both ends of the pin slightly so the tight fit wouldn't move the pin. It was a simple repair really, but took a few tries to get just right.
I can tell you that I am more than impressed by the quality of work being turned out at Predator Custom Shop in Knoxville. Jim and his staff did a complete build for me in 5 weeks! I was prepared for a much longer time, considering his workload. If you need high quality work done and done timely, Predator is your place.
 
Here's a quote straight from the boys over at "flowwaterjet.com". Looks like depth of cut can be achieved with the speed of the pass. Anyway, here's the quote:
"Ask Dr. Hashish
Inventor of the Abrasive Waterjet

At Flow in 1979, Dr. Mohamed Hashish invented the abrasive waterjet. Today, he continues to develop breakthrough waterjet solutions with an equally passionate team of experts at Flow.

Question:
Can you use a waterjet to cut to certain depths in a material and not all the way through?

Answer:
It is possible to create "milling" cuts where you can control the depth of a cut, say through 4" stainless.

This is done by moving the cutting head at a set speed. Each pass removes "x" amount of material. By having the head move in rapid passes, we can control the depth of the cut, however, this application is very specialized."
 
I've had the same problem with 2 older Rem actions, I've mounted in AICS. When the bolt release comes down it's hitting the chassis. You have two options, you can alter the chassis or grind a little off the bolt release lever. I altered the lever on both of mine. It doesn't take much. I'm guessing when you push the bolt release it moves but not quite enough.
 
SPEAK338: I am only repeating what Jim Ruiz told me on the phone when we had the conversation regarding fluting my barrel. He did not hesitate to tell me about a shop he sends barrels to for "water jet fluting". I personally know very little about the process, and have never witnessed a water jet machine in action. I will say that Jim seems to me to be a very trustworthy shop owner with a ton of experience. If he tells me that my barrel was fluted with a water jet I have no reason to doubt him. I hate to say this, and I hope Jim forgives me if he gets bombarded with calls, but dial the man up. He's extremely friendly and knowledgeable.
 
boone3380, I went a different direction and removed the trigger housing pin with a small punch, then carefully ran both sides of the pin over sandpaper until the desired length was achieved. It was a longer process with some trial and error, but it prevented me from altering the chassis and the release lever. Something to consider if you run into this problem again. I will say this, make sure that the firing pin is forward, otherwise the pressure will cause the trigger housing to pop out and is hard to line up after. Ask me how I know.....LOL!
 
boone.....that's right, it is the lever that actually comes in contact with the bolt. When it's not engaged, the front bottom portion of the lever sits right above the front trigger housing pin. Hence the reason for filing down the pin slightly.......
 
I believe that the heat factor is it. I don't know how much difference it really makes, but if you believe that barrel harmonics can be affected by heat from milling then it's worth it I guess. The process was no more expensive than a traditional milling. I for one didn't ask about the process, he just offered to tell me. I think it's important to Jim. If it's important to Jim to do it to my build, then it's important to me......;-)