• Watch Out for Scammers!

    We've now added a color code for all accounts. Orange accounts are new members, Blue are full members, and Green are Supporters. If you get a message about a sale from an orange account, make sure you pay attention before sending any money!

Help with Defiance Action Feed Problems

ColtSAA.45

Private
Full Member
Minuteman
Oct 18, 2017
79
37
Beaufort, SC
I built up a Defiance AnTi short action with the following components: Proof barrel 6.5CM, Hawking Hunter DBM, and Manners LRH. I'm having some problems with feeding.

I've measured the distance to lands as approximately 2.877 COAL with Hornady ELD-M 147gr. I decided to load approximately .020 off the lands with a COAL of 2.860". I have two magazines; a Hawkins Hunter 4rd mag and an Accurate Mag 6.5CM binderless.

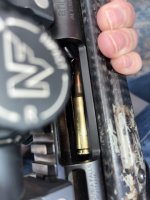
The problem is, with these 2.860" COAL rounds, the subsequent rounds hang up below the feed ramp in both mags. From my research, the problem appears to be that I either 1) need my feedramp notched or 2) I need to reduce my COAL and use binder plate mags. Am I understanding this correctly? Interestingly, with shorter factory ammo I've tried (Hornady ELD-X 143gr COAL 2.815), there doesn't seem to be any problems as the shorter COAL allows the bullet to pass the lip of the feedramp. What I am not understanding is that the problem is also happening with the Hawkins Hunter Mag which states a max COAL of 2.880". This seems in line with binder plate mags (2.870" COAL with MDT binder plate mag). This makes me wonder if a binder plate mag would actually be a solution to the problem? Feeling inside the mag, the ledge of the feedramp feels more than .01" but obviously that isn't conclusive.

If I wanted to notch the feedramp, what gunsmith is a good option? It seems like a very simple job, but not one I would want to try myself. I really really want to keep using the Hawkins Hunter Mag since it is very nice having flush fit for hunting. As such, simply buying binderless mags seems like an easier but less desirable option.

IMG_1397.JPG
IMG_1400.JPG
IMG_1399.JPG
 

Attachments

  • IMG_1399.JPG
    IMG_1399.JPG
    50.4 KB · Views: 43
You could get it notched, but the easier solution is to seat the bullets deeper into the case.
Incorrect.
Recoil is going to keep any rounds pushed forward in the mag body regardless of how short the OAL is.
As they feed up, the nose of the round will still conflict with the front of the ramp.

I guess he could mortar the ass of the rifle into the ground just before cycling the bolt each time but that might not be conducive to good form.

.
 
If that was the case, then no round would be feeding correctly. The OP stated that the factory ammo that is close to 2.80" feeds correctly. Seat the bullets deeper into the case and see if you still have feeding issues
 
If that was the case, then no round would be feeding correctly. The OP stated that the factory ammo that is close to 2.80" feeds correctly. Seat the bullets deeper into the case and see if you still have feeding issues

I think the point @Terry Cross is trying to make is that while shorter OAL rounds have worked for the OP, relying on using short OAL rounds may not be an absolute 100% fix because of recoil. Recoil can displace ammo in the mag, causing the tip of the projectile to present below the feed ramp, resulting in unreliable feeding.

A more reliable solution would just be to get the feed ramp notched. Relying on shorter OAL rounds not only potentially handicaps performance, but likely won't be a 100% fix.
 
surgeon actions have the bottom notched for 20 years just for this reason
Yes they have, however I also encountered a problem like OP is describing with a Surgeon action, surgeon bottom metal and binderplate-less mags. I switched to mags with a binder plate and all my problems were solved.
 
  • Like
Reactions: brianf
The easiest way, even this lady with weird ass fingernails could do it
6 Things You Can Do with a Dremel Tool – Handmade Haven
I’ve got one of those (the dremel not the fingernails)! If I did try to conquer this on my own, what would be a good bit to use? From my research, a 1/4” half moon cut is all that is needed
 
I’ve got one of those (the dremel not the fingernails)! If I did try to conquer this on my own, what would be a good bit to use? From my research, a 1/4” half moon cut is all that is needed
I’m honestly not sure, I just grabbed a little grinding cylinder out of the random assortment that seemed right to my eye ball, 1/4” sounds perfectly fine.
You can see how my rem700 went a bit off center as it was pulling one way vs the other but I also had it done in like 20 seconds holding both the action and dremel in my hands so it’s better than I expected it to be.

I emptied the mag, put it in the stock and then got an awl and scratched a line in that corner where the mag touched the action. I now knew how far I had to grind to in order to clear the bullet tips no fail. Took it apart and with it slanted slightly back so as to make it ramped for a smoother transition up into the action vs a flat vertical wall I just pressed the dremel grinder into it. Clamp the action in a vice and use both hands on the dremel and you could make it more aesthetically pleasing if the stuff hidden in a stock bothers you.
FE379448-7838-4B9A-A15E-30E5C8BE9377.jpeg
 
  • Like
Reactions: Jack's Dad
It is very simple to fix but if your not the type of guy that is good with tools you can make a mess of things. If you do try is run the rpm's high and use light pressure, let the tool do the work.
 
It is very simple to fix but if your not the type of guy that is good with tools you can make a mess of things. If you do try is run the rpm's high and use light pressure, let the tool do the work.
There’s a speed other than 20K rpm?
 
I've done several of my own with the Dremel method. Super easy. Look at some Google photos for an idea of how deep to go. A monkey could do it.
 
So I gathered up the courage today and broke out the Dremel. I held the barreled action in a barrel vise and scribed a line with the spring and follower out of the magazine and the centerline lined up with the action screw hole.

I think it came out pretty good! It only took maybe 5 minutes of grinding with the Dremel. Then I cleaned it up a bit more with 600 grit sandpaper. Pics are before cleaning up with sandpaper. Function testing results in no more issues with the bullet hanging up on the bottom edge of the action.

IMG_1405.JPG
IMG_1407.JPG