• Watch Out for Scammers!

    We've now added a color code for all accounts. Orange accounts are new members, Blue are full members, and Green are Supporters. If you get a message about a sale from an orange account, make sure you pay attention before sending any money!

Gunsmithing homemade paint oven (more pics added)

Re: homemade paint oven (more pics added)

It was insulated when it would only hit 170. I just dont think the two little elements I pulled out of the toaster oven have enough juice for such a large cabinet.

I had to leave my controls un-insulated since thats where the thermostat is, they are inside the toaster oven to begin with so I think theyre designed to take high temps.
 
Re: homemade paint oven (more pics added)

Jonaddis,

I think you have a little insulation density issue. The dryrock is particularly good at absorbing moisture. Just like the refractory in a forge the moisture in the dryrock will evaporate, taking heat with it, there by keeping the temperature of your oven down.

Another thing to note is that dryrock has a much higher density than foil lined foam insulation. Denser materials conduct heat much better than less dense materials (which gets cold faster, steel or plastic?). This also means that it will take much longer to bring to temperature since there is more mass to heat up. Couple this with evaporating water from the board and you begin to see a problem.

The main reason you are not getting hot is...your toaster oven is probably large enough but NOT FOR THE WAY YOU INSULATED YOUR OVEN. As you can see in the pictures in this thread, they have foil lined foam insulation on the interior surface of the oven. This type of insulation gets most of its R value from REFLECTING heat. Meaning they don't slow heat from exiting the oven so much as bounce it around the oven as much as possible before heating the insulation. You are trying to keep your insulation hot while it is trying to conduct heat out of the oven (slowly, but over a large surface area).

FINALLY AND THE MOST IMPORTANT NOTE!!!!!
I would not put those oven controls inside your oven. Yes they are made to take a certain amount of heat, but think about it. Those controls are isolated by a metal liner in the oven. The heat bounces around inside the oven then out the glass front! Yes the metal conducts a lot of heat, but most of it goes out the front, which is how the controls stay cool. I SERIOUSLY BELIEVE YOU ARE SETTING UP TO HAVE A FIRE OR SERIOUS ELECTROCUTION HAZARD!

msahlm,

Looks good! Although the hole issue is why I suggested round connectors (hole saws make things easy). A small grinder with cutoff disk should take care of the pid hole, the others will be difficult to make look neat. Keep posting pictures! I like seeing what you're doing. I barely have enough time outside of work to go shoot, much less have projects like these. I'm still young and already living vicariously through others!

Let me know how she runs

Finally
 
Re: homemade paint oven (more pics added)

Jonaddis- I sure hope that you don't think that we are dumping on your oven build- It's really pretty ingenius. But I have to say that I think TxAg makes some good points.

I think if you'd spring for one more internal layer of foil-lined duct board inside your drywall (which is already inside a layer of duct board) your oven will out bake mine (with your two elements) and for a lot less effort and money. But more heat will probably get you there too.

I'm note sure how you'd deal with your thermostat. If your toaster oven was anything like the one I cannibalized, It's likley that the dial temp does not exactly correlate with the temp the thermostat is reading (for the reasons TxAg explained)meaning that the thermostat is likely reading a temp of (say) 180F when the cookspace of the oven is at 350F- so they print 350 on the dial when the T-stat reads 180. Doesn't mean you couldn't use the thermostat, But I concure that the rest of the wiring and controls are probably not meant to bake at 300F and it could end badly.

Depending on the design of it, you may be able to put the thermostat inside the oven, and the rest of the controller stuff behind good insulation- mine would not have worked like that and was built into the knob. If you could find a thermostat salvaged from an electric oven I bet you could get it to work without too much headache and do it pretty cheap- that was my original plan.

Lots of guys are simply using dimmer switches (a probe thermometer) and trial and error to find a dimmer setting that keeps the oven consistantly at your desired temperature without a thermostat- It's a heck of a lot easier and cheaper than my pimp-mo-oven that has about wiped out my bank acount and that my special-lady-friend is now refering to as "Mike's Mistress". (And it has yet to fire!!- so that should tell you how much my advice is worth)
 
Re: homemade paint oven (more pics added)

My school locker oven just went 400 in it's first test with the 1500 watt toaster oven burners. Outside surface temp was 92 degrees. Ambient air was 55 degrees. It jets right up to 375 and then takes about 20 more minutes to hit the 400. I put it on convection so the little fan in the bottom is circulating ever so gently and the thermostat holds it about 100 degrees hotter than the dial indicates. I have had it on 150 for the last 3 hours and it is purring along right at 250 degrees. I am going to run it overnight to thoroughly dry out the bricks in the bottom and the insulation. It is swelling up blisters here and there with vapor. I'm thinking it is either moisture in the rigid foam or just the gasses in the foam swelling up with the heat. Stand-by for a few pictures.
 
Re: homemade paint oven (more pics added)

Here she is almost ready. We still need to do some finishing touches to secure the burner unit and then add some hooks in the ceiling of the unit to hang stuff. Then I have one small air leak I want to make tighter. The top and left edge of the door needs a strike plate of insulation to close up against. Even with this 180 degree 1/8" air leak it still will break 400 degrees.

I just tallied up the damages.
39.88-1500 watt Black and Decker toaster oven from WalMart
13.93-7 fire bricks
8.00-4 wheels
25.00-Double foil rigid insulation
8.00-100# Bag of 60-30 blasting media
0.00-Locker from school scrap pile.
20.00-4 cans of engine enamel
===========
$114.81


Re: homemade paint oven (more pics added)

VERY NICE Hired Gun! Your oven is a monument to this thread as it seems to hone and combine a lot of ideas. I really dig what you did with the toaster oven- I expect a run on those Black and Decker ovens as it seems to fit your locker oven perfectly and the controls seem removable without too much hoopla. What model is that?

Did you put rigid board below the toaster? Why not insulate between the door and the toaster- just tight clearance? A fiberglass (fabric) welding skirt may be helpful there- it's like a welding drop cloth used for when you're welding on a car or something- good for up to 1000F and should help you insulate the bottom of the door. Pricey, but can be found cheap if you look.

http://www.grainger.com/Grainger/STEINER-Welding-Blanket-6NE19

http://cgi.ebay.com/WELDING-CURTAINS-BLANKETS-/260751022660?pt=BI_Welders&hash=item3cb5f8da44

http://cgi.ebay.com/Comfort-Fiberglass-W...=item5641dd7102

Awesome build- I wish I'd have thought of that.
 
Re: homemade paint oven (more pics added)

Thank you. Yes, the oven is about a perfect fit. It is this one.
http://www.walmart.com/ip/Black-Decker-Convection-Toaster-Oven-White/12533801#rr

Model No.: TRO4075
Walmart No.: 001592559
On the bottom of the oven it does state it is the 1500 watt and has a 2 year warranty.
grin.gif


51Jjlh-nJ%2BL._SL500_AA300_.jpg


With the fire brick under and around it on 3 sides it puts the wiring on the front of it very close to the door. With the reflective tape closing the louvers it really doesn't get that warm down there unless it's running 400 degrees and then it takes a while for it to reach 100 degrees. At 275 it's not much issue yet. I was almost thinking a piece of cardboard sealed in the aluminum tape. I will look into the welding skirt. The oven is sitting loose in the bottom right now. I'm going to install a couple metal tabes to keep it tight to the rear of the oven. This will give it a bit more room up front. I think I will relieve the bricks a bit to allow the wiring on the backside to recess into the bricks a bit. The oven bricks cut easily with a chop saw. Not shown in the pictures is the convection fan in the bottom. I will shoot a few more pictures later today.
 
Re: homemade paint oven (more pics added)

Hired Gun- I think it's possible you may have voided your warranty
smile.gif


I've already posted way too many pics of my build but I might as well stick with the program- We're almost to the end.

I cut my vent in the back of my bottom drawer- The electrical conduit is so that I can pull my cord in and out of the drawer without scratching the insulation off- I wanted to be able to keep my cord inside the box when I'm not using it- But I'm already wishing I'd have done it some other way. I should have mounted a male 3-prong into the shell somehow and just used a 10ft extension cord- As it is, the end of my power cord will stick out 2-3 inches in the back and I'll never be able to push it flush up against the wall- I may redo it as it's bugging me.

Also- I should have done this step much earlier on as the vibration from cutting the vent rattled the hell out of everything and I had to retighten several bolts and I hafta hope My hardi-backer is securly fastened.

buildpic34.jpg


I had gone through several plans on how to mount my thermocouple. In the end I just mounted it straight to the element pan- it sits about mid height in the oven.

buildpic35.jpg


I then plumbed all my wires out of the oven- I ran the wires (and thermocouple) under the pan, then down through the insulation near the middle, and then out a hole drilled near the front- The point being I didn't want a straight shot- the offset should help keep heat from escaping. In retrospect- I should have brought the wires down further back in the cabinet as there is not a ton of clearance for my "electrical box" drawer.

I siliconed the hell out of all the seams and edges in the insulation- I almost left the bottom insulation unsealed as I just know that I will probably have to remove the element pan or something- but I'm heading in with optimism that everything's going fire up right and stay right.- Screw it-Glue it!

buildpic36.jpg


Then I dry-fit all my components- I'm glad to have taken so much time diagraming my electric- Helped a bunch in planning on how to position everything. I tested out my fan (thank god) as I had planned it to face fan-forward. It turns out that the fan blows over itself regardless of which way you wire the hot and neutral-( I thought I could change the direction the fan spins depending on how I wire it-Gross Conceptual Error. Also, the fan does not put out the volume I thought it would- Have left plenty of space in case I need to change out for another fan.

buildpic37.jpg


I cut out my panel- It was a much easier task than I had thought, but only because I had the right tools. I dug out my pneumatic jig saw I picked up at the flea market- My feelings about that little Harbour Freight turd have taken a 180- it cut like butter! (My sawzall was a nightmare). Good files did much more then just clean the edges- they actually remove a lot of steel in a hurry- and one could get the job done with just a drill and good files.

buildpic38.jpg


All that's left is the fun part- gonna wire it all up in front of the TV watching the tourney. If it doesn't work then you guys have been witness to one EPIC failure
smile.gif
 
Re: homemade paint oven (more pics added)

looks like its coming together. I think I skipped one of your questions on fusing the PID. As it sits right now you basically have no circuit protection on that device as it sits behind the 15A fuse and will never blow that. I would find a fuse as close to .1A as I could get at retail, probably .5A or .25A.

I really don't like ace hardware or radio shack, but this is the kind of area that those retailers shine at so I would look there first. In fact, on a side note, I wish those retailers would embrace the small technical stuff and stop trying to compete with the big boys so I could actually find the stuff I'm looking for when I need it.

Looks like you're gtg. Be sure to post pictures of that thing fired up with that ridiculous light! Think you'll fire it today or tomorrow?
 
Re: homemade paint oven (more pics added)

Hi all i went another way i had 16ga steel folded up and made it run on Liquid propane gas. it gets realy hot 300f easily no insulation no wiring i have an oven thermometer inside i can check the temp on and just use the gas valve to adjust the temp. I had to drill a lot more holes into the top section to allow for it to work firstly it was not drawing enough oxygen nad then filling with carbon dyoxide now it works a charm. i also have brass rods that barrels can be slid over and other spikes actions lugs and bolts can be placed on to be cured. so i will try to get some pics to show you how we ended up doing it a lot less complicated.
 
Re: homemade paint oven (more pics added)

Finished mine up and it works awesome now, shut it down when it hit 350 in under 10 minutes. Added a hot plate just to be sure. Rewired everything with high temp wire and a dimmer switch. Added a walmart digital thermo. 2 layers of 3/4 rigid foil backed insulation. Stove gasket around the door.

IMAG0619.jpg

IMAG0620.jpg

IMAG0621.jpg
 
Re: homemade paint oven (more pics added)

Looks nice and shiny jonaddis!
wink.gif
Glad to see you went back and reworked the wiring. Hope it works great for you for a long time.
 
Re: homemade paint oven (more pics added)

Success! This oven fired right up and performs better than I'd ever thought it would.


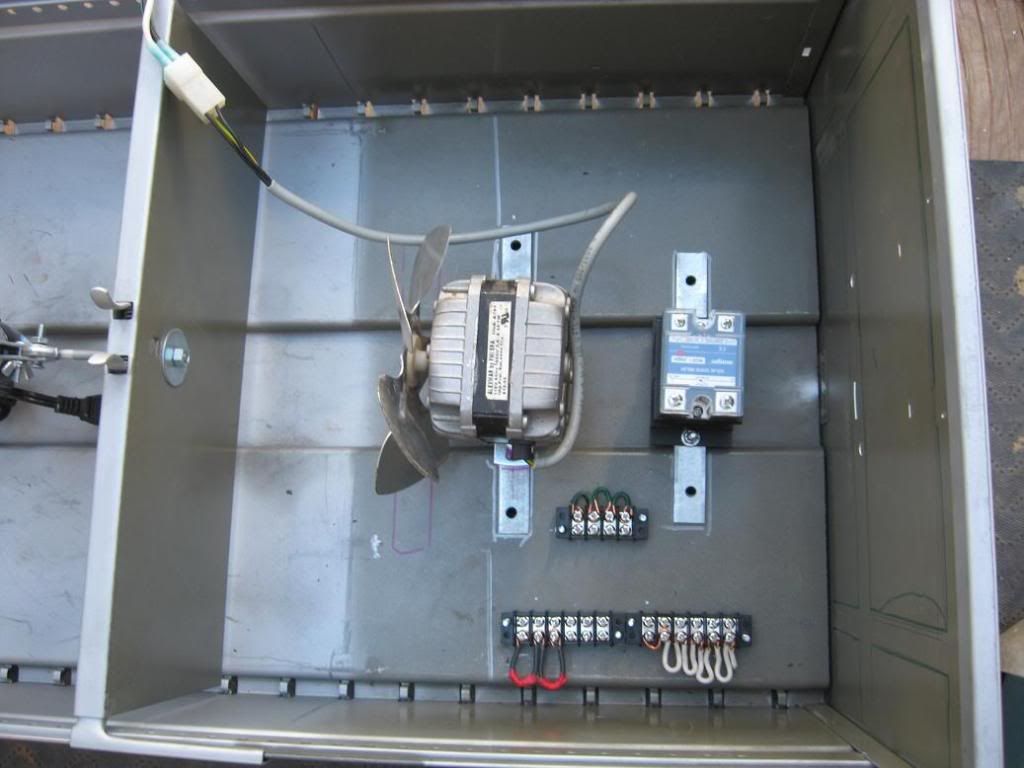
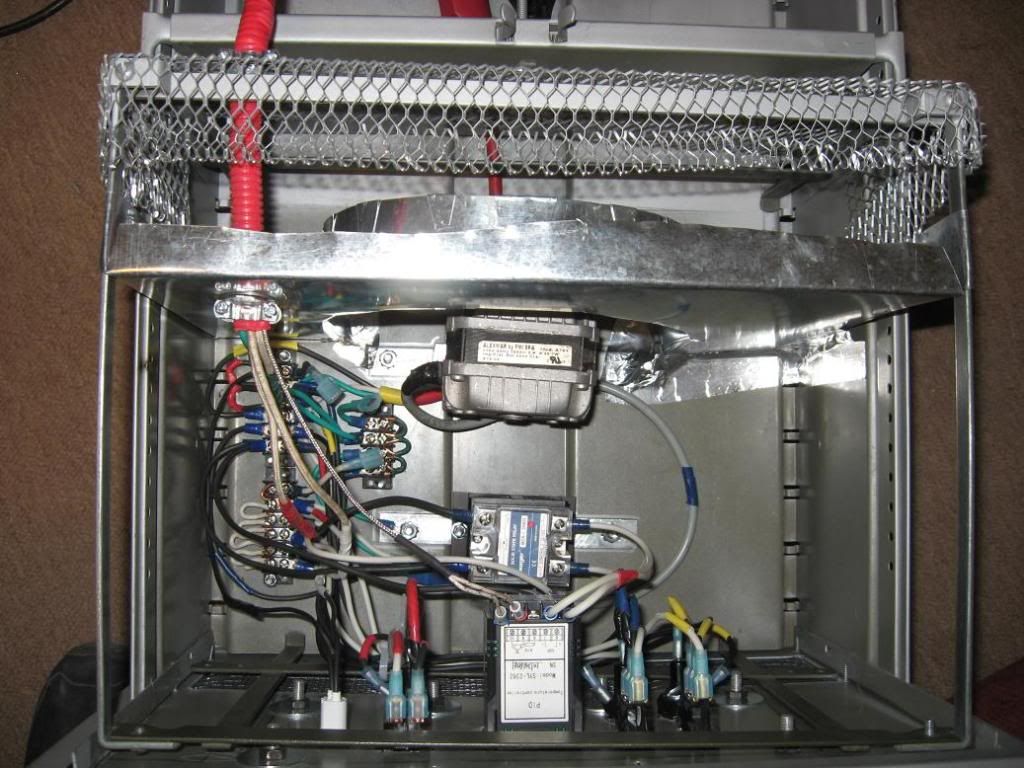
The wiring looks alot more complicated than it really was- obviously it was pretty time consuming putting everything together. The only real problem I had was with those stupid rocker switches that I had been asking for advice on- thought I had them figured otu but was wrong- anyway, for future reference it was 1=source,2=load,3=neutral; neutral was a gold color which is very misleading.

I have my electric split into 3 loops, light (yellow) fan (blue) and elements/PID (red) the (second) wiring diagram I posted was perfect. The PID/SSR could not have been easier to wire or understand and the instructions are pretty clear.

buildpic44.jpg


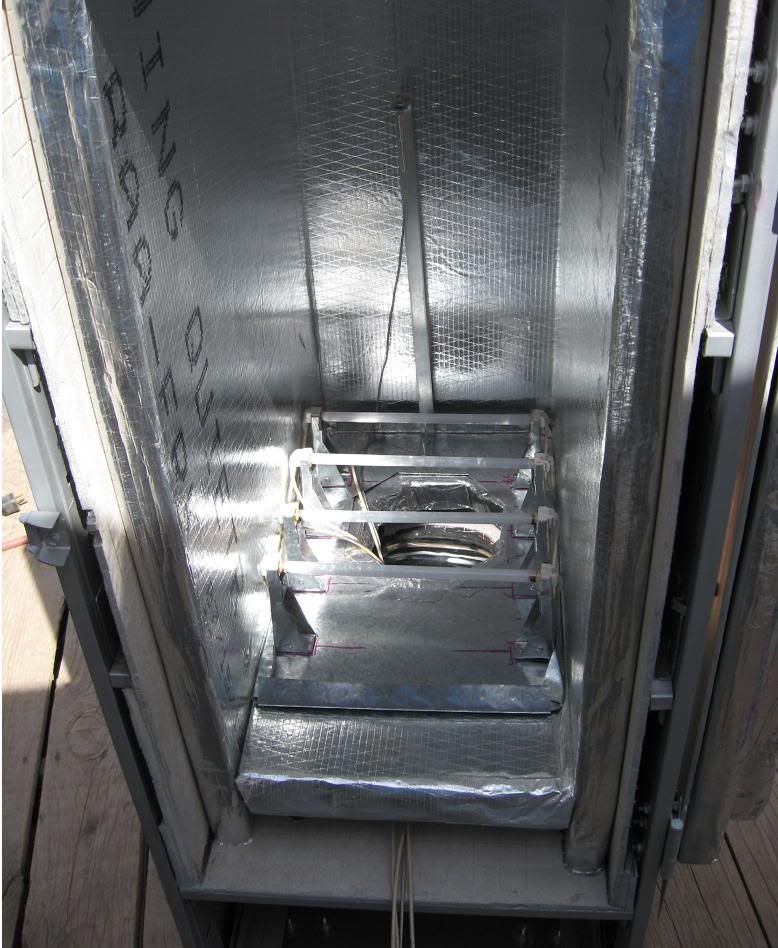
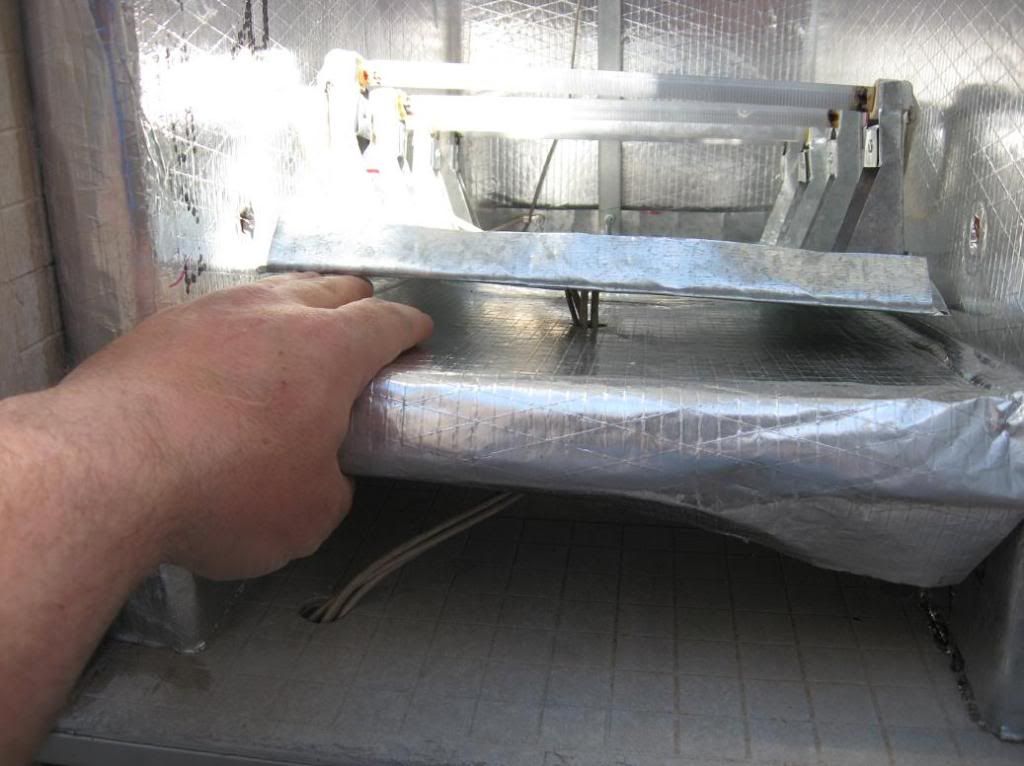
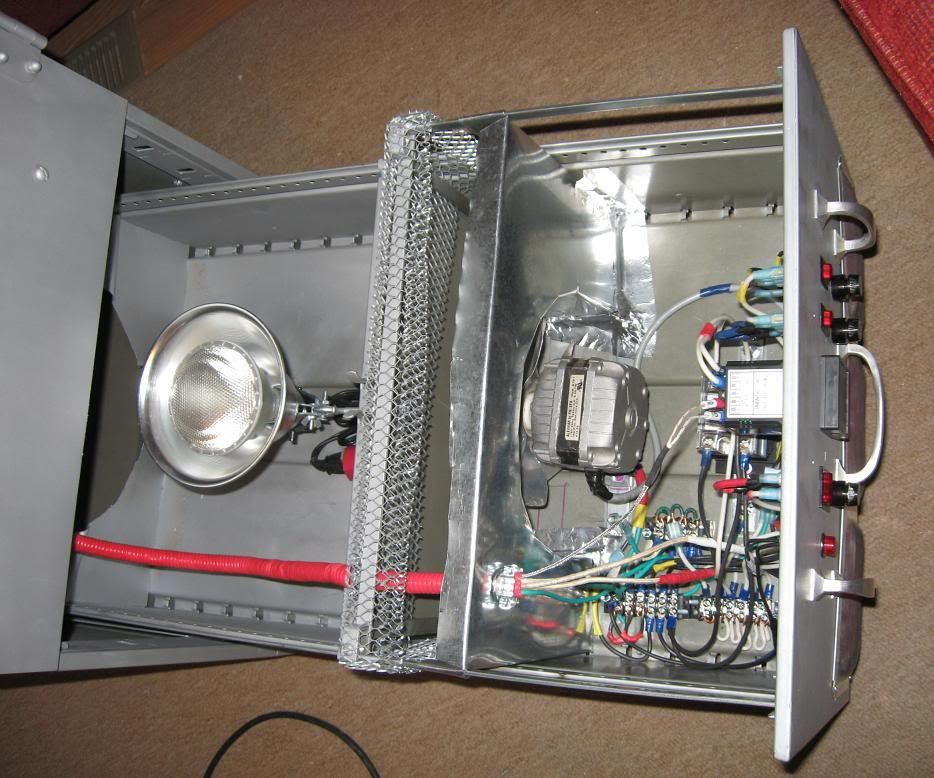
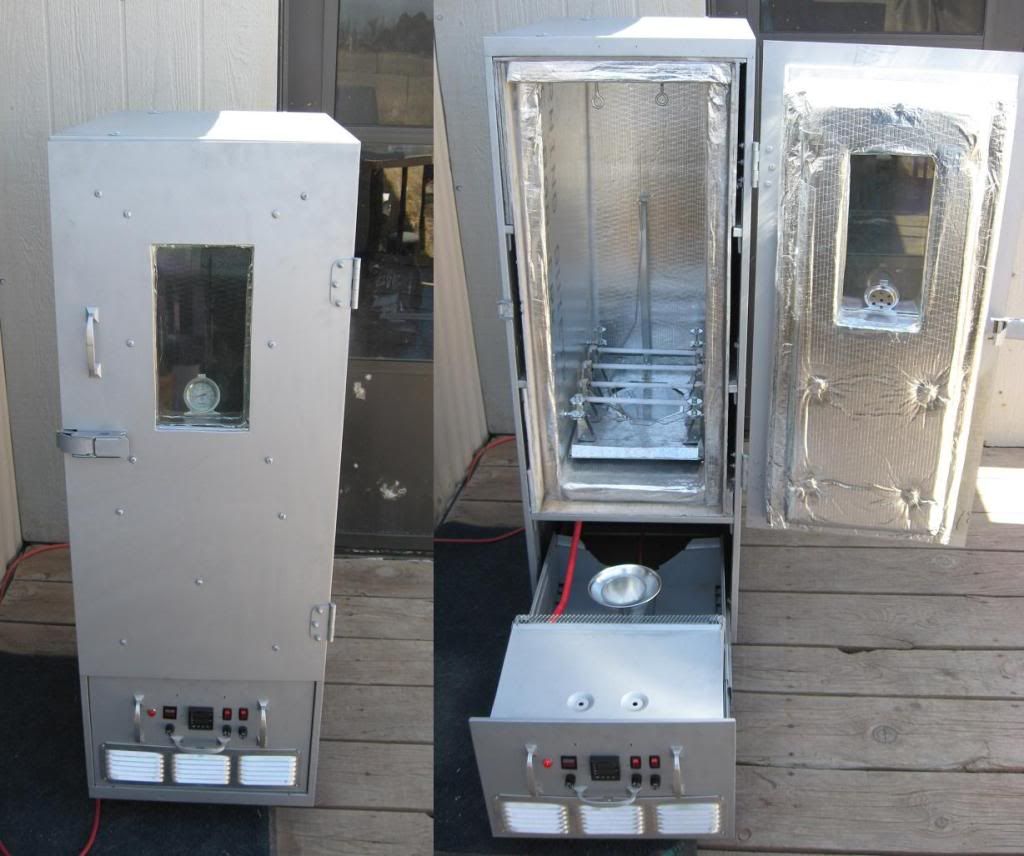
I've got my high-temp element wires, thermocouple, and a earth ground to the outer cabinet run inside this plastic conduit, taped up with electric tape, and attached at both ends with metal wire holders mounted into the panels. Makes for a flexible "umbilicus" that will allow the Drawer to come in and out without tearing anything out or messing anything up.

buildpic43.jpg


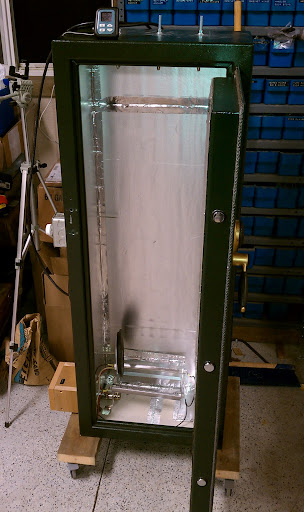
pretty clean build when it's all done, que no?

buildpic42-1.jpg


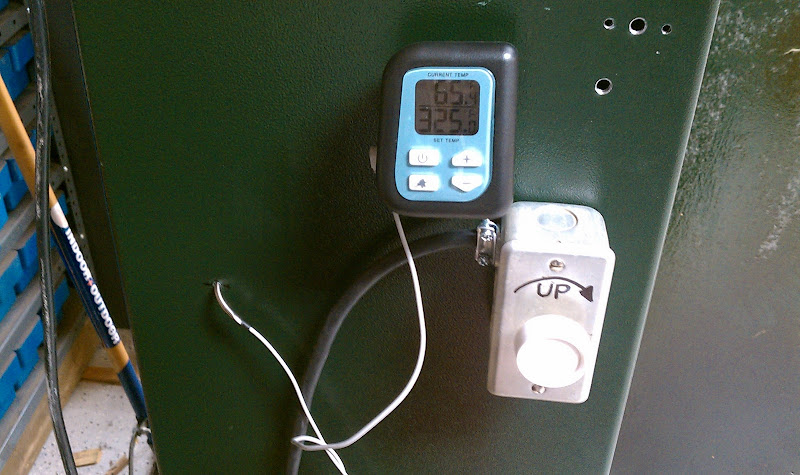
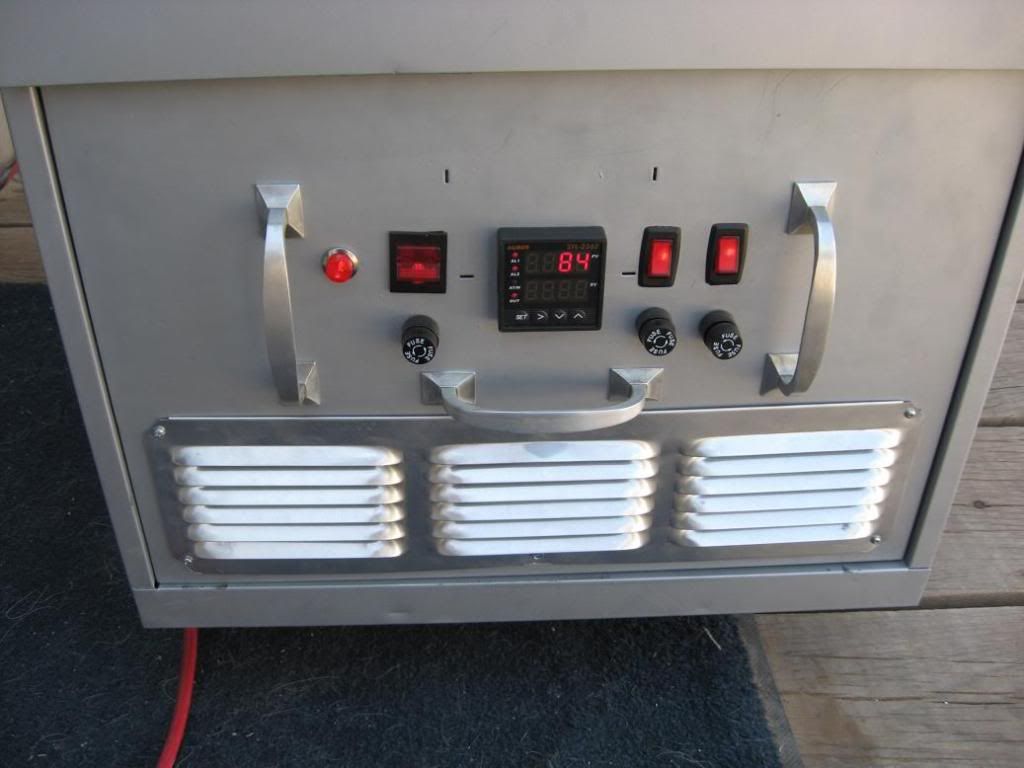
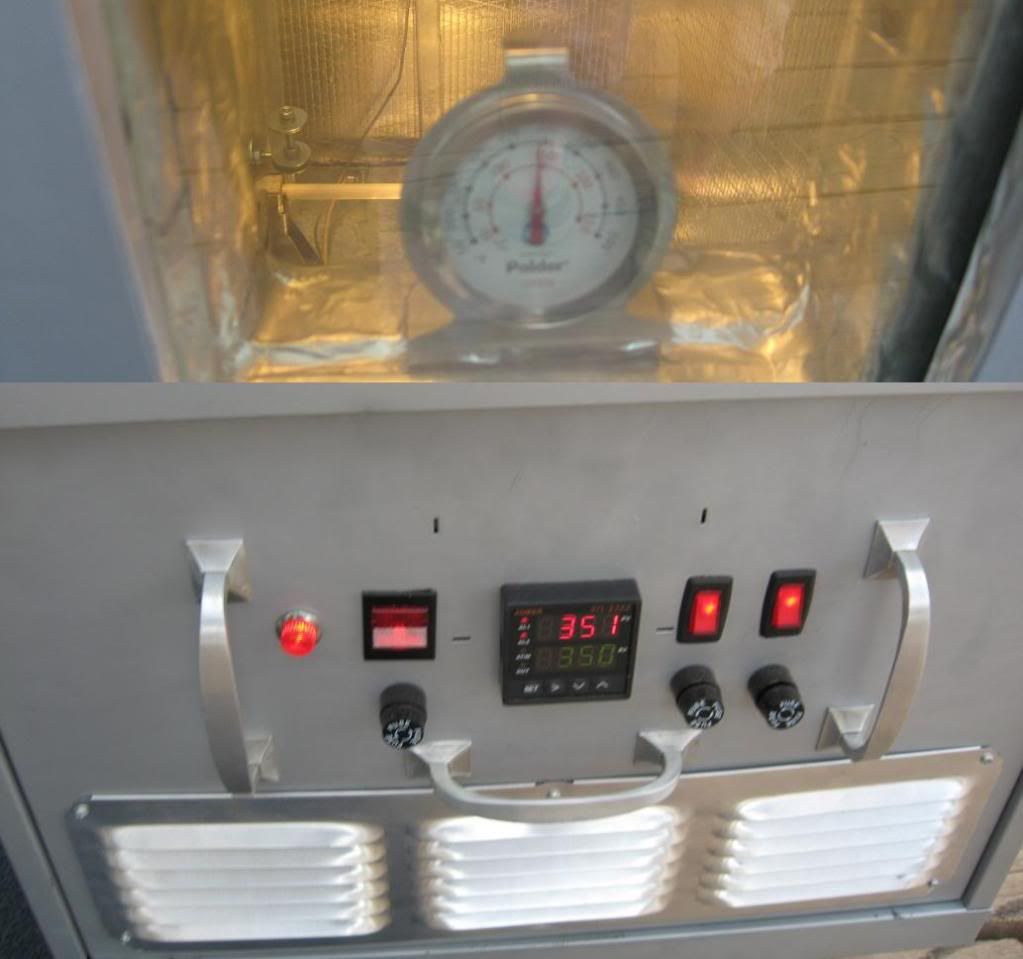
So then I fired it up- i took several pictures of the PID at different temperatures but the LED numbers are kind of constantly flashing- it's not noticable with the naked eye but the camera just captures a millisecond and this is the only pic that captured the entire readout- I had just turned it on.


It only took about 5-6 minutes to get from 70F- to 300F. I didn't pay that close of attention as I concentrating on programming the PID. The PID has an autotune function that basically cycles the oven up to temp a couple of times and uses the information about how long it takes to reach temp, how quickly the temp in that particular oven drops etc, to tune itself for the optimum P, I, and D (PID) settings. No need to get into that but the gist is that with the push a single button the PID taught itself how best to operate for THIS oven, and then changed all of it's internal settings so that it is now set to optimaly run THIS oven. I could not believe how easy this was- it took about 5- minutes and all I had to do was hold down a button for 8 seconds.

After the oven temp increased to it's set temperature (it over-shot the temp by about 7F the first time- but now that it's autotuned it may be better) I did not see the temperature fluctuate more than 1F up or down from that temp for the next hour.

buildpic40-1.jpg


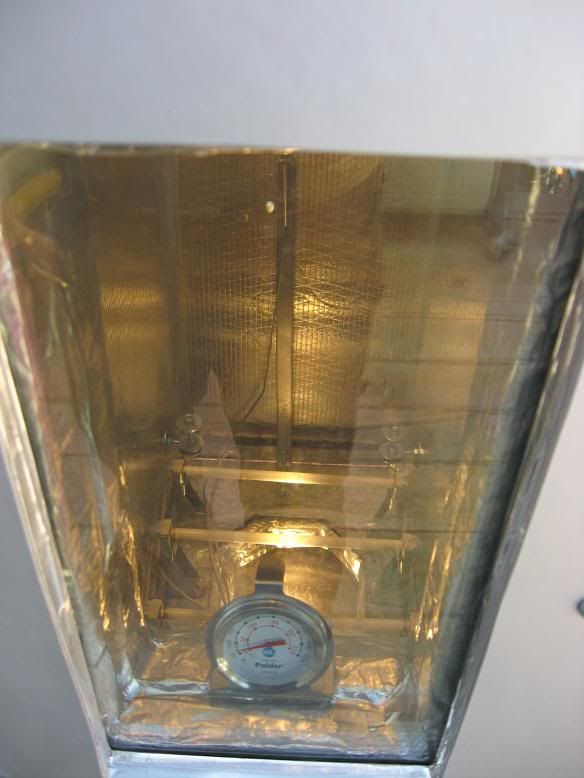
One thing I did notice is that the PID and the steel oven thermometer I mounted inside the window are off from each other by about 40F- Not sure yet which to trust and will be getting a third opinion- When I'm confident what the PID reads compared to true temp I can probably adjust it (program it) , or just set it a little higher or lower depending on what I trust the true temp is inside.

I ran the oven up to 350F for oven an hour. I did not test the oven's top end yet as it heated to 300/350 so fast that I can assume it will be able to exceed the operating limits of much of my components (about 485F) and I'm not looking to try and run it that high.

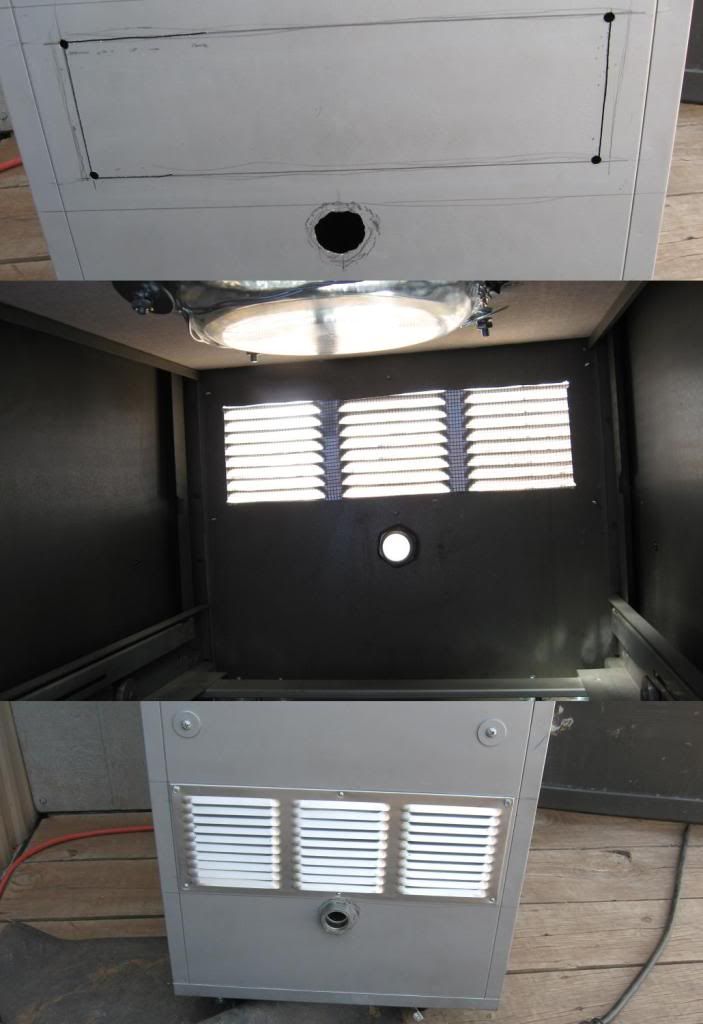
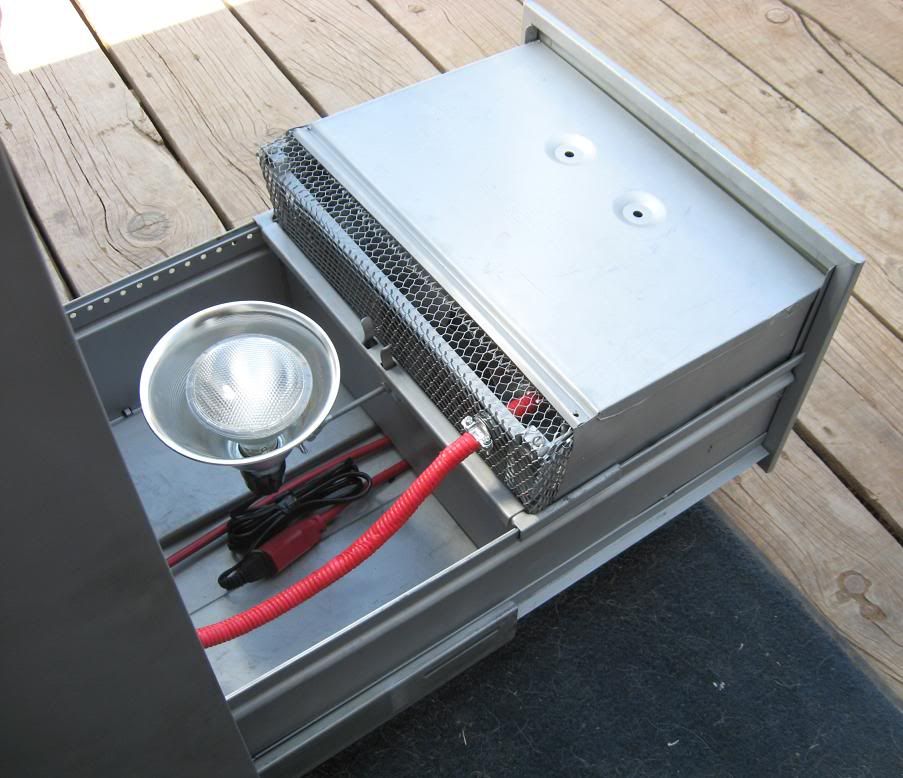
At 350F for 1 hour I did not locate a single spot on the oven that was not "cool" -I mean entirely cool- to the touch. There was a spot on the top of the oven that was warm but then I noticed that the sun was shining on that spot and I moved it more into the shade- and it cooled right off. I could locate- ZERO areas of heat loss- even around the door and the bottom cabinet never exceeded the ambient temperature outside . I touched the bottom portal window under the oven and it was warm but not so much that I could not keep my hand on it indefinately. In fact, most of the warmth in the bottom portal had to have come from the 75 watt light as I did burn the crap out of myself on the bulb when I reached in there-

The outer door window finally got warm enough that you could not leave your hand on it after an hour of baking.

buildpic41-1.jpg


That's about it- This thing kicks ass and I'm suddenly glad that I invested so much effort (and money) to build this thing the right way, as I feel this is a tool that will literally last and work a lifetime.


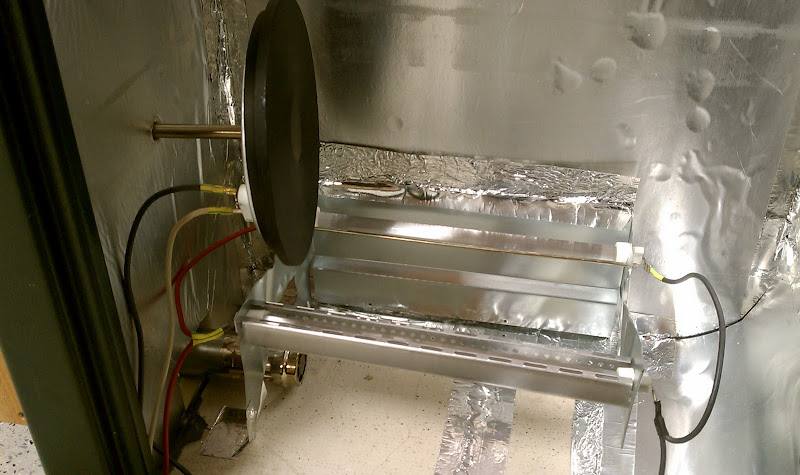
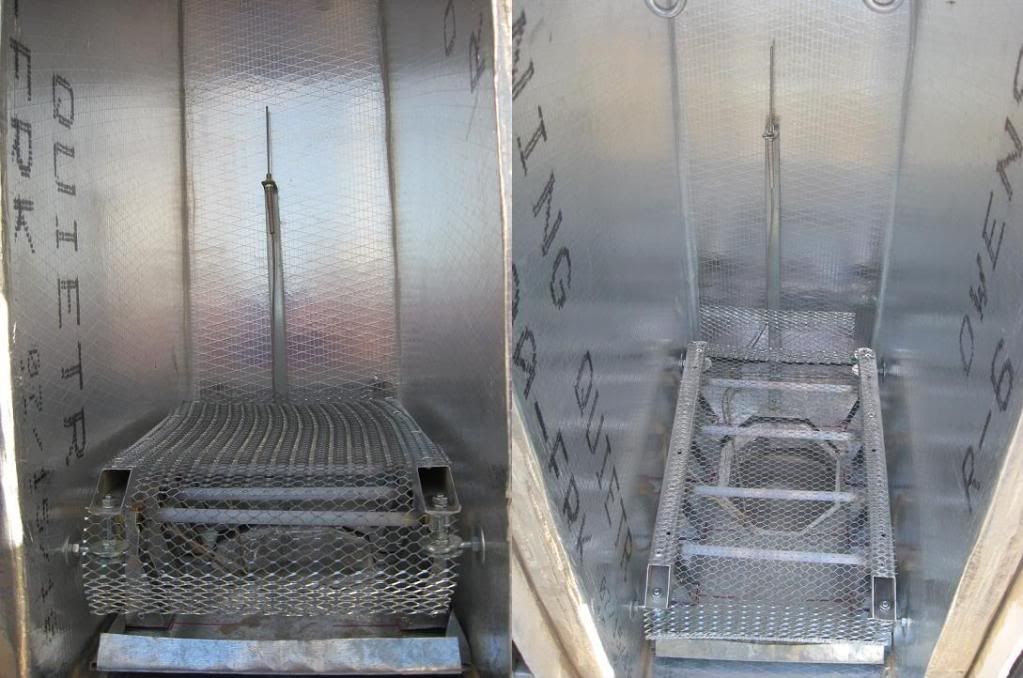
I need to finish up building a rack above my elements, and maybe some kind of hanging rack from my top eyebolts-

I'm going to paint another coat of silver in a few spots, and probably paint her name on her. I'm calling it the Fee-Nix F5

F5 heat rating

F=Fire

FF= Forest Fire

FFF= Fox in a Forest Fire

FFFF= F%$ked Fox in a Forest Fire

FFFFF= Freshly F%$ked Fox in a Forest Fire

buildpic39-1.jpg


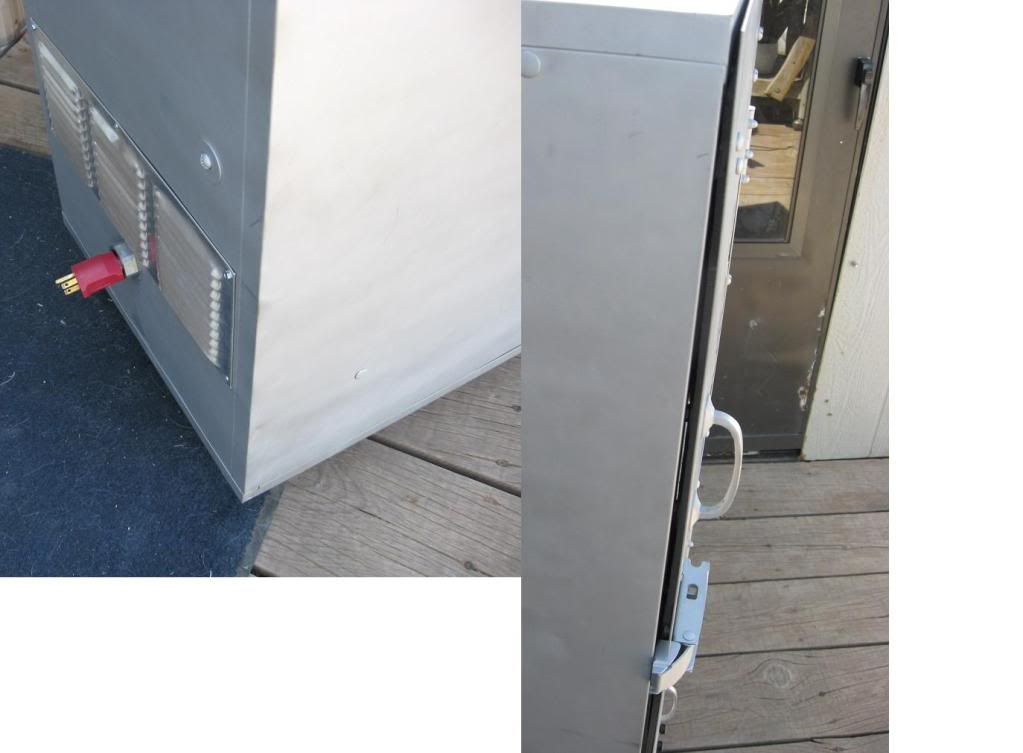
Issues: I'm not a big fan of how the cord sticks out in the back- but at least I can push most of the cord inside when I'm not suing it

The door does not close pretty, but it seals perfectly

buildpic45-1.jpg
 
Re: homemade paint oven (more pics added)

Very Nice Jonaddis!

One thing I'll add on my oven- If I had known the thing would do such a good job of keeping heat inside the oven- I definately would have used the bottom 3 drawers for the oven and the top drawer for the controller components- It makes sense to have then up at eye level and they'd be less likely to get kicked or have something dropped on them.

I was worried they'd get too hot up there- but I don't think now that it would have been a problem.

Again- Jonaddis- nice work
 
Re: homemade paint oven (more pics added)

Very nice mashlm!!! It turned out better than I would have expected. Next time I drive through NM I'll have to stop by and bake some duracoat on my tikka.

There should be a calibration function in the PID that will let you adjust the temperature up or down. Get a glass of ice water, set it in the fridge for an hour or so, and submerge your thermocouple in the ice water. Since this fluid would be right at the phase change state now it would be exactly 32*F. Calibrate the PID to 32 and you can get rid of the oven thermo and rest assured that you can bake at a precise temp.
 
Re: homemade paint oven (more pics added)

Well, it turns out I will be PM'ing you about setting mine up with a PID. The dimmer switch sucks balls, first of all it doesnt do anything, the oven would crank up to 400, Id turn the switch all the way down, and it would either just shut off or would not go down in temp.

Second, Im surprised the switch didnt melt down, I put my multimeter thermocouple on the metal switch housing and it was up at 210F at one point.

It got me through the first barrel coating job, but I want to set it up with a PID so I can set it and forget it.
 
Re: homemade paint oven (more pics added)

Got your PM and sent one back- I decided to post my response here on the thread as it may be useful to someone else later. Hope that does not equate to airing our dirty laundry in public or anything-

XXXXXXXXXXXXXXXXXXXXXXXX
I used foil-lined rigid duct board for the insulation. It comes in 4x8 sheets and is 1 1/2 thick. It was all the rage for a while for heating and air conditioning guys- It was a lot easier to make the HVAC ducts in a house just using this stuff instead of dealing with the galvinized steel flashing and then having to insulate it- It is not that easy to find now as most HVAC places have have gone back to steel ducts as they are more hardy and requre less mantenance in the long run. I called around to some local HVAC outfits and found one that had a few sheets of it cost me about $44 for a 4x8 sheet.

I noticed in your pics that your door is recessed back into the gun cabinet and you have insulation filling the door- You should be able to come up with a way that your door insulation seals with the rest of the insulation (back inside from the door)- instead of trying to seal the heat WITH the door. what I did is try to think of how to create an insulated oven box that did not allow heat out to my metal box. The metal shell- especially a heavy metal gun cabinet- acts as a heat sink and basically SUCKS heat out of you oven box requiring more heat to keep it at temp- Of course then you have to deal with the hot cabinet which causes problems too.

For example- why not create a forth insulation wall in your oven (where your door hole is) and cut out a doorway in it that is smaller than your steel door- So that when your door is closed, the insulation in your door seals with the insulation of the forth wall- no heat gets to your big steel door at all- See what I mean?

I think running your elements and the hot plate is a lot of draw for one outlet. 2000Watts at 120Volts =16.7 amps which is a lot. Most common 120 curcuits will have a 15amp breaker and I'd guess you'd be blowing the breaker pretty regularly and you'd have to assume that there is a good reason they have a 15 amp breaker on 120v circuits- know what I mean? TxAg explained that my reasoning is not exact here but the gist is there is only so much juice you want to try and pull.

I think your 1000W elements will get the job done fine- my 4 elements are only 1300W total (11Amp). The key is a well insulated box that keeps the heat in- then once the oven gets to temp- your elements only have to add enough heat to keep it at temp.

Now as far as the PID you can get them on Ebay and you can even get packages that have the PID, the SSR, a heat sink, and a thermocouple. You might be able to find them a little cheaper than at Auber instruments- but not by much- and many are clones and knock-offs.

I would 100% suggest Auber Instruments as the way to go.

http://www.auberins.com/
1-770-569-8420

I posted in the thread the model numbers of the components I bought from them, but if you call them they are very helpful in helping you understand which stuff you need. If you buy the exact stuff I got it will be perfect as you're doing the exact same thing I did. Don't let my oven's wiring scare you- My wiring is so much more complex since I had to wire the light and the fan and the isolation switches the power indicator light-blaqhh blah blagh- the fan is only necessary because the SSR produces a lot of heat- if you mount it out in the open air it will not need a fan- but if you keep it inside a box it will need some air circulating- If you had a well vented box and/or a computer fan you'd be fine.

I think my bill from Auber was about $85 with shipping for everything. I found the components on E-bay for $70 shipped but I recommend paying the extra

The wiring would be much more simple than it looks- If you look at my (second) wiring diagram and really study it you'll see that it's a pretty basic hot/neutral loop- the SSR interupts the hot wire to the elements and is told when to open and close by the PID which needs it's own hot/neutral wires and a thermocouple to tell it the temperature. -

Also- I go back to the suggestion I had of using a thermosat from an electric kitchen oven- I have not tried it but it should work perfect- it's a simple dial type controller that has the appropriate temp range (say 50-500F) and has an attached thermocouple on a 3-6 foot probe that mounts inside the oven- You could probably find electric ovens super cheap (if not totally free) on craigslist- pull the thermostat and haul the rest to the dump.

Anyway- I hope this helps/ I may repost this in the thread- as it might help someone else years from now.
 
Re: homemade paint oven (more pics added)

I'm glad you have had as much good service and supply from Auber Instruments as I did.

And you just got this thing running, and now you want to sue it? (your electrical cord quote) HA.

Looks good. Start coating.
 
Re: homemade paint oven (more pics added)

I was a little bugged that I did not get a good picture of the oven at temp- So when I fired up the oven again to show my neighbor I took some more pictures and one of them came out (the digital display flashes and when you take a picture not all of the numbers are always visable at that exact moment- You cannot tell that is hapening with the naked eye and it just looks like a constant display).

Anyway- I finally got a good money shot
smile.gif


buildpic46.jpg


It took just under 6 minutes to hit 350F and this time the gap between the PID temp and the metal oven thermometer was smaller- the little metal thermometer takes a long time to catch up to temp and I would not trust it's reading until it's been at temp for 10-20 minutes.

Yes, Sean, now it's time to get off the oven thread and start gunkoting- I think I'm going to build a homemade sandblasting cabinet first as this aluminum oxide is way too expensive not to try and recycle it. Should be a much smaller project than the oven.

Happy baking to you all, let me know if I can be of any help.
 
Re: homemade paint oven (more pics added)

Totally inspired me on this guys, I ordered a PID, SSR and re-purposed a Walmart quality locker/gun box that was given to me.

This is a great thread.

Also thank you to the folks with technical info, I had a few years worth of automated manufacturing classes, I later changed gears and went into Orthotics and Prosthetics. I'm excited to get into some of that stuff again.
 
Re: homemade paint oven (more pics added)

I've got a few PMs in reference to PID/SSR stuff.

Here is the list of what I purchased from Auber.
$42---SYL-2362 PID two relay (one alarm and 1 Contactor/SSR)
$12---TC-K3MM K-type thermocouple probe (air probe) smoker oven
$15---RS1-A40D25- 25 AMP SSR
$10---HS25 Heat sink for 25AMP SSR

If you go back throught the thread, I had a post that described pretty well why each item is appropriate- what I will add is that the heat sink comes with a small plastic vile of white grease- You're supposed to cover the face of the heatsink with a thick layer (all of it)before you bolt on your SSR and the grease insures proper heat distribution from the SSR to the sink.

I finished up a cover/shield for my heating elements in the oven- The light stucco wire was too flimsy on it's own to make an adequate shield, but once riveted to a couple pieces of very light aluminum square tubing (mangled old garden trelless) and bolted to my side eye bolts the thing is VERY RIGID and makes a PERFECT element shield.

I did not want something that had a lot of thermal mass, like steel expanded mesh or angle iron- this should be quick to heat and quick to cool, and have a minimal effect on the ovens performance. Plus the stucco wire was really really cheap.

Having said that, now that the shield is installed, I expect that It'll be a bit slower to get to temp, but that it will likely cycle less (on/off) to maintain temp since there is heat stored in the additional metal- Not worth mentioning except that I plan on re- "autotuning" my PID since the nature of the oven has changed, so that it can reprogram itself accordingly (minimixing overshoot when heating to temp, and providing the best setting to maintain a constant temp with a minimum (on/off)cycle rate). I'm by no means an expert at this- just sharing what my understanding is- which could be wrong. This same PID could be used in a walk-in oven, or a walk-in freezer for that matter- so the autotune sure makes life easier setting the thing up for THIS oven.

buildpic47.jpg


Anyway- I really look forward to seeing what others do with this thread!- This oven has been a ton of fun for me- Just ordered $100 worth of Gunkote and goodies from KG- gonna build a $50 sandblast cabinet first- let's see if Mike can stay within the budget this time (I promise I'll spare you guys the blow-by-blow)

(Oh and thanks to M1K3 for the original post- sorry if I took it over for a while there)
 
Re: homemade paint oven (more pics added)

One other thing I'll add for those who might concider using a file cabinet to build one of these- try to get an old one- they are much more heavy duty-

My biggest regret with this oven is that I did not put the controls on top and the oven below- Would make for a real improvement- assuming that one went to the same lengths I did to make sure you'd have no heat escaping through bolts or through the top of the door.

I drew this up early in the project. It was also helpful in planning how I was going to cut my hardibacker and duct board- as I was BARELY able to get it done with a single 4x8sheet of insulation.

buildpic48.jpg
 
Re: homemade paint oven (more pics added)

I was following right along until: <span style="color: #CC33CC"> "Just ordered $100 worth of Gunkote and goodies from KG"
</span>

Why go to all the trouble of first rate oven and then choose a second rate finish for your guns? Cerakote is many times more durable.
 
Re: homemade paint oven (more pics added)

<div class="ubbcode-block"><div class="ubbcode-header">Originally Posted By: Hired Gun</div><div class="ubbcode-body">
Why go to all the trouble of first rate oven and then choose a second rate finish for your guns? Cerakote is many times more durable.
</div></div>

Everything I know about coating guns I learned from reading these threads-(so basically nothing) I've seen DOZENS of discussions on the virtues of Cerakote/GunKote/MolyRes/Durakote/Alumahyde/rattlecan and the gist of my understanding is that the thermal cured coatings are without question the most superior- Seems like most pros prefer the Cerakote- but that's not universal. There did seem to be a real consensus though, that Gunkote was a little more forgiving of techique and easier to apply than Cerakote, so that is why I'm starting there- Plus I like the idea of the K-phos pretreatment they sell, and am buying some color matched air-cured coating from them too- so I'm just getting it all in one order. Once I get a few under my belt and am more comfortable with my skill level (now that I have all the tools I need)- I'll certainly try out the Cerakote and make my own judgements.

I'm not a pro- I'm just a day-job dude who likes doing things myself (collecting tools) and learning skills.
 
Re: homemade paint oven (more pics added)

<div class="ubbcode-block"><div class="ubbcode-header">Originally Posted By: Hired Gun</div><div class="ubbcode-body">I was following right along until: <span style="color: #CC33CC"> "Just ordered $100 worth of Gunkote and goodies from KG"
</span>

Why go to all the trouble of first rate oven and then choose a second rate finish for your guns? Cerakote is many times more durable.
</div></div>

Yes, Id love to see this statement backed up with some first hand evidence on your end.
 
Re: homemade paint oven (more pics added)

Let me rephrase it. Not second rate but 7 1/2 times inferior to Cerakote. Cerakote published tests performed by an independent military testing facility proving Cerakote to be 7 1/2 times more durable than KG Gun-Kote. In the Tabor abrasion test Gun-Kote wore through at 500 wear cycles where Cerakote didn't fail until 8000 wear cycles. Duracoat wore through at 600 wear cycles.

I applied Cerakote on some Glock barrels that are still intact thousands of rounds later. I have seen Gun Kote wear off in one magazine. The difference is huge. I have nothing against KG finishes. If they were measurably better I would use them. My reputation rides on every job. I just want the best for my customers.

In my own experience it takes something that would impact or damage the base metal to damage properly applied Cerakote. I recently used it to coat a local motocross racers Yamaha aluminum and magnesium engine cases. Where his boots ride the factory finish was gone after one moto and wearing heavily into the base metal.. Cerakote is just starting to show wear after 10 races. It's actual more durable than the aluminum and magnesium.
 
Re: homemade paint oven (more pics added)

those are very nice. I made a home made dutch oven once, try and get some pics
 
Re: homemade paint oven (more pics added)

I dunno, Ive read that "independent study" before, but from my experience, if cerakote is more durable, it isnt that much. I sprayed my alloy 1911 frame with kg 2400 about 1500 rounds ago, and the finish is barely wearing off the FEED RAMP. The slide rails are still 95% in tact. I really cant imagine much higher wear areas than those two.

Im not going to get into a pissing match over it, because I can believe Cerakote is slightly superior. But when KG is applied correctly I dont think the average person will ever notice a difference. And its cheaper and easier to deal with.

On a side note...I just ordered my PID setup for my oven from Auber, excited to see this thing in action, Im sick of having to check on it every ten minutes to make sure its not creeping up on 400 degrees.
 
Re: homemade paint oven (more pics added)

<div class="ubbcode-block"><div class="ubbcode-header">Quote:</div><div class="ubbcode-body">Gunkote was a little <span style="font-weight: bold">more forgiving of techique and easier to apply than Cerakote,</span> so that is why I'm starting there-</div></div>

This is, I believe, an accurate assessment. In fact I'd say <span style="font-weight: bold">much</span> more forgiving.

Anything that is dry to the touch and can be manipulated with gloved hands in minutes prior to baking is <span style="font-weight: bold">more forgiving </span>in my book.

I don't think that makes any statement about the superiority of any product over another in durability or suitability for any particular application.
 
Re: homemade paint oven (more pics added)

Hey all, I've not thought about this thread much in the past few months since I've finished the oven. I've done a few projects with the KG gunkote and am thrilled that I took the time and effort to collect and build all the tools I need to apply thermal cured gun coatings myself. The gunkote is far supperior to any paint or even two-part epoxy coatings I've used. I tend to expect that the many folks who prefer the Cerekote have good reason to, and I will likely go for the Cerekote for my next big project. Don't hold your breath for any feedback as it won't be until after a move to my new place and build a brand new shop which will keep me plenty busy for a while.

As far as the oven, it still works like a dream. One of the Pyrex dishes I used as a cover/shield over my oven light split. I anticipated the problem, since I had part of the pyrex covered with insulation and it's important that pyrex be heated uniformly. No big problem, and no heat is allowed to escape the oven because of it- so I'm not going to mess with it. I've gained enough confidence in the oven (that the insulation is not melting or venting vapors or catching fire during a 1 hour bake) that I'm confortable recomending against using a light and window at all. the ridiculers where right- light/window is as stupid as you thought. I still like being able to look in there though.
smile.gif


look forward to seeing some of the other ovens being built.
 
Re: homemade paint oven (more pics added)

For those that have done the leg work on all of this, <span style="font-weight: bold">thank you.</span>

I was wondering, given the difficulty in finding this foil backed rigid fiberglass insulation...

Has anyone considered the Hardibacker or other cement board backed by regular fiberglass insulation using the non thermally transmissive mounting shown in one of the diagrams?

I will need to be building something along these lines and thought I might give that a try.
 
Re: homemade paint oven (more pics added)

It's double foil rigid foam. Much easier to get. Most lumber yards and building suppliers stock it. If it's not in stock they can usually get it in a day or two. 1" thick is plenty to contain up to 400 degrees. The more mass you put in the oven between the heat and the insulation will just work your heating unit that much harder. This project doesn't need to be complicated to work well. My oven is a workhorse and cost about the same as a tank of gas.
 
Re: homemade paint oven (more pics added)

I actually had a hard time getting the insulation around here. Perhaps because of the local weather, don't know. The Home depot and Lowes didn't even know what I was talking about.

I got a tip to call the HVAC guys and they new exactly what I wanted and were reasonable on the price. So if you are having a hard time finding Duct Board, look up HVAC suppliers.

Mike
 
Re: homemade paint oven (more pics added)

<div class="ubbcode-block"><div class="ubbcode-header">Originally Posted By: jonaddis84</div><div class="ubbcode-body">I dunno, Ive read that "independent study" before, but from my experience, if cerakote is more durable, it isnt that much. I sprayed my alloy 1911 frame with kg 2400 about 1500 rounds ago, and the finish is barely wearing off the FEED RAMP. The slide rails are still 95% in tact. I really cant imagine much higher wear areas than those two.

Im not going to get into a pissing match over it, because I can believe Cerakote is slightly superior. But when KG is applied correctly I dont think the average person will ever notice a difference. And its cheaper and easier to deal with.

On a side note...I just ordered my PID setup for my oven from Auber, excited to see this thing in action, Im sick of having to check on it every ten minutes to make sure its not creeping up on 400 degrees.</div></div>

Couldn't agree more! Plus, I love the bike.
 
Re: homemade paint oven (more pics added)

What a cool thread! Just an idea for those of you using fans.

It may not be that big of a deal but when I was heat treading Aluminum in the Aerospace industry and we could not have hot/cold spots with using fans, we would put in a baffle around the parts.

So that the air that is produced by the fan does not blow directly over the parts. We wanted the air from the fan to travel all around the furnace and touch the parts last.

picture9.png


Something to force the air around the furnace to even hot/cold spots before touching the part.

Just a little tidbit of heat treating tribal knowledge.
 
Re: homemade paint oven (more pics added)

Tagging a thread is not necessary and needlessly clutters up the forum. At the top of the thread in the topic options just add the thread to your watched list. This way you get thread updates and don't need to drive the current topics down.
 
Re: homemade paint oven (more pics added)

<div class="ubbcode-block"><div class="ubbcode-header">Originally Posted By: *Straight Shooter*</div><div class="ubbcode-body">Tagging a thread is not necessary and needlessly clutters up the forum. At the top of the thread in the topic options just add the thread to your watched list. This way you get thread updates and don't need to drive the current topics down. </div></div>

Awwwww....come on man!! Everyone does it, its the "Thing" nowadays...lol

Seriously though...it is a shit pot ton of info in this thread to say the least...wow!
 
Re: homemade paint oven (more pics added)

That's it!

I'm Tagging it so I don't have to keep this thread in my Watched Topics list.

smile.gif


Mike
 
Re: homemade paint oven (more pics added)

<div class="ubbcode-block"><div class="ubbcode-header">Originally Posted By: m1k3</div><div class="ubbcode-body">That's it!

I'm Tagging it so I don't have to keep this thread in my Watched Topics list.

smile.gif


Mike </div></div>

cool +1


to my post count.
 
Re: homemade paint oven (more pics added)

Just so there will be some actual information on this 4th page:

I'll be doing an AR15 this weekend along with some other parts and have a few new colors to try out as well. Should be a lot of pics since this customer always likes to see all the steps during the process.

KG is sending some samples of tans and browns for a shotgun project. Also going to get some of their Deep Flat Black, anyone have any experience with that color?

The oven is still holding up great by the way. I've replaced the dimmer with a better one but other than that, everything is the same from the start of the thread.

Mike
 
Re: homemade paint oven (more pics added)

These are some very cool ideas, I might have to try to make one myself.
 
Re: homemade paint oven (more pics added)

I made my oven from a donor high school locker. I added insulation and another inside wall of stainless steel. My heat source is a Walmart $7 hot plate with the thermostat removed sitting on fire bricks in the bottom. I have mine wired into a process controller with relay. I have run it up to $400 and the outside wall is still touch safe. No fan in mine either. A simple rod through the cab is my hanger with fixed and swivel hooks. I also mounted a light I had laying around. It help to have good light when you are spraying.

It's not pretty and you can see my air brush spray patterns all over it when I set my spray gun. It's big enough for my use and take up little floor space. Works well for a spare key vault....

Oven1.jpg


Oven4.jpg


Oven3.jpg


Oven2.jpg
 
Re: homemade paint oven (more pics added)

I didn't get a chance to do the other AR I was thinking of photographing throughout the process but went ahead and FDE'd mine. Here is a quick shot from this AM before work.

ar15-600.jpg


That's a shot from my phone which isn't a bad camera but the lighting sucks. My wife loves it when I do this on the bed!

I did 2 AR barrels plus some misc stuff to test the Deep Flat Black. Everything came out looking great! I'll post some pics of that stuff once I get back home. I usually paint a few test pieces to test my process and the color. Bottom of a Savage mag and a modified Beretta 9mm mag usually work well. The color seems to hold up well but since its flat, contact marks appear slightly glossier. Anyways, I'll post more pics this evening.