• Get 25% Off Access To Frank's Online Training

    Use code FRIDAY25 and SATURDAY25 to get 25% off access to Frank’s online training. Want a better deal? Subscribe to get 50% off.

    Get Access Subscribe

Gunsmithing Just did a glass bedding for my Tikka T3x CTR

Jayjay1

Gunny Sergeant
Full Member
Minuteman
Oct 30, 2018
982
499
My first bedding ever, what a mess.

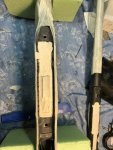
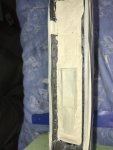
The CTR has very less space in the middle, where the magazine sits.
There are only two small rims which I opened a bit with a cutter drill.

Weird somehow to drill and cut into a new stock, felt wrong somehow.

The epoxy-stuff was very stiff and tough.
I´m wondering how the result will come out, or if I can seperate the system from the stock at all....
:oops:
 
Hope it comes apart for for you, my first bedding was done on my Rem. 700 BDL in 222, my varmint rifle 45 years ago it did not release, bought it to an ice cream factory sat in the freezer all day still did not release.
 
It did come apart very well.

The bedding itself isn´t optical perfect, but sure will do it´s job.

As I did a full bedding, the sides next to the magazine shaft didn´t stay there.
I think I was to anxious to ruin the stock there.

Removed the poor rests of the bedding there, dremeld and filed then to take off some more material and drilled some small holes into it, to get a good hold.
Poured only those sides again and it worked out ok.
 
  • Like
Reactions: Afkirby
Well, here are photos right before I began to put in the material.

On the small sides right to the magazine shaft I cutted out as much space as I could and added a kind of an edge where the epoxy could "sit".
Then I drilled a bunch of small holes into it, to anchor it.

Honestly, when it was done, I couldn´t await to put everything together again and so I didn´t take a photo of the finish.
Will have to soon.
 

Attachments

  • IMG_0864.JPG
    IMG_0864.JPG
    490 KB · Views: 174
  • IMG_0866.JPG
    IMG_0866.JPG
    380.5 KB · Views: 165
Well, here are photos right before I began to put in the material.

On the small sides right to the magazine shaft I cutted out as much space as I could and added a kind of an edge where the epoxy could "sit".
Then I drilled a bunch of small holes into it, to anchor it.

Honestly, when it was done, I couldn´t await to put everything together again and so I didn´t take a photo of the finish.
Will have to soon.


Hope it went well for you. If I could offer some friendly advise.

Poking holes to provide a "tooth" is never a bad idea. Surface area is always good. The consequence of this however can be a pocket of trapped air. If/when that happens, the exact opposite effect ends up taking place.

If this should ever be a concern for you moving forward (as in the next job) don't be afraid to hit em pretty aggressively with a chamfer tool. Flare the walls so that resin is more likely to fill from the bottom up. Wearing a rubber glove and playing "finger paint" with the initial application of resin is always a good idea to ensure it completely saturates the hole. The heavy viscocity of epoxy tends to flop over a hole, rather than run down inside of it and fill from the bottom up.

It's helped me a great deal on projects where I have to do this sort of thing.

Hope it helps.

C.