
400 TYD
Compatible with Impact 737R Actions.
To be used with recoil lugs .300" or thinner.
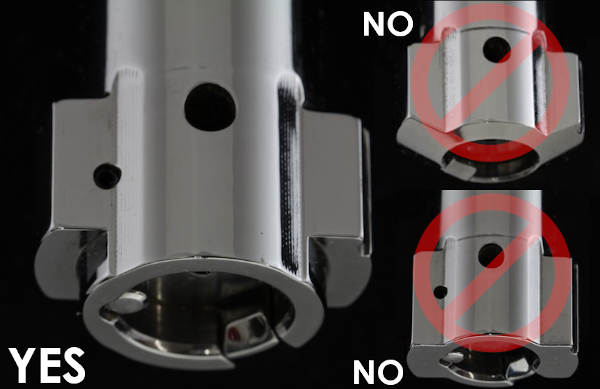
***THESE REM/AGES PREFIT BARRELS REQUIRE A BARREL NUT AND ARE ONLY COMPATIBLE WITH STANDARD FACTORY REMINGTON 700 ACTION THREADS (1-1/16"x16TPI) AND STANDARD FACTORY REMINGTON 700 BOLT-FACE GEOMETRY (.700" Breech Counter-Bore) & LUG GEOMETRY OR (if selected as .715" Counter-Bore) THOSE WITH UPGRADED M16-STYLE EXTRACTORS: ANY DIMENSIONAL DEVIATIONS FROM ANY/ALL OF THOSE AFOREMENTIONED DESIGN ELEMENTS ON YOUR ACTION AND/OR BOLT-FACE WILL PREVENT PROPER FITMENT AND/OR HEADSPACING OF THIS PREFIT BARREL***
***WILL NOT WORK WITH CURTIS ACTIONS (Unless the "NO COUNTERBORE" option is selected for breech counterbore size but this is STILL UNTESTED AND UNSUPPORTED BY X-CALIBER)***
1-1/16x16TPI Rem/Ages Barrel nut required, not included.
Need a Rem/Ages barrel nut? Head here!
Need a Muzzle Thread Protector? Head here!
Our Prefit 1MOA accuracy guarantee is 3 rounds at 100 yards with quality ammo and a skilled shooter. Like anything X-Caliber makes, we stand behind it 100%. If you do not think your barrel can shoot 1MOA groups or less, we will have you ship it back. We will inspect the barrel. If the barrel fails, we will build you another barrel and ship it to you at no cost. If the barrel passes all test, it will be shipped back to you at your expense.
For more information about our 1MOA accuracy guarantee and the conditions that apply, please refer to our FAQ or Conditions Pages.
*NOTICE REGARDING 6MM CHAMBERINGS: Some SAAMI 6mm chamberings, such as 6mm ARC, 6mm Creedmoor and 6 PRC, might experience projectiles sticking in the freebore of the chamber's throat if the projectiles are at or exceed maximum-SAAMI projectile diameter specifications of .2433-.2434" (depending on chambering). It has been noted in some instances that Hornady brand projectiles in 6mm can oftentimes be right at the maximum limit for what SAAMI specifications call for, and while safe to fire assuming the load adheres to SAAMI specifications, may experience projectile-sticking when extracting unfired rounds until the barrel has had 100+ rounds fired through it.
For more information on available contours, please visit our Contours page.
***************************
X-Caliber Barrel Break-In
Procedure Guide
When breaking in your new X-Caliber Barrel, you should perform appropriate fire and clean cycles to normalize the bore surface. Each fire and clean cycle consists of a certain number of rounds fired (one to five) followed by a cleaning procedure (see below for reference), to be completed a certain number of times (1-25). These vary depending on the type of steel of the barrel, bore/groove diameter, velocity and pressure of any given round, etc. This is to be used as a guide. Since our barrels are hand-lapped, each barrel may break in a little differently. Some barrels may require more or less shots or cycles to break in than what is listed here.
416R Stainless Steel: Fire One Round then Clean: Do this 5-10 times. Fire Three Times then Clean: Do this 1 time. Fire Five Times then Clean: Do this 1 time.
4140 Chrome Moly: Fire Once Round then Clean: Do this 5-25 times. Fire Three Times then Clean: Do this 2 times. Fire Five Times then Clean: Do this 1 time.
Example: For a 416R Stainless Steel barrel, you would fire one round, then perform the cleaning steps outlined below a total of five to ten times (shoot 1 round & clean, done 5-10 times) before starting the three shot cycle where you would fire three rounds and then clean as outlined below, then proceed to fire five rounds then clean, completing the break-in procedure.
Each Firing Cycle (1 shot, 3 shot or 5 shot) should be followed by cleaning the bore (see steps below for reference):
1.) Using a one-piece, coated cleaning rod with a properly sized bore brush (wet with your favorite non-foaming bore solvent), carefully clean the bore from the chamber end toward the muzzle (3-5 passes is usually sufficient). If you cannot clean from the chamber end, be sure to use a bore-guide so as not to damage the crown or muzzle end of the rifling. Let sit 30-60 seconds before moving on to the next step.
2.) Push a dry patch down the bore. (2-3 times)
3.) Put a few of drops of oil on a patch and push that down the bore so as to leave a thin film of oil inside the bore.
4.) Begin a new cycle: Fire your next round or rounds in your next firing cycle and repeat cleaning as necessary.
It is recommended to keep a written tally of your current step within the process so if you get distracted you will know where you left off.
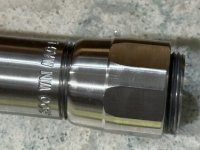
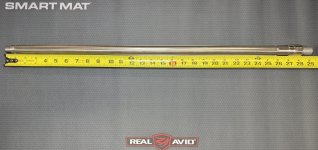
Description below copied directly from manufacturers website. Only 20 rounds through the barrel and not even broken in yet. I swapped calibers and went to a 300 PRC and that is why I am selling it.
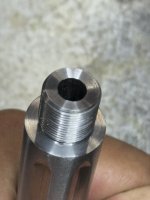
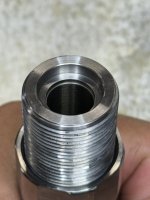
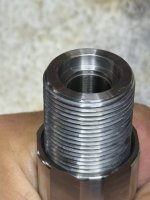
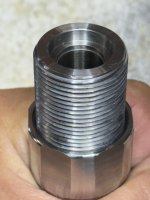
"Rem/Ages" Remington 700 Prefit Barrels
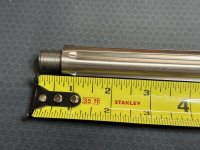
For over 50 years the Remington 700 has been the go to gun for hunters and servicemen alike because of its’ known out-of-the-box accuracy. Now coupled with the Savage Barrel nut design we get the Rem/Age pre fit barrel. By elongating the threads and adding a barrel nut, you are able to change out your Remington 700 barrel with a matching chamber Go gauge, barrel nut wrench and a barrel vise.Compatible with Impact 737R Actions.
To be used with recoil lugs .300" or thinner.
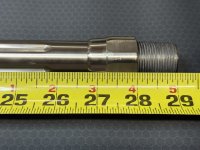
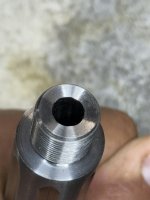
***THESE REM/AGES PREFIT BARRELS REQUIRE A BARREL NUT AND ARE ONLY COMPATIBLE WITH STANDARD FACTORY REMINGTON 700 ACTION THREADS (1-1/16"x16TPI) AND STANDARD FACTORY REMINGTON 700 BOLT-FACE GEOMETRY (.700" Breech Counter-Bore) & LUG GEOMETRY OR (if selected as .715" Counter-Bore) THOSE WITH UPGRADED M16-STYLE EXTRACTORS: ANY DIMENSIONAL DEVIATIONS FROM ANY/ALL OF THOSE AFOREMENTIONED DESIGN ELEMENTS ON YOUR ACTION AND/OR BOLT-FACE WILL PREVENT PROPER FITMENT AND/OR HEADSPACING OF THIS PREFIT BARREL***
***WILL NOT WORK WITH CURTIS ACTIONS (Unless the "NO COUNTERBORE" option is selected for breech counterbore size but this is STILL UNTESTED AND UNSUPPORTED BY X-CALIBER)***
1-1/16x16TPI Rem/Ages Barrel nut required, not included.
Need a Rem/Ages barrel nut? Head here!
Need a Muzzle Thread Protector? Head here!
No Shipping outside the US
*Please refer to the footer of this page for up-to-date production lead-time estimates.
Fluting: Adds 1 week to order lead timeOur Prefit 1MOA accuracy guarantee is 3 rounds at 100 yards with quality ammo and a skilled shooter. Like anything X-Caliber makes, we stand behind it 100%. If you do not think your barrel can shoot 1MOA groups or less, we will have you ship it back. We will inspect the barrel. If the barrel fails, we will build you another barrel and ship it to you at no cost. If the barrel passes all test, it will be shipped back to you at your expense.
For more information about our 1MOA accuracy guarantee and the conditions that apply, please refer to our FAQ or Conditions Pages.
*NOTICE REGARDING 6MM CHAMBERINGS: Some SAAMI 6mm chamberings, such as 6mm ARC, 6mm Creedmoor and 6 PRC, might experience projectiles sticking in the freebore of the chamber's throat if the projectiles are at or exceed maximum-SAAMI projectile diameter specifications of .2433-.2434" (depending on chambering). It has been noted in some instances that Hornady brand projectiles in 6mm can oftentimes be right at the maximum limit for what SAAMI specifications call for, and while safe to fire assuming the load adheres to SAAMI specifications, may experience projectile-sticking when extracting unfired rounds until the barrel has had 100+ rounds fired through it.
For more information on available contours, please visit our Contours page.
***************************
X-Caliber Barrel Break-In
Procedure Guide
When breaking in your new X-Caliber Barrel, you should perform appropriate fire and clean cycles to normalize the bore surface. Each fire and clean cycle consists of a certain number of rounds fired (one to five) followed by a cleaning procedure (see below for reference), to be completed a certain number of times (1-25). These vary depending on the type of steel of the barrel, bore/groove diameter, velocity and pressure of any given round, etc. This is to be used as a guide. Since our barrels are hand-lapped, each barrel may break in a little differently. Some barrels may require more or less shots or cycles to break in than what is listed here.
416R Stainless Steel: Fire One Round then Clean: Do this 5-10 times. Fire Three Times then Clean: Do this 1 time. Fire Five Times then Clean: Do this 1 time.
4140 Chrome Moly: Fire Once Round then Clean: Do this 5-25 times. Fire Three Times then Clean: Do this 2 times. Fire Five Times then Clean: Do this 1 time.
Example: For a 416R Stainless Steel barrel, you would fire one round, then perform the cleaning steps outlined below a total of five to ten times (shoot 1 round & clean, done 5-10 times) before starting the three shot cycle where you would fire three rounds and then clean as outlined below, then proceed to fire five rounds then clean, completing the break-in procedure.
Each Firing Cycle (1 shot, 3 shot or 5 shot) should be followed by cleaning the bore (see steps below for reference):
1.) Using a one-piece, coated cleaning rod with a properly sized bore brush (wet with your favorite non-foaming bore solvent), carefully clean the bore from the chamber end toward the muzzle (3-5 passes is usually sufficient). If you cannot clean from the chamber end, be sure to use a bore-guide so as not to damage the crown or muzzle end of the rifling. Let sit 30-60 seconds before moving on to the next step.
2.) Push a dry patch down the bore. (2-3 times)
3.) Put a few of drops of oil on a patch and push that down the bore so as to leave a thin film of oil inside the bore.
4.) Begin a new cycle: Fire your next round or rounds in your next firing cycle and repeat cleaning as necessary.
It is recommended to keep a written tally of your current step within the process so if you get distracted you will know where you left off.
Attachments
-
 IMG_0029.JPEG700.6 KB · Views: 5
 -
 IMG_0031.JPEG603.3 KB · Views: 6
 -
 IMG_0034.JPEG676.5 KB · Views: 5
 -
 IMG_1023.JPEG472.2 KB · Views: 7
 -
 IMG_1024.JPEG468.2 KB · Views: 7
 -
 IMG_1025.JPEG624.4 KB · Views: 7
 -
 IMG_1026.JPEG480.8 KB · Views: 5
 -
 IMG_1027.JPEG470.4 KB · Views: 5
 -
 IMG_1028.JPEG571.6 KB · Views: 5
 -
 IMG_1029.JPEG623.5 KB · Views: 5
 -
 IMG_1030.JPEG466.9 KB · Views: 5
 -
 IMG_1031.JPEG1.1 MB · Views: 7
 -
 IMG_1032.JPEG1,011.6 KB · Views: 7
 -
 IMG_1058.JPEG443.8 KB · Views: 7
 -
 IMG_1059.JPEG444.8 KB · Views: 6
 -
 IMG_1060.JPEG506.2 KB · Views: 9
 -
 IMG_1061.JPEG508.5 KB · Views: 7
 -
 IMG_1062.JPEG533.4 KB · Views: 7
 -
 Screenshot 2025-05-03 200423.png258.5 KB · Views: 8
