This is a review of the Magpul Precision Rifle 1 Course in Yakima, Washington - January, 2013 hosted by Caylen Wojcik.
About the Instructor and Course
Caylen Wojcik's is a former USMC Scout/Sniper and Scout/Sniper instructor. He has seen active combat in the Middle East and received the Purple Heart during his tour. Caylen uses his experience in combat to teach real-world actualities of deploying a rifle effectively.
This course was four days and covered the basics of precision rifle from 100-1000+ yards. During this course we shot in winter conditions with temps ranging from around 20F-35F during the day.
My Rifle
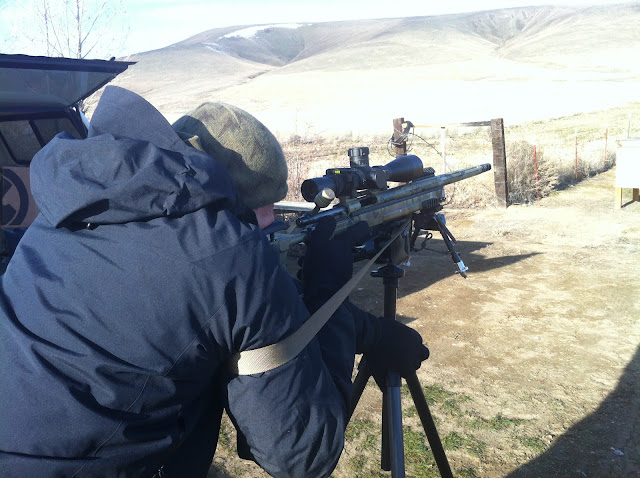
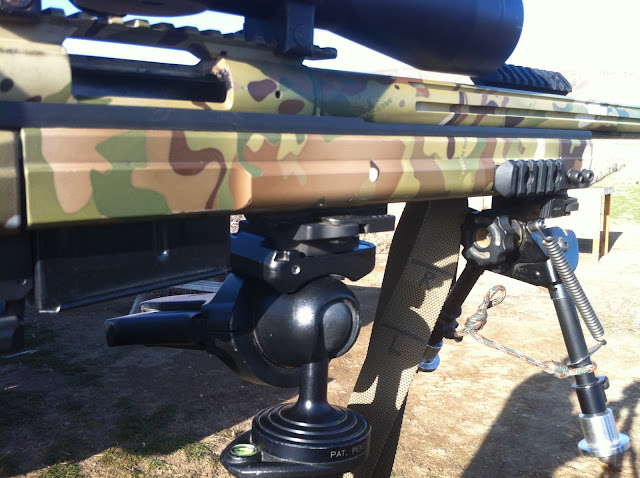
Accuracy International AW in .308
26" Barrel
Single Chamber Muzzle Brake
Nightforce F1 3.5-15X w/Mildot Reticle
USGI Synthetic Sling
AI or Harris Bipod (See why below)
My Reloads
I was using reloads and they shoot sub 0.3MOA from my rifles. Here is the recipe and gear used to make them:
Lapua .308 Brass
175 Sierra Match King
43.5 grains Varget powder
CCI Benchrest Primers
2.80" COAL
Full length resize
Redding competition die and competition bullet seater
RCBS Rock Chucker
RCBS Charge Master
Nothing special is being done with these reloads. They are middle of the road in terms of pressure and velocity and are loaded to spec in terms of brass size, bullet seating depth, etc. I value consistency and reliability more than tweaking my loads for max velocity and this load gives me great performance and great reliability in my rifles.
Day 1 - Intro, Zeroes and Technique
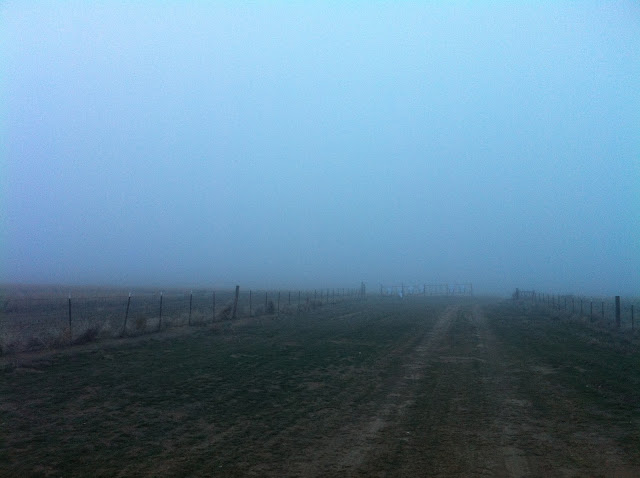
It was about 21-22 degrees when I took off for the shooting area located on private ranchland. The ranch is in the desert region and is sagebrush with large rolling hills. The ranch is on 36,000 acres. That's not a typo!
There were five shooters, including myself, and two instructors. Caylen and the other instructor would teach together the first day. The remaining three days it would just be Caylen. But with only five of us this is an incredibly good teacher to student ratio. Everyone received great personal attention.
First we went over a basic briefing of the course and received a data book from impactdatabooks.com full of information and logging pages. We also received a laminated card deck with information about shooting positions, mil to yards conversions, blank elevation tables, etc. This card deck would be used throughout the course not only as a field guide to proper shooting technique, but also for our own elevation, windage, holdovers, etc.
Next, we went over the rifles, scopes, stocks, etc. that were present. This gave everyone a chance to see different hardware. There were:
2 - Stock Remington 700Ps (or close variants)
1 - GA Precision custom 700 in McRee Chassis
1 - REPR Semi-Auto
1 - Accuracy International Arctic Warfare (AIAW)
All rifles were shooting .308 in either hand loads or Federal Gold Medal Match. The class had all levels of experience from novice to a member of a regional Police SWAT Sniper team.
Firing Positions -- Get Out of Prone!
After a brief intro into what we will cover over the next few days, we went out to the 100-yard firing line. Here we went over the basics of firing positions, breathing, etc. We started off in the prone position, but Caylen was careful to inform us that the course would do more than prone position because he feels it is not realistic with what shooters face in the field. In particular, he thinks prone is good for a couple basic things:
1) Sighting in
2) Load development
He has found that around 95% of the time your shot is not really from the prone position. This is based on his military experience, but for civilian purposes it applies directly to situations like hunting where going prone is often not possible due to field obstacles and losing sight of your game when you drop to the ground. We would use not just prone, but also shoot off obstacles, odd positions, etc. Further, we would not be using shooter/spotter teams because that is also no longer realistic for civilian long range (hunting) or for many police/military applications. He would train us to spot our own bullet splashes and correct our own shots rapidly.
How to Set Parallax and Focus a Scope
We got behind the rifles and the instructors checked our positions and made adjustments. We were taught how to get straight back behind the rifle, good foot position, and eye to scope alignment. My form was already pretty good in this regard so it was more of a review. But for new shooters this adjustment phase is very important to get a consistent position behind the rifle. Accuracy is all about consistency.
The next order of business was to adjust parallax and focus our scopes. Caylen explained parallax and how it can cause serious problems in accuracy as the reticle and focal plane are not aligned. Many shooters have big problems correctly adjusting their parallax and this leads to inaccurate results.
We aimed at a target 500 yards away. The first thing we did was adjust parallax so that the reticle/target did not shift as we moved our head around behind the scope. Once we adjusted so the reticle and target were not moving, we loosened our focus rings and focused the reticle until it was clear. It's two simple steps:
1) Get rid of parallax at 500 yards.
2) Then focus the reticle.
When you do these things, you will have the target focal plane and reticle focal plane aligned accurately.
My scope was already adjusted and didn't need any changing. But it's always a good idea to double-check your gear from time to time to make sure nothing is out of alignment.
New Magpul Precision Rifle Target
Caylen put up the new (but not yet released) Magpul precision rifle targets to get our zeroes. Here is a sample of one that has been shot already:
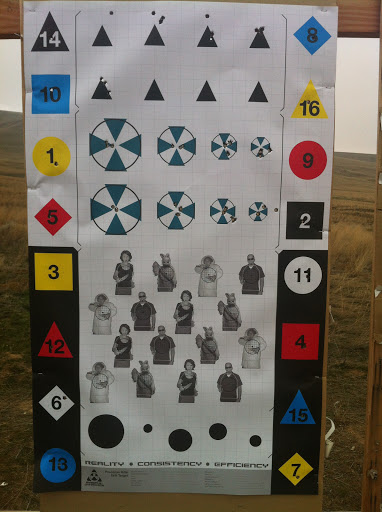
The target is still going through some modifications. But basically:
1) The triangles up top are for sighting. You aim at each point because it is easier to be precise with aiming at a point than a big round/square blob.
2) The group of four inner pointing triangles is for a Natural Point of Aim drill that I'll discuss.
3) The numbers on the outside are for various drills, but we also used them for a NPA drill.
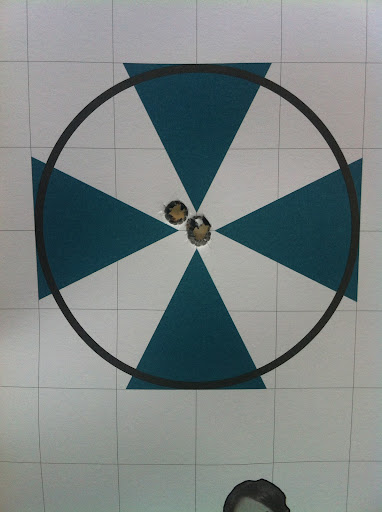
Zero Rifles
We sighted in the rifles. My final three shots did this (squares are 1 inch):
At this point I tightened the zero stop and turrets, but I left a couple clicks below zero stop just in case I needed it later in the course. I don't want to have to pull the turrets again because each time I do it there is I chance I mess things up or get debris into the turret mechanicals.
Make Your Position, Then Break Your Position
After the sight in we went to a drill that helped us get into position and Natural Point of Aim (NPA), then break it, then get back into it again.
It works like this:
1) Get into position and shoot for the center of number "1" target.
2) Cycle the bolt, put on safe, and back up to your knees behind the rifle.
3) Get back down behind the rifle and shoot for target "2."
4) Do this for all 16 targets.
The objective here is to shoot for the center of each numbered shape, but the shapes do not really have a defined center and they are placed randomly on the target. The purpose is to see if you can get into and out of position consistently and put the bullet more or less in the center. If you are not doing it repeatedly, then the bullet strikes will tell the instructors where you are going wrong (left, right, etc.).
You can see on the full size target I did OK, but miscounted and skipped #3 by mistake! Oh well. The strikes I did have were all in the faint circle (you can't see it from 100 yds.) for the most part.
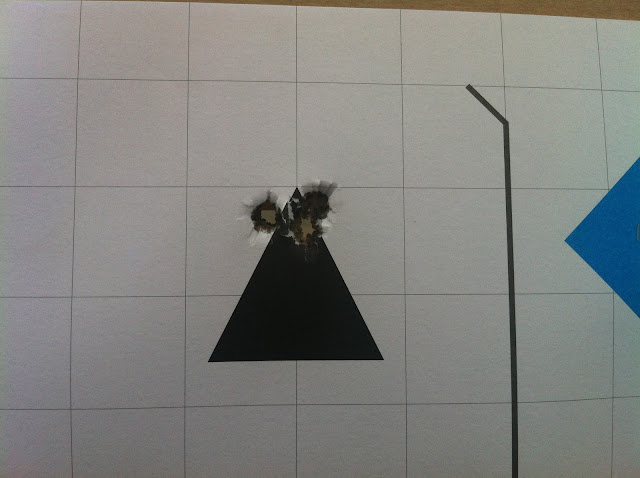
Natural Point of Aim - Use the Force
This next drill we aligned our sights with the targets with four pointed in triangles. Each one gets smaller from 4MOA to 3, 2, 1. But, we will do it with our eyes closed.
The object here is to get NPA, close your eyes, open them, check for NPA again, then close eyes and shoot! So these targets were shot with our eyes closed. If you do it right the NPA takes care of the rest and you'll be accurate.
The shooting was done very safely in an environment where there is no chance a bullet could go errant and hurt anyone. The ranch again is 36,000 acres with very large hills as backstops behind the targets. With that said, I don't recommend doing this drill unless you have proper instruction.
Let me also add that the difference between an average shooter and a great shooter is their ability to get NPA consistently. It's not what gear you own, what rounds you shoot, what videos you've watched or anything of the sort. It's about getting into a good position, getting solid NPA, and pressing the trigger consistently each time. I have done marksmanship instruction and we focused a lot on NPA as a basic skill. Within an afternoon, you would see very average shooters who couldn't hold 4MOA at 100 yards go to 1MOA to sub-MOA shooters even with very modest equipment. Technique trumps gear in almost every case. If you can't get NPA, you will shoot poorly.
Now, here's a three shot group I did with my eyes closed at 100 yards. This is an example of what good NPA can do. My other groups were acceptable (sub-MOA), but I had two fliers simply because my finger was freezing staying on the steel AI trigger with temps still in the 20s and no gloves!
Chronograph
After the NPA drill we chrono'd our rounds with a MagnetoSpeed. My rounds were as follows from my 26" 1:12 twist barrel:
Max Velocity: 2683
Min Velocity: 2653
Average: 2670
Standard Deviation: 12
The standard deviation of 12 is pretty well in line with what I get with Federal Gold Medal Match. It's perfectly fine for this kind of shooting. Velocity was within margins as well. Varget powder is temperature stable and cold wasn't affecting it.
Rifle Cleaning
We next went inside to discuss: Rifle Cleaning! A subject steeped in much voodoo and mystique.
Now I admit that I don't like cleaning my rifles until they show an accuracy drop off. And when I do clean them, I will not strip copper out of the barrel. After all, I figure the gun kind of wants it there anyway. Besides, being an engineer type I'm a huge believer in "If it ain't broke, don't fix it." Over cleaning a rifle is far more likely to cause damage and trouble than leaving it alone. IMO.
Caylen cleans out carbon and leaves the copper alone as well. His rifle has 6500 rounds through it and he has never removed the copper and it works great (and it certainly shows in how it shoots).
The AIAW I was shooting is stainless so cleaning the barrel a lot is not very high on my list and I clean my rifle very infrequently. I maybe clean the rifle every few hundred rounds or so at most outside of wiping down the bolt and bolt face which I do more frequently just to get the loose stuff off.
However, fouling can attract corrosion and cause pitting in carbon steel varieties and you probably want to get it out with some milder cleaners using a nylon brush and patches. You don't want to scrub the hell out of the thing and use stuff that will peel skin off your fingers. A simple cleaning regimen is fine and it really is true that "less is more" when it comes to cleaning a rifle.
I use Simple Green and a nylon bore brush to remove carbon fouling from time to time and it will not affect your zero on the "clean bore" shot. I have tested this out myself to confirm. The nylon brush is also soft enough to leave the copper alone and not scratch areas of the chamber or crown that could affect accuracy. If you are storing the rifle for a while, running a light oil, CLP, or other protectant down the bore to prevent rust is a good idea.
While I have used Simple Green with great success, Caylen likes these products as well:
MPro 7 (carbon cleaner, NOT the copper solvent version!)
Slip 2000
Also, muzzle brakes attract a ton of carbon buildup. They need to be cleaned as well, but with great care to not damage the crown when you are doing it.
After this discussion on cleaning, he told the class to not clean their weapon for the rest of the course. Part of this was as an experiment for the students to get away from the overkill cleaning that many people want to do. Also, it was a practical thing because we just spent the afternoon confirming our zeroes and he didn't want anyone messing them up! Again: If it ain't broke, don't fix it. This was fine by me because I wasn't going to clean my rifle anyway.
Pre-Fire/Post-Fire Checklists
Finally, Caylen recommends a pre-fire/post-fire checklist:
1) Is everything tight? Put a co-witness mark on your bolts so you can see if they moved (A dab of whiteout or red nail polish is what he recommends).
2) Anything cracked or wobbly?
3) Is the action smoothly operating?
4) Is your suppressor on tight? He sees a ton of accuracy problems from loose suppressors.
5) Are your sling and bipod attachment points solid?
6) Etc.
Then there is a post-fire checklist:
1) Again is anything loose?
2) Re-torque all bolts every 500rds. with 308. Do it every 200-300 rds. for bigger calibers like .338, etc.
To bring the point home, Caylen went to every rifle with a torque wrench and personally checked the tightness of the sight mounts and other components. As an instructor, he constantly sees rifles coming through with loose components that destroy any chance of good accuracy.
Day 2 - Exterior Ballistics
Today we met at 0800 at a local diner for a class session to get out of the freezing weather. The class was on exterior ballistics. We discussed G1 vs. G7 profiles, bullet shape, air density as it relates to altitude, humidity, etc. and even spin drift. We also discussed the flight path of a bullet from supersonic to transonic to terminal velocity.
Long Range Data
We were given Android tablets to run the Applied Ballistics application using Bryan Litz's data. We entered in our rifle, barrel, sight height over bore, barrel twist, and results from yesterday's chrono session.
With this information, we hit the long-range targets today starting at 400 yards and going out to 1030. The object was to use our ballistic computer to get our elevation and dial it in to target. The ballistics program gave me numbers that closely matched the data I already had on my rifle from previous engagements.
We shot each target spotting our own impacts and correcting. There was virtually no wind. I had first round hits at 431, 495, 560, 611, 674 and 745 yards. I put five rounds on each target.
I had a bare miss at 809 yards on first round and next four were center mass so elevation from the computer was good. The wind picked up and I had to hold one mil right after the first shot splash was seen. At 893 yards I had first round hit center mass but was a little high so I brought it down 0.2 mils away from what the computer told me. All follow-ups were center mass with good elevation.
At 955 yards the computer-generated elevation was too high. It said 10.2 mils and it was more like 9.9 mils. I did my elevation correction plus I held off another 0.5-mil right to get onto target. Follow-ups were hits.
At 1030 yards the computer said elevation should be 11.8, which seemed high to me based on experience. But we were going with the data so I shot and of course it was too high! So I dropped it down to 11.4 and hit to the left of the target with good elevation. I corrected for the wind and put the other rounds on target.
A Competition and a Shoot-Off
After the long-range work we went back to the 100-yard line to recheck our zeroes. We also did consistency drills where we shot 16 times breaking our position each time just as before. But this time, we were playing for prizes...
We did the 16 shots and it was announced the person with the best score would win a PMAG. A hit inside the center 1MOA circle on each colored shape was one point. I had 16 points, a perfect score. One other shooter did the same. That means we needed to have a shoot-off!
The shoot-off target was the smallest of the "Know your limits" dots at the bottom of the Magpul Precision Rifle Target. I'd say it was about a little over 1/2MOA in diameter.
The shoot-off was simple: We were to load our rifles with bolt back and stand behind the guns. A buzzer would activate and we'd have to get into position and fire two shots within 15 seconds at the smallest dot. The person with the best group on the dot would win.
The buzzer sounded. I got down, slid the AI action closed, and established my position. For some reason I felt my hand reach into the thumbhole stock which I virtually never use! The AIAW feels very aggressive when using the thumbhole, like it wants you to hold it and shoot the lights out. I aimed and fired. I then racked the bolt, grabbed the thumbhole, aligned sights and fired again. I opened bolt and made the gun safe. Then the buzzer sounded. I got up with the memory of how awesome the AIAW felt in that grip. The AIAW is solid and all business as you can see below…maybe I should use the thumbhole more often?
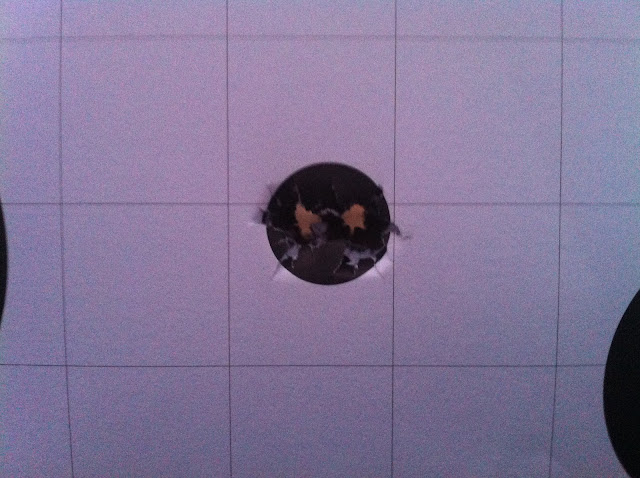
That's about a 0.5MOA group shot in rapid fire in less than 15 seconds starting from a standing position. As a result of this shooting, I won an AR-15 PMAG.
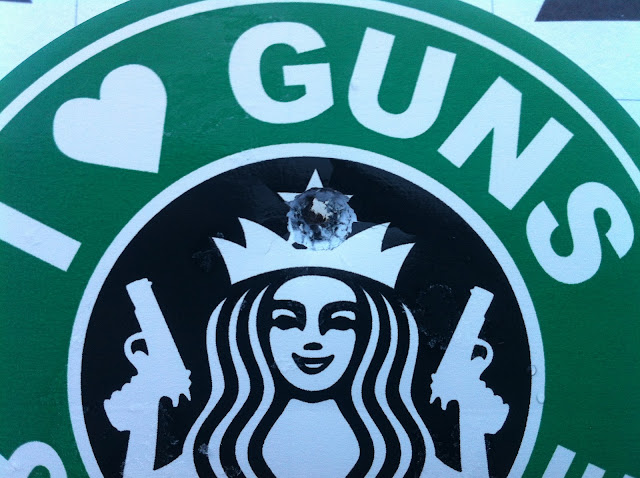
Next up we placed a "Guns and Coffee" sticker on our target. The drill is that all shooters would have 25 seconds to start from standing, go their rifle at the 100-yard line, and fire one shot. That one shot had to be at the star on the head of the Mermaid. The shooter closest to the star won a prize.
I stood. The buzzer sounded. The AI bolt closed. I fired. We walked down range and...I won an AR10 PMAG with this shot:
At this point it was getting dark and class was wrapping up. Tomorrow we were told we will start shooting from barriers at unknown distances and computers are no longer allowed. We will be milling and using our elevation data from non-prone positions.
About the Instructor and Course
Caylen Wojcik's is a former USMC Scout/Sniper and Scout/Sniper instructor. He has seen active combat in the Middle East and received the Purple Heart during his tour. Caylen uses his experience in combat to teach real-world actualities of deploying a rifle effectively.
This course was four days and covered the basics of precision rifle from 100-1000+ yards. During this course we shot in winter conditions with temps ranging from around 20F-35F during the day.
My Rifle
Accuracy International AW in .308
26" Barrel
Single Chamber Muzzle Brake
Nightforce F1 3.5-15X w/Mildot Reticle
USGI Synthetic Sling
AI or Harris Bipod (See why below)
My Reloads
I was using reloads and they shoot sub 0.3MOA from my rifles. Here is the recipe and gear used to make them:
Lapua .308 Brass
175 Sierra Match King
43.5 grains Varget powder
CCI Benchrest Primers
2.80" COAL
Full length resize
Redding competition die and competition bullet seater
RCBS Rock Chucker
RCBS Charge Master
Nothing special is being done with these reloads. They are middle of the road in terms of pressure and velocity and are loaded to spec in terms of brass size, bullet seating depth, etc. I value consistency and reliability more than tweaking my loads for max velocity and this load gives me great performance and great reliability in my rifles.
Day 1 - Intro, Zeroes and Technique
It was about 21-22 degrees when I took off for the shooting area located on private ranchland. The ranch is in the desert region and is sagebrush with large rolling hills. The ranch is on 36,000 acres. That's not a typo!
There were five shooters, including myself, and two instructors. Caylen and the other instructor would teach together the first day. The remaining three days it would just be Caylen. But with only five of us this is an incredibly good teacher to student ratio. Everyone received great personal attention.
First we went over a basic briefing of the course and received a data book from impactdatabooks.com full of information and logging pages. We also received a laminated card deck with information about shooting positions, mil to yards conversions, blank elevation tables, etc. This card deck would be used throughout the course not only as a field guide to proper shooting technique, but also for our own elevation, windage, holdovers, etc.
Next, we went over the rifles, scopes, stocks, etc. that were present. This gave everyone a chance to see different hardware. There were:
2 - Stock Remington 700Ps (or close variants)
1 - GA Precision custom 700 in McRee Chassis
1 - REPR Semi-Auto
1 - Accuracy International Arctic Warfare (AIAW)
All rifles were shooting .308 in either hand loads or Federal Gold Medal Match. The class had all levels of experience from novice to a member of a regional Police SWAT Sniper team.
Firing Positions -- Get Out of Prone!
After a brief intro into what we will cover over the next few days, we went out to the 100-yard firing line. Here we went over the basics of firing positions, breathing, etc. We started off in the prone position, but Caylen was careful to inform us that the course would do more than prone position because he feels it is not realistic with what shooters face in the field. In particular, he thinks prone is good for a couple basic things:
1) Sighting in
2) Load development
He has found that around 95% of the time your shot is not really from the prone position. This is based on his military experience, but for civilian purposes it applies directly to situations like hunting where going prone is often not possible due to field obstacles and losing sight of your game when you drop to the ground. We would use not just prone, but also shoot off obstacles, odd positions, etc. Further, we would not be using shooter/spotter teams because that is also no longer realistic for civilian long range (hunting) or for many police/military applications. He would train us to spot our own bullet splashes and correct our own shots rapidly.
How to Set Parallax and Focus a Scope
We got behind the rifles and the instructors checked our positions and made adjustments. We were taught how to get straight back behind the rifle, good foot position, and eye to scope alignment. My form was already pretty good in this regard so it was more of a review. But for new shooters this adjustment phase is very important to get a consistent position behind the rifle. Accuracy is all about consistency.
The next order of business was to adjust parallax and focus our scopes. Caylen explained parallax and how it can cause serious problems in accuracy as the reticle and focal plane are not aligned. Many shooters have big problems correctly adjusting their parallax and this leads to inaccurate results.
We aimed at a target 500 yards away. The first thing we did was adjust parallax so that the reticle/target did not shift as we moved our head around behind the scope. Once we adjusted so the reticle and target were not moving, we loosened our focus rings and focused the reticle until it was clear. It's two simple steps:
1) Get rid of parallax at 500 yards.
2) Then focus the reticle.
When you do these things, you will have the target focal plane and reticle focal plane aligned accurately.
My scope was already adjusted and didn't need any changing. But it's always a good idea to double-check your gear from time to time to make sure nothing is out of alignment.
New Magpul Precision Rifle Target
Caylen put up the new (but not yet released) Magpul precision rifle targets to get our zeroes. Here is a sample of one that has been shot already:
The target is still going through some modifications. But basically:
1) The triangles up top are for sighting. You aim at each point because it is easier to be precise with aiming at a point than a big round/square blob.
2) The group of four inner pointing triangles is for a Natural Point of Aim drill that I'll discuss.
3) The numbers on the outside are for various drills, but we also used them for a NPA drill.
Zero Rifles
We sighted in the rifles. My final three shots did this (squares are 1 inch):
At this point I tightened the zero stop and turrets, but I left a couple clicks below zero stop just in case I needed it later in the course. I don't want to have to pull the turrets again because each time I do it there is I chance I mess things up or get debris into the turret mechanicals.
Make Your Position, Then Break Your Position
After the sight in we went to a drill that helped us get into position and Natural Point of Aim (NPA), then break it, then get back into it again.
It works like this:
1) Get into position and shoot for the center of number "1" target.
2) Cycle the bolt, put on safe, and back up to your knees behind the rifle.
3) Get back down behind the rifle and shoot for target "2."
4) Do this for all 16 targets.
The objective here is to shoot for the center of each numbered shape, but the shapes do not really have a defined center and they are placed randomly on the target. The purpose is to see if you can get into and out of position consistently and put the bullet more or less in the center. If you are not doing it repeatedly, then the bullet strikes will tell the instructors where you are going wrong (left, right, etc.).
You can see on the full size target I did OK, but miscounted and skipped #3 by mistake! Oh well. The strikes I did have were all in the faint circle (you can't see it from 100 yds.) for the most part.
Natural Point of Aim - Use the Force
This next drill we aligned our sights with the targets with four pointed in triangles. Each one gets smaller from 4MOA to 3, 2, 1. But, we will do it with our eyes closed.
The object here is to get NPA, close your eyes, open them, check for NPA again, then close eyes and shoot! So these targets were shot with our eyes closed. If you do it right the NPA takes care of the rest and you'll be accurate.
The shooting was done very safely in an environment where there is no chance a bullet could go errant and hurt anyone. The ranch again is 36,000 acres with very large hills as backstops behind the targets. With that said, I don't recommend doing this drill unless you have proper instruction.
Let me also add that the difference between an average shooter and a great shooter is their ability to get NPA consistently. It's not what gear you own, what rounds you shoot, what videos you've watched or anything of the sort. It's about getting into a good position, getting solid NPA, and pressing the trigger consistently each time. I have done marksmanship instruction and we focused a lot on NPA as a basic skill. Within an afternoon, you would see very average shooters who couldn't hold 4MOA at 100 yards go to 1MOA to sub-MOA shooters even with very modest equipment. Technique trumps gear in almost every case. If you can't get NPA, you will shoot poorly.
Now, here's a three shot group I did with my eyes closed at 100 yards. This is an example of what good NPA can do. My other groups were acceptable (sub-MOA), but I had two fliers simply because my finger was freezing staying on the steel AI trigger with temps still in the 20s and no gloves!
Chronograph
After the NPA drill we chrono'd our rounds with a MagnetoSpeed. My rounds were as follows from my 26" 1:12 twist barrel:
Max Velocity: 2683
Min Velocity: 2653
Average: 2670
Standard Deviation: 12
The standard deviation of 12 is pretty well in line with what I get with Federal Gold Medal Match. It's perfectly fine for this kind of shooting. Velocity was within margins as well. Varget powder is temperature stable and cold wasn't affecting it.
Rifle Cleaning
We next went inside to discuss: Rifle Cleaning! A subject steeped in much voodoo and mystique.
Now I admit that I don't like cleaning my rifles until they show an accuracy drop off. And when I do clean them, I will not strip copper out of the barrel. After all, I figure the gun kind of wants it there anyway. Besides, being an engineer type I'm a huge believer in "If it ain't broke, don't fix it." Over cleaning a rifle is far more likely to cause damage and trouble than leaving it alone. IMO.
Caylen cleans out carbon and leaves the copper alone as well. His rifle has 6500 rounds through it and he has never removed the copper and it works great (and it certainly shows in how it shoots).
The AIAW I was shooting is stainless so cleaning the barrel a lot is not very high on my list and I clean my rifle very infrequently. I maybe clean the rifle every few hundred rounds or so at most outside of wiping down the bolt and bolt face which I do more frequently just to get the loose stuff off.
However, fouling can attract corrosion and cause pitting in carbon steel varieties and you probably want to get it out with some milder cleaners using a nylon brush and patches. You don't want to scrub the hell out of the thing and use stuff that will peel skin off your fingers. A simple cleaning regimen is fine and it really is true that "less is more" when it comes to cleaning a rifle.
I use Simple Green and a nylon bore brush to remove carbon fouling from time to time and it will not affect your zero on the "clean bore" shot. I have tested this out myself to confirm. The nylon brush is also soft enough to leave the copper alone and not scratch areas of the chamber or crown that could affect accuracy. If you are storing the rifle for a while, running a light oil, CLP, or other protectant down the bore to prevent rust is a good idea.
While I have used Simple Green with great success, Caylen likes these products as well:
MPro 7 (carbon cleaner, NOT the copper solvent version!)
Slip 2000
Also, muzzle brakes attract a ton of carbon buildup. They need to be cleaned as well, but with great care to not damage the crown when you are doing it.
After this discussion on cleaning, he told the class to not clean their weapon for the rest of the course. Part of this was as an experiment for the students to get away from the overkill cleaning that many people want to do. Also, it was a practical thing because we just spent the afternoon confirming our zeroes and he didn't want anyone messing them up! Again: If it ain't broke, don't fix it. This was fine by me because I wasn't going to clean my rifle anyway.
Pre-Fire/Post-Fire Checklists
Finally, Caylen recommends a pre-fire/post-fire checklist:
1) Is everything tight? Put a co-witness mark on your bolts so you can see if they moved (A dab of whiteout or red nail polish is what he recommends).
2) Anything cracked or wobbly?
3) Is the action smoothly operating?
4) Is your suppressor on tight? He sees a ton of accuracy problems from loose suppressors.
5) Are your sling and bipod attachment points solid?
6) Etc.
Then there is a post-fire checklist:
1) Again is anything loose?
2) Re-torque all bolts every 500rds. with 308. Do it every 200-300 rds. for bigger calibers like .338, etc.
To bring the point home, Caylen went to every rifle with a torque wrench and personally checked the tightness of the sight mounts and other components. As an instructor, he constantly sees rifles coming through with loose components that destroy any chance of good accuracy.
Day 2 - Exterior Ballistics
Today we met at 0800 at a local diner for a class session to get out of the freezing weather. The class was on exterior ballistics. We discussed G1 vs. G7 profiles, bullet shape, air density as it relates to altitude, humidity, etc. and even spin drift. We also discussed the flight path of a bullet from supersonic to transonic to terminal velocity.
Long Range Data
We were given Android tablets to run the Applied Ballistics application using Bryan Litz's data. We entered in our rifle, barrel, sight height over bore, barrel twist, and results from yesterday's chrono session.
With this information, we hit the long-range targets today starting at 400 yards and going out to 1030. The object was to use our ballistic computer to get our elevation and dial it in to target. The ballistics program gave me numbers that closely matched the data I already had on my rifle from previous engagements.
We shot each target spotting our own impacts and correcting. There was virtually no wind. I had first round hits at 431, 495, 560, 611, 674 and 745 yards. I put five rounds on each target.
I had a bare miss at 809 yards on first round and next four were center mass so elevation from the computer was good. The wind picked up and I had to hold one mil right after the first shot splash was seen. At 893 yards I had first round hit center mass but was a little high so I brought it down 0.2 mils away from what the computer told me. All follow-ups were center mass with good elevation.
At 955 yards the computer-generated elevation was too high. It said 10.2 mils and it was more like 9.9 mils. I did my elevation correction plus I held off another 0.5-mil right to get onto target. Follow-ups were hits.
At 1030 yards the computer said elevation should be 11.8, which seemed high to me based on experience. But we were going with the data so I shot and of course it was too high! So I dropped it down to 11.4 and hit to the left of the target with good elevation. I corrected for the wind and put the other rounds on target.
A Competition and a Shoot-Off
After the long-range work we went back to the 100-yard line to recheck our zeroes. We also did consistency drills where we shot 16 times breaking our position each time just as before. But this time, we were playing for prizes...
We did the 16 shots and it was announced the person with the best score would win a PMAG. A hit inside the center 1MOA circle on each colored shape was one point. I had 16 points, a perfect score. One other shooter did the same. That means we needed to have a shoot-off!
The shoot-off target was the smallest of the "Know your limits" dots at the bottom of the Magpul Precision Rifle Target. I'd say it was about a little over 1/2MOA in diameter.
The shoot-off was simple: We were to load our rifles with bolt back and stand behind the guns. A buzzer would activate and we'd have to get into position and fire two shots within 15 seconds at the smallest dot. The person with the best group on the dot would win.
The buzzer sounded. I got down, slid the AI action closed, and established my position. For some reason I felt my hand reach into the thumbhole stock which I virtually never use! The AIAW feels very aggressive when using the thumbhole, like it wants you to hold it and shoot the lights out. I aimed and fired. I then racked the bolt, grabbed the thumbhole, aligned sights and fired again. I opened bolt and made the gun safe. Then the buzzer sounded. I got up with the memory of how awesome the AIAW felt in that grip. The AIAW is solid and all business as you can see below…maybe I should use the thumbhole more often?
That's about a 0.5MOA group shot in rapid fire in less than 15 seconds starting from a standing position. As a result of this shooting, I won an AR-15 PMAG.
Next up we placed a "Guns and Coffee" sticker on our target. The drill is that all shooters would have 25 seconds to start from standing, go their rifle at the 100-yard line, and fire one shot. That one shot had to be at the star on the head of the Mermaid. The shooter closest to the star won a prize.
I stood. The buzzer sounded. The AI bolt closed. I fired. We walked down range and...I won an AR10 PMAG with this shot:
At this point it was getting dark and class was wrapping up. Tomorrow we were told we will start shooting from barriers at unknown distances and computers are no longer allowed. We will be milling and using our elevation data from non-prone positions.
Last edited: