• Watch Out for Scammers!

    We've now added a color code for all accounts. Orange accounts are new members, Blue are full members, and Green are Supporters. If you get a message about a sale from an orange account, make sure you pay attention before sending any money!

My reloading journey officially begins... 6.5CM

sissupr

Supporter
Supporter
Full Member
Minuteman
Mar 7, 2019
470
103
Las Vegas
Tonight I was ready to prime my first set of prepped brass. Once fired from my REM 700 5r and Ruger RPR in 6.5 CM. I totally forgot to separate at the range, but for all intensive purposes I just want to load my 1st reload (does that make sense lol)...

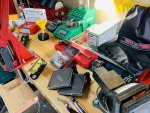
Gathering my tools and consumables has taken about two months. Still changing things as I go. I’ve already changed out my hornady LnL for a Co-Ax, and I haven’t even finished my first reload! I’m pretty sure there will be a ton of changes to come. Still waiting on my Chargemaster, GemPro 250, and Dandy Auto trickler.

C54DF2E6-D6B3-43F0-A50B-5FAC8ED2C783.jpeg


I’m going to keep this thread live as a history of how much freaking money and time I’ve spent on this journey/new found hobby. I’ll be posting my full list of everything I’ve bought, how much I spent (new/used) and what I’ve changed out and why. Hopefully this will help out any one else crazy enough to go down this rabbit hole. J/K, it’s been a great learning experience thus far.

I actually think I like reloading better then actually shooting... crazy! So addicting learning something that was totally foreign to me a couple months ago. I’ve never reloaded and not even sure why I started to be honest, but I’m so glad I did...

Here goes...

- decapped w/Lee universal decapper die
- annealed - DIY annealer
- sized w/Hornady custom die (waiting on my Forester die set)
- trimmed to 1.915 w/Crow Gunworks tool
- reamed/cleaned out primer pockets
- reamed/cleaned out flash holes
- chamfered/deburred the case mouths
- wet tumbled in my Harbor Freight tumbler w/Lemi shine & dawn
- air dried overnight and heated up with a heat gun for a couple of seconds to make sure all moisture was gone from the inside of the case
- Prime with Co-Ax
- Check primer seating visually and with Wilson gauge
- Check overall length again 1.915 (my target)

Now to impressions and questions.

- Co-Ax for priming, setting it up was key. The pocket had to be aligned with the three plates and ensure it pushes the plunger high enough to seat the primer. I had 3 / 6 that wouldn’t seat right. After I adjusted the travel (screw by the jaw plates), the 3 set screws, and oiled the plunger spring, it was mush better ‘feel’. I’ve never done this before, so it was definitely a learning experience.

Questions.

1. So 2 of the 14 I primed seemed to have primer flash between the plunger and the primer, so when I seated the primer.. the primers were damaged. See pic,

6CCDC79B-409B-46AF-A5C1-67FBAA5806BF.jpeg


How does this happen? Is this common in general?

2. One case was significany longer than 1.915 target see pic. It’s passed the max end of 1.920. My question is... if I wanted to trim a case that is already primed is it a bad idea since the shaving will definitely get caught in the case body. Do you guys de-prime first and then trim, or is it ok to trim a primed case and just clean out. I’m assuming NO.


431364DE-7002-428D-8A8E-2F62A9FA800C.jpeg
 
Last edited:
You have marks on your primers from pushing on them with too much force. The case that is over on length put a x on it with a sharpie marker and shoot it. Then trim it next time.
 
^
That’s the reason lol. So my wife walks in and I said, ‘hey want to try one’... of course easy as pie for her. I was like beginners luck wtf.

Didn’t think about it, but I remember in the beginning when these happened, first 6 I tried this issue came up and I was definitely using more force. Once I got a good ‘feel’, didn’t happen again. Good to know and thank you.

2nd point. Thanks, I marked it with a big ass ‘T’. Shouldn’t be able to miss it. Probably will still, and wonder why the bolt doesn’t close at the range... genius over here!
 
This will be an interesting thread. But I'm concerned you're taking on too many steps for your first go at reloading. Doing a manual case anneal may have compromised your brass integrity. Using the wet tumble method you need to make absolutely sure there isn't any moisture inside the case.

Do you have any once fired brass that you haven't processed yet?

For best accuracy/precision you'll want to keep brass separate for each rifle.
 
Those marks on your primers are from small shavings of brass that come off the brass when seating the primers. I keep a can of air on hand and every few cases blow out the primer seater. Those primers will still work just fine.
 
^
Thanks for your reply shtrdy.

Annealing: I made sure to not anneal for too long (right when orange flame starts, and nothing past 3-5 seconds). I didn’t use tempilaq to make sure, but I was pretty sure when to pull out (that’s what she said!)... no glowing orange, and not enough to have the heat move down the case for that period of time

Wet tumble: I dried upside down and heated for couple seconds with a heat gun. I let sit upside down for 3 days... I don’t have my dispenser yet, but regardless I was going to let dry for at least 24h

Fired brass: no, did all 100 pcs I had all once fired by my rifles

Separating: the other 84 pcs are separated... for my RPR and Rem. When I first shot my first box of ammo, I didn’t realize I wanted to reload, hence this was a mix bag, literally. But I know I should keep separated going forward... and have the rest separated currently.
 
Last edited:
Those marks on your primers are from small shavings of brass that come off the brass when seating the primers. I keep a can of air on hand and every few cases blow out the primer seater. Those primers will still work just fine.

Gotcha, smart. I check the plunger every time now before I prime.
 
If your clothes dryer came with a removable rack you have my preferred method of drying wet tumbled brass.

I set brass on a towel on top of the rack and run it for an hour at the highest heat setting.
 
Some updates.

Got most of my equipment.

Loaded my 1st 38 rounds. 18 for my RPR and 18 for me Rem 5r. Every .2 grains from 36.8-42.0 with H100v w/ELD-x 143.

Ogive for both set back 0.04 from the max COL for each rifle. They are different of course. This was definitely a learning experience! I wouldn’t trade it for anything. Learning so much about what I like, what I need, what I want to do and what I can do without for now. Loads were done in to find the right node area for both rifles and the fine tune it from there for the 2nd Load for both the right Load weight and adding in neck turning via 21st century power lathe. Need a gauge tool to check the neck thickness and concentricity gauge for the neck tension. Figure I could hold off on those purchases until my 2nd Load when I fine tune the weight.

More to come.

Some pics of my current equipment. Things are going to change again for my next load.

EA743818-1166-4379-86A9-2C77CFC6DB74.jpeg


Don’t like the GemPro and 1500 combo w/Dandy Trickler. Just slow IMO, works though. Going to upgrade to a Fx-120i combo (thrower and trickler) from CE. I think it will be worth the time I will be saving from dropping the charge, moving it to the GemPro, trickling up, etc. plus the GemPro seems to drift here and there. I recall and zero after 5 loads to make sure now.
 

Attachments

  • 9C0419E6-66C8-4022-953D-C402C6015A40.jpeg
    9C0419E6-66C8-4022-953D-C402C6015A40.jpeg
    652.1 KB · Views: 37
Last edited:
You got a good attitude, and that goes a long way, but I think you're gonna get burned out with all those steps. IMO...
- Deburring the flash holes is a good idea on the first load. After that you can skip this step. ...And don't go overboard. You're just removing burrs, not "reaming".
- Instead of cleaning primer pockets each time, you may consider running them through a uniformer the first time, then skipping that step afterwards. Some say that cleaning primer pockets is completely unnecessary in any scenario, possibly even more so in your case. -- If you're wet tumbling with the primers out anyway, cleaning primer pockets separately seems redundant.
- Cleaning: I personally clean them before resizing to keep junk out of my dies, but then again, I shoot a lot of ARs and shoot them suppressed. My brass is dirty.
- Annealing. Cool DIY job, but looks like it may not scale well (meaning the more you do it, the bigger pain in the ass it will become). You may consider Salt Bath annealing, and doing so only every second or third load.
- Priming. I just like a simple hand tool from Hornady or RCBS. It's pretty obvious when there's something wrong with the case -- you should know somethings up long before you push so hard it damages the primer.
- Trimming. I use the Little Crow WFT as well, and I love it. However, it indexes off the shoulder so if you're trimming brass in various conditions, shot from different rifles, it may not be very consistent, especially if your sizer is not bumping the shoulder. -- All the more reason to keep your brass separate, including separating by # of fires for a given rifle.
 
  • Like
Reactions: sissupr
? on salt bath annealing!!! You actually know what the temperature is.
IMG_20190422_1506383.jpg
IMG_20190422_1507044.jpg


For powder, I use a Lee Perfect Powder Measure and tune it to be about .2-.5 grain low, then trickle up to my desired charge. Throwing a charge takes maybe 30 seconds at maximum. Lately I've been tuning it to see how close I can get. Many times I can get it to dead on or off by +/- .1-.2 grains.

3 granules of H4350 is .1 grain BTW......
 
  • Like
Reactions: sissupr
Unless you have a neck turn chamber, I've found NT makes no discernible difference on paper or chronograph. Some may differ with this. I thought it would help with consistent neck tension but could never measure the difference anyway. The concentricity gauge will tell you about runout. If it is an issue, it can be tough to diagnose. If it's not, you'll probably never use it again - unless an occasional check. My .02...
 
Last edited:
  • Like
Reactions: sissupr
^
Appreciate the comments above. Taking all of that into consideration for what is the best processes base on my end goal, expectations, etc. Not even sure what that is, or maybe there’s isn’t one!

Equipment update.

Sold

- RCBS Chargemaster, GemPro 250, and Dandy Autotrickler
- Redding 2 and Redding manual trickler 5
- Lee hand priming tool

Purchased

- FX-120i autotrickler and powder throw purchased from Cambridge. Good guys over there! Can’t freaking wait for this to arrive!
- Forster Universal Bullet removal die and .264 collect. Using a hammer style extractor is a pain for a lot of mistakes lol.

Next up

- 21st Century neck turning powered lathe kit
- Neck thickness gauge - Recommendations?
- Concentricity gauge - Recommendations?

Future upgrades to the madness

- Salt bath, Bench Source, or Annealez...

Enough for today, back to work.
 
Save the money and dont bother with the neck turning, or concentricity gauge. Unless you know youll need to turn necks they wont do you much good and only lead to excessive working of the neck. For most people the concentricity gauge is a use once, realize youre doing just fine in that department and then get stored away to never be used again situation.

Instead of a "thickness gauge" which usually has a stand etc I would just get a micrometer. I use a cheap rcbs vernier ball micrometer I got for 50 bucks and it works great.
7066967
 
^ok, I’ll take that into consideration. God knows I should stop spending money!

Update on my journey.

- I loaded a total of 38 cartridges, 18 for my RPR and 18 for my Rem700. For whatever reason when I set the ogive length 0.04 off the lands I mistakenly inverted one of the numbers and seated the bullets... lol.

0D616AE4-9902-4073-A13B-F73DC13F5D43.jpeg


- ordered a Forster universal bullet puller and .264 collet. My impressions is that it works well, but it’s definitely a feel thing with how much to close the collet to ensure you’re hitting the case neck. After about 3, I got a good feel for how much to tighten to not mar the bullet. Definitely trial and error... nice to know that I did put powder in each case, even though this was mistake.. it was actually good to learn another process, because it will happen again. Hopefully not for bullet depth!

AF2F14E4-1167-4314-9CC8-1F26A5D7438B.jpeg


94015709-FAB7-427F-9F19-63D1F59581C9.jpeg


B3745EDA-98B4-49E7-8310-C4C74FBA4E26.jpeg


- My V3 showed up as well this week. I read a ton of reviews and for where I usually shoot (busy typically with other shooters in to the left and right of me)... I went the V3 route.

139EE548-D2E4-44C2-9E89-DB06F9606C70.jpeg


Got a good deal at $250 shipped. Figured I could just order a labradar and compare them myself after some experience with the V3. I was pretty impressed with the feel of the Chrono, thought it would ‘feel’ cheap if that makes sense. Definitely some weight to it. The display and menus are pretty straight forward... looking forward to trying this out in a couple of weeks after I re-reload the last 18 rounds again for the Rem.

*Fx-120i setup should be delivered in a couple of weeks. Can’t freaking wait...

Happy Sunday!
 
I load for fun not for necessity so speed, or lack there of, doesn’t bother me. I’m proficient with the setup I have. If you set your mind on speed you are going to fuck something up believe me. And that fuck up may be multiple things with multiple cartridges. The autotrckler you ordered is awesome buy finicky, IMO. You need to ay e a place you can set it where not dust, vibrations or anything else can disturb it. That being said I have 250 glass test tubes I keep filled in case I need to load in a pinch for a match.
 
Updates. Did a couple of loads:

- ladder test for both rifles
Rem 700 5r 22”
RPR w/24 LRI barrel

Hybrid 100v
Hornady 143 ELD-X
Winchester Magnum LRP - this was all my LGS had at the time.
Hornady brass fired once from each rifle and separated.

BE4D6D6D-C417-47F0-A4CE-87B4E2619EA6.jpeg


Raw data

CC6F1561-0901-4748-A1A4-45DD26C22B25.jpeg


- additional load passed the ladder test to find potentially higher node since there were no signs of pressure issues

E21C6698-6514-4C66-9021-CEFAA2B0699A.jpeg


Now I’m looking for recommendations on my 3rd Load.

Not sure if I should continue working up on the charge weight and see if there’s a higher node or stay within the highest nodes I currently have... no pressure signs on any of 42g charges on either rifle load. No ejector marks on the bottoms, all look good so I’m wondering what to do next for my 3rd Load.

Notes/other info.

- Load 1, 1x fired brass
Rem ogive 2.2125 (.040 off lands)
RPR ogive 2.226 (.040 off lands)

Had issues with magazine loading. So backed off the lands some more for Load 2.

- Load 2, 2x fired brass
Rem and RPR ogive 2.200

Kept the measurements the same for both rifles to make it easier, since the difference was minimal and negligible for what I’m trying to achieve at this point.

- Load 3, I will use 2x fired brass
Rem and RPR ogive 2.190 (had one cartridge from Load 2 that wouldn’t load from the magazine).

All brass annealed before running through my Forster FL resized

All brass trimmed to 1.915

All bullets seated using Forster micrometer seater die

Load 1 and Load 2 were shot on two different days with relatively the same temperature ~55 degrees C. I didn’t take any other readings. What else should I note and what app do you guys use? Just weather.com lol.

Load 1 I used a RCBS Chargemaster and GemPro 250 scale for powder measure.

Load 2 used Fx 120i and AutoTrickler V2

I’ll post the groups tomorrow. All within 1” MOA from 100yds, except for one group which was at 1.20”. Best group was with my RPR at 42.0g 2 shot group 0.40 MOA. Yes I said 2 shot, I was zero’n in at the same time with the first 3 out of the series and ran out of damn ammo lol of course. I know doesn’t count... but I’m going to run 42.0g again, I have a feeling that’s the area I need to fine tune, at least for the RPR.

- Magnetospeed V3 is nice, but IMO a pain to hookup back and fourth if you’re testing multiple rifles with that strap. I ordered a Labradar to see if this is just easier in general.

Open to recommendations and comments. This is all new to me, so please chime in!
 
Last edited:
May want to research and try some different powders? So far it looks like your development has been focused on one powder, but there are usually several which would be applicable and you will likely find significant differences working up ladders.
 
  • Like
Reactions: sissupr
I would go higher just to see what the max is, then back off from there. My guess is there is another node over 2800.

And just an fyi Hornady uses 41.1gr of H100v pushing a 140gr HPBT for its American Gunner ammo and my R700 shoots sub moa groups all day.

Looking at your graph that might be a sweet spot for you also.
 
Last edited:
  • Like
Reactions: sissupr
^
Thanks. I didn’t know that about American Gunner. Good info sir.

As for Load 3. I loaded this last night.

Rem 700 and RPR
42.0, 42.3, and 42.6

I can pull the bullets if someone feels it may be a waste and just stop. Ultimately I’m probably only shooting out to 2-300y max, just based where I’m located. What’s my goal, just target and bench shooting and having fun developing loads for whatever powder is readily available by me... which is typically H100V, RL16 and 17.
 
Last edited:
Wow. You've definitely gone whole-hog into getting top-rung equipment right out of the gate! With that in mind, I noticed a couple of things that may or may not be changed.
  • I saw plain ol' Winchester primers in one of the first photos. If you're going to go for the best, use match primers such as Federal 210M or CCI BR2.
  • I am personally very skeptical of digital calipers. Every one I ever used gave inconsistent readings. My long-time friend and well-known gunsmith uses dial calipers exclusively, and his best one is from Brown & Sharpe. I got one of those and learned my lesson - good tools matter, and last pretty much forever.

I read with interest your description of using the collet bullet puller. My rifle-loading "mentors" all use inertial pullers because of the bullet-deformation issue, so I do too. Looks like you figured it out.

The deformed primers... my experience is dents like that are caused by some kind of trash (brass slivers) on the primer seating punch.

I'll be watching this thread - I'm curious as to whether using the best equipment as you're doing makes enough accuracy difference to me to be worthwhile. What's good enough to me isn't going to be sufficient for a lot of members here.
 
Quick update.

Sold the Magnetospeed V3 and picked up my Labradar.

92C386E1-47E8-41C8-BAED-A1092050BA39.jpeg


Went crazy with trying to find the right tripod that was sturdy enough. There was a review for a Manfrotto tripod, but it was too narrow IMO so I went with this one...


For $32, it’s rock solid and the base is really wide and low. I’m really happy with this purchase.

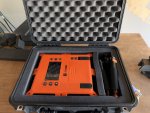
Also found a Pelican 1500 case locally that I modified the foam to fit the Labradar, battery pack, cable, and tripod. The case is deep enough, I may reposition it so I can add a firearm in there as well.

Lastly, my upgraded V3 board for my Fx-120 setup shipped today. Ordered on 5/28 for reference directly from AutoTrickler.com.

Now to my load development.

I reloaded up another 10 rounds of Hybrid H100v at 42.0g with the same configuration for both my RPR and Rem. I fell like that is the right around the sweet spot for both. I want to see how they group along with the chrony numbers... I’ll be using the labradar, so I’m curious how different the reading will be. I know I’m not shooting at the exact same conditions, etc.... but just curious.

I’m starting a new load with H4350 w/CCI 200, and Hornady once fired. I’ll be loading COL 2.800 starting at 40.5g, up to 42.4 with 143g ELD-X (RPR) and 147g ELD-M (Rem)

Going forward with this load development for H4350, I’m not going to FL resize... I’m going to purchase a Forster bushing bump die with .292, 290, and .288 bushings.
 

Attachments

  • 3A000F52-C1C5-4868-A5B0-0AC56B0677A2.jpeg
    3A000F52-C1C5-4868-A5B0-0AC56B0677A2.jpeg
    638.8 KB · Views: 26
Last edited:
Whenever I shoot with my Magnetospeed V3 on, and my brothers Labradar right next to it, they show within 1 fps of each other. They're both exceptionally accurate. The Labradar is definitely more finicky with respect to placement, but can be handier when shooting multiple rifles.
 
  • Like
Reactions: sissupr
^
Thanks for the info. I usually take both my rifles with me and switching out the magnetospeed was annoying IMO. With that said, it works and the controls are straightforward. No complaints.
 
RPR: H100v, 42g, Winchester Magnum LRP, 143g ELD-X, Hornady 1x fired, COL 2.835, Ogive 2.190

8 shots, 2 groups
Ave velocity: 2790

First time using the Labradar, so I had some setup issues with making sure it was armed, facing properly, etc... learning how to use it. In comparison, the magnetospeed is easier to get going the first time vs the labradar.... but I feel the lab will be better long term.

Here are my stats, groups, and brass. Had a couple ejector swipes, and one brass that had a bit of ejector brass metal.

52F09BFA-1619-4F30-B921-02ECA2225D16.jpeg


A6000DC0-D314-4441-A2BB-B0361CD7814E.jpeg


18EEAA2D-B42A-4D58-87D6-CA8DE44F4F89.jpeg


83885780-626A-4262-B120-BC8D46BAFE05.jpeg


143147ED-F156-4F97-97CF-2CA19D8238F4.jpeg


5512E28A-ED5F-4E34-B4C2-8F349BC5E402.jpeg

Temp shooting was 85 deg, no humidity. When I did the ladder testing it was about 50 deg. Curious if what you guys think... should I back off to 41.8g to play it safer just in case I’m in hotter climate.

Questions for H100v Load

1. Back off to 42.8g or lower?
2. What can be causing my SD and spread to be so bad IMO? What can I change or pay attention to better?

Ladder for H4350

RPR: H4350, 40.5-42.4g, CCI 200 LRP, 143g ELD-X, Hornady 1x fired, COL 2.800, Ogive 2.160

41F9D8A9-DAFF-4C68-A70B-676F342FB331.jpeg


9CE5BEC7-3E5C-4A30-A3CF-A2EC1918BA0E.jpeg


Here is the ladder test for H4350 from 40.5-42.4. Not sure what happened to 41.8 on the Labradar. I noticed on 42.4 the crater a bit more, cause for concern... or ok? Where should I fine tune for the next load?
 
What are you looking for in this test?
What made you decide on starting charge and to go in .3 incriments?

Also why are you using multiple charges for hi, low, ave, sd, es?
 
Last edited:
^
Ladder test: looking for the flat spot essentially for H4350.

I used .3, because i didn’t have enough brass to go .2 increments at the time.

Disregard the averages... that was default calc from the labradar
 
I didn't see your original SD's and ES's but I have seen those go South with 30-40 degree temp changes - even with supposedly temp stable powders. My area sees temp swings of about 70 degrees so I've developed loads that are fairly consistent for that bottom 35 and top 35 and they ended up being within a grain and a half of each other. Shooting one or the other in the unfavorable temp conditions makes my ES go to around 35 and SD about 20 so it's doable but not ideal. The cold weather loads do better in hot temps than the other way around...

I've yet to find an H4350, RL 16 or 17 node that performs identically at both extremes but all give very good accuracy even in the adverse temps and with crappy ES and SD's. BTW, the RL 17 doesn't average very much more deviation than the other powders I've used that are supposed to be much more temp stable. Perhaps, all of this has something to do with my ammo coming from an ammo box from my shooting bag and not sitting out for long periods freezing or baking in the sun. I do see differences shooting in the extreme temp ranges though. Just my .02...

Edited. - Your latest ES and SD are either faulty readings or huge differences in powder charge or neck tension. Something is very inconsistent.
 
Well, it’s been a while!

A lot of changes and I’ve sold my 6.5 Ruger and R700... bought and sold my first custom action (Defiance Elite) 6CM... and ended up with this rig...

Impact Action 737
TS Custom 26” Heavy Palma X-Caliber 25 CM
Jewel trigger
APA LB
KRG Bravo Chassis
Vortex Razor Gen 2

Why did I go from Defiance Elite — Impact, ease of swapping barrels at home. I could of utilized a LGS and ordered new barrels, but the cost of that vs. finding an impact action in the classifieds (ala used) was the deal breaker. Should have done my research, but it all worked out in the end. The impact action feels AMAZING and I know it was the right choice for me...

I’ve changed stocks so much to come back to a Bravo. The MPA Comp was nice, but just didn’t fit me well. My Foundation was great, but I felt it was an overkill (money wise) for what I do, and the MDT ACC felt good, but with adding all the accessories (weight kit for example) it was pricey as well.

The Bravo with the spigot, arca rail, and adjustable butt plate is everything I need. In terms of adding weight, there’s room in the forend and in the grip for a DIY job. Overall this is my 3rd KRG stock, and they are just well priced and hold their value well IMO.

And yes, I had to modify (remove some material) the trigger hangers area of the Bravo to make it fit and find a flat head screw to get rid of the wobble. It’s fits so well and I’m very happy with the Impact Action / KRG Bravo setup!

Started loading my first rounds and will report back soon... cheers!

B46420F7-5634-4EE1-A034-3B06E23C7237.jpeg


8D4E8A4C-CDA6-4FFD-ADB0-4CB4738D58BD.jpeg


D4F5B80D-803C-411E-B4B1-66C85E3AECD6.jpeg


1E8F812A-06C8-40D6-9ECE-8A30B478C9AE.jpeg
 
Last edited:
Sounds like you've had a busy year. Let us know how she shoots when you get some more range time in.
 
  • Like
Reactions: sissupr
Thinking of pairing a 737 with the KRG Bravo as well. Any advise on modifying the bravo? Also what is the wobble you are talking about?
 
  • Like
Reactions: sissupr
Been out of the game for 6 months or so. Now settled in Vegas and will be getting back into all of this... out of Comicalifornia!

There's a thread in Snipershide about the bravo and 737. There is some shaving/dremel around the action screw. I can't find a pic on my phone.
 
Been out of the game for 6 months or so. Now settled in Vegas and will be getting back into all of this... out of Comicalifornia!

There's a thread in Snipershide about the bravo and 737. There is some shaving/dremel around the action screw. I can't find a pic on my phone.
Yeah I found one that people were talking about it. Just guesses on what needed to be done, not someone who had actually done it. From what that said it doesn’t seem like it would be all that hard