• Watch Out for Scammers!

    We've now added a color code for all accounts. Orange accounts are new members, Blue are full members, and Green are Supporters. If you get a message about a sale from an orange account, make sure you pay attention before sending any money!

Gunsmithing Need to "fix" the threads of my barrel (improperly machined.)

bm11

Gunny Sergeant
Full Member
Minuteman
Jun 18, 2010
2,562
13
40
Maine
Ok,

Without naming names, I sent my Lilja barrel for my CZ 455 to a well regarded smith here on the hide to be threaded for my Sparrow. When I received it back, my Sparrow would not thread all the way to the shoulder. I did a bit of research and it turns out he made a common mistake- he threaded it to AR-15 spec 1/2x28, which leaves the threads about .500" long, where most .22 suppressors call for .400". I felt a bit like he should have known better, I did tell him that I would be threading on a Sparrow, but hey, mistakes happen, right?

So I sent the barrel back to him, this time including the specs that Silencerco supplies on their site. Plug it all into the CNC machine, and nothing could go wrong, right? Well, not exactly. I get it back, and now the thread protector I paid $40 for no longer evenly mates the barrel. This would suggest to me that either it or the barrel are not threaded concentric, but I thread my can on, and it by looking down the barrel, concentricity is good. However, the suppressor STILL doesn't thread all the way to the shoulder.

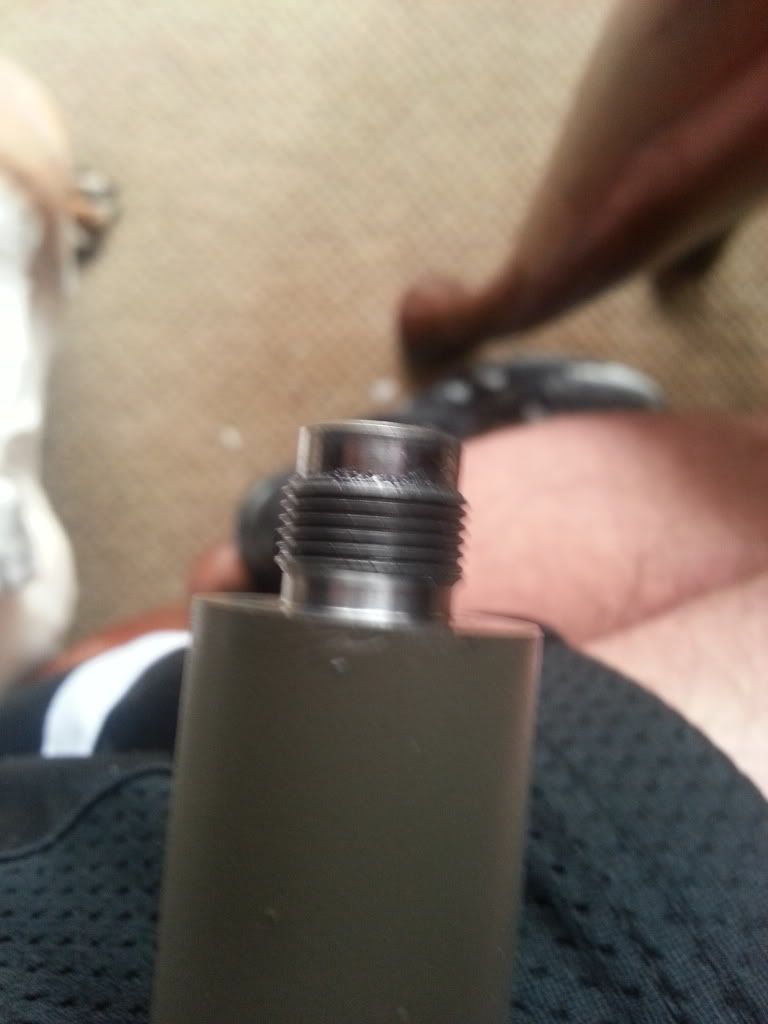
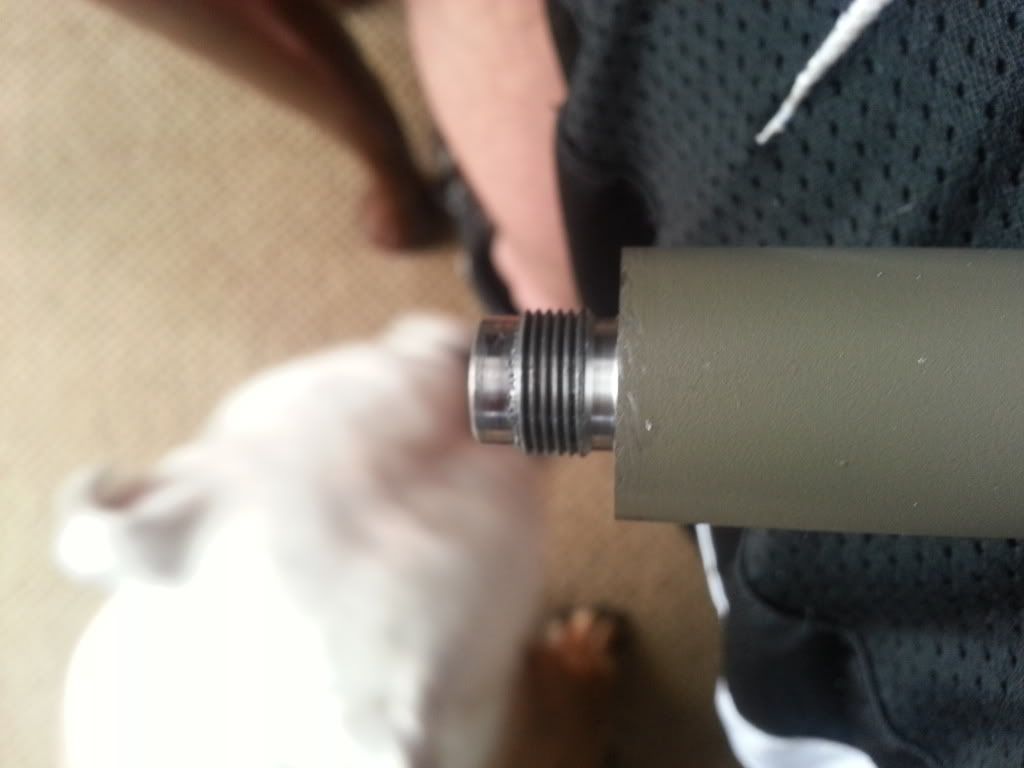
I borrowed a tap to clean up the suppressor threads, didn't help, upon close examination I can see that the threads are actually "closed" on the muzzle, where the threads meet the relief cut. Something about the way the machine cut the threads caused a thread impingement that does not allow the suppressor to thread past the threads into the relief. It can be seen with the eye, though difficult to photograph. I confirmed by reversing my thread protector and threading it on, it also gets hung up.

So $250 later, I still don't have a functionally threaded barrel. I don't really want to send it back to the smith, twice seems enough, and based on the shit fit of the thread protector, I am not overly confident in the machine work of this smith. Hell, I'm relatively pissed I have this much tied up into a thread job that still isn't done right when plenty of places advertise thread jobs for $70, but being pissed won't fix it.

Can I clean the threads up with a die? I believe I need a "class 3" die. Could someone link me one? Or do I need to send it out a third time?

Thanks,

-Bob

Edited to add a photo. You can see where the relief cut meets the threads and the threads to not continue into the relief.
20130221_081333_zpse70c8401.jpg

20130221_081353_zps3946ba40.jpg
 
Last edited:
That die will work....as will any other 1/2-28 die. That particular one is adjustable (hence the slice and the cross-bolt), which can allow the user to slightly alter the pitch diameter of the threads it cuts.

In machinist terminology, there are "classes" of threads which describe the size of the pitch diameter. A class 3A thread (which is commonly prescribed for male muzzle threads) calls for the largest permissible threadform, allowing for a tighter threadfit. The differentiation between a class 2A and 3A can be as small as .0005", and can not be held via a multi-point cutter such as a die.

So, you can run a die down the muzzle threads and call it a day, but you may end up cutting more (a lot more) metal away than you needed to. It'll work. It's conceivable the die would cut more metal on one side than the other, however, which would results in some concentricity issues. Because it's following an existing (hopefully) concentric threadform though, it should be alright.

Or, you could buy a small triangular file and remove the tiny bit of metal (in the thread trough) that needs to be removed to allow the can to thread on all the way. With just a little practice with a triangular file, you'll be able to quickly do a very nice job correcting the problem, WITHOUT removing more metal than necessary. That will allow you to keep your nice class 3A threadfit that you have now, but allow the can to go on all the way.

Hope this helps, sorry the 'smith couldn't get it right in 2 tries.
 
Last edited:
Ah, triangular file. Good idea! I'll try it.
 
If I were in the same situation, I'd probably give it a go with the adjustable die. Adjusted properly, it could be used to follow the existing threads and clear out that little bit of material at the end with very little risk of screwing up anything.

A small triangular file will also work, but be careful and go slow. Depending on how much material needs to be removed, a "thread file" (Google it) may also work with a bit less risk.

I sure do love a good threadfile. Mine are some French-made brand that have a doinker hanging off each end so you can reach DOWN INTO a threaded hole to clean up the threads!

That said, the reason I didn't mention a thread file, is because it too will inevitably remove a little metal off the other threads just as the die will. I was trying to provide a method for him to leave his "picture perfect class 3A" threadfit totally intact, and ONLY attack the one small spot that is stopping the can.

Still, I'm sure the die or the threadfile will do just fine. Plus, it's nice to tell people about such tools because many people aren't aware they exist - and they are fabulous tools to keep around. You can clean up some pretty boogered up threads with one....rather quickly too.
 
I don't really think naming names is inappropriate here, the original oversight is understandable since 95 percent of 22 cans will work with .5" threads (AR is .6"). I wouldn't name names if that's all that happened.

But the second time back they obviously didn't even test the threads before shipping it back out.

You may save someone else here a big headache and some money.

Hopefully the triangle file does the job for you, save you having to buy a somewhat expensive die for one use.


Galaxy S3 on tapatalk
 
send it off to the group buy thats going to happen soon,,,wait, its already been there right?
 
There is also a single thread type file, looks like a V form for four inches, then a handle. I'm at the house, not the shop or I'd take a picture. Very handy for cleaning up right to a shoulder ( like here ) and only touches the thread that you are working, doesn't foul up the full size 3A threads.

Bought my first one as a young Honda/Husqvarna/Suzuki/Kaw mechanic, for fixing boogered axle threads.
 
28 pitch thread file will clean up the barrel threads.
If you want to borrow mine you are welcome to.
(just return it).

PM me if you need it.
 
Just cut the end of the last thread with a triangle needle file---end of problem. All the rest of the threads will hopefully be correct, and line up your can properly. No big deal!
 
If i was you I would go to local hardware store or machine shop and ask to use a thread file. This is basically a file that has the pitch of the thread cut into. It would be a lot easier then a single point file.
 
If I am understanding the problem correctly...... if you can spin the barrel some how, a bent piece of 120 emory cloth run over the threads is how I polish my threads after machining. It is very easy to undercut threads so I do that once I get close to make sure they are polished and properly sized. I will say that unless your suppressor required that area of no threads near the muzzle, that is a very interesting way to thread a barrel. I have seen a small clean under cut but not one that large. Again, that may be required for your suppressor.
 
I don't really think naming names is inappropriate here, the original oversight is understandable since 95 percent of 22 cans will work with .5" threads (AR is .6"). I wouldn't name names if that's all that happened.

But the second time back they obviously didn't even test the threads before shipping it back out.

You may save someone else here a big headache and some money.

Hopefully the triangle file does the job for you, save you having to buy a somewhat expensive die for one use.


Galaxy S3 on tapatalk


First, I'm pretty sure I did this. "I" as in Chad Dixon, LongRifles, Inc. owner/operator. There, that debate/shit storm is settled.

2nd. For you to state that I never checked anything is highly speculative. I own fully certified Class 2A/2B ring/plug thread gauges in the 1/2-28, 5/8-24, 3/4-24, and M18x1 thread pitches. EVERY threaded device we machine is gauged before it comes out of the lathe. It has to. Short of using PD wires It's the only way to know if the work your doing is correct. (PD wires are a pain in the ass) I DID gauge these threads. I know I did because I bought the damn gauges. The GO gauge spun on/off as it's supposed to. The NOGO went on about 3/4 of a rotation then stopped dead in its tracks. -Just like its supposed to.

These gauges start at around $450.00/set. The less common ones are even more expensive. I didn't invest the shekels to have them sit in a drawer and look impressive. They are used every day. They are certified and have chromed surfaces so that they last longer. (all gauges wear out eventually) My staff has been properly trained in how to use them. They DON'T use them as thread chasers to qualify a thread that's border line. If the GO doesn't spin on freely, the inspection stops, the thread is again machined, and then its reinspected.

-The point being sir, your NOT here in my shop. You DON'T have a 1st person perspective as to what takes place. So YOU SHOULD'NT run your mouth with wild speculation from the comfort of your computer or smart phone on what I do or don't do.

3rd. YES, the client did have to send it in twice. For that my deepest apologies. I will be issuing you a refund check in full for your troubles.

4th. I've threaded barrels in the thousands. It's a rare occurrence that we have an issue. I've had it twice now with the Sparrow model can. Why? I don't have an explanation. I'm not a Class 3 and don't possess a suppressor. If I had one in the shop I'd use it as a "final word" gauge. I don't so I can't. This is the only model muzzle can that I've ever had an issue with. The ONLY one. It might be the program I wrote for it, I don't understand why as its done to the print. Something else is going on. Either a bad offset in my machine, something. I don't know and until I have this particular can/owner sitting in front of me I won't know.

SO, that being said from this moment forward I'm not threading barrels for the Sparrow model suppressor. Not until I can sort this out once and for all.


To the OP,

Again, my sincerest apologies. Please shoot me a PM/Email with your contact information and I will reimburse you the $250.00 you stated in your earlier posting.


Respectfully,

Chad
 
excuse my dumb question, but is $250 the going rate these days for threading 1/2x28 for suppressors? or was more machine work done besides this?
 
excuse my dumb question, but is $250 the going rate these days for threading 1/2x28 for suppressors? or was more machine work done besides this?

No.

$20 to ship to him
$100 for the thread job
$40 for the thread protector
$16.48 to ship back to me
$50 (?) To overnight back to him

Total: $226.48, the $250 was an overestimate going off memory, and a good chunk of it is shipping.

Chad didn't charge me a dime to overnight it to me upon completion of the second thread job, and he was gracious throughout. His offer of compensation does a lot to rectify this for me and is much appreciated.
 
Last edited:
In the close up picture it looks like he pulled the tool out early(before the relief). If it was done on a CNC it is pretty common because they don't pull out of the cut instantly one they reach the final z depth. They ramp out and when you put the mating part on all goes well untill it gets right at the back where the minor diameter of the first internal thread wont clear the ramped minor diameter of the last external thread. If it's a fanuc control it probably explains the ramp calculation in the manual where it describes the G76 function.


That may very well be the issue. Since you have the vocab for this stuff I looked closer at my ring gauge. The lead thread of the gauge does not start flush with the face of the gauge. It's countered slightly. I didn't measure it, but on a guess I'd say it's between .06/.075". Combine that with the tool retraction on the threading cycle and it means its an issue that the gauge never "saw/felt" as it clams against the shoulder before it gets to the end of the thread where the problem lies.

Lesson learned.

FWIW I don't use a G76. I use the simpler G92. It's done in a segment of 31 steps. A "roughing" stage that gets the thread .01 over the targeted pitch OD. Then 30 more G92's peeling .001" at a time with M00's in between and block skips at the start of each cycle. You just keep pushing "cycle smash" till the thread gauges out. Once the thread qualifies you mash the BS button and it ignores the rest of the cycles. You may go to #12 on one barrel and stop at #9 on the next. This way the variances in material condition (which can vary more than one would think from one barrel manufacturer to the other especially between cut/button/hammer forgings) can be dealt with without the headaches of constantly chasing wear offsets on the control. I do it this way because ultimately more than one person may be fitting up a barrel at any given moment. Doing it this way eliminates a potential BIG mistake if a guy has to bump -.01 for one barrel, moves onto something else and I come in behind him to run another and forget to reset the offset.

It's not the most elegant solution, but it's dumb enough for me to wrap my head around and the others here that work on this stuff.

My control is a Fanuc Oi. I've wanted to search for the parameter (assuming it exists) that can alter the retraction rate of the tool at the end of the G92. As you likely know the Fanuc manuals are painful. (painful as in tooth extraction combined with a vasectomy. . .)

Someday. . . :)


Again, sorry for the headache OP.

C.
 
Last edited:
If you go to the Functions to simplify programming section and then to the G92 description where it gives an illustration of the cycle, there should be a notation about the thread chamfer. I have a similar control and mine is controlled by parameter no. 5130. The chamfering distance is specified in a range from 0.1(thread lead or pitch length) to 12.7(lead) in .1 lead increments. Hope that makes sense.
Good luck.
RonA
 
The explanation sounds plausible, but that doesn't explain why this has almost *never* been an issue historically...

Was the thread relief narrower than usual on this barrel for some reason?

Are the threads in Sparrow cans different than most others? Perhaps most other cans have the first thread or two bored out, similar to how your thread ring gage is configured?

Seems like this would be an ongoing problem if there weren't something special about this particular job or the Sparrow can.
 
I was lucky enough to take my can in the day I had mine threaded. The work came out perfect as we used my can as the go/no go gauge. What I'm wondering is couldn't Silencerco supply a no go/go gauge for the shops at a fair price since they have a non-standard attachment. Maybe I'm over looking something but having my can on hand at time of threading made for a better fitting thread than just a generic 1/2-28 thread.
 
I was lucky enough to take my can in the day I had mine threaded. The work came out perfect as we used my can as the go/no go gauge. What I'm wondering is couldn't Silencerco supply a no go/go gauge for the shops at a fair price since they have a non-standard attachment. Maybe I'm over looking something but having my can on hand at time of threading made for a better fitting thread than just a generic 1/2-28 thread.
It IS better to have the "part" on hand, but if unknown, then cutting a relief on the threads (at the shoulder) is standard proceedure. I am sure the smith will make it right, give them a chance.
 
In the close up picture it looks like he pulled the tool out early(before the relief). If it was done on a CNC it is pretty common because they don't pull out of the cut instantly one they reach the final z depth. They ramp out and when you put the mating part on all goes well untill it gets right at the back where the minor diameter of the first internal thread wont clear the ramped minor diameter of the last external thread. If it's a fanuc control it probably explains the ramp calculation in the manual where it describes the G76 function.

I am by no means tring to portray that I am as well versed with these operations as Chad, RonA, and others on this fourn. However that being said I have seen a thread or two and IMHO this is what happened. I have seen the barrel in question and the tool was pulled away just a bit too soon causing the threads to remain closed. It is small and could be easily over looked during a visual inspection inless you were specifically looking for a cause to this problem. Also I would be willing to bet that this would not be noticed when checking with the thread gauge as I dobut it has threads going all the way to the edge just to protect the tool. Just thought I would throw that in FWIW...
 
If you go to the Functions to simplify programming section and then to the G92 description where it gives an illustration of the cycle, there should be a notation about the thread chamfer. I have a similar control and mine is controlled by parameter no. 5130. The chamfering distance is specified in a range from 0.1(thread lead or pitch length) to 12.7(lead) in .1 lead increments. Hope that makes sense.
Good luck.
RonA

Noted, appreciate the help!

C.

This might turn out well just yet! :)
 
I looked at my Outback II and my Sparrow and both have about 2 threads worth of counterbore(.075 or so deep). Picture taking is one of many things i'm not good at
but here are the two next to each other. The other picture is of the detail on my Ruger MkII. The thread stops about .085 from the shoulder and with .010 worth of shims
the suppressors both will lock up against the shoulder. I threw in the threading tool just because it happened to be laying on the table. I like using shims between the
suppressor and barrel so all the on and off doesn't start digging into the shoulder. The radius on that insert will work down to a 48 pitch thread and the way i calculate
my depth is to take 1 divided by the threads per inch(pitch) X the Cosine of 30 deg, X .75, X 2, and subtract that from the maximum major diameter. With that number
I can either enter it into the program as the final X coordinate in my threading cycle, or i can touch off my threading tool on the manual lathe and zero the dial(or dro)
then turn in the calculated amount and reset my zero. I have found that this is usually very close to where it will finish so start with it backed off about .005 and run it. Then i check the pitch diameter with the pitch micrometer, make the adjustment, and re-cut.
 

Attachments

  • 002.jpg
    002.jpg
    98.7 KB · Views: 38
  • 004.jpg
    004.jpg
    97.1 KB · Views: 39
Last edited:

"3rd. YES, the client did have to send it in twice. For that my deepest apologies. I will be issuing you a refund check in full for your troubles."


Just in case there were any doubts.

f0031451-b9cc-4c32-9d64-78d4479d25fd.jpg
 
Chad, You are one hell of a stand up guy. I wish more people in your line of work and others had the passion, ethics and business practices that you seem to have. I commend you sir.
 
I think I have the little threading issue figured.

The control is a Fanuc Oi series. Parameter 5130 sorted out the threading chamfer problem. It was set at too high a value. (As suggested, thanks Ron)

So, I think I've got this licked.

Experience is never cheap!

C.
 
Last edited:
Thanks for being a gentleman about this chad, and glad to hear you got the programming figured out. Hopefully it's smooth sailing from here on out.
 
Not to hijack the thread, but, a question to all who thread muzzles for suppressors:

Why not use a full thread relief at the shoulder and eliminate these issues?

CNC threading makes it "simpler", but, for all the suppressors vs. muzzle threads issues I've seen, the culprit was nearly always the relief (or lack thereof).

The latest was a factory-threaded Remington with no relief and the major diameter of the threads was too large - but that is a different story...
 
Last edited:
I just read this entire thread, and I've got to say, I am VERY impressed by the way this was handled by Chad.

PM inbound for some bolt work, Chad...