I’m seeing conflicting procedures all over the place. After I install the action into the epoxied stock and clean up the excess goo on the outside of the rifle should I:
A) pop out the action just after the epoxy has set up but isn’t fully cured (so I can clean up the inside and edges easily with an exacto knife) and then reinstall the action to finish curing?
OR
B) let it fully cure to rock hard for 24hrs or whatever and then pop it out and deal with clean up?
Also, what torque should I put on the action screws for the cure? If it matters, I read that ProBed 2000 can be kind of a thicker/pasty epoxy. I do intend to wrap it liberally with bungee cords along the action length to maintain even compression during cure.
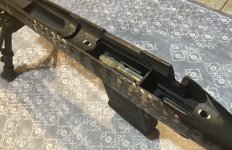
Background - I’ve never bedded a rifle, but I looked at a bunch of tutorials and YouTube videos. I’m using ProBed 2000 single rifle kit (epoxy resin, release agent, & clay). I’ve taped up the stock and prepped the inlet by lightly removing any paint/primer with a sanding wheel anywhere I expect bedding to cradle the receiver. I now have pillar contact with the receiver, still have good function check (mag feeds rounds), and the barrel is floated & centered in the channel with about .050” clearance all around.
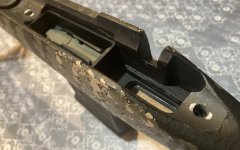
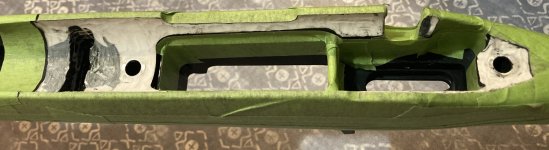
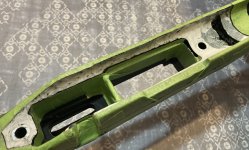
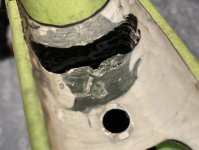
It’s a Grayboe stock. Pretty light at about 28oz, decently rigid, good looking & feeling, not too expensive and the wait wasn’t bad. Overall I like it. But the way they make thier stocks (almost entirely by molding into pretty much the final shape with no inlet machining or cleanup) left a bit to be desired. It wasn’t a bad fit persay, as it was snug with almost no play... but the contact was not very uniform at all with a few very high spots & lumps and no pillar contact (not even close). A thick nonuniform painted inlet wasn’t helping. After fit checks I could see it was really only making contact in a couple of small patches where it burnished and smoothed the paint from rubbing. Plus there’s a few small molding voids and one actually uncured spot (soft, like dried toothpaste) right at the ledge of the recoil lug inlet shoulder of all places, lol. I’m not too worried about these perceived issues since was sort of anticipating bedding both the stock and scope rail on this build anyways and bedding well should cure all of it.
A) pop out the action just after the epoxy has set up but isn’t fully cured (so I can clean up the inside and edges easily with an exacto knife) and then reinstall the action to finish curing?
OR
B) let it fully cure to rock hard for 24hrs or whatever and then pop it out and deal with clean up?
Also, what torque should I put on the action screws for the cure? If it matters, I read that ProBed 2000 can be kind of a thicker/pasty epoxy. I do intend to wrap it liberally with bungee cords along the action length to maintain even compression during cure.
Background - I’ve never bedded a rifle, but I looked at a bunch of tutorials and YouTube videos. I’m using ProBed 2000 single rifle kit (epoxy resin, release agent, & clay). I’ve taped up the stock and prepped the inlet by lightly removing any paint/primer with a sanding wheel anywhere I expect bedding to cradle the receiver. I now have pillar contact with the receiver, still have good function check (mag feeds rounds), and the barrel is floated & centered in the channel with about .050” clearance all around.
It’s a Grayboe stock. Pretty light at about 28oz, decently rigid, good looking & feeling, not too expensive and the wait wasn’t bad. Overall I like it. But the way they make thier stocks (almost entirely by molding into pretty much the final shape with no inlet machining or cleanup) left a bit to be desired. It wasn’t a bad fit persay, as it was snug with almost no play... but the contact was not very uniform at all with a few very high spots & lumps and no pillar contact (not even close). A thick nonuniform painted inlet wasn’t helping. After fit checks I could see it was really only making contact in a couple of small patches where it burnished and smoothed the paint from rubbing. Plus there’s a few small molding voids and one actually uncured spot (soft, like dried toothpaste) right at the ledge of the recoil lug inlet shoulder of all places, lol. I’m not too worried about these perceived issues since was sort of anticipating bedding both the stock and scope rail on this build anyways and bedding well should cure all of it.
Attachments
Last edited: