• Watch Out for Scammers!

    We've now added a color code for all accounts. Orange accounts are new members, Blue are full members, and Green are Supporters. If you get a message about a sale from an orange account, make sure you pay attention before sending any money!

Gunsmithing Quick question on skim bedding.

jhr1986

Sergeant
Full Member
Minuteman
Apr 6, 2012
247
79
SLCish, UT
I've never tried glass bedding a rifle stock but I'm going to give it a try with my Bergara B14R. Has the HMR (polymer stock with aluminum mini chassis).

Should I drill a few small, shallow holes into the polymer in the areas where I'll be applying epoxy or just rough it up with some sandpaper?
 
  • Like
Reactions: timwoo
If there is paint on the stock In the bedding area remove it. Light sanding or scuffing it up is fine. I would recommend Devcon or Marine Tex for bedding. Either of these will require grinding out once dry and they bond to just about any surface
 
Be sure to use a good de-greaser (I like TCE) everywhere- especially on the polymer where there may be residual mold release agents before you start with drilling divots and sanding.
 
Thanks for the replies folks. I went ahead and did it last night, hopefully didn't screw anything up too badly.

The aluminum bedding block(s) that are molded into the stock were painted over at the factory, gray with black texturing. Sanded down to the metal, drilled 5 shallow holes between the front action screw and recoil lug recess and then 3 in the rear tang area.

I'll see how it turned out tonight and hopefully get it to the range tomorrow.
 

Attachments

  • bergara bedding.jpeg
    bergara bedding.jpeg
    171.6 KB · Views: 935
^^^
I'm still seeing splatter-texture around the tang pillar, not sure about the action screw/lug area...
Point- you need to remove material in the area of the pillars to make room for epoxy bedding.

You need to maintain the elevation right around the action screw holes- but I would have relieved the aluminum beyond what's needed (leave the area around the hole itself original like it were a round pillar- but relieve the rest). Even for a "skim" bed job, I make sure there is room for the epoxy and that there can't be any "high" spots that would negate the whole exercise. You want the receiver to be contacting the tops of the two action screw pillars ONLY before applying the bedding compound.

If you bedded the entire receiver, the sides of the stock/receiver should have been relieved as well. Otherwise, you just end up squeezing out the epoxy or leaving a paper-thin coating that'll likely crack and peel away.

Let us know how it turned out.


After I took that picture I did spend a bit more time cleaning paint from the tang and lug areas and relieving it a bit more. I did not take out much material - tried to be cautious my first time doing this. I figure worst case scenario if I remove too little material is that I have to dremel out the epoxy, remove more and start over.

I think I'll be able to take it to the range tomorrow to see if it's made any difference. The rifle was already shooting pretty well, averaging sub moa (0.45" ctc @ 50 yards) with SK/Lapua/Eley match ammo. I'm hoping that bedding will help it be more consistent - while the average group size was pretty good, the individual group sizes from a single box of ammo would vary from the .2s to the .7s.
 
A skim bedding benefit that I found was my cold bore shot seemed more consistent to me, in that there is no deviation from CBS to my regular groups or as the rifle gets “warmed” up. Not sure if all in my head or what.
 
So how did this turn out ? Which bedding compound did you use and has it held up? Only asking because I want to bed my hmr and am curious how well it bonded to the thermoset plastic
 
  • Like
Reactions: timwoo
After I took that picture I did spend a bit more time cleaning paint from the tang and lug areas and relieving it a bit more. I did not take out much material - tried to be cautious my first time doing this. I figure worst case scenario if I remove too little material is that I have to dremel out the epoxy, remove more and start over.

I think I'll be able to take it to the range tomorrow to see if it's made any difference. The rifle was already shooting pretty well, averaging sub moa (0.45" ctc @ 50 yards) with SK/Lapua/Eley match ammo. I'm hoping that bedding will help it be more consistent - while the average group size was pretty good, the individual group sizes from a single box of ammo would vary from the .2s to the .7s.
I was contemplating doing this also, and found your post helpful. My HMR and I typically put up 1" to 1.5" 5-shot groups @ 100yd (not great). Occasionally, I get a .75" group here and there, but not consistently. I have always had a hunch that the gun would probably meet Bergara's MOA guarantee if I was taken out of the equation, but w/ me, the 1"-1.5" range is pretty consistent. Two things that have me doubting my hardware though is the fact that I put up about the same type of groups (maybe only slightly worse) w/ a factory pencil-barreled AR-15 (which I would think should be far less accurate), and also after Looking back at my records, It shows that I typically get 3-4 shots w/in 0.5", but one or two from every group seem to be anti-social, and distance themselves from the others ;). I've been wondering for a while now if bedding might help w/ the 1-2 shots that seem to depart from the others, but haven't built up the cahones to start grinding material from my stock to do a bedding job.

In line w/ what Wannashootit has said, I was thinking about using ring shims on top of the aluminum beds, (like the accu-risers sold by erniethegunsmith) so that the action only contacts near the action screws, which would also allow for a bit more bedding thickness elsewhere w/out having to relieve so much of the existing polymer and Aluminum.
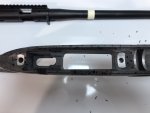
So, this weekend, I bit the bullet (no pun intended) and decided to do this too (thanks jhr1986 for helping me to get brave enough). I haven't found many pics online of how other people have done this with the HMR mini-chassis stock, so I figured I would share some pics of my project. I used Brownells steel-bed. First I masked the stock and degreased the action recess w/ acetone (I figured masking would keep the acetone from removing the OEM paint from other areas). Then, I relieved the plastic around the pillar blocks and around the sides of the action until the action had about .03-.06 clearance all around when seated on top of the existing pillar blocks. I used feeler gages to check for clearance.

On mine, I also had to grind down the top of the aluminum recoil lug channel in the stock, because I found that the front of the action was resting on top of the back end of the recoil lug channel when seated. This was evident by putting some machinists bluing that I had laying around on the bottom of the action, then torqueing it down in the stock. After pulling it back out, I found that it was contacting there.

I test fit the action and made sure that the barrel was still free floating when sitting on just the pillar blocks, and as expected, it was.

Then, to finish up the stock, I drilled a bunch of small holes w/ a .094" drill bit to help the epoxy grip the plastic of the stock. Next, I masked off again and sand blasted all the surfaces that I expected epoxy to stick, then degreased all of those surfaces again. I added a clay dam just forward of the recoil lug recess to (attempt) to stop epoxy from flowing farther forward than I wanted it to.

I put clay in the action recesses, and in the stock's trigger recess, applied Johnson's paste wax to the action, then taped off the front and bottom of the recoil lug w/ masking tape. I then added three more layers of masking tape to the bottom of the recoil lug, and a layer of regular clear scotch tape to the sides and bottom of the recoil lug. My theory here is that the clear tape only measured .002" thick w/ my caliper, but the masking tape measured .005" I didn't want a lot of clearance on the sides of the lugs, but wanted plenty on the bottom to keep it from bottoming out before the action contacts the pillar blocks.

I added additional masking to the barrel, then re-waxed all of the barrel surfaces and tape again. I then waxed all of the bottom metal twice, inserted the action screws, and wrapped them w/ tape, until they fit tightly into the action screw holes in the stock. Lastly, I waxed the screws heavily.

I then mixed and applied the epoxy to all of the surfaces where I expected the action to contact. I worked it into the small drilled holes w/ a tooth pick. Next, I inserted the action & bottom metal, then torqued the action screws to 10 in-lb. I wiped off the excess "squish out" from around the top of the stock and around the mag well from the bottom using alcohol soaked cotton swabs, and let it sit overnight. The next morning (about 15 hours later), I unscrewed the bottom metal, gave the action one light whack w/ a plastic hammer, and removed the action. To help w/ removal, I inserted a wooden dowel into the back of the action, so I could pull up from both ends (the barrel, and the dowel).

After removal, I removed the modelling clay, then filed and sanded the excess from around the edges of the trigger recess, mag well, and from the front end where I placed the clay dam. The epoxy still pushed the clay dam forward and extruded a little farther forward than I wanted, but at this stage (15 hours), it trimmed nicely w/ a razor blade, back to where I originally wanted it to end.

I cleaned an oiled the barreled action, reassembled it torqued it down, and am going to let it cure for a full week (as recommended by the steel-bed instructions). Hopefully it will hold up, and shoot good after this. I hope that someone else may find this writeup useful. This was my first bedding job ever, so I relied heavily on other people's writeups, pictures, and videos too.
 

Attachments

  • IMG_7977[1].JPG
    IMG_7977[1].JPG
    587.6 KB · Views: 467
  • IMG_7979[1].JPG
    IMG_7979[1].JPG
    467.9 KB · Views: 383
  • IMG_7980[1].JPG
    IMG_7980[1].JPG
    382.2 KB · Views: 369
  • IMG_7984[1].JPG
    IMG_7984[1].JPG
    516.9 KB · Views: 461
  • IMG_7986[3].JPG
    IMG_7986[3].JPG
    482.2 KB · Views: 790
Not really to be honest. I had the barreled action in an unbedded Grayboe Phoenix and then back into the bedded HMR stock and between the two I didn't really notice an accuracy difference. I've got an unmolested HMR stock from my B14R and I think I'm going to leave that as is.
 
  • Like
Reactions: timwoo
I finally took my HMR out for the first time since bedding it. The results seem promising, but probably inconclusive...because I brought my 13yo with me. I knew that he would be sitting at home with a broken heart if I left to go shooting without him, so after contemplating it in my head, I woke him up, and said "get up, were going shooting". When I take him, he gets to do most of the shooting because he has an awesome dad ;). I only got to shoot 3 groups. My son didn't want to be responsible for sighting it back in, so my first group was the sight-in group through a clean bore. As clean bore groups go it wasn't that great (approx. 1.5"). After that, I turned the gun over to him and let him shoot several groups. He was grouping about 1" to 1.5" 5-shot groups at 100yd. The only other 5-shot groups I fired were .74" & .88", both better than my previous average. Two groups probably isn't enough to tell whether there is really any difference, but since they were both below my previous normal, there might be a slight improvement...but if there is, it's not huge.