Reloading Basix:
After helping quite a few folks recently getting set up for reloading I decided to put my thoughts on paper. Here is my spin on how to turn out good quality ammunition for precision/tactical rifle at minimum cost and minimum fuss. The steps I use are ones that make me feel good and confident in my reloads and they are not to be the end all be all of reloading. I am always up for trying something new so I’m liable to change my mind at any time providing I can prove to myself that it is worth the effort. This is also why I have a very large box full of reloading parts that I never use anymore. You will note that I am not a “Brand Name” guy, I use what works, color and name have very little to do with my choice in equipment. I won’t provide links to each item in some companies catalog but all the items are readily available for purchase via whatever medium “you”, the reloader prefer.
I started reloading about 20 years ago simply because I could not afford to buy factory ammo in the quantities that I was shooting. We were shooting upwards of 2,000 rounds a week of .45 in IDPA/IPSC type shooting. The better we got, the faster we shot, the more rounds were needed. This is also where I learned the merits of doing ammo in separate stages. I would deprime all of the brass, then prime all of the brass, finally I would powder and seat all the cases. All this time I was building ammo on a Lee turret press in “semi-auto mode”. I needed the deprime/resize static and the powder/seat side on auto. I developed a two handed method to do just that and turned out many 10,000’s of rounds that way.
Somewhere along the line I was introduced to High Power Service Rifle. I essentially did the same thing as handgun but I had to modify the powder part a bit. I also became a brass rat, mainly to avoid trimming brass. I figured if I had enough brass in rotation I would never have to trim. Somehow, it didn’t work out like that. Precision ammo came much later. I was older, supposedly wiser and had access to this neat thing called the internet which saved me from spending a ton of money on stuff that I though was good but via others experience found out it wasn’t all it was advertised as. With a bit of experimentation and much trial and error I have arrived at the following.
PARTS and CONCEPTS:
BOOKS, BOOKS, BOOKS: You have to have them!!!!! I STRONGLY recommend that before you buy reloading part 1, or primers or powder or bullets, you buy a reloading manual. Now that you have it, READ IT!!!!!!! Reloading is not a process where you can toss the directions in the corner and figure it out as you go. There are many books on reloading out there. I will say that if you are going to load a specific brand of bullet or use a specific brand of powder it is very handy to have that companies reloading manual. There are also reloading guides that discus reloading as a process as opposed to a load cook book for different cartridges. One of each type is a good start. I am partial to Sierra’s I5 CD and book and Zediker’s “Handloading for Competition”. Reloading manuals are like potato chips “You can’t have just one.” more information is always a good thing in this venue.
Dies: For making general purpose ammo or OAL ammo a regular seating die like the ones that come in the Lee, Hornady and RCBS sets are all you need. In a gas gun you are more worried about the OAL of the cartridge (so that it fits in the mag mainly) and less with seating the bullet to touch or be just off the lands. You can make good ammo loading to an OAL. HOWEVER, you can and will on most occasions find more accuracy when loading to a specific rifle barrel.
When you get to loading long range ammo and precision ammo that needs to be loaded into or a specific distance from the lands you will want to go with the Micrometer seating dies. You can load precision ammo without the micrometer but there is significantly less guess work (and frustration) if you have calibrated markings that will allow you to precisely adjust the die to seat the bullet. I like Forster Ultra Dies personally but its Ford - Chevy - Dodge argument between Forster, Redding and RCBS Competition dies, all seem to have a floating chamber of some nature.
I will not go down the road of neck bushing dies. I have never seen how they can operate as designed without neck turning the brass to make it uniform before running it into the bushings. I don’t feel the benefit of neck turning is sufficient to warrant the great expenditure of time and money, subsequently I don’t use bushing dies. For a new reloader it is one process that they do not need to worry about. As folks gain experience and want to delve into them, go right on down that road!
Presses: To gain any value from precision dies you will need to put them in a single stage press. I know there are very stable turret type presses but for simplicity sake in this text an “O” frame press is the most cost effective for precision work. For the best price vs value I recommend the Lee Classis Cast Press. It’s bomb proof cast iron and has the added feature of having the 1-1/4 X 12 TPI opening milled into the press. It comes with a reducer bushing for standard 7/8” X 14 TPI dies or you can run the Hornady Lock n’ Load system. The Hornady system is basically a bushing that you screw into the press and several other bushings that fit inside it to hold the 7/8” x 14 TPI dies. It allows you to set your dies, lock them in place on the removable bushings. With a twist of the wrist, change them out of the press as opposed to unscrewing them each time.
A note on Lock Rings: I have used just about every type out there from the Lee’s with the O-Ring and no set screw to the Forster “C” rings to the RCBS type with a set screw through the die. The ones I like the best, ESPECIALY if you will be taking the dies in and out of the press, are the Hornady rings with the wrench flats milled into the sides. These rings are the clamp type so there is no set screw going into your dies (or more likely, sliding around the threads). The best part is the wrench flats which allow you to use an open ended wrench or a crescent wrench to get the dies in and out. No more vice grips or pipe wrenches boogering up your rings.
Runout: There has been a lot of exposure regarding runout. I think it is a significant issue and definitely bears watching. Until this past weekend I have had no method to check it. I was loaned a NECO runout gauge to test some ammo on. Using the reloading procedures described above and below to make the ammo I tested 200 rounds. The WORST I got was .003” 1/8” from the tip. 162 cartridges made the needle wiggle between a pair of lines (.001” between lines). 31 crossed the line but didn’t go over the second one. 7 cartridges were over .002 but less than or just at .003”. There will be more experiments with this topic including the idea of turning the case 180* and running it up into the seater again to negate any mechanical offset in the press. I think there is merit, as evidenced by the above, to seating on a single stage press with good quality dies.
Other Tools: There are so many tools for reloading out there now you could go crazy trying to figure out what works and what doesn’t. I’ve listed the ones that work for me and laid them out in the order of use. I’m sure there will be some things that others like that I don’t use. This is simply what I use. One that I mention and use a lot is a dial or digital caliper. This is a must have device for reloading and multiples are preferred if you are Running an ogive or headspace measuring tool.
CLEANING BRASS:
I like my brass to be clean, I don’t need to eat with it but I want all the grunge off it before I start running through my dies and feeding it into my rifles. I have been using a Thumlers Tumbler 18 for about 15 years and have no complaints. Vibratory tumblers seem to work slightly more efficiently that the rotary ones. I have not yet tried an ultra sonic cleaner but it is on my short list of things to play with in the future. In a vibratory tumbler I’m not particular about my media and have used walnut, corn cob, and the pet store stuff. It all works about the same to me. The most efficient method for me is to load up the tumbler, turn it on and go to work. Work as in your real job. The machine works while you are away, and in 8 -9 hours your brass looks great, how long it actually takes to get clean, I have no idea.
From there I take the whole tumbler and pour it into my squirrel cage type media sifter. Mine is a Dillon but there are various others out there which work just as well. Rotate the handle around till the media quits coming out of the cage and you are done. Pick the brass out and put it in a loading tray for the next step.
RELOADING:
I’ll start off assuming that we are working with once fired brass from XYZ mfg. that has never been processed except at the factory. This type of ammo requires ALL the case preparation steps to get up to speed as well as the powder and seating of the bullet.
Resizing Brass:
First let me say that I Full Length (FL) resize ALL my brass EVERY time. I have never understood the concept of neck sizing brass. Nor do I agree with the idea that I am working the brass too much by full length sizing each time.
Here is why: If you only size the neck of the brass, the body will continue to grow as the brass springs back less and less after each firing. It makes sense to me that if the outside is growing, the inside (case volume) must be getting larger also. That means that the volume is increasing, which ultimately means you are getting less pressure each time you reload. Your velocities will get lower (or at least will be changing) after each reload. This does not lend itself to consistency in my eyes. Add to that is given that you will have to run your case through a FL die (or body die) after about 5 reloads anyway because it won’t fit into your chamber anymore. Full Length sizing it at that time means that you just squoze it back down to the minimum dimension all in one shot and have really worked the brass. More Consistent? Easier on brass? I can’t see it.
Setting up the dies:
In the absence of a headspace gauge (which actually pretty worthless if you think about it, since they are made to a standard that may or may not match your chamber) or another device that allows you to measure the shoulder of the case, you will need the rifle that the ammo is intended for. For this text the brass we are resizing will not fit into your chamber. That gives you a starting point: The bolt won’t close.
How To:
Put the die into your press and raise the ram with a shell holder in place. Screw the die down until it hit’s the shell holder. Now back it off 1 full revolution. Size a piece of brass. Attempt to chamber the brass. Does the bolt close smoothly with NO resistance? If it does you’ll need to back off the die some more and try more brass until it DOES NOT chamber with out resistance. Remember to keep the brass lubricated during this phase. Once you are feeling resistance or can’t get the bolt closed, begin rotating the die clockwise about a 1/16th or a 1/8th of a turn at a time and resize the case again. Continue to check the brass against your chamber and reset the die as needed until you get to the point where it just closes smoothly and without resistance in the rifle. Don’t forget to keep the case lubed while doing this!! Now take a new piece of brass and resize it. It may fit your chamber cleanly but chances are you will need to give the die another 1/16th of a turn to ensure the first time through the die gets it right, even brass coming out of dies has spring back. At this point in time you have your dies set and are probably pushing the shoulder of the case back .001 - .002”, not a whole lot of work on the brass. Lock your dies in place and don’t touch them again.
On Lube and Expanders:
Lube - Since the advent of spray on lubes I find NO reason to use a lube pad. It’s messy and a pain in the butt. I simply set my cases into a loading block and hose them down with spray lube ensuring I get all 4 sides and the mouth. VERY IMPORTANT!! Let the spray lube sit for a couple of minutes before you start to resize. It gives the propellant time to evaporate and lets the lube set up. If you don’t, you WILL have a stuck case before too long.
Expander balls on the decapping pin were a hot topic for a while as to whether you should use them or not. I’ve tried both ways and can find no difference in the results on the target. Not using the decapping rod/expander ball in the resizing step simply means you have added another step to your process. You have the option on most dies to remove the ball but if you have brass with a dented case mouth the BULLET will be what rounds out the case mouth. Running a die without the expander ball simply forces any errors on the outside of the case neck to the inside. When the bullet is pressed into the neck later it will invariably result in uneven neck pressure and runout. I just run the ball on the resizing step. I do find merit to the idea that you should polish the expander ball. That is done simply chucking the decapping spindle in a drill press and polishing it with some fine lapping compound.
BRASS PREP:
There has been much written and discussed regarding the need for or lack of need for brass preparation. I tried most of the various methods and processes from nothing to weighing and all manner of other things. I even went so far as to test each phase to determine if there was a real benefit by doing it. These steps either by themselves or in combination have shown me some benefit in consistency or repeatable results through testing and observation. These are the steps that I do in the order I do them in, you may find a better method, but this works for me. Since most of the preparation requires some form of rotary cutting I have found that a drill press is a huge asset in this process. I have put a drill in a vice and used a battery powered screw driver but they are more effort than they are worth. The scream of a hand drill for several hours will wear on your nerves pretty quickly and changing batteries every 20 minutes isn’t fun either. You don’t need a floor model or a high horsepower drill press, a $40.00 bench top press works just fine for this and is very quiet.
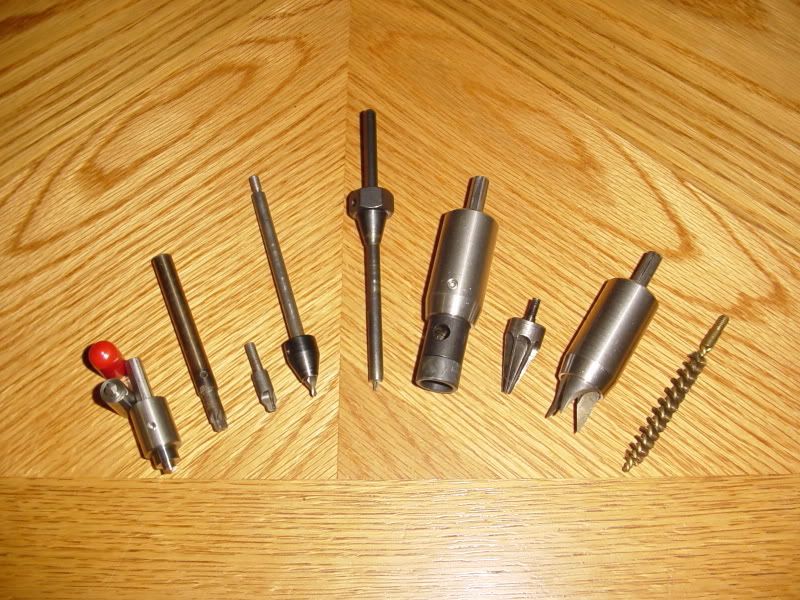
Case Prep Tools: The Drill Press Way.
From Left to Right: Sinclair LG & SM Primer pocket uniformer, Lyman LG Primer Crimp reamer, Lyman SM Primer Crimp Reamer, Lyman Flash Hole Deburrer set up for the Outside Flash Hole, RCBS Flash Hole deburrer to do Inside Flash Holes, Possum Hollow .308 Case Trimmer in a Sinclair Power Chuck, Lyman VLD Chamfer Tool, RCBS Case Deburring Tool (Outside end) in a Sinclair Power Chuck, 30 Cal bore Brush.
1. Uniforming Primer Pockets. Sinclair makes the best system out there that I have found and you can buy it as a set for large and small primer pockets with the power adaptor. Chuck this little gizmo into your drill press and press the primer pocket up into the cutter TWICE. Press once, dump. Press twice, dump. There is no mechanism to remove the chips the cutter makes as it is cutting. You have to do it by dumping out the chips to make sure it cuts flush and all the way down. The benefit from this step is simply a uniform depth and seating for the primer so that the fire will enter the flash hole the same way every time. It also prevents a primer from being seated too high or low, potentially creating a slam fire or no fire condition.
1.a. Primer Crimps. If you need to remove primer crimps from military brass, there are several options. (NOTE: The Sinclair uniformer mentioned above WILL NOT remove a crimp for you, you will need a reamer or swager) There are press mounted tools, bench mounted tools and rotary cutter type tools. . I never liked the bench or press mounted swaggers. Things may have changed since I played with them last but they seemed to be hit or miss on removing the crimp when I tried them. Lyman makes a nice primer pocket reamer that has worked well for me for many years on both rifle and pistol brass of many flavors. I unscrewed the reamer from the wooden handle and chucked it in the drill press. I’ve heard some others complain about it not removing the crimp completely but that has not been my experience. The cutter head is also chamfered at the bottom and can only side cut so there is no worry about deepening the primer pocket.
2. Chamfer the OUTSIDE flash hole. You will need a flash hole chamfer/reamer for this operation. Lyman has one that comes with a stop that is supposed to be for the case mouth but can be set to stop on the primer pocket rim too. Once again unscrew it from the wooden handle, chuck it in the drill press and ream away. This step may be considered to be extraneous by some but I kind of like the idea of a tapered hole to direct the fire into the case. Used in combination with the next step I found the velocity spreads were reduced by about 30% compared to the un-chamfered flash holes.
3. Chamfer the INSIDE flash hole. Unless you buy Lapua or some other brass which has drilled flash hole most flash holes are pressed into the brass. This can create a burr on the inside of the case. The effect is rather significant in terms of consistency if you leave it there. The drop in my velocity variations simply by removing this was significant. For this step I like the old RCBS Universal or the current Midway EJS Flash Hole Reamer. I specify these because they index on the web of the case as opposed to the mouth. This is important because you don’t have to trim all your brass to an exact length before hand to get the same depth of chamfer.
The first 3 steps only need to be done ONCE in the life of the brass. That being said I use the primer pocket uniformer to clean the carbon out of the pocket each time. It definitely works better than the little brush thingy for cleaning pockets on the 2nd and later reloads.
4. Case Trimming: This part is painful no matter how you do it. It is also the one part that can have disastrous effects if you don’t do it. If the brass grows to the point where it begins to get crushed by the end of the chamber it will essentially add crimp to your round. Add too much crimp and the case will fail catastrophically due to over pressure. There are several choices equipment wise in how to do this operation.
Conventionally you can use a bench mounted hand cranked (or powered) trimmer such as a Wilson, Lyman or Forster. There are many variations on this tool as well as different adaptors to perform other functions. I have a Lyman and associated pilots that I keep around for doing small lots of brass or for brass that I normally do not load in quantity for. While the hand cranked versions get the job done well, they will significantly add to the dislike of trimming brass after not too many cases.
The most efficient method I have found is a little gizmo by Possum Hollow (a subsidiary of Sinclair) that has a cutter mounted in side a steel tube with a delrin insert that indexes on the shoulder of the case. I’ve used one with great success on 308’s. The one I have for 30-06 is not as good since there are similar rounds chambered in larger diameter bullets and the cutters are designed to cover a spectrum of cartridges based on shoulder angle, hence it’s a little sloppy. You simply mount the cutter in a power adaptor, chuck it in the drill press and push the case up inside. When the case stops vibrating in your hand it’s trimmed.
On the high end price wise for mass production is the Giraud Trimmer from a fella by the same name down in Texas. This tool isn’t cheap at ~$450.00 but it’s fast and does this and the next 2 steps in one operation in about 3 seconds, I have heard nothing but great things about it from those that use it. Sinclair and Gracey also produce a similar tool and I have heard many positive things about them also. Trimming brass is a painful but necessary step, anything that makes it easier is a plus in my book.
Time Saver: I decided what the maximum amount I wanted my case to be and took that measurement to my local machine shop with a 3” x 1” x 1” chunk of steel and had them mill it into the shape of a “C” for that exact dimension. As I finished the inside flash hole ream I pressed the case into the gauge. If the case fit, I didn’t worry about it. If it didn’t, it got tossed into the trim pile. This simple fit check saved me bunches of time and pain in trimming all my brass, all the time or checking each one with a dial micrometer.
5. Inside Case Mouth Chamfer: Get yourself the VLD chamfer tool by what ever manufacturer you prefer and chuck it in the drill press. You may need a power adaptor to get it in the press depending on which type you get. It takes about 1 second and a light touch to get the chamfer. The reason for doing this step is to provide a nice smooth ramp when seating your bullet and prevents scoring the bullet if there was a burr from case trimming.
6. Outside Case Mouth Chamfer: On the bottom of most of the chamfer tools are three pointy ends, they are actually cutters. Use the same procedure as the inside chamfer, WATCH YOUR FINGERS!!!! Depending on how you are viewing the cutter it will appear that you are pushing the case into the back of the cutter, it’s an illusion this IS the middle. If you miss the center you could potentially run your fingers up into the cutter points, this hurts and will make you bleed. This step simply knocks off any rough edges on the outside rim of the case mouth which result from trimming.
7. Polish your Neck: Chuck a bronze bore brush of the appropriate caliber into the drill press and polish the inside of the neck. Just up and down twice, slowly. The brass will get warm from this procedure. This step will get you a nice smooth neck surface and will aid in a more consistent neck tension.
At this point I generally throw the brass back in the tumbler for a half hour or so to clean off the lube and knock all the brass bits out of the case. There has been some worry expressed about media in the flash hole. The squirrel cage media separator fixes this and I have never seen any media in the hole after a good spin through there. As a second check when I pull my brass out is to put them in my loading block bottom up and ready for priming. A quick eyeball across the cases will verify clear flash holes.
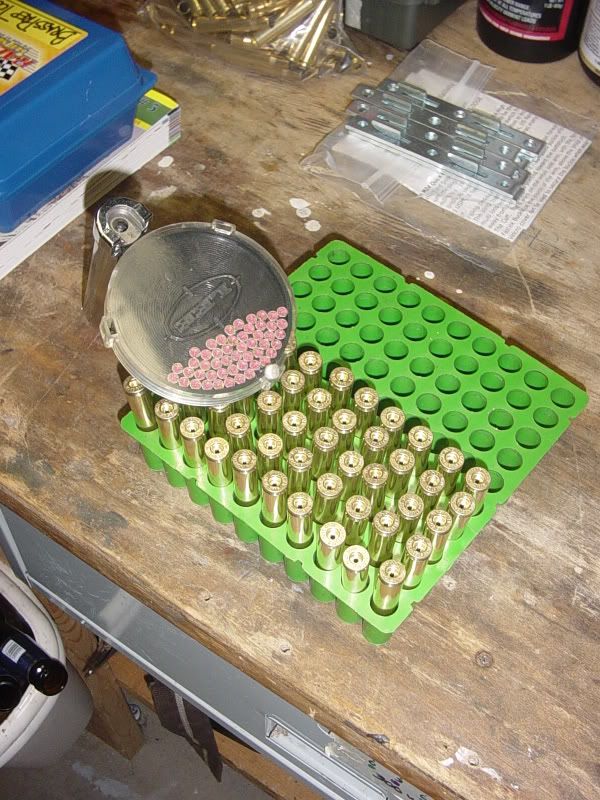
Ready for priming after a trip through the tumbler.
That will get your brass prepped up into what I call “Full Match” and be ready for priming. After 18 - 20 years of reloading I find these steps to be the most beneficial and time/cost effective. Do you need to do all this stuff, NO. You NEED to check case length! If you have crimped primers you NEED to remove the crimp! Setting off primers while seating is BAD THING and VERY LOUD! The other steps each add to the consistency of your rounds but are not required. You have to make the decision as to which if any steps you want to do.
PRIMING: For this operation I HIGHLY recommend the hand held priming tools like the Lee Auto Prime or the RCBS. I have used the Lee for years and continue to do so even after blowing one up 18 years ago. Note: With the Lee you need to buy special shell holders. The RCBS uses regular shell holders and also has a safety shield built into it to prevent sympathetic detonation should you set one off. I haven’t used one so I have no first hand knowledge of it’s function.
Using press mounted tools is painful endeavor in keeping it fed and/or reloading the device. Some folks like it, to each his own.
How To: Sit down in front of the idiot box (TV) with a can of unprimed / prepped brass and the priming tool. Start priming. Toss your primed brass into an empty ammo can as you go. Once you are done close the can and they will stay good forever. Priming doesn’t require your full concentration (OK, it’s down right monotonous) as long as you are cognizant of the feel of the primer tool and are comfortable with the idea. I wouldn’t recommend watching a show that requires your full attention. I discovered NASCAR while doing this year’s ago as something to watch but not be so engrossing that you couldn’t pay attention to the priming operation. I would prep brass and load all week to shoot on Friday and Saturday then prime on Sunday for the next week of reloading. One race could net me about 5,000 primed cases before my thumb gave out (I was shooting pistol at the time). It worked for me. “Books on Tape” are also a great things to listen to while doing this.
POWDER TOSSING:
There are several different ways to do this with any efficiency as well as the old scoop and tap method. I will discuss the three that have served me well over the years. Which one or which combination you decide upon will be solely up to you. ALWAYS have a beam scale to verify your loads. Powder weight is the single biggest factor in reloading that YOU have total control over. Taking the time to ensure EVERY round has the same amount of powder will yield the largest gains in accuracy and consistency.
Accuracy in powder = Consistency in velocity = Accuracy on Target
For any manual powder thrower there are simply variations on the same theme. The powder hopper sits over an adjustable cavity, when you throw the handle, the cavity rotates around and dumps the powder down a tube into the case. The speed an accuracy of any of them will be directly related to the size of the powder granules. Flake or ball powders meter very well and are very consistent per throw. Extruded powders are less so and get worse the bigger the granule. You may find it beneficial to make a list of powders you wish to use and choose your go to powder with this in mind if it gives you the velocity and consistency that you are looking for. Using a powder thrower in conjunction with a powder dribbler takes 4 steps per case. Throw the powder, put it in the scale, wait for the scale to settle down, dribble the remainder (or throw it back as needed) , put the powder in the case. Effective and accurate but slow.
Next are the electronic powder dispensers. IF you trust them. Push the button, wait for it to finish and pour the powder into the case. One step and done. Electronic dispensers are finicky devices by their nature and should be verified for accuracy and calibration often. Some are affected by different light bulbs and all that are sufficiently precise are affected by air currents. Opening a door or having the heater/AC kick on will play havoc with the scale. I have a Lyman DPS 1200 and while it is very accurate I weigh EACH charge on a beam scale. If I let the dispenser toss the whole charge it takes me no longer to dispense, check weight and pour than if I just waited and poured. I am more comfortable in checking each round that way. It takes between 30 – 45 seconds per charge depending on the cartridge.
The fastest method for smaller cases or pistol rounds is the Lee Auto Disk or Pro Auto Disk. If you are using flake, ball or a fine extruded powder and keep the hopper more than ½ full at all times it is very consistent and reliable. It also dumps powder directly into the case via the Lee Powder Through Die. I used it quite extensively in my High Power days for mass producing 200 & 300 yard ammo; it is quite sufficient accuracy wise for that and very fast. Mounted to a bidirectional turret and seating to magazine length you can really crank out some ammo. If the volume of a single disk is insufficient you will need the “Double Disk Kit”. It’s a pair of spacers that basically allows you to put two disks together and double the volume your charge. As with anything measuring powder, you need to check the charge weights. How often and with what regularity is up to you.
BULLET SEATING:
There are two thought processes for seating bullets and both have different applications, both can be very accurate. The first is to seat to an Over All Length (OAL), the length of the cartridge is the driving factor in this seating operation. This is for ammunition that has to fit into a variety of rifles or for magazine fed guns. For this type of seating most any type seating die will do you good service. The higher end dies that orient the bullet prior to forcing it into the neck MAY yield more consistency on run out. I’m not yet convinced.
The other is seating by the Ogive. This method pays no attention to the OAL of the cartridge but instead is concerned with the distance from the bottom of the case to the portion of the bullet that will hit the lands in the rifling. This is where a micrometer seating die is worth its weight in gold. On the first pass through the seating die I will deliberately seat my bullets slightly long, I never adjust the die, that is “ZERO”. This is more to get the round closed up and sealed than for any other reason, except possibly to compress the jumbled up powder in the case. I have noticed that when loading near the case maximum VOLUME the bullet seems to “pushed back out” after seating, and never the same way twice. I measure each round before it goes back into the seating die and adjust the micrometer as needed via the markings. If my thumbs and eyeballs are working that day I rarely need to seat the round a third time and almost never need to back out a round.
You will hear folks talking about being .0020” or .005” off the lands and such. You may be thinking “What’s the difference, if the OAL is the same, the ogive should be the same.” Not true or even close. Stoney Point (now Hornady), Sinclair and a few others makes a tool called the Cartridge Length Gauge or Ogive Length Gauge which clamps to your dial caliper and measures to the ogive length of the bullet. Taking a box of match bullets and simply measuring the bullets will show you just how inconsistent the ogive lengths of bullets from even the same box are, let alone from different lots or manufacturers. To say that you are seating .0010” off the lands and that your OAL is always 2.80” would be highly suspect. The terms and measurements are mutually exclusive and rarely match up.
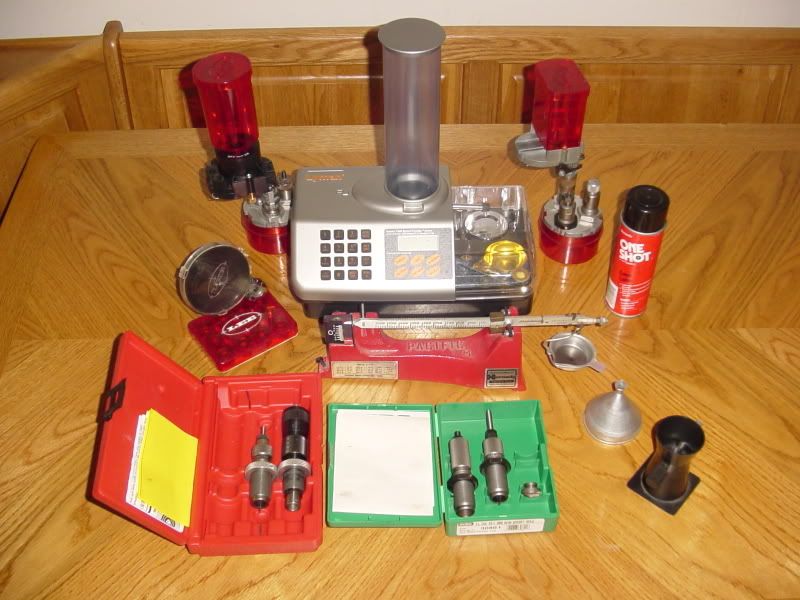
Here is everything else but the press, loading tray and drill press.
From Left to Right:
Front Row: Forster Ultra & FL dies, RCBS regular seat and FL dies w/ shell holder, Powder funnel, Powder Dribbler.
Middle Row: Lee Auto Prime and Shell Holder Set, Hornady Model M- Scale, Hornady One Shot Spray Lube.
Back Row: .45 Dies with a Pro Auto Disk mounted on a Lee Turret, Lyman DPS 1200, .223 Dies with the Auto Disk mounted on a Lee Turret.
That my friends’, in a nut shell, is how I reload rifle rounds. I will prep a batch of brass, prime a batch of brass, and then powder and seat a batch of brass. It’s roughly three phases and I can stop if need be anywhere along the line and not worry about loosing my place. I have done marathon sessions of 500 rifle rounds from the ground up and don’t recommend it. 100 rounds per phase is quite enough for me on most occasions. The nice part is, once you have done a full case prep, the next time it comes through you will have very little work to do. Resize, Clean the primer pocket, Check the case length, Check the chamfers, Prime, Powder, Seat.
I’m sure I have missed bits of procedures that have become so second nature it doesn’t even hit the radar. I am also sure there are other tools out there that do a specific job(s) even better than the ones I listed. Feel free to let me know about them, I can be converted. I do want to point out that the above ramblings are centered around getting the job done to maximum effective ness with the minimum of effort and expenditure of money. A press, scale, dies and a fist full of little tools that get mounted to a drill press will have you turning out ammo better than you can buy. As of this writing the cost of a complete set up of the things mentioned runs about $550.00. No, this doesn’t include the Giraud or DPS 1200. Combining the above parts and components to make 2,000 rounds you will come out ahead on money and accuracy vs. buying 2,000 rounds of Match ammo. It’s also nice to be able to tell the spousal person that by spending now in a short period of time you will actually be making money and getting ammo for FREE!!!
As always I look forward to your comments and corrections. If I missed something let me know. If you have a better mouse trap let me know, I can be converted!
Cheers, Doc