• Watch Out for Scammers!

    We've now added a color code for all accounts. Orange accounts are new members, Blue are full members, and Green are Supporters. If you get a message about a sale from an orange account, make sure you pay attention before sending any money!

  • The site has been updated!

    If you notice any issues, please let us know below!

    VIEW THREAD

Remove Tikka T3X series rifle factory barrel?

thexman

Sergeant of the Hide
Full Member
Minuteman
Dec 24, 2018
309
87
I did some goolging, found couple of options or methods people did:
1. Some can simply use a barrel wise and a (action) wrench with torqued wrench to remove it without too much difficulty if lucky
2. Some would require to have a relief cut to release pressure, then remove it

As a newbie on remove barrel, wonder what gunsmith or I would require to get the job done?
What I can think of to remove the factory barrel:
1.Torque wrench
2.Barrel wise
3.Action wrench
4.Few spanners/wrenches
5.Some spacers

In addition to put new barrel on:
5.Go/no-go gauge
6.New barrel with barrel nut
7.Bespoke wrench

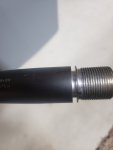
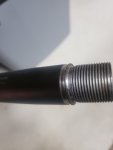
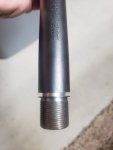
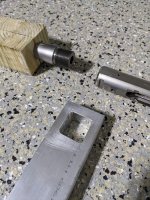
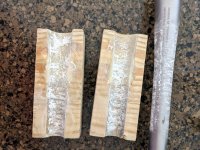
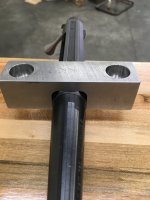
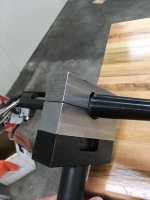
Few photos I took around barrel/action area. There is no barrel nut from factory barrel. Don't think the Bespoke wrench I got with the new barrel from PVA with the new barrel would be useful in this case as there is no barrel nut?

Thank you. Any input would be really appreciated.
7071435


7071436


7071437
 
I say this with all of the experience of a person who has removed precisely one factory Tikka barrel... sumbitches are TIGHT. Not threadlocked or otherwise mechanically locked, but simply ridiculously tight.

I was able to remove mine with a barrel vise (Farrell) and a semi-generic action wrench (originally intended for Savage actions; from Northland Shooter's Supply) along with a 3 pound shop hammer and a fair amount of elbow grease and cussing. Something that I didn't do as well as I could have, though, is in regard to pre-treating the barreled action in preparation for barrel removal; what I did do is get the barreled action oriented vertically with the muzzle down, and sprayed some penetrating oil (Liquid Wrench) on the barrel/action interface inside the action. I did this and let it soak for a few days, spraying a little more penetrating oil probably every other day or so. What I could have done better is to use a heat gun to warm the action prior to spraying the penetrating oil. I think that multiple heating/cooling cycles coupled with good penetrating oil might have made it a bit easier.

I'll tell you, though, I wouldn't use a rear-entry action wrench for this task, as I think that you'd be likely to tear up either the action or the wrench (if not both).

If I had to do it again, I'd likely spend more time preparing the barreled action as described above (re: soaking in penetrating oil, heating/cooling cycles) for a couple of weeks in an attempt to get the penetrating oil worked as far down into the tenon threads as possible before clamping the barrel in the vise. Once it was clamped in, though, I think that I'd warm the action one last time (again, with a heat gun rather than a torch), clamp on the (external) action wrench, put on as much preload as I could, and start whacking the handle of the action wrench with that 3 pound shop hammer.
 
Both my tikkas required a relief cut. The action is quite a bit thinner walled than a savage or rem, I was worried about twisting action. My Smith made the relief cut pretty quick.
 
  • Like
Reactions: Pvt.Donut
Just removed my Tikka barrel. Used a Brownells barrel vice and action wrench. It was a bitch. There were several points where I stopped and debated taking it to a smith and I probably should have. In the end it finally broke loose and luckily I didn't twist the action. Get a decent barrel vice and torque wrench to install your new barrel and take your current setup to a gunsmith or machinist to relief cut and remove. Not really worth the trouble or risk.
 
Anyone have a picture of this relief cut for the tikkas? Im assuming its running lengthwise of the barrel right in front of the action so that it can compress a bit to take force off of the threads?
 
From my experience (I think I posted it in the Tikka thread a few weeks ago) it's not the threads that are the issue, and I don't know how much penetrating lube would help, it's tension from the shoulder to the action face. My theory is that they're torquing them with the action heated and the barrel cooled, and that once they equalize they're cinched together there much tighter than the actual torque would let on.

I had mine with the stub of barrel lightly glowing, put copper antisieze on the threads and let it wick in (which it did amazingly well), and put a 2' chain wrench on the barrel with the action in a vise, didn't accomplish jack. Had a machine shop cut down the shoulder just in front of the action face, and they said they put a wrench on the flats I'd ground in the barrel and it came off with one half-decent whack with a hammer.
 
Anyone have a picture of this relief cut for the tikkas? Im assuming its running lengthwise of the barrel right in front of the action so that it can compress a bit to take force off of the threads?
I unfortunately forgot to take my stub of barrel with me from the machine shop, but he stuck it in a lathe and cut down the circumference of the shoulder. It was about 3/16" wide, and juuuust in front of the face. I thought about trying to do lengthwise, but decided I'd rather not risk it.
 
  • Like
Reactions: spife7980
I unfortunately forgot to take my stub of barrel with me from the machine shop, but he stuck it in a lathe and cut down the circumference of the shoulder. It was about 3/16" wide, and juuuust in front of the face. I thought about trying to do lengthwise, but decided I'd rather not risk it.
Gotcha, lets that minimal amount of remaining material give a bit to relieve the torque on it.
 
Gotcha, lets that minimal amount of remaining material give a bit to relieve the torque on it.
Yeah... I think it's more the shoulder "pressing" on the action face than it is literal, rotational torque. But that's the gist of it. The aforementioned theory of temperature difference is the only thing I could come up with to explain how tight it ends up with what seems to not be all that much torque... or perhaps I'm wrong and they really do just give it that much at the factory.

I know some people say that sharp, fast hits are key... I don't have a barrel vise to clamp the barrel solid, nor did I think an action wrench would cut it so that I could put the barrel in my vise & try to turn the action, and of course I couldn't really "hammer" on a chain wrench. But I did use my 3lb steel dead-blow on a combo wrench on the flats I ground in the barrel, and it wasn't doing anything.
 
7071677
Yes, my Smith made a 3/16" wide cut, about .030 in front of receiver face. Tenon size is 1" od, so relief cut should be as deep as tenon od. I believe the od of shoulder is 1.15". I had my Smith turn the receiver face down to the flats of receiver. This let's u put a 1.2" m24/LV contour barrel on it.
 
The fact that LRI can remove any Tikka barrel without cutting relief notches in the barrel is proof enough (for me) that it's possible. They use dedicated tooling that supports the receiver, but someone is going to have to do a lot to convince me that a flat sided receiver is somehow more prone to twisting than ROUND receivers where the grip is entirely pressure based. A #1 Brownells action wrench fits perfectly on the Tikka receiver flats and there's no chance of slipping.

As for holding the barrel, there's a couple things at play. First, unless you have shims of the correct contour, you need to grip the barrel at a place where the contour is mostly flat. That happens to be 9 or 10 inches from the shoulder. In that case, the receiver is mostly likely hanging several inches beyond the end of your table and you have to get the flex out of the system so the force is properly transmitted and isolated. A simple wooden post/stud/whatever between the barrel shoulder and floor takes care of that.

LRI can do it for $50, a relative bargain. If you want to do it yourself and have the tools it absolutely can be done without carving notches into the barrel or hiring a body builder with a 4 ft cheater bar.

-Stooxie
 
Last edited:
  • Like
Reactions: Pvt.Donut
The fact that LRI can remove any Tikka barrel without cutting relief notches in the barrel is proof enough (for me) that it's possible. They use dedicated tooling that supports the receiver, but someone is going to have to do a lot to convince me that a flat sided receiver is somehow more prone to twisting than ROUND receivers where the grip is entire pressure based. A #1 Brownells action wrench fits perfectly on the Tikka receiver flats and there's no chance of slipping.

Mayhaps so... I was at the point of "what am I willing to buy (that I'll probably never need again) to remove a barrel I might net $120 selling?"... the only non-A-hole local gun shop quoted me $95 an hour and "at least an hour, maybe more". I reckon even LRI's very reasonable $50, by the time you pay round trip shipping, is only worth it if you have a barrel (like a Varmint or CTR) you want to keep yourself, or can get a good bit more for.

I was taking off a Lite barrel, and was infinitely more concerned about removing my barrel without messing up a $600 rifle, than about being able to salvage a barrel I might be able to break even selling if it comes off in one piece.
 
  • Like
Reactions: Stooxie
You can remove it yourself at home with the right tools.

- Barrel vise
- Brownells Universal Action Wrench
- Brown sugar
- hammer
- pipe to fit over action wrench handle for a cheater.

Clamp the barrel in vise with some brown sugar around it to get grip. Tighten Brownells wrench head. Slide cheater pipe over wrench handle. Whack handle with hammer. Make sure you’re hitting/turning in right direction. It’ll come loose.

Let some Kroil soak in the threads overnight before you start too.

To get the Brownells wrench to fit I think you’d have to remove the factory scope rail on top of the action, as the flat top is what the wrench will engage and line up on. You’ll need heat to do that. Obviously, also remove the action from the chassis as well.
 
Last edited:
You can remove it yourself at home with the right tools.

- Barrel vise
- Brownells Universal Action Wrench
- Brown sugar
- hammer
- pipe to fit over action wrench handle for a cheater.

Clamp the barrel in vise with some brown sugar around it to get grip. Tighten Brownells wrench head. Slide cheater pipe over wrench handle. Whack handle with hammer. Make sure you’re hitting/turning in right direction. It’ll come loose.

Let some Kroil soak in the threads overnight before you start too.

To get the Brownells wrench to fit I think you’d have to remove the factory scope rail on top of the action, as the flat top is what the wrench will engage and line up on. You’ll need heat to do that. Obviously, also remove the action from the chassis as well.

My Smith had all those tools, or better, and after putting considerable force on everything we decided a relief cut would be safest/cheapest route. Sure, I couldn't sell my shot out 308 tactical barrel or 260 sporter barrel because of the cut, but I was worried more about the action straightness and not a 50.00 used barrel.

I've done all kinds of crazy shit that worked, mechanically, but that doesn't mean I want a customer watching me do it. With enough brute force you can remove anything, but is that the best way or safest way....NO. Just read the gunsmith section, a "Smith galled threads" thread. He mentioned he could have put everything in barrel vise and action wrench and muscled it off. He knew that would only cause more damage. Sometimes it's better to spend a few bucks and do it the right/safe way. My Smith did the relief cut, but he was also doing the barrel work to, so it wasnt a big deal to him or any added cost to me.
 
  • Like
Reactions: Pvt.Donut
My Smith had all those tools, or better, and after putting considerable force on everything we decided a relief cut would be safest/cheapest route. Sure, I couldn't sell my shot out 308 tactical barrel or 260 sporter barrel because of the cut, but I was worried more about the action straightness and not a 50.00 used barrel.

I've done all kinds of crazy shit that worked, mechanically, but that doesn't mean I want a customer watching me do it. With enough brute force you can remove anything, but is that the best way or safest way....NO. Just read the gunsmith section, a "Smith galled threads" thread. He mentioned he could have put everything in barrel vise and action wrench and muscled it off. He knew that would only cause more damage. Sometimes it's better to spend a few bucks and do it the right/safe way. My Smith did the relief cut, but he was also doing the barrel work to, so it wasnt a big deal to him or any added cost to me.
?? For sure if a smith is putting in your new barrel, and your old tube is junked, then by all means, I get it. Also a Smith is usually gonna charge less than it is to buy the tools to do it yourself.

But if you’re doing a prefit or barrel nut install yourself, and don’t want to ship a rifle (not everyone has a good local smith who can do such things), then you can do it yourself if you’re careful and have the right tools.
 
  • Like
Reactions: KenCS
I did mine at home. Soaked in Kroil. Put it in a Brownells barrel vice. Hit it with a good amount of heat then quickly cooled inside the chamber with canned air. I wanted to save the barrel so no relief cut made. My first attempt was with a PVA internal wrench for the Tikka. It twisted into 2 pieces under torque- it was designed to not to damage the receiver at maybe 100 ft/lbs.

I didnt want to spend much more for an action wrench so I measured the receiver flats- 31mm. Ordered a big honkin 31mm box wrench off Amazon for $20. Put a cheater on it and it spun the barrel off like butter with no damage to anything. It now has a PVA switch barrel setup on it.
 
I say this with all of the experience of a person who has removed precisely one factory Tikka barrel... sumbitches are TIGHT. Not threadlocked or otherwise mechanically locked, but simply ridiculously tight.

I was able to remove mine with a barrel vise (Farrell) and a semi-generic action wrench (originally intended for Savage actions; from Northland Shooter's Supply) along with a 3 pound shop hammer and a fair amount of elbow grease and cussing. Something that I didn't do as well as I could have, though, is in regard to pre-treating the barreled action in preparation for barrel removal; what I did do is get the barreled action oriented vertically with the muzzle down, and sprayed some penetrating oil (Liquid Wrench) on the barrel/action interface inside the action. I did this and let it soak for a few days, spraying a little more penetrating oil probably every other day or so. What I could have done better is to use a heat gun to warm the action prior to spraying the penetrating oil. I think that multiple heating/cooling cycles coupled with good penetrating oil might have made it a bit easier.

I'll tell you, though, I wouldn't use a rear-entry action wrench for this task, as I think that you'd be likely to tear up either the action or the wrench (if not both).

If I had to do it again, I'd likely spend more time preparing the barreled action as described above (re: soaking in penetrating oil, heating/cooling cycles) for a couple of weeks in an attempt to get the penetrating oil worked as far down into the tenon threads as possible before clamping the barrel in the vise. Once it was clamped in, though, I think that I'd warm the action one last time (again, with a heat gun rather than a torch), clamp on the (external) action wrench, put on as much preload as I could, and start whacking the handle of the action wrench with that 3 pound shop hammer.
Thank you. I guess I may just shoot out the factory one first, then see if I would re-use the action again for a different caliber.

Seems a risk job to remove the factory barrel.
 
The fact that LRI can remove any Tikka barrel without cutting relief notches in the barrel is proof enough (for me) that it's possible. They use dedicated tooling that supports the receiver, but someone is going to have to do a lot to convince me that a flat sided receiver is somehow more prone to twisting than ROUND receivers where the grip is entire pressure based. A #1 Brownells action wrench fits perfectly on the Tikka receiver flats and there's no chance of slipping.

As for holding the barrel, there's a couple things at play. First, unless you have shims of the correct contour, you need to grip the barrel at a place where the contour is mostly flat. That happens to be 9 or 10 inches from the shoulder. In that case, the receiver is mostly likely hanging several inches beyond the end of your table and you have to get the flex out of the system so the force is properly transmitted and isolated. A simple wooden post/stud/whatever between the barrel shoulder and floor takes care of that.

LRI can do it for $50, a relative bargain. If you want to do it yourself and have the tools it absolutely can be done without carving notches into the barrel or hiring a body builder with a 4 ft cheater bar.

-Stooxie
Sorry, LRI means LongRifles Inc?

$50 is really a bargain. Would check it out.
 
?? For sure if a smith is putting in your new barrel, and your old tube is junked, then by all means, I get it. Also a Smith is usually gonna charge less than it is to buy the tools to do it yourself.

But if you’re doing a prefit or barrel nut install yourself, and don’t want to ship a rifle (not everyone has a good local smith who can do such things), then you can do it yourself if you’re careful and have the right tools.
Thanks for both of your replies.

I think I am more worrying about the force which might damage the action, don't want to risk that. for sure. To install I reckon it should be reasonable simple.
 
I did mine at home. Soaked in Kroil. Put it in a Brownells barrel vice. Hit it with a good amount of heat then quickly cooled inside the chamber with canned air. I wanted to save the barrel so no relief cut made. My first attempt was with a PVA internal wrench for the Tikka. It twisted into 2 pieces under torque- it was designed to not to damage the receiver at maybe 100 ft/lbs.

I didnt want to spend much more for an action wrench so I measured the receiver flats- 31mm. Ordered a big honkin 31mm box wrench off Amazon for $20. Put a cheater on it and it spun the barrel off like butter with no damage to anything. It now has a PVA switch barrel setup on it.
Sounds like straight forward.

I may still go to a gunsmith to do the swap at some stage, but it would be good know if you don't mind.

Just wonder:
1.Did you soak the entire rifle in Kroil? Seems like need a long container and a lot of Kroil
2.For the heating part, any heat gun would do the work right? How hot do you think it went to in your case? Can't touch at all or a quick touch is still OK?
3.I guess some good solid wrench would do, what is a cheater? Is that some kind of spacer to between the barrel and the wrench?

I probably have the same sort of PVA barrel like you are having, my original plan was trying that first instead of the original factory barrel as only one per rifle.

Thank you.
 
Anyone have a picture of this relief cut for the tikkas? Im assuming its running lengthwise of the barrel right in front of the action so that it can compress a bit to take force off of the threads?

I have my old 260 CTR barrel at home with the relief cut in it. I will try and get a picture of it tonight. The barrel was toast, so that was the easiest way. I started to tweak my PVA inside wrench, so I just let my local smith make the cut.

For my 22 BR build I started with a T3 270. I soaked it in Kroil for 2 weeks and it came loose with the inside wrench. Tikka definately uses some kind of thread locker as it was on the threads of both barrels.

1.Did you soak the entire rifle in Kroil? Seems like need a long container and a lot of Kroil I put the barreled action barrel down in a padded vice and put Kroil inside the action so it could kreep down into the threads. It was halfway down into them.
 
Sounds like straight forward.

I may still go to a gunsmith to do the swap at some stage, but it would be good know if you don't mind.

Just wonder:
1.Did you soak the entire rifle in Kroil? Seems like need a long container and a lot of Kroil
2.For the heating part, any heat gun would do the work right? How hot do you think it went to in your case? Can't touch at all or a quick touch is still OK?
3.I guess some good solid wrench would do, what is a cheater? Is that some kind of spacer to between the barrel and the wrench?

I probably have the same sort of PVA barrel like you are having, my original plan was trying that first instead of the original factory barrel as only one per rifle.

Thank you.

I just soaked where the barrel mated to the receiver. Kept applying it to the seam. Honestly not sure if it did anything, I suspect they used the same glue on the threads they do on the scope rail, but thats just a guess.

I used a MAAP torch with a camping propane tank on it instead as thats what I had laying around. My goal was just slightly smoking hot but not anywhere near red hot. Like 200-300 degrees as ling as Im guessing lol. Altering the heat treat on a receiver especially in a critical spot is not something I want to do. Definitely hot enough to cant touch though. My goal was to heat it all (the barrel threads will unfotunately heat as well) so I had a can of air ready and blasted the barrel chamber after it was all smoking hot, trying to shrink just the threads. Not sure if it helped but it certainly didnt hurt.

The cheater is just a long bar over the wrench to get extra leverage. I took the long metal tube handle off the floor jack in my garage to use. I had to saw one end of the box wrench off to get it to fit over, but the leverage of a 5 foot bar on the 31mm wrench took very little force at all to spin the barrel off. If you use a bigger diamter pipe get one that fits over the end of the wrench but I was just using what I had. The tool steel of the wrench was a bitch to saw through even with my sawzall. I did use a single scrap from a beer can to shim the wrench to make sure it didnt scratch the receiver and was as tight as I could get it. Wished I had just done that to start instead of buying an expensive action wrench that twisted apart.
 
  • Like
Reactions: Alwaysforlearning
For Kroil, I grabbed my barreled action in a soft jawed vice to hold it vertically. I put lots of Kroil around the inside barrel threads and then also where the barrel shoulder meets the action. It was amazing to see the Kroil seep in, even where you think it wouldn't be possible. I didn't heat that area but that sounds like it could be useful.

I let the oil kreep (ha!) in for a few days and then did the procedure I outlined above.

I 100% agree that using an internal action wrench is NOT the way to go for this.

ETA: there's no glue on the barrel threads. There seems to be some kind of white anti-seize, but it's definitely not glue or thread locker.

-Stooxie
 
I just soaked where the barrel mated to the receiver. Kept applying it to the seam. Honestly not sure if it did anything, I suspect they used the same glue on the threads they do on the scope rail, but thats just a guess.

I used a MAAP torch with a camping propane tank on it instead as thats what I had laying around. My goal was just slightly smoking hot but not anywhere near red hot. Like 200-300 degrees as ling as Im guessing lol. Altering the heat treat on a receiver especially in a critical spot is not something I want to do. Definitely hot enough to cant touch though. My goal was to heat it all (the barrel threads will unfotunately heat as well) so I had a can of air ready and blasted the barrel chamber after it was all smoking hot, trying to shrink just the threads. Not sure if it helped but it certainly didnt hurt.

The cheater is just a long bar over the wrench to get extra leverage. I took the long metal tube handle off the floor jack in my garage to use. I had to saw one end of the box wrench off to get it to fit over, but the leverage of a 5 foot bar on the 31mm wrench took very little force at all to spin the barrel off. If you use a bigger diamter pipe get one that fits over the end of the wrench but I was just using what I had. The tool steel of the wrench was a bitch to saw through even with my sawzall. I did use a single scrap from a beer can to shim the wrench to make sure it didnt scratch the receiver and was as tight as I could get it. Wished I had just done that to start instead of buying an expensive action wrench that twisted apart.
Thanks a lot for the explanation.

I may give it try when I plan to remove the factory barrel.
 
Thanks for both of your replies.

I think I am more worrying about the force which might damage the action, don't want to risk that. for sure. To install I reckon it should be reasonable simple.

If I didn't fuck mine up (haven't got a chance to go find out with boolits yet, but the bolt still runs smooth!) you'd have to use retard strength on it to fuck up the action.

I paid $40 locally to have it removed after I tried and failed, but the guy who did it I'm pretty sure hooked me up... he only told me $30. If I were machining stuff and had his skills (look up Silver Seitz shotguns) I don't think I'd even chuck something in a lathe for that little.

That and destroying the Lite barrel was well worth it to me, though... although that barrel lacks much of any resale value. Can't say I've seen one of the heavier barrels as a good take-off to have an idea of value and if it'd be worth saving.
 
Re: uses for take-off barrels, I like to hang on to them because I plan to get a lathe at some point, and would like some barrels on which to practice. Additionally, they make good mandrels for inletting barrel channels in stocks (wrap a piece of sandpaper around the barrel at the diameter that you want the barrel channel, and Bob's your uncle), disciplinary tools to aid with poorly behaved children, etc...
 
Anyone have a picture of this relief cut for the tikkas? Im assuming its running lengthwise of the barrel right in front of the action so that it can compress a bit to take force off of the threads?

Here are some pictures of the relief cut on my old 260 CTR barrel. Came off real easy after this was made.
 

Attachments

  • 5-7-19 014.jpg
    5-7-19 014.jpg
    148.1 KB · Views: 712
  • 5-7-19 015.jpg
    5-7-19 015.jpg
    209.6 KB · Views: 581
  • 5-7-19 016.jpg
    5-7-19 016.jpg
    188.3 KB · Views: 619
That looks like a candidate for doing the REMAGE thing to the shank and using it or selling it. Depending on how far the thread interruption is. If it's under the cap, then why not?
 
That looks like a candidate for doing the REMAGE thing to the shank and using it or selling it. Depending on how far the thread interruption is. If it's under the cap, then why not?

The throat is toast in that barrel, over 3000 rounds of 260 down it.
 
Would the relief cut need to be as wide as what is shown in this thread. What about taking a porta-ban and making a cut near the action. It seems as if it would still relieve the pressure. I may end up giving it a whirl soon.
 
Using your head and not your wallet ?

I am a cheap bastard :) Barrel cost me $120, collar and headspacing from my smith cost $80. $200 for a fitted barrel that will hold it's own with a custom tube is my kind of price. Also, this project was for a short range brush gun that will occasionally be shot out of a chopper (hence the 17 inch barrel and Aimpoint), so I was hedging my bets in-case accuracy was off. I need not have worried as the rifle is easily sub Moa with factory hunting fodder or my 130gr Barnes TTSX handholds - just like all the other Tikka's I've messed with
 
Found this thread and the light finally came on. I couldn't visualize the relief cut that has been mentioned so many times, Thanks
260284 for posting those pictures.
 
  • Like
Reactions: 260284
I just use a bugholes rear entry action wrench a barrel vice and a big crescent wrench. They take a bit but they come off. I haven’t twisted a receiver yet.
 
After reading a few posts here, I milled out a 1.20x1.21 pocket in a aluminum bar (2x1) as the action wrench.


For the barrel vice, I did the following: cut a stepped hole in a pice of pressure treated wood which was made up of a few sections glued together to achieve a suitable size. I then step drilled the wood. Cut in half, and layer epoxy with substantial filler. The barrel was placed between the epoxy coated wood section with a saran wrap / plastic food wrap piece of barrier.

I did use powdered sugar in the mold between the barrel, it really helps. All in all worked great, didn't take much effort to get off after a few dead blow hits. No marking at all.

I hope these photos help for someone else who would want to do the same.
 

Attachments

  • PXL_20210319_232619412.jpg
    PXL_20210319_232619412.jpg
    611.8 KB · Views: 451
  • PXL_20210319_233422584.jpg
    PXL_20210319_233422584.jpg
    593.2 KB · Views: 505
  • PXL_20210319_232835840.jpg
    PXL_20210319_232835840.jpg
    640.4 KB · Views: 507
  • PXL_20210319_233234102.jpg
    PXL_20210319_233234102.jpg
    616.9 KB · Views: 492
Last edited:
Removed three so far, barrel vise and external action wrench. Two came off easy, one needed a longer bar and a couple taps with a mallet.
 
Allthewatts has a good and simple solution. These are cut to fit an existing action wrench. I've never had a Tikka factory barrel that wouldn't come off with this set-up and a couple hard wacks.
 

Attachments

  • IMG_1139.JPG
    IMG_1139.JPG
    452.9 KB · Views: 957
  • IMG_1145.JPG
    IMG_1145.JPG
    320.8 KB · Views: 465
I think I watched that one through the mill window, but yes we made it when we got into Tikkas
 
I think the key is some solid whacks with a head hammer. It can be the same getting off Savage barrel nuts. A cheater bar just isn't the same as a sharp whack with a heavy chunk of steel. A barrel vice and an external action wrench make short work of it as long as they are held well.
 
will be using an external action wrench to remove the barrel. is there a benefit (or the opposite) for leaving the bolt (or an internal action wrench) in the action, thinking maybe it would add a little structure to the action?
 
will be using an external action wrench to remove the barrel. is there a benefit (or the opposite) for leaving the bolt (or an internal action wrench) in the action, thinking maybe it would add a little structure to the action?
No benefit. Either would just be along for the ride.
 
will be using an external action wrench to remove the barrel. is there a benefit (or the opposite) for leaving the bolt (or an internal action wrench) in the action, thinking maybe it would add a little structure to the action?

You better hope there's no advantage to leaving the bolt in place. That would mean the receiver is bending or caving.

I used an external action wrench on my Tikkas. The flat faces are a huge blessing. Use a sheet of paper between the wrench and the receiver and it will protect the finish (at least it did for me). It really didn't take all that much force in any part of the operation.

-Stooxie
 
Allthewatts has a good and simple solution. These are cut to fit an existing action wrench. I've never had a Tikka factory barrel that wouldn't come off with this set-up and a couple hard wacks.

Can those be purchased somewhere?

-Stooxie
 
  • Like
Reactions: 260284
ok i got it off! tried using a wheeler barrel vice with oak inserts but it kept spinning. so vised the barrel in my machine vise and that did the trick, at the expense of scratching/gouging the barrel, but i figured there wasn't a huge market for factory barrels anyways... used a wheeler external action wrench and just smacked it a few times with a small sledge and it finally broke free.

next question, torque spec pls for spinning on the new barrel (tikka proof carbon prefit)? apply some anti-seize? other tips? thanks!
 
  • Like
Reactions: Stooxie
next question, torque spec pls for spinning on the new barrel (tikka proof carbon prefit)? apply some anti-seize? other tips? thanks!
35-150 lbs of force, I usually settle in around 70-80, and a little antiseize, yes. Just be careful not to clamp down on that carbon too hard and unset it, get on the metal shank as much as you can. And dont clamp on the muzzle end to torque it on either and twist it up.