
Table of Contents:
– Introduction
– Why grip fit matters
– Disclaimer
– Materials list
– What is oven bake clay and which to buy
– Adding inserts to a composite or wood stock to hold the grip in place
– Molding a grip for use on a chassis with an AR15 pistol grip
– Making sure the grip will release:
– Applying the clay, building the grip
– Removing the grip and firing it
– Final fit and Attachment
– Conclusion
Introduction:
Somewhere around 6 or 7 years ago, I picked up a Kimber 82G and started shooting in a 3-position rimfire league. This is the classic discipline featured in the summer Olympics as well as in universities. 3-position is all sling and bone support, and in addition to being devastatingly unforgiving when it comes to fundamentals such as natural point of aim and trigger control, this discipline strongly highlights the importance of rifle fit to the shooter. Because you are essentially the only support your rifle gets, every contact point with that rifle becomes vital for stability. It didn’t take me long to figure out that my Kimber did not fit me very well and that I needed to fix that if I wanted to have success in the league. A little bit of research indicated that the 3-position crowd exceeds all other disciplines when it comes to rifle fit and had been doing so for some time. I added a Warner Tool Company cheek piece and a DV 4-way buttplate with hook to my stock, which caught me up with the state-of-the-art in 3-position shooting circa 1980. At this point, most of my fit felt pretty good but the one nagging problem was the grip. In the prone position (one of the discipline’s three shooting positions), your forearms essentially act as bipod legs, and getting the meat of your palm solidly against the grip while your trigger finger is properly at 90 degrees all without muscle tension is essential. Today’s competitive 3-position guns feature multidirectional adjustable trigger shoes as well as swappable and position adjustable grips for this. However, it wasn’t that long ago that they did not and shooters must have had to solve the problem other ways with the wooden stocks they used at the time. A little research informed me that it was common to build out the grip area to fit an individual shooter’s hand with wood filling products, Bondo, or more purpose-designed quick set epoxy pastes. I wasn’t so sure I wanted an ugly mess of sanded glue on my stock. There must be a better way. My search engine had misfired a little during my research and landed on a bullseye pistol shooter asking about glomming oven hardened polymer clay onto his grip. He was po-pooed by the others who thought, probably correctly, that firing the clay might crack the wood grip or perhaps just wouldn’t stick. That got me thinking, what if I molded a whole grip from the clay and held it in place with inserts in the stock? The clay was around $10 a pound and I had a few extra brass inserts from the WTC cheek hardware, so I figured I had little to loose. My results changed everything I thought about rifle grips.

Why Grip Fit Matters:
Most rifle shooters don’t think much about their firing hand grip. If you’re shooting from a bench or prone with a bipod, you’re not really supporting the rifle with your firing hand. It is easy enough to just position your firing hand such that the pad of your trigger finger lands at 90 degrees on your trigger, so what is the big deal? Turns out there are, in fact, several big deals.
First off, without breaking your shooting position to look, when you put your hand your firing hand on the rifle, where does your trigger finger land and does it always land the same place? This is a big deal because when shooting, your firing hand moves whenever you change positions and also every time you run the bolt. You move it all the time and, often, especially with unfamiliar and different positions, your hand will not land back in the right place. Before molding my own grip, my hand often landed a little off and I needed to readjust my grip to have proper trigger finger position. This is not so with a molded grip. Because the fit is perfect, I feel where I need to go as I slide into position and therefore always end up exactly where I am supposed to go quickly and repeatably.
But, wait – there’s more! How much muscle tension do you have in your firing hand and trigger finger? In positions where you can load the bipod, tripod, or bag, you really shouldn’t have much tension. Certainly, you don’t want tension in those little muscles that hold your hand open or hold your finger back since that causes tremor, fatigue, and inconsistency. I often did have my trigger finger and firing hand unnaturally held off of the rifle stock with tension in these muscles, though. No longer: now my hand is fully and comfortably supported even out to the first knuckle on the trigger finger so that I always press and never mash or curl the trigger.
Finally, what if your shooting position dictates some support from your firing hand in the form of rearward pressure from the non-trigger fingers or partial support of the rifle? With a poor grip, you will now find muscle tension in all different parts of your hand going all different ways trying to hold the rifle in position while holding the trigger finger correctly, all with few actual contact points with the machine. Good luck doing any of that in a controlled and repeatable manner. Mold that hand into the rifle and you will only have tension where you want it. You can even mold an index line into the grip along the center of the rifle if you really want to be sure that you keep the direction of the force you apply in line with the barrel when you are in a position where you pull the rifle into your shoulder.
When it comes to grip, the saying, “you don’t know what you’re missing” is probably the operable phrase. I certainly didn’t know what I was missing. Before I tried a molded grip, the grip fit of a stock was well down on my list of important stock geometry. Now, it is #2 behind cheek weld. I am excited to see that stock makers are finally coming out with some models that fit an average hand better, have replaceable grips, or have adjustable grips. This is a real win for shooters. What I like best, though, are stocks like the new MDT XRS that have a place for me to easily mold on my own. I don’t think I can ever go back.
Disclaimer:
The ideas about stock modification and grip construction in this article are a little like a load recipe in that they are things I have done and are working well for me but may or may not translate for you. They are also like a handload in that they have not been tried on hundreds of different guns and been subjected to a battery of tests to failure. Of course, unlike a handload that fails to translate from one gun to another, a grip that has issues isn’t going to blow your face up. So there’s that. Still, understand that I am only sharing my experiences here, not advising you to copy them. It is possible that the polymer clay will prove less durable for you than it has for me or that the insert system I have suggested might rip out under some circumstances. Rifles can have tremendous recoil and I have certainly heard of scope knobs and bolt handles being sheared off under recoil when people unwisely braced those parts against rigid barricades and allowed the force of the recoiling rifle to be brought to bear on them. I have little doubt that a polymer grip would break or the inserts rip out in such a situation as well. Similarly, PVC plastic has limited flexibility and it is quite possible for it to be cracked by impact under the right circumstances, such as maybe dropping it on a rock in below freezing temperatures. I have chosen to take these risks to gain better firing hand position. You will have to make up your own mind about whether you feel it is worth the risk and effort to do so.
Materials List:
– Unloaded rife in its stock
– Tools to remove rifle from stock and reinstall it
– Drill
– Large drill bit set with finely graduated sizing
– Scrap piece of wood
– Polymer clay, roughly 8oz
– Cling wrap
– Aluminum foil
– Good painters tape
– A lousy pan you don’t intend to ever cook food with again
– An oven, and preferably a second oven temperature gauge
– Machine screws to fit your inserts or attachment points in a variety of lengths between .5″ – 1.25″
– (For composite or wood stock) 3-D printing inserts corresponding screws of a variety of lengths between .5″ – 1.25″
– (For composite or wood stock) Epoxy glue
– (Optional) Dremel with some high speed cutters, sharp utility or X-acto knife, and a very coarse file
What is oven bake clay and which brand to buy:
Oven bake clay is actually not clay: it is a PVC powder and fillers with plasticizers, stabilizers, lubricants, and colorants. In other words, it is plastic and is often more accurately called polymer clay. Like other plastics, not all polymer clays are created equal. Prior to hardening, when they are workable, their firmness varies greatly as does their stickiness. Following baking, their strength, flexibility, brittleness, and adherence to original size and shape also vary greatly from brand to brand.
At this point I have tried a variety of clays from several brands with varying success. I will here give you the benefit of my experimentation.
Craftsmart: This is essentially the generic house brand that Michaels’ stores stock. Rumor has it that it is manufactured by Sculpey. It is inexpensive and much maligned by polymer clay websites. Evidently, what those folks are trying to do with clay is very different than what I am doing, as every grip I have made from this came out very well. In fact, every grip pictured in the image at the start of this article is made from Craftsmart. I have had none of it crack in the baking process, and all the resulting grips have been strong with enough flexibility to not crack when I fastened them on the stock. In practice, the Craftsmart clay is a bit softer than would be ideal when you are molding it, but it works easily and bonds well to itself. After baking, it grinds, cuts, or is filed very easily as well. The surface finish of this clay is flat and where it is cut or ground it looks much whiter and almost foamy or chalky. Few colors are available in Craftsmart, with only gold and silver semi-metallics and the rest just opaque. I was able to put together a pretty good camo palette, though, so I can’t say I was disappointed.
Premo: Premo seems to be generally considered the best polymer clay overall. It comes in a huge variety of opaque colors as well as semi-metallic and translucent varieties. I tried Premo for two grips. While baking the first one, my oven decided to have its logic board fail, resulting in 600+ degrees and a bubbling ball of flaming plastic. Hell of a time for the oven to die. It couldn’t just ruin a pan of brownies, no. The second Premo grip was properly baked and ended up usable but developed surface cracking while cooling down. I think I let it cool down too slowly and essentially overcooked it. I still think I can probably get Premo to work, but it is not as plug and play as the Craftsmart stuff. When working Premo, it is a little firmer than Craftsmart but still on the soft side. It bonds well to itself. The finished product is semi-gloss in appearance and cuts and grinds well, with the cut area appearing very much like other cut plastic. The finished product feels like plastic and has some flex. Premo also seems to be a bit lighter weight than Craftsmart and shrinks a bit more.
Super Sculpey: I tried this out in the medium firmness. This was substantially firmer than the Premo and Craftsmart, and I would wager is just about perfect when it comes to the texture while working it. Despite being pretty stiff, it was not crumbly and it bonded well to itself. It was a joy to mold with because you could really feel the shape you made and so had a good idea what the finished grip would feel like. Unfortunately, Super Sculpey is well known for being brittle and my finished grip broke pretty easily. I do not believe that Super Sculpey is usable for grips due to this fragility. The finished product is matte in appearance and requires much effort to cut or grind. It is surprising that a plastic product can be so resistant to whirling sharp steel blades. They must have gone super heavy with the fumed silica in this stuff.
Kato: If you have a perfectionist that you want to suffer, buy them Kato Polyclay. Trying to mold it is an exercise in futility and self-flagellation. It is hard as a rock but crumbly as a biscuit, all while displaying an unfathomable repulsion to itself. Its only redeeming quality is the nostalgia it engenders in you for summertime in childhood, as it smells exactly like an inflatable raft in the hot summer sun. Lest you think it is worth all the effort to make the grip because Kato has a reputation for being strong when finished, I can assure you that is all lies. The finished product not only cracks at every joint where you attempted to bond the self-loathing product to itself, but also generally cracks and crumbles like expensive cheese everywhere else.
Adding inserts to a composite or wood stock to hold the grip in place:
If you’re going to do your grip build out on a wood or composite stock, you need to install the inserts first because the grip will actually be molded around the screws that hold the grip to the stock. I have spoken to Grayboe, McMillan, and Manners concerning this practice. Grayboe does not see any problems with it. Manners thinks it is an interesting idea, does not think it will cause any problems and wants you to know it will not void their products transferable lifetime warranty. Manners also encourages you to call and talk to them before hand. I think this is both to help you with exactly what to expect and so that they can gather data from those trying this new modification. McMillan recommends against drilling it’s stocks to add inserts for a grip build out. If you are using a different brand of stock, you should call and ask their advice before doing any drilling, as companies’ product construction can differ greatly even when the products appear superficially similar.
There are a few special considerations. With Manners stocks, adding inserts to the super light hunting stocks may cause problems as there may not be enough strength in this area on those models to support the inserts. If you have one of those and are really set on trying it, be sure to call Tom up first and talk to him about it. Inserts of the size I have specified will work fine on any stocks in the tactical line, though. On any composite stocks with an outer shell such as the Manners etc., do not drill any holes in the front of the grip directly on the centerline, as there is a joint between the two halves of the stock there and it is a little bit weaker. Also, when drilling these type stocks, you will notice the fill material cuts very quickly and easily, so be careful not to go to deep. You should also be aware that the shell is where almost all the strength is and, as such, you want to make sure you are well bonded to this. Do not push the inserts in past flush when you epoxy them in place as you want to be well bonded to the shell and not just glued into the fill. With wooden stocks, if there is a narrow neck of wood between the butt section and the section supporting the action, do not drill into that narrow neck. Put the inserts further down in the area of wood that is connected to the butt stock. Those narrow sections on wood stocks are often directly cross grain. It is not advisable to weaken them since they are already pretty weak.
The inserts I use are marketed for use in 3-D printing and are designed to be heated and then inserted into finished prints. They can be obtained from McMaster-Carr. The ones I have are brass, 10-32, and 3/8″ in length. This is about the size of insert you want.
In order to determine what size hole to drill, it is advisable to drill test holes in some scrap wood. The fit you are looking for is a very slight interference fit. This means that insert will slide in with very little force but will not just fall into the hole; just enough contact to keep the insert straight and allow you to determine its depth. For the inserts I am using, the correct drill bit is 19/64. This is not a super common size, but I do recommend going out of your way to make sure that you use the correct size bit, even if it takes effort to obtain.
Once you have determined the bit size you should tape it off to mark the correct depth to fit the insert so that you do not drill out more stock than necessary. You should also tape over the whole area you will be drilling with painters’ tape. This is to prevent chip out on the stock and also to later serve to keep the epoxy you use to hold in the inserts from making a mess on your stock. My preferred pattern of holes is two on the palm side where the grip will be thick and one on the finger side between the pad of your middle and ring finger. All three holes will be angled toward the center of the stocks grip area. Drill at a high rpm and with very little force to get a clean cut with no chip out. After drilling, clean dust out of the holes thoroughly and then swab both the hole and the inserts with rubbing alcohol or acetone. If you encounter any voids in the stock, as sometimes happens in composite stocks, be sure to fill the void with epoxy, allow it to harden, and then re-drill the hole so that you have a good foundation for your insert. When I apply the epoxy, I apply it lightly to both the insert and the hole with a toothpick. Be sure not to use too much, as you don’t want so much excess that it works its way up thorough the hole in the center of your insert and blocks some of your threads. Use the screws you will be holding the grips on with to easily push the doped up inserts into the holes and to set their depth flush with the surface, then immediately remove the screws. On composite stocks with a shell such as Manners, remember to keep the inserts flush and not any deeper so that the insert is adhered well to the shell of the stock and not just the fill. Wipe the excess epoxy that gathers around the hole off with q-tips, being sure not to shove any in the hole. Remove the tape and check to see that the area around the insert is clean. Give the epoxy at least 24hrs to set before moving on to building the clay grip.
Molding a grip for use on a chassis with an AR-15 pistol grip:
There are a lot of grip choices that fit the AR-15 pattern. If you want to mold your own, I think the best option would be to start by buying the MDT vertical grip. You can take the plastic adjustable slabs off and mold your grip around the aluminum core with the nice threaded holes it has. At $50, this grip is pretty expensive but would be very easy to mold off of. You might also find out that its adjustability and geometry fill your needs right out of the box and just end up using it as-is.
Making sure the grip will release:
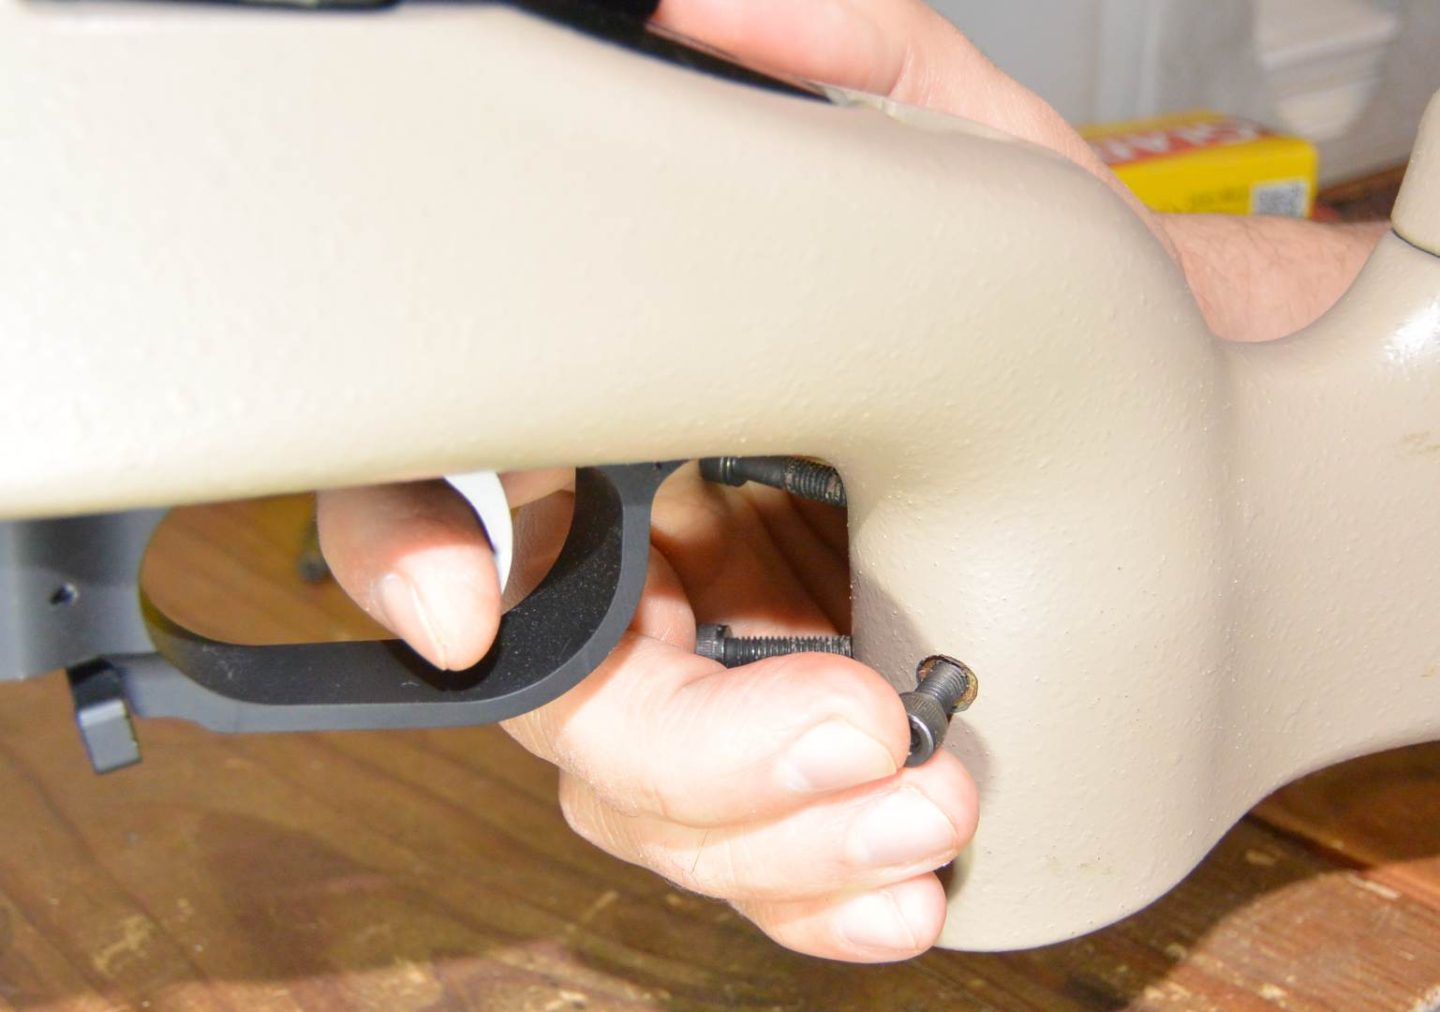
Once you finish molding your grip, you will be trying to remove it from the stock and fire it without distorting its squishy self in the process. You will find polymer clay stickier than you think and it will certainly try to adhere to whatever surface you are molding it on. You will not be able to remove the grip you have molded from the stock without distorting it unless you use a release agent. Guess how I learned that? To get the grip to release cleanly, you must cover the surface you are molding it on in cling wrap. Tape the cling wrap to the surface you are molding onto just outside of where you want the grip to extend to. Next, thread the screws you will be holding the grip onto the stock with right through the cling wrap and into the inserts. You may have noticed in the materials list that you should have screws of a variety of lengths that fit your inserts / attachment points. Here is where you must choose the right ones. Put your hand where you want it to eventually be when the grip is done. You must choose screws of the correct length so that each is just touching your hand in this position. Don’t worry too much: if you’re wrong you can switch mid-molding but you want to start the molding with the screws that you think you will use threaded in just like they will eventually be when they are holding on the grip because these screws form the scaffolding that you are building the grip on. At this point you should have your cling over everywhere the molded clay will be and the screws should be in their correct positions sticking right through the cling wrap.
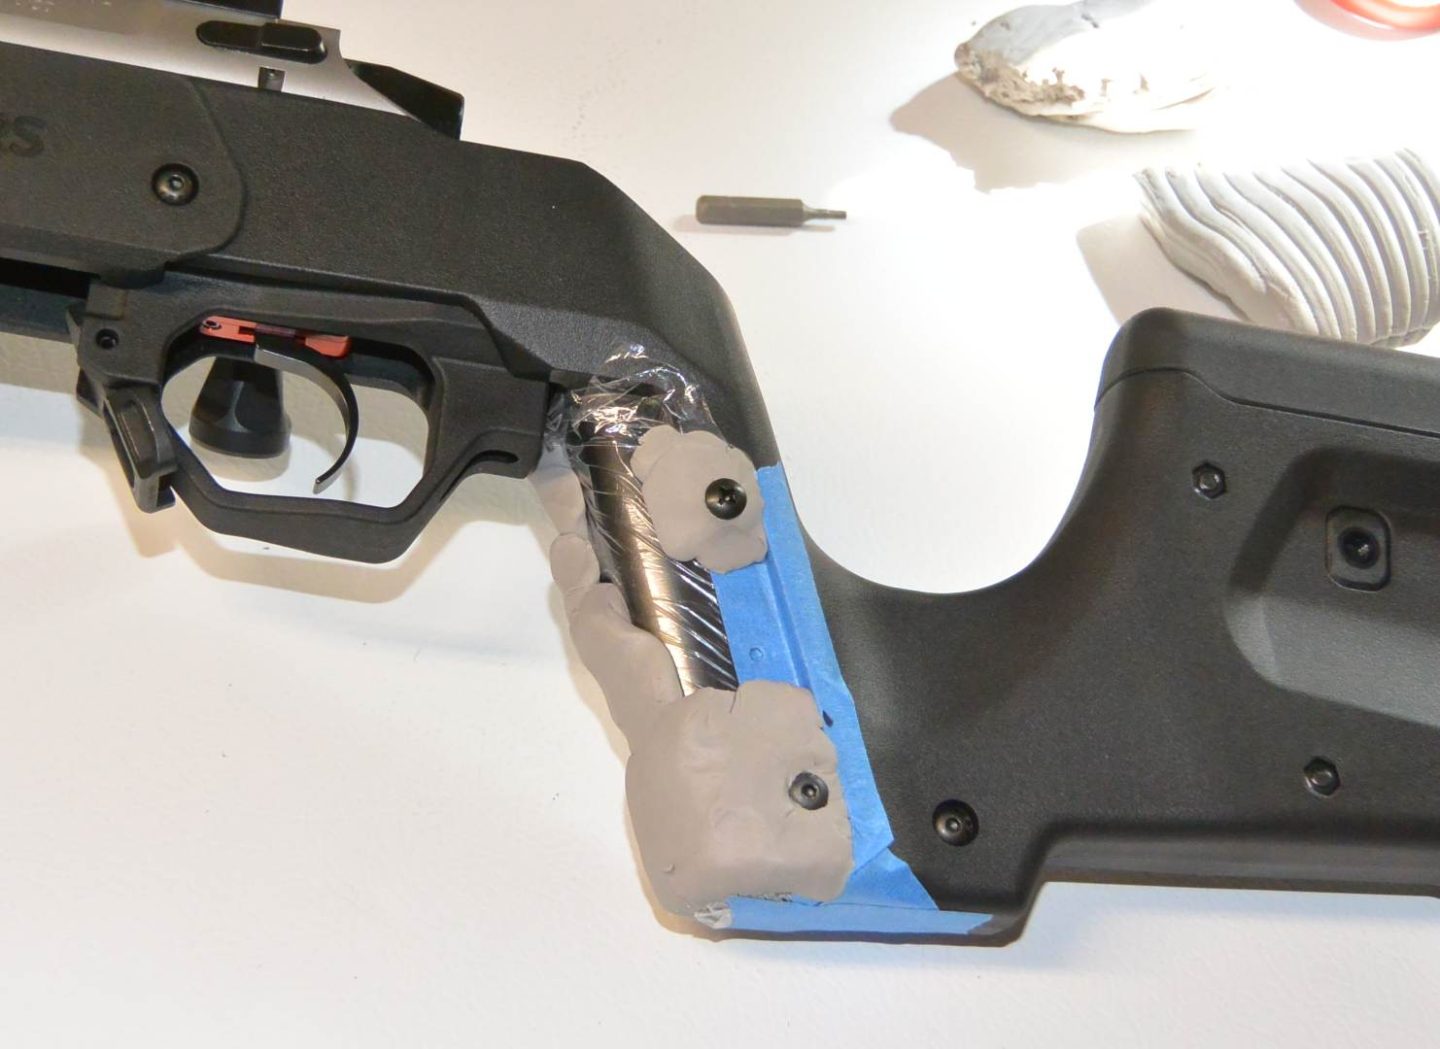
Applying the clay, building the grip:
Before you apply the clay, you must “condition” it. This basically means that you need to work it. Some people mash on it with a hammer or rolling pin. I just worked it against the table for a bit, making sure not to fold any air into it. There is not a specific size chunk that it is best to work with when applying the clay unless you are doing a camo pattern. In that case, each chunk will be a camo blotch so your sizes determine the end appearance. This makes it easy for you to see, from the various camo grips I have in my pictures, about what size chunks I tend to work with. When applying the clay to the grip area, I always start with the screws to make sure that I get it tight around them. I work out from there, typically finishing with the thumb and trigger finger shelves. As you build, you will want to keep testing how the grip feels in proper shooting position as you go. Pay particular attention to:
1) When I slide my hand onto the grip, what parts of the grip are indexing my hand into place repeatably? Are these places offering definite tactile feedback or do I need to make more contour to feel where my hand should go? Specifically, I index my hand into the grip with the V of the thumb shelf. I want to come to a definite stop on that with the rest of my hand in the correct position. I also like to distinctly feel a support under my trigger finger supporting it in front of the knuckle so that I will properly articulate the trigger using the middle joint.
2) Once gripped, does my trigger finger lay repeatably 90 degrees to the trigger and the pad comfortably on the trigger? Does it do this the first time I touch it to the trigger every time or am I adjusting my grip to get there? If the grip fits, and is properly indexing me as I mount it, my trigger finger should lay right every time.
3) Does my trigger finger feel relaxed and stress free?
4) Is my thumb properly supported and comfortable or is it wandering around looking for something to do?
5) Does my wrist feel relaxed or is it bent at an angle that feels strained?
6) Does my whole hand feel relaxed and in solid contact with the grip?
Build, test, build, test, and so forth. The shape you are generating is different than you thought it would be, isn’t it?
Removing the grip and firing it:
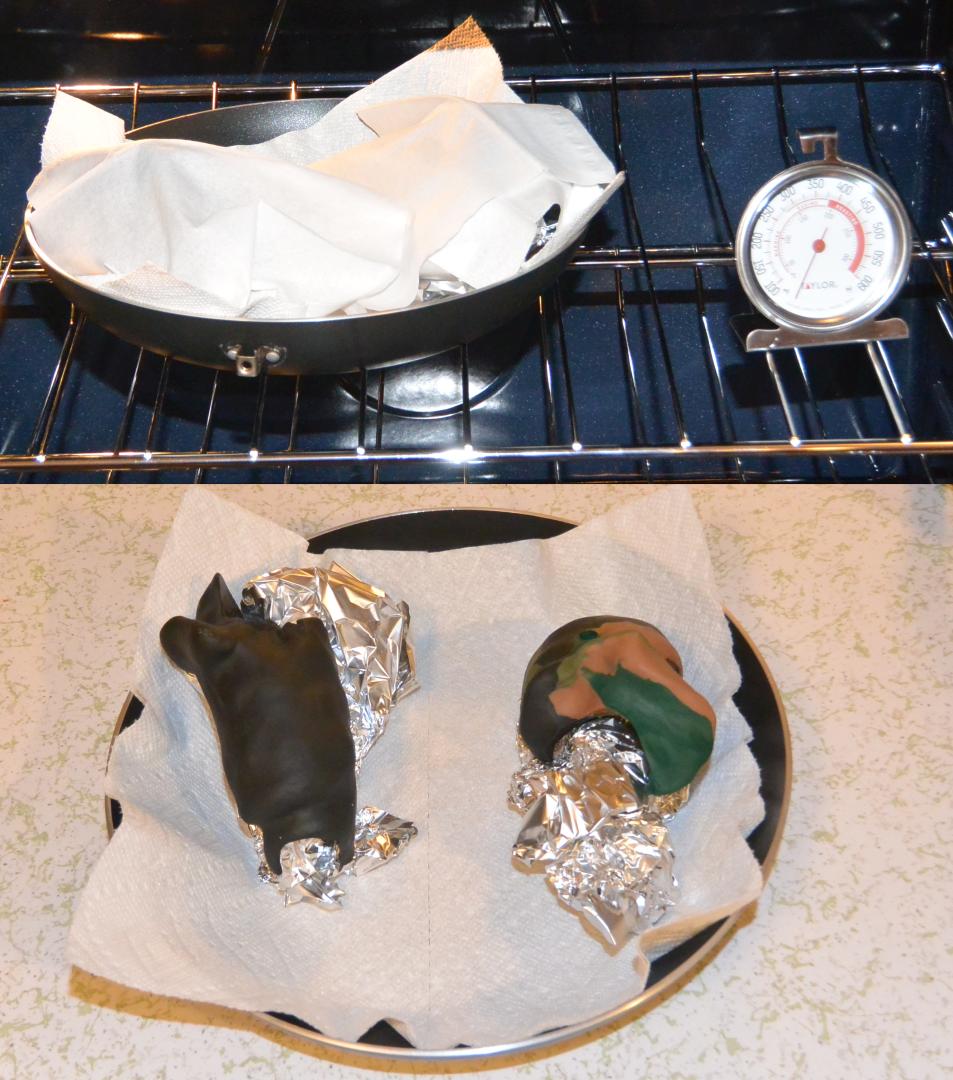
Once you are satisfied that you have the end all, be all grip, or, at least one you want to try out since it is only $10 – $15 in clay to try again later, it’s time to take your grip off and bake it. This is always the part that makes me pucker a little. Taking out the screws is no problem, though you do have to unscrew them all the way and not try to pull them though the clay. Depending on the geometry of the grip and stock, it can be a little tricky getting the grip off. Make sure you free all the tape first and be careful not to deform the grip as you free it. Once it is free you can easily, gently, pull the cling wrap off of it. The very best way to support the grip when baking is with an aluminum foil support inside it that is about the right shape. On the MDT XRS I just did, I actually made this support by jamming foil into the angled plastic replicable grip option it came with. Two sided grips like that for the XRS are doubly important to get this foil the right size and shape on as they often have thin floppy areas that are hard to support and you need to be pretty close on shape as the grip wraps far around the rifle. Be aware that the clay softens before it hardens as it heats up so you can get deformation if you do not have the right support. When I fire the clay, I do so in my home oven on a crappy old pan I no longer use for cooking. I put a paper towel between the pan and the foil supporting the grip and lay a tissue over the grips so that the outside of the clay is shielded from any radiant heat and conductive heat. You want convection heat, as that is the most even. Do not worry about the paper catching fire so long as they are not right next to a heating element. Paper does not catch fire until 451 degrees Fahrenheit (hence the book title) and your firing temperature is far below that. Fire the clay on a nice day when your wife and kids aren’t home and you can open the windows up and run the fan. The clay stinks when being fired and I don’t think you really want to breathe a lot of what is cooking off. Exact time and temp vary by clay so follow the manufacturer’s instructions for yours. You should also use an auxiliary thermometer in the oven that lets you monitor the temperature as ovens can be pretty far off true – refer to the photo of my crispified grip if you are skeptical. That would not have happened if I had a second thermometer in there. When you have finished your cooking time, turn the oven off and open the door. Let the grips cool in this environment several hours before disturbing them. They are most fragile while cooling.
Final fit and Attachment:
You may find after firing that the grip has shrunk just a tiny bit or that something deformed slightly. The clay is now essentially a block of PVC plastic. You can grind on it with a Dremel high speed cutter, shave it with an X-acto or utility knife, file it with a file or rasp, or drill it with a drill bit. I typically run a drill bit through the screw holes to give them a little slop. I then trim or grind anything that needs altered and screw it on. If your grip is a wraparound, such as on a stock that was designed for a replaceable grip like the MDT XRS, be sure you do not try to flex the grip substantially to slide on, as it will likely break. File, cut, and grind if the grip is deformed inwards a little, as it likely will have. When tightening the screws, it is best to start all the screws before tightening any of them. Also be sure not to over tighten the screws. Remember, the grip is just plastic, and PVC at that. If you hork on it too much, it’s going to break.
Conclusion:
Proper grip fit is of great importance to proper shooting mechanics, but it is not as easy as getting to proper cheek weld. Every hand is different in a lot of different dimensions and so making grips properly adjustable is a difficult task. Molding has long served as the answer to the difficulty and I think that doing so using a polymer clay and insert system is a better solution than previous epoxy putty methods. I think it is easier to mold the polymer clay than epoxy putty and you have unlimited work time to do so instead of the very limited time when dealing with epoxy. The resulting product, though only a little flexible, is still far more flexible than an epoxy build out as well. Despite what some of my creations might suggest, polymer clay is also a material intended for artistic modeling and has potential to produce very attractive products. For instance, you could incorporate some of the custom canes produced for sale by a variety of artists for some dramatic effects or do a nice cammo pattern. The finished clay is also paintable. Probably the biggest advantage of the polymer clay and insert system is that grips are interchangeable and cost very little money ($10 – $20) to produce. If you decide you don’t like a particular grip, need a different shape – such as for a match with weak hand stages, or you want to share your rifle with someone else, you can easily just make another grip to fit the bill.
Hope you found this article useful and please accept my apologies for spoiling your tolerance of bad grip fit forever – sorry, not sorry.
Thanks to Luke Johnson, Tom Manners, Derrick Guay at MDT, and Kelly and Ryan McMillan for their input on various aspects of this article.
