• Watch Out for Scammers!

    We've now added a color code for all accounts. Orange accounts are new members, Blue are full members, and Green are Supporters. If you get a message about a sale from an orange account, make sure you pay attention before sending any money!

Machinists! Isometric/orthographic drawings!

Swift

Chief Bagel Technician
Full Member
Minuteman
Aug 4, 2010
1,461
0
35
Cleveland, OH
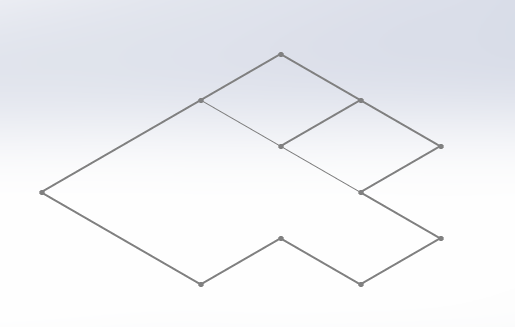
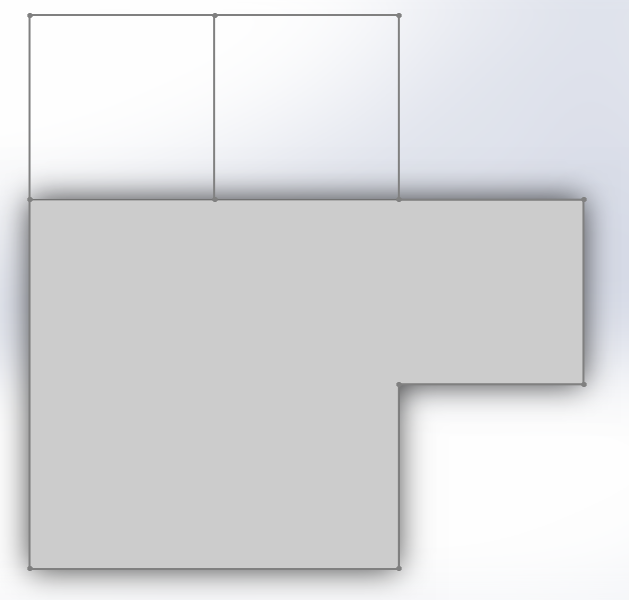
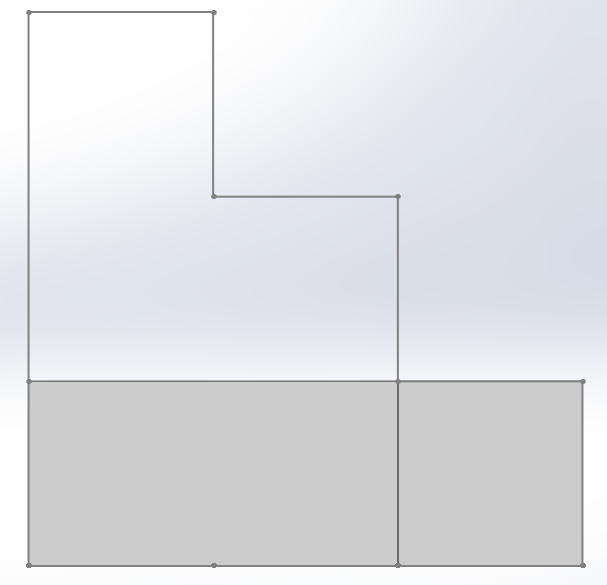
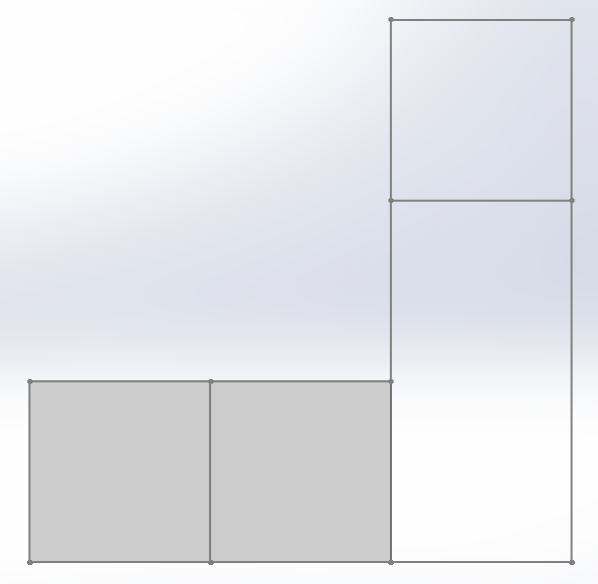
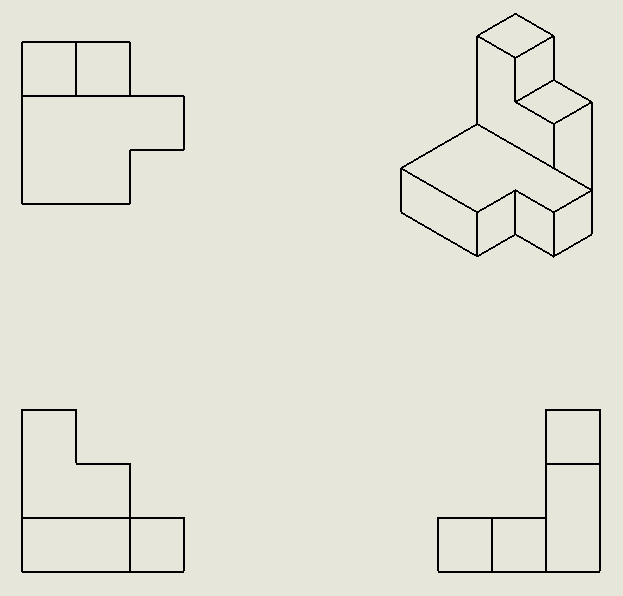
This is the only course that's giving me trouble. The math, the blueprint and the machines are easy to grasp but I lack the creative juices to create an isometric drawing from an orthographic drawing when given a front, top and right side view. This is an important component when you're trying to make a career in gunsmithing so do yall have any tips or tricks to help visually paint the image? Once it's drawn, it's easy to check your work and it makes perfect sense but getting there is another story.

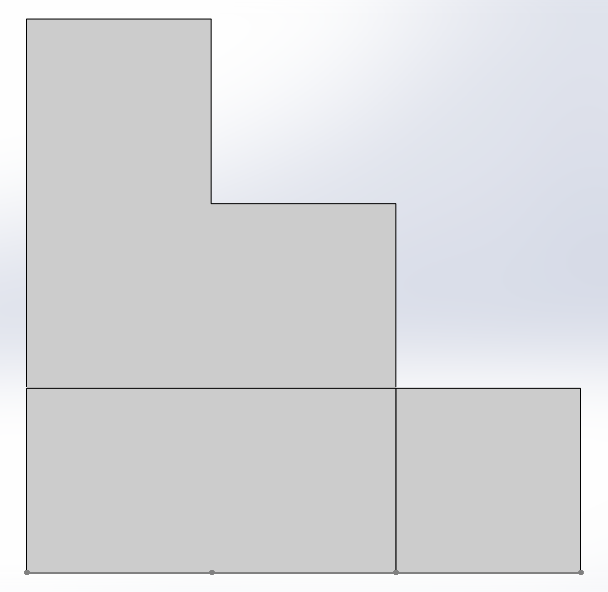
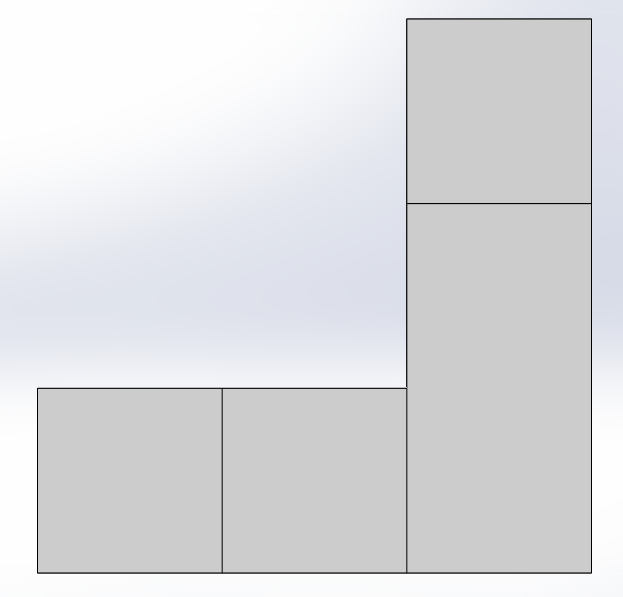
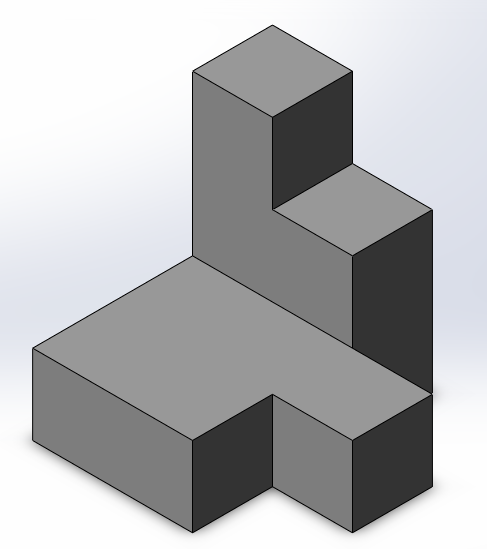
This is an example from our workbook. My instructor is one of those guys that knows his way around a machine but doesn't know how to explain it very well; I know we've all had em. There's a few lines I haven't erased yet so excuse those. This page took me a shade over an hour start-to-finish and there's still some errors I need to correct, #2 in particular but my brain needs a break.
s40wg9.jpg
 
Re: Machinists! Isometric/orthographic drawings!

Take another look at two and four. Draw the isometric in layers starting with the top view...once it is compliant there, look at the front view and side view together...and build the shape from back to front on the foundation you have from the top view. All of the front and side view blocks in the second and third layers will be sitting on one of the foundation blocks from the top view...none are hanging over blank space.
 
Re: Machinists! Isometric/orthographic drawings!

<div class="ubbcode-block"><div class="ubbcode-header">Originally Posted By: KYpatriot</div><div class="ubbcode-body">Take another look at two and four. Draw the isometric in layers starting with the top view...once it is compliant there, look at the front view and side view together...and build the shape from back to front on the foundation you have from the top view. All of the front and side view blocks in the second and third layers will be sitting on one of the foundation blocks from the top view...none are hanging over blank space. </div></div>

Thanks KY. The only suggestion he made is to use the top view to create a coded plan but didn't elaborate much further. I've been building from the bottom up but front to back might be the better approach since lines seem to get lost when you have a foundation of "1s" and you just start throwing stacks together.

Some of these are much easier than others like 1 and 3 but it's easy to let the hidden lines throw you off.
 
Re: Machinists! Isometric/orthographic drawings!

"TBJ"

In short, look at your scale/graph dots. On your ortho #2, each view is 3 spaces by 3 spaces by 3 spaces. Yet, on your iso attempt, (and good on ya for trying btw) you have a base that is 2 by 2 with a height of 4.

Remembering that you can only see 3 sides of a die (one of a pair of dice) at the most, at one time, this is another method of extrapolating it into mechan-o-speak.

Just start with that, and then it won't take long for you to see it. My thoughts are, you're trying too hard.
 
Re: Machinists! Isometric/orthographic drawings!

The most simplistic explanation I can offer (it may not make a bit of sense in text) is to simply rotate each view 45 degrees on each axis as it would be viewed in the isometric. Draw each angle as it would appear by itself, while ignoring which lines should and shouldn't be seen. It makes more sense in my mind to start with the bottom layer an work your way up. After all three angles have been transposed, then you can begin analyzing which lines should be erased from your point of view. I hope that makes some sense and helps. If not, I'm not surprised as my mind doesn't seem to work the same as most.
 
Re: Machinists! Isometric/orthographic drawings!

<div class="ubbcode-block"><div class="ubbcode-header">Originally Posted By: Sean the Nailer</div><div class="ubbcode-body">"TBJ"

In short, look at your scale/graph dots. On your ortho #2, each view is 3 spaces by 3 spaces by 3 spaces. Yet, on your iso attempt, (and good on ya for trying btw) you have a base that is 2 by 2 with a height of 4.

Remembering that you can only see 3 sides of a die (one of a pair of dice) at the most, at one time, this is another method of extrapolating it into mechan-o-speak.

Just start with that, and then it won't take long for you to see it. My thoughts are, you're trying too hard.</div></div>

The die idea is really good. All this time I've been trying to play Bob the Builder and picture these big fictional ominous blocks in my mind but to relate it to something real and more familiar is a huge help. I'm gonna use that method on my exam next week.

Yeah I boogered that second one pretty good but I'd been buried in that book for about 4 hours at that point and didn't have much left in the tank. Normally I'd cross reference with the orthos when I'm finished to make sure everything's where it should be. I just ran outta steam and closed the book before finishing but the other pages were covered in lines, numbers and notes so this was the cleanest example I had(definitely not used for accuracy because I'm mildly embarrassed to even post this particular page with all these errors but this isn't something I'd turn in for a grade). It's easy to lose yourself in the grid and end up drawing a stack only to discover it didn't go where you thought it would; in the case of #2, that stack of 3 was supposed to go behind all the 1s and I knew this before drawing it but it obviously didn't come out this way. Tomorrow when my head is clear I'm gonna scratch most of that page and do it again. I've never had much of a creative imagination so this course is gonna be a big help and a big challenge at the same time.

<div class="ubbcode-block"><div class="ubbcode-header">Originally Posted By: athhud</div><div class="ubbcode-body">The most simplistic explanation I can offer (it may not make a bit of sense in text) is to simply rotate each view 45 degrees on each axis as it would be viewed in the isometric. Draw each angle as it would appear by itself, while ignoring which lines should and shouldn't be seen. It makes more sense in my mind to start with the bottom layer an work your way up. After all three angles have been transposed, then you can begin analyzing which lines should be erased from your point of view. I hope that makes some sense and helps. If not, I'm not surprised as my mind doesn't seem to work the same as most.</div></div>

This is very close to the way it was explained to us. The issue is visualizing and extrapolating those angles into three dimensions when only given separate two dimensional views to work with(assuming I'm understanding what you're getting at). Going from isometric to orthographic was very easy for me to pick up but this is more challenging.

With enough time and effort I can put together a correct drawing but only after a lot of erasing, brooding, cursing and migraine inducing critical thinking. Once the breakthrough is made it becomes second nature cuz my instructor flies through those like 3rd grade addition problems.

For now, I'd be content to cut down on the time but I suppose that comes with an understanding of the concepts. I will keep that die idea in mind and that's exactly what I was looking for when I posted so thank you; it made more sense than you give yourself credit for.
 
Re: Machinists! Isometric/orthographic drawings!

So unfortunately there is not really a right way to do these as everyone's brain is wired differently. I will say they do get easier the more you do them. I went thru the 2nd problem to illustrate how I would approach it. This method may or may not work for you so keep that in mind. I also might do some things differently depending on the features of the part like blind holes, etc. but that comes with experience.

My methodology involves breaking a larger part up into smaller parts. I typically start with the sketch that has the largest solid area. In this case it is the top view which I then <span style="text-decoration: underline">lightly</span> sketch into the isometric view.

Top_View.png


I then pick the largest area and start with that.

First_Extrude_Top.png


From the front view, I can see that it goes up 1 unit.

First_Extrude_Front.png


I added the right view just so you compare but the right view provides no extra information in this case.

First_Extrude_Right.png


I then sketch this chunk of the solid in the isometric view.

First_Extrude_Iso.png


Now that the largest area is done, I go back to the top view and pick the next largest area. In this case, two areas are the same so I picked the one on the left.

Second_Extrude_Top.png


I then use the front view to figure out how far up this block goes.

Second_Extrude_Front.png


Again, for completion sake, I added the right view even though it adds no extra info.

Second_Extrude_Right.png


Drawing the isometric view gives the following:

Second_Extrude_Iso.png


Finally, I return to the top view and add in the last block left.

Third_Extrude_Top.png
 
Re: Machinists! Isometric/orthographic drawings!

Looking at the front view gives me an idea of how far up the last block goes.

Third_Extrude_Front.png


The right view again provides no extra info.

Third_Extrude_Right.png


Finally, drawing the isometric view of the three parts combined gives the final answer.

Third_Extrude_Iso.png


The tougher problems will force you to use all 3 sketches. For this one, the right view was never really used except to confirm what the top and front views already told me. Hopefully I didn't confuse you. Luckily, once you start using a CAD program, it does as many different views as you want automatically. I've attached one such example below.

Combined_Views.png
 
Re: Machinists! Isometric/orthographic drawings!

OK I am not a gunsmith but I stayed at the holiday inn. If I were you I would get some Lego's. Put the pieces together just like the drawings and just spend a little time on visualizing them while they are actually in your hand. I think that will jar loose the lock you have figuring them out. Some people have a problem with converting what is in the hand to what is drawn on paper. Hope this helps.
 
Re: Machinists! Isometric/orthographic drawings!

Angelballer, I don't wanna quote your post cuz it'll double the length of the thread but it's a great post and I thank you for taking the time to put it together. I understand everyone's brain is wired differently and that's why I wanted to see how others think their way through these. Right now I've been working in a similar pattern to what you did although visually seeing the process versus mentally walking through it is a big help.

Unfortunately, we're not working in CAD yet, only manual machines and pencils otherwise this would be a piece of cake. CNC and CAD will come next year.
 
Re: Machinists! Isometric/orthographic drawings!

<div class="ubbcode-block"><div class="ubbcode-header">Originally Posted By: The Mechanic</div><div class="ubbcode-body">OK I am not a gunsmith but I stayed at the holiday inn. If I were you I would get some Lego's. Put the pieces together just like the drawings and just spend a little time on visualizing them while they are actually in your hand. I think that will jar loose the lock you have figuring them out. Some people have a problem with converting what is in the hand to what is drawn on paper. Hope this helps. </div></div>

I haven't had a chance to stop at the local toy store yet but legos are on the list. The "lock" you mention is a good way of describing it. My bolt cutters are on standby.
 
Re: Machinists! Isometric/orthographic drawings!

As others have said, everyone's brain is wired differently. The way I started out doing it was to calculate how many "units" where in each layer from the angle I was drawing if from. Then draw each layer top to bottom or front to back depending on the angle. After you get the hang of it you'll be doing them in your head and wonder why you ever had trouble with them in the first place, that light bulb moment.
 
Re: Machinists! Isometric/orthographic drawings!

You may want to look into a couple of drafting class at the community college. The first thing you'll learn is this and lettering. It will help you in your machining in the long run.
 
Re: Machinists! Isometric/orthographic drawings!

<div class="ubbcode-block"><div class="ubbcode-header">Originally Posted By: Bryan27</div><div class="ubbcode-body">As others have said, everyone's brain is wired differently. The way I started out doing it was to calculate how many "units" where in each layer from the angle I was drawing if from. Then draw each layer top to bottom or front to back depending on the angle. After you get the hang of it you'll be doing them in your head and wonder why you ever had trouble with them in the first place, <span style="font-weight: bold">that light bulb moment</span>. </div></div>

That's what I'm hoping to find. I wanted other people's input because they may have a better way of looking at it than I do or at least provide a small spark to get that bulb lit. I'm gonna keep a pair of dice on the table during class for a quick visual reference when I hit a mental block.

 
Re: Machinists! Isometric/orthographic drawings!

<div class="ubbcode-block"><div class="ubbcode-header">Originally Posted By: KHOOKS</div><div class="ubbcode-body">You may want to look into a couple of drafting class at the community college. The first thing you'll learn is this and lettering. It will help you in your machining in the long run.
</div></div>

There are a few campuses that offer drafting classes and if I can work it around my class schedule I will definitely check into it. Anything to help hone these skills is welcome.
 
Re: Machinists! Isometric/orthographic drawings!

You could also pick up a older drafting book should have a section with these type of picks in them. Just for more practice it'll come to you just keep doing it.
 
Re: Machinists! Isometric/orthographic drawings!

I LOVE THIS STUFF! I have a folder from my old Vo-tech full of this stuff! Let me know if you still need some assistance on it!
 
Re: Machinists! Isometric/orthographic drawings!

<div class="ubbcode-block"><div class="ubbcode-header">Originally Posted By: Mosley</div><div class="ubbcode-body">I LOVE THIS STUFF! I have a folder from my old Vo-tech full of this stuff! Let me know if you still need some assistance on it! </div></div>

Will do. I'm headed to class in a few and if my head is still spinning afterwards you can count on a PM later tonight.
 
Re: Machinists! Isometric/orthographic drawings!

Sounds good! I'll see if I can dig up that old folder! Not all that old but it's what I was taught on
 
Re: Machinists! Isometric/orthographic drawings!

Aa large part of the reason it's hard to visualize the isometric is that it's just a featureless stack of blocks.

In an effort to make it simple(maybe), they may have made it harder for some.
 
Re: Machinists! Isometric/orthographic drawings!

The lego idea is genius! I picked up my limited amount of knowledge on the topic from a drafting class. A quick tutorial in day one of basic CAD revealed shortcuts that made these conversions stupid simple. As soon as I can get access to microsoft paint, I'll do my best to share them.
 
Re: Machinists! Isometric/orthographic drawings!

<div class="ubbcode-block"><div class="ubbcode-header">Originally Posted By: athhud</div><div class="ubbcode-body">The lego idea is genius! I picked up my limited amount of knowledge on the topic from a drafting class. A quick tutorial in day one of basic CAD revealed shortcuts that made these conversions stupid simple. As soon as I can get access to microsoft paint, I'll do my best to share them.</div></div>
Jeepers, thanks. Every once in a while I come up with something.
smile.gif
 
Re: Machinists! Isometric/orthographic drawings!

I teach the majority of my students to use modeling clay for ISO projects prior to a set of working drawings. Especially for single part creation.

Also, check out this site, http://wps.prenhall/chet_giesecke_9/

Most Technical Drawing and Drafting and Design classes still use these books.
 
Re: Machinists! Isometric/orthographic drawings!

<div class="ubbcode-block"><div class="ubbcode-header">Originally Posted By: The Mechanic</div><div class="ubbcode-body">OK I am not a gunsmith but I stayed at the holiday inn. If I were you I would get some Lego's. Put the pieces together just like the drawings and just spend a little time on visualizing them while they are actually in your hand. I think that will jar loose the lock you have figuring them out. Some people have a problem with converting what is in the hand to what is drawn on paper. Hope this helps.</div></div> <div class="ubbcode-block"><div class="ubbcode-header">Originally Posted By: The Mechanic</div><div class="ubbcode-body">
athhud said:
quote]
Jeepers, thanks. Every once in a while I come up with something.
smile.gif
</div></div>

If youd stayed at the Hilton youd be a gunsmith
grin.gif