Im sure it's been covered in threads but after a ton of research I couldnt find a thread that covered WHAT exactly to file away.
Hopefully this helps those who are going to run the krg impact action combo.
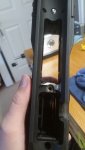
This little ridge around the screw is what needed to be reduced. As well as a low profile screw head, which I just filed down as well

Using a small, flexible file I slowly started to reduce that lip. Of course it helps to tape off the surrounding areas to avoid unwanted filing.

After a few hours of filing and checking the trigger hanger clearance I finally got enough material removed. I did test this without the front trigger hanger screw installed.

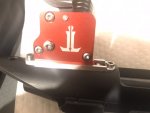
I went to the local hardware store to match threads and bought a couple spares. Took them home and filed down one of them to be low profile. It now sits flush without any wobble from the hanger or screw.

Hopefully this helps those who are going to run the krg impact action combo.
This little ridge around the screw is what needed to be reduced. As well as a low profile screw head, which I just filed down as well
Using a small, flexible file I slowly started to reduce that lip. Of course it helps to tape off the surrounding areas to avoid unwanted filing.
After a few hours of filing and checking the trigger hanger clearance I finally got enough material removed. I did test this without the front trigger hanger screw installed.
I went to the local hardware store to match threads and bought a couple spares. Took them home and filed down one of them to be low profile. It now sits flush without any wobble from the hanger or screw.