Hopefully even more so, since they're getting the improved design. You're stuck with last year's model, the outdated turd hahaIm excited for everyone getting theirs. Yall are going to love it as much as i do.
Join the Hide community
Get access to live stream, lessons, the post exchange, and chat with other snipers.
Register
Download Gravity Ballistics
Get help to accurately calculate and scope your sniper rifle using real shooting data.

Install the app
How to install the app on iOS
Follow along with the video below to see how to install our site as a web app on your home screen.
Note: This feature may not be available in some browsers.
You are using an out of date browser. It may not display this or other websites correctly.
You should upgrade or use an alternative browser.
You should upgrade or use an alternative browser.
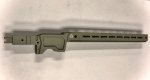
Group Buys Aftermarket AI "Obsession" Chassis - Group Buy
- Thread starter samb300
- Start date
Hopefully even more so, since they're getting the improved design. You're stuck with last year's model, the outdated turd haha
aye, i'll keep this outdated turd. im glad i have been able to help in the small amount that i have.
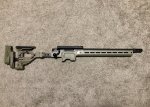
I received my chassis today. Looks awesome I’ll have this thing together later tonight can’t wait to get it to the range.
edit.
From start to finish it only took me 45 mins to do the conversion. Sam made the instructions super simple.
edit.
From start to finish it only took me 45 mins to do the conversion. Sam made the instructions super simple.
Attachments

Last edited:
FedEx had mine arriving Friday. Now they say Tuesday. Either way I can’t go get it in and installed
Bummer...I hope it comes on Friday and isn't delayed. Unfortunately with the Holiday weekend some of them are getting pushed to Tuesday. I know the Ground option was 4 days to the west coastFedEx had mine arriving Friday. Now they say Tuesday. Either way I can’t go get it in and installed

Not the end of the world. Friday would be awesome. But I work all weekend. And wife is off Monday so she will want my full attention so it will be Tuesday before I can do anything but drool all over it anyways. I’m just excited either way. As I’m sure you remember when I first messaged you. I bought the AI for your chassis lol. And I couldn’t be Any happier that I didBummer...I hope it comes on Friday and isn't delayed. Unfortunately with the Holiday weekend some of them are getting pushed to Tuesday. I know the Ground option was 4 days to the west coast
Huh? That’s really odd. I think 4 days was the longest that FedEx showed, I can’t imagine why it would take that long. I hope it gets updated with better news.Lucky. Mine got pushed back from Friday to next Thursday. 4 times it got pushed back.
The bottom of the forend has M-Lok, so you will just need an M-Lok picatinny rail.Is there a way to mount a pic rail to attach a bipod or is the arca rail the only way?
I received my chassis today. Looks awesome I’ll have this thing together later tonight can’t wait to get it to the range.
edit.
From start to finish it only took me 45 mins to do the conversion. Sam made the instructions super simple.
damn, that black looks fuckin ( o )( o ). makes me question getting the FDE. Glad you got it together. Youre going to fall in love with your AI all over again.
Dude, I’m telling you black is the sleeper color, for sure. It looks incredible.damn, that black looks fuckin ( o )( o ). makes me question getting the FDE. Glad you got it together. Youre going to fall in love with your AI all over again.
I don’t know what’s up with FedEx, but I hope the shipping times go back down for you West Coast guys. The longest time was 4 days via ground, so sending them out on Tuesday (which don’t get picked up til 6pm) should have been Wed-Thur-Fri-Tue for the delivery. I’m at a loss as to why that would be pushed out to Thur or Fri of next week.
Then at the same time, guys in NC are getting theirs today.
Then at the same time, guys in NC are getting theirs today.
Just got mine in AL. Tracking originally said Wed, then Thur, then Friday, then back to Thur. But wouldn't have been surprised if it wasn't delivered despite showing out for delivery given some of the Ground guys in this part of the country.
Nice!!

Nice!!
Damn, these look good.
I have quick question regarding the brass washer. I notice they have a slight conical shape, they are not completely flat. Does the orientation matter for assembly? I didn't pay attention to this when disassembling and I don't see a difference in the mating surfaces.
I have quick question regarding the brass washer. I notice they have a slight conical shape, they are not completely flat. Does the orientation matter for assembly? I didn't pay attention to this when disassembling and I don't see a difference in the mating surfaces.
The washers should be flat. My suspicion is that when they were removed/pried out of the epoxy during de-bonding that they got bent. As long as the old epoxy is cleaned off prior to re-assembly, I think you’d be good either way. The torque on the action screws during assembly should be more than enough to flatten the brass washers back out. If you really want new ones I believe someone said Mile High has them in stock.Damn, these look good.
I have quick question regarding the brass washer. I notice they have a slight conical shape, they are not completely flat. Does the orientation matter for assembly? I didn't pay attention to this when disassembling and I don't see a difference in the mating surfaces.
These are brand new from Mile High and it does look like they are stamped, which causes it. The ones I removed also looked slightly conical too with slightly more epoxy on one side. I know they are brass and should flatten pretty easily, but I wondered if the torque of the action screws would be enough.
Sounds like it's not an issue, I will just keep them facing consistently when I assemble it.
On another note, has anyone considered using a tapered applicator syringe to apply the epoxy. That way you can get a nice consistent bead everywhere you need it. Or is the epoxy to thick to be pushed through even a larger opening of the syringe?
If they are punched and have a sharp edge of "flash" on them, you could always lightly sand them on a flat surface with some sandpaper.These are brand new from Mile High and it does look like they are stamped, which causes it. The ones I removed also looked slightly conical too with slightly more epoxy on one side. I know they are brass and should flatten pretty easily, but I wondered if the torque of the action screws would be enough.
Sounds like it's not an issue, I will just keep them facing consistently when I assemble it.
On another note, has anyone considered using a tapered applicator syringe to apply the epoxy. That way you can get a nice consistent bead everywhere you need it. Or is the epoxy to thick to be pushed through even a larger opening of the syringe?
The first couple times I re-bonded the action back to the chassis, I used the Devcon plastic-steel epoxy (the kind that comes with the AX buttstock kit). One time I mixed them first, then put them in an epoxy syringe. Another time I bought the syringe nozzle that mixes the two parts together as it comes out. It's definitely way more of a pain than using the putty with the brush. Not only are the syringes extremely hard to push out the epoxy, but they become messy when the epoxy comes out when and where you don't want it to.
From what I've heard the factory AI techs use the aluminum putty and a brush, which is what I have come to prefer using as well. My recommendation is to do it that way as well. The kit has everything you should need, other than some rags and alcohol or degreaser. The application doesn't need to be perfect, so as long as you have enough epoxy to fill the 0.031" gap, it'll be all good. And if you completely botch it you can clean it all back up and I can send you a new epoxy kit.
Sam
If you go the syringe route, I would recommend "West System Epoxy"" syringes found online at West Marine or most any Marine Store, the tips are easily cut to provide the perfect application bore size and angle.
These are brand new from Mile High and it does look like they are stamped, which causes it. The ones I removed also looked slightly conical too with slightly more epoxy on one side. I know they are brass and should flatten pretty easily, but I wondered if the torque of the action screws would be enough.
Sounds like it's not an issue, I will just keep them facing consistently when I assemble it.
On another note, has anyone considered using a tapered applicator syringe to apply the epoxy. That way you can get a nice consistent bead everywhere you need it. Or is the epoxy to thick to be pushed through even a larger opening of the syringe?
Those are the exact ones I tried with the lower viscosity plastic-steel epoxy, and still didn't care for them in this application. I think the aluminum putty is even thicker and will be more difficult to apply with the syringe, until you open the tip up so large that more comes out than you want.If you go the syringe route, I would recommend "West System Epoxy"" syringes found online at West Marine or most any Marine Store, the tips are easily cut to provide the perfect application bore size and angle.
In any case, try what you think will work best! Chances are it'll be fine. As long as you don't go overboard in the Quick-Loc barrel retention area (make sure to tape off the ID of the barrel tenon threads on the action!!!) you'll be good no matter how you apply the epoxy.
Sam
I would agree, looking at your video, that is thick stuff.
Those are the exact ones I tried with the lower viscosity plastic-steel epoxy, and still didn't care for them in this application. I think the aluminum putty is even thicker and will be more difficult to apply with the syringe, until you open the tip up so large that more comes out than you want.
In any case, try what you think will work best! Chances are it'll be fine. As long as you don't go overboard in the Quick-Loc barrel retention area (make sure to tape off the ID of the barrel tenon threads on the action!!!) you'll be good no matter how you apply the epoxy.
Sam
Still unsure if I will or not, but I’m making a list of interested people. If you haven’t already, shoot me a PM with your name and contact info and I’ll mark you down.Couldn’t get stuff sold fast enough to jump on the bandwagon... maybe I’ll get luckyand Mr. Sam will do another run... HURRY UP!
Well FedEx moved my order again. At first they moved it to Wednesday, But then they moved it to today. So im pretty excited today now.
Hopefully you get it today!Well FedEx moved my order again. At first they moved it to Wednesday, But then they moved it to today. So im pretty excited today now.
And am I the only one that’s disappointed that no one is posting pics of the assembled rifles???
you're not the only one. I promise ill be posting photos soon as i can. lolHopefully you get it today!
And am I the only one that’s disappointed that no one is posting pics of the assembled rifles???
Mine moved up today too and was just delivered! Now I’m bummed that I’m out of town and won’t get to work with it til Monday night. But pics will be inbound soon. Have a club match next Saturday to put it through it’s paces too!
Almost back together. I would highly recommend fully watching sams videos then doing it. I didn’t do that. Lol. And not working with the video.
Also do the butt stock first.
I did get it all together in time. But I think the Florida heat just helped the epoxy cure faster so it was close on the butt stock.
Sadly I can’t get it all back before bed. Hopefully tomorrow after work I’ll have it fully back together and get some good pics.
btw Sam did a awesome job labeling everything. You definitely went above and beyond.
Attachments
Last edited:
Looks great man! And thankfully it looks like I did the math right on the 16.5” barrel hahaAlmost back together. I would highly recommend fully watching sams videos then doing it. I didn’t do that. Lol. And not working with the video.
Also do the butt stock first.
I did get it all together in time. But I think the Florida heat just helped the epoxy cure faster so it was close on the butt stock.
Sadly I can’t get it all back before bed. Hopefully tomorrow after work I’ll have it fully back together and get some good pics.
btw Sam did a awesome job labeling everything. You definitely went above and beyond.
I apologize for just throwing out the full install videos. I was intending to edit them so it’d be easier to follow along with, but that stuff isn’t my thing and I decided to be lazy and leave the uncut versions instead. Definitely better to watch the video first; following along with it will be very slow.
I still wouldn’t recommend doing the buttstock first, since that will really throw the balance off to the rear and make it more difficult to assemble the chassis to the action.
Looks great man! And thankfully it looks like I did the math right on the 16.5” barrel haha
I apologize for just throwing out the full install videos. I was intending to edit them so it’d be easier to follow along with, but that stuff isn’t my thing and I decided to be lazy and leave the uncut versions instead. Definitely better to watch the video first; following along with it will be very slow.
I still wouldn’t recommend doing the buttstock first, since that will really throw the balance off to the rear and make it more difficult to assemble the chassis to the action.
yeah. I horrible at following directions. More of a Just do it type person. So I actually slowed down in parts following the last video. So by the time I was ready for the butt stock it really was pretty hard. But it worked. And it wouldn’t of been the end of the world if I had to buy the other stuff just for it.
And yeah. The barrel length works out perfectly. Or well so far. Lol. I’m sure I’ll develop a method to make it easier to take on and off.
Well I got it together. And I couldn’t be happier with the results. That being said. I want everyone to know that hasn’t installed there’s yet. Reinstalling the magazine catch is the hardest part of the entire thing. And @samb300 really made it easier with the assistance of the instal pin he put in with the other parts.
now I just can’t wait to get to the range and hopefully a match soon.
now I just can’t wait to get to the range and hopefully a match soon.
Attachments
-
 CF670B0E-6033-4E45-86D2-887EE29675C8.jpeg671.7 KB · Views: 159
 -
 8731B01E-5D78-4111-B2F8-22E7AC6EAF6E.jpeg663.2 KB · Views: 152
 -
 8F8106BF-8CFC-4010-8B92-B555CD9FFAF4.jpeg737.9 KB · Views: 153
 -
 BAAEA957-AB87-4CD9-858B-59F5C905F8F3.jpeg610.8 KB · Views: 151
 -
 B5A8B20F-79D9-4EB6-945C-55EA266629C2.jpeg629.4 KB · Views: 143
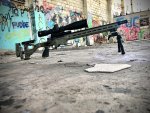
For those that dont know, in reference to the artwork in the background of the above photo shoot, A-ccuracy obsession C-hassis' A-re B-eautiful.Well I got it together. And I couldn’t be happier with the results. That being said. I want everyone to know that hasn’t installed there’s yet. Reinstalling the magazine catch is the hardest part of the entire thing. And @samb300 really made it easier with the assistance of the instal pin he put in with the other parts.
now I just can’t wait to get to the range and hopefully a match soon.
hahaha thats right. I did my best to keep that stuff out of the background. Sadly it was everywhere and made it quite difficult.For those that dont know, in reference to the artwork in the background of the above photo shoot, A-ccuracy obsession C-hassis' A-re B-eautiful.
Looks great man, thanks again for the support throughout the entire design and manufacturing process.Well I got it together. And I couldn’t be happier with the results. That being said. I want everyone to know that hasn’t installed there’s yet. Reinstalling the magazine catch is the hardest part of the entire thing. And @samb300 really made it easier with the assistance of the instal pin he put in with the other parts.
now I just can’t wait to get to the range and hopefully a match soon.
The mag catch is a pain in the butt for sure, the installation dowel hopefully helps. It’s one of those things that you either get on the first try, or it takes ten times and you’re swearing the whole time haha
yeah I again didnt fully look at everything. And I struggled and struggled until I finally looked and found the installation dowel. And then it took like 5 seconds. lol.. Of course I was in a time crunch to install it all. So that made it take even longer lol..Looks great man, thanks again for the support throughout the entire design and manufacturing process.
The mag catch is a pain in the butt for sure, the installation dowel hopefully helps. It’s one of those things that you either get on the first try, or it takes ten times and you’re swearing the whole time haha
and your welcome for the support. But Thank you 1000000 times more than that for designing this chassis and making it happen.
So were the pics taken in a shoot house? Or do you just live in a REALLY bad neighborhood hahayeah I again didnt fully look at everything. And I struggled and struggled until I finally looked and found the installation dowel. And then it took like 5 seconds. lol.. Of course I was in a time crunch to install it all. So that made it take even longer lol..
and your welcome for the support. But Thank you 1000000 times more than that for designing this chassis and making it happen.
Its the last remaining building on a old Air Force Fuel Depot. The city I work for now owns the property, however kids are always trespassing and doing graffiti on the building. Actually the area is a low crime rate higher class community. However you know how teenagers can be.So were the pics taken in a shoot house? Or do you just live in a REALLY bad neighborhood haha
My kit will be here in three days and will post pictures soon after. FedEx also changed my arrival date possibly because of the Labor Day weekend. Can't wait to get this thing together. Thanks Sam!
Labor Day has messed things up, but the shipping times to the West Coast have sucked! There are a couple going to WA state that claimed 4 days ground, and are now being estimated as 7 business days.My kit will be here in three days and will post pictures soon after. FedEx also changed my arrival date possibly because of the Labor Day weekend. Can't wait to get this thing together. Thanks Sam!
Certainly seems that way. I’ve had good luck with them in the past, that’s why I’m surprised by the flip-flopping delivery dates. The other thing that sucks is that when I dropped them off at 8:05am on Tuesday, they didn’t actually get picked up until 5pm.Fedex Ground - when it absolutely, positively has to be there whenever we feel like it.
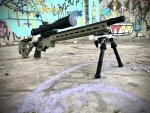
How does it balance in that configuration?
For those wondering. I installed the large weight and the bridge. Gun weights 20lbs 2oz with my 26” 65cm barrel.
Seems a little to front heavy to me right now. But I need to actually get it on a barricade to really be sure.How does it balance in that configuration?
I have my balance point about 3” in front of the magazine well, which is about perfect for using Game Changer type bags. That’s with the prototype chassis with the 1.5# internal weight and one MDT external weight up front. I think with the production chassis and 2# internal weight it’ll be just about perfect.
Similar threads
- Replies
- 6
- Views
- 1K
- Replies
- 8
- Views
- 1K
- Replies
- 3
- Views
- 687
- Replies
- 1
- Views
- 495
