To all who are wondering how to mount a top rail for Thermal Clip-Ons to the handguard of your Christensen Arms MPR, I am posting this solution for you. I couldn’t seem to find this anywhere. I saw in another thread someone posted back in 2019, asking that question - “Can you mount a top rail to the handguard of the Christensen Arms MPR?”. The only response to the question was that the holes are fairly small and there isn’t much clearance from the inside of the handguard to the top of the barrel.
I present to you, the solution.
What you need:
(1) M-lok 11 slot Picatinny Rail
(3) Sets of Chicago screws (posts and screws)
A belt sander, dremel or metal file (what I used)
A Phillips head screw driver
A flat head screw driver
The process:
1. Sand down the indexing pieces of the MLok rail so that it is flat. I used a metal file, clamped to my bench and just ran the rail back and forth until it was flat. A dremel with a sanding wheel or belt sander might be faster.
2. Remove the handguard of your CA MPR by unscrewing the 8 screws that hold it onto the receiver.
3. Line up the holes in the rail with the holes in the handguard.
4. Start with one Chicago screw post inside the handguard and put the Phillips head screw through the top of the rail. Tighten them down by holding the Chicago screw in place with a flat head screw driver looking through the bottom of the handguard. ***Make sure to use loctite and make sure to put your rail in a position that gives you enough room to mount it in front of your day scope***
5. Repeat step 4 for the remaining two holes
6. Re-attach your handguard to your receiver with the proper torque (reference the CA MPR manual).
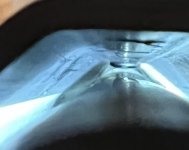
I hope this helps. There are some picatinny rails that come with a flat bottom already (so no sanding required) but I cannot confirm whether the holes for the screws will line up with the holes in the handguard. I used an M-lok 11 slot rail and they lined up perfectly, and the Chicago screws clear the barrel on the inside of the handguard. See photos attached.
Hope this helps! Good shooting out there!
I present to you, the solution.
What you need:
(1) M-lok 11 slot Picatinny Rail
(3) Sets of Chicago screws (posts and screws)
A belt sander, dremel or metal file (what I used)
A Phillips head screw driver
A flat head screw driver
The process:
1. Sand down the indexing pieces of the MLok rail so that it is flat. I used a metal file, clamped to my bench and just ran the rail back and forth until it was flat. A dremel with a sanding wheel or belt sander might be faster.
2. Remove the handguard of your CA MPR by unscrewing the 8 screws that hold it onto the receiver.
3. Line up the holes in the rail with the holes in the handguard.
4. Start with one Chicago screw post inside the handguard and put the Phillips head screw through the top of the rail. Tighten them down by holding the Chicago screw in place with a flat head screw driver looking through the bottom of the handguard. ***Make sure to use loctite and make sure to put your rail in a position that gives you enough room to mount it in front of your day scope***
5. Repeat step 4 for the remaining two holes
6. Re-attach your handguard to your receiver with the proper torque (reference the CA MPR manual).
I hope this helps. There are some picatinny rails that come with a flat bottom already (so no sanding required) but I cannot confirm whether the holes for the screws will line up with the holes in the handguard. I used an M-lok 11 slot rail and they lined up perfectly, and the Chicago screws clear the barrel on the inside of the handguard. See photos attached.
Hope this helps! Good shooting out there!