Join the Hide community
Get access to live stream, lessons, the post exchange, and chat with other snipers.
Register
Download Gravity Ballistics
Get help to accurately calculate and scope your sniper rifle using real shooting data.

Install the app
How to install the app on iOS
Follow along with the video below to see how to install our site as a web app on your home screen.
Note: This feature may not be available in some browsers.
You are using an out of date browser. It may not display this or other websites correctly.
You should upgrade or use an alternative browser.
You should upgrade or use an alternative browser.
Re: DIY Bed Job*** POPPED OUT w/ Pics****
Just a few things I've learned from bedding stuff:
<ul style="list-style-type: disc">[*]Put the putty in the nooks & crannies after you apply the release agent. [*]The blue colored Acraglas Non-Flammable Release Agent that comes with SteelBed sucks. [*]Tape up every part of your stock, even if you think you won't get any bedding compound way over there. For me, it's like printer toner. Eventually you look down and it's all over.[*]Put release agent inside the action, around the front screw hole. When you squeeze it all together it goes right up in there.[/list]
I appreciate and want the perfect results that you get from doing it thousands of times. I view bedding jobs similar to drywall work ... the guys who do it all the time really get all of the little tips and tricks down and it makes the jobs look that much better in the end.
I have to battle the want/desire to do it myself with my other side that seeks perfection.
Great thread.
Re: DIY Bed Job*** POPPED OUT w/ Pics****
OK, now how about a DIY bedding job on an M14?
Anyone? Anyone? From what I understand, it's supposed to be a simple process, buuuuut, I also have to wonder if I shouldn't just forget about Highpower, and go for dead nuts accuracy with a drop in stock from Troy...yeah I know guys, I shouldn't think on this stuff
Re: DIY Bed Job*** POPPED OUT w/ Pics****
For those who are against using tape on the front, sides, and bottom of the recoil lug, check out this post:
http://www.thefirearmsforum.com/showthread.php?t=40782
There's a guy on there that does "professional" bedding jobs and you can see his results.
I think that 7mmRM did a damn good writeup and I apreciate the pictures so much! Many people will do a writeup, but most dont include as many pictures as that.
Thank you!

Re: DIY Bed Job*** POPPED OUT w/ Pics****
Also, if you all want, check out this site as well. There is a complete writeup on bedding an action here. This site also tells you how to check to see if your bedding job actually works with teh use of a few tools.
http://home.comcast.net/~davidawilson/LongRange/Bedding01.htm
I just figured I'd put all these links in one spot, that way hopefully someone who has a question on bedding can come here and real 7mmRM's write up, see LongRifles write up, and then see one on LTRDavid's as well.
Oh, and the last reference for bedding a rifle:
http://www.6mmbr.com/pillarbedding.html
Enjoy! I hope that these additional links helped enforce what 7mmRM showed. From most of these links they definately sugest putting tape around the recoil lug to float the bottom.
Think about it, if your recoil lug is tight, when you take your action in and out of your stock, you're going to be scrapping that bedding job and it's going ot build up under your recoil lug ... that is BAD. Also what happens as everything gets hot? That recoil lug has no room at all.
Re: DIY Bed Job*** POPPED OUT w/ Pics****
Although I'd really like to claim ownership on that job, the picture comes from the link posted above.

If I were able to do a bedding that clean, I'd even consider switching to professional gunsmith from my current job

Although I'd really like to claim ownership on that job, the picture comes from the link posted above.
If I were able to do a bedding that clean, I'd even consider switching to professional gunsmith from my current job
Re: DIY Bed Job*** POPPED OUT w/ Pics****
Pro Bed 2000.Mix it with fumed silica to the consistency of putty and it wont run any where.Clean up is nothing.


Pro Bed 2000.Mix it with fumed silica to the consistency of putty and it wont run any where.Clean up is nothing.
Re: DIY Bed Job*** POPPED OUT w/ Pics****
I'll give you guys a tip that'll save some time and get just as good a results.......
Hold off on the tape and try this......
I prefer to use a buffing wheel that's pretty course, but a file or belt sander works too..
Put a draft on your recoil lug on the sides. Bed the rifle with all other items adhered to, with plenty of release agent, my favorite being Johnson's Paste Wax.
After removing the the receiver, simply polish the bottom of the lug on the buffing wheel or the other methods described.
This will guarantee you that the bottom of the lug is not touching and saves time on the taping and the chance of the tape adhering to the bedding. It will also provide easier removal of the action after bedding.
When I bed, the only thing I want relieved is the bottom of the lug, but that's my technique that was shown to me and works every time.
Re: DIY Bed Job*** POPPED OUT w/ Pics****
looks good 7mmRM... I was actually searching for one of my old posts and ran across this one.... I bedded an AICS last night and actually used a grip vise as well. It was so out of wack that I had to jut clamp it in the center to create a new rear tang.
looks good 7mmRM... I was actually searching for one of my old posts and ran across this one.... I bedded an AICS last night and actually used a grip vise as well. It was so out of wack that I had to jut clamp it in the center to create a new rear tang.
Re: DIY Bed Job*** POPPED OUT w/ Pics****
Go ahead and try bedding a rifle with a recoil lug similar to a remington lug w/o some kind of tape etc to allow adequate room to remove lug from glass but id reccomend a big F-ing hammer and chisels in order to remove action from stock.I made tht mistake once and only once 25yrs ago cost a stock and nearly the bedded
action as the glas had securely and i mean securely form fitted itself to the lug!I was lucky simply to disssemble it with just a ruined stock.Use some sort of waterproof tape on front sides and bottom of the lug(ive used electricians tape,the wide kid in order to trim excess w/razor) and then apply plenty of release gent for excellent job otherwise get out the chisel, drift and mallet.
fair warning!!
Re: DIY Bed Job*** POPPED OUT w/ Pics****
Thanks for the heads up.............There for a minute I was having some kind of dillusion that I'd actually done it, but apparently I was mistaken.
Now I have to go back and think just how many times I've been wrong and make a talley.....................this could take a while.
Thanks for the heads up.............There for a minute I was having some kind of dillusion that I'd actually done it, but apparently I was mistaken.
Now I have to go back and think just how many times I've been wrong and make a talley.....................this could take a while.
Re: DIY Bed Job*** POPPED OUT w/ Pics****
My 1st bedding job, thanks for Isaac's pictutorial
I know, the carpet is dirty...
My 1st bedding job, thanks for Isaac's pictutorial
I know, the carpet is dirty...
Re: DIY Bed Job*** POPPED OUT w/ Pics****
An idea for the scared people!!!!
Put a want add for a take-off stock...most will probably damn near give them away and they are complete shit but....at least you won't f up a MCM.
7MM...awesome post.....thanks for your time with the pictures.
Not a stickey yet?
An idea for the scared people!!!!
Put a want add for a take-off stock...most will probably damn near give them away and they are complete shit but....at least you won't f up a MCM.
7MM...awesome post.....thanks for your time with the pictures.
Not a stickey yet?
Re: DIY Bed Job*** POPPED OUT w/ Pics****
I just did my first bedding job and it wasnt bad. I dont really think you can "f up" your stock though, unless you're really bad mechanically, then you should just send it off to get done by someone else! Hah.
If you want, get your pillars bedded first from whoever you get your stock from. Your pillars will set the height for your action and also set where your bottom metal sits. So once this is in place, your action should ALWAYS have contact with the pillars.
With that being said, bed your rifle. If it comes out crappy or their's high spots, grab your dremmel and carefully remove the top layer of the bedding so that when you sit your action back in, nothing is touching it besides the pillars again. Apply more bedding compound and this time use what you learned from the last time.
My first bedding job had sags in the show line and parts of it was missing by the ejection port. I dremeled down those areas and reapplied bedding compound and it came out alright ... but not perfect because I SHOULD HAVE dremeled the entire surface of the bedding (I left some of it alone and in result, some leaked under the action on the good surface ... it's enevitable .. just dremel some of that surface away.)
Basically, if you screw it up you just want to "re-surface" it, dont need to remove it all unless there's big air pockets in it.
Re: DIY Bed Job*** POPPED OUT w/ Pics****
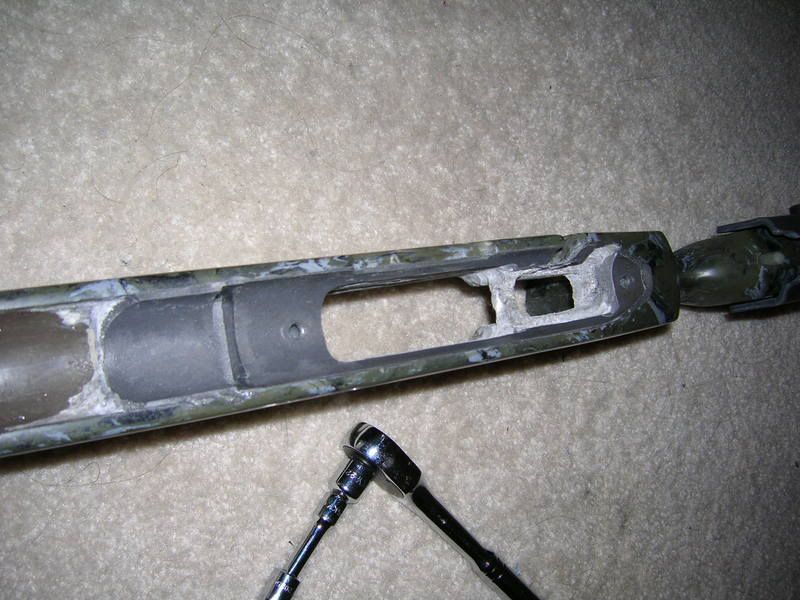
These pictures shows the results of my first time (well, 2 if you count the fact that that I dremeled some of it away and put more on it to fix it) bedding a stock.


It came out "alright." I say that because I had to sand away some of the spots where crap leaked under the action and ontop of the good surface I had before. This is why I'm saying to just take of about 0.010" - 0.050" of the ENTIRE surface before rebedding.
I used some water based orange acrylic paint on the bottom of my action and set it carefully into the stock. I then removed the action carefully and looked to see if any orange was on the stock. If there was any orange paint anywhere BESIDES the top of the pillars, I used the dremel to cut it down. I left about a 0.014" (3 or 4 pieces of blue 3M masking tape stuck together) gap around the sides of the action so that I could have a uniformed show line.
I'll shave the top layer off again once I get my action blueprinted. Make sure that if you get any work done on your recoil lug that you dremel a good portion of the existing bedding away behind the recoil lug. I'd personally remove about 0.100" (this is the amount I removed UNDER my action) so that you can refill it and have a nice solid layer of bedding that perfactly mates with your recoil lug.
**EDIT: Please excuse the blemishes on the stock. The gray spot near the bolt handle recess is where I sanded it down to perfectly match the action's contour. I havent repainted her yet. The spots you see on the inside of the inletting is just where there's no black paint due to dremeling away some crap and trying to be a perfectionist (I have a long way to go before I reach that ... lol)
These pictures shows the results of my first time (well, 2 if you count the fact that that I dremeled some of it away and put more on it to fix it) bedding a stock.
It came out "alright." I say that because I had to sand away some of the spots where crap leaked under the action and ontop of the good surface I had before. This is why I'm saying to just take of about 0.010" - 0.050" of the ENTIRE surface before rebedding.
I used some water based orange acrylic paint on the bottom of my action and set it carefully into the stock. I then removed the action carefully and looked to see if any orange was on the stock. If there was any orange paint anywhere BESIDES the top of the pillars, I used the dremel to cut it down. I left about a 0.014" (3 or 4 pieces of blue 3M masking tape stuck together) gap around the sides of the action so that I could have a uniformed show line.
I'll shave the top layer off again once I get my action blueprinted. Make sure that if you get any work done on your recoil lug that you dremel a good portion of the existing bedding away behind the recoil lug. I'd personally remove about 0.100" (this is the amount I removed UNDER my action) so that you can refill it and have a nice solid layer of bedding that perfactly mates with your recoil lug.
**EDIT: Please excuse the blemishes on the stock. The gray spot near the bolt handle recess is where I sanded it down to perfectly match the action's contour. I havent repainted her yet. The spots you see on the inside of the inletting is just where there's no black paint due to dremeling away some crap and trying to be a perfectionist (I have a long way to go before I reach that ... lol)
Re: DIY Bed Job*** POPPED OUT w/ Pics****
GREAT POST!!!
I wish this was a sticky. I plan to give this a go as soon as I can get some devcon.
Which brings me to my ? Where is a good place to get some? Would a hardware store carry it?
Ryan
GREAT POST!!!
I wish this was a sticky. I plan to give this a go as soon as I can get some devcon.
Which brings me to my ? Where is a good place to get some? Would a hardware store carry it?
Ryan
Re: DIY Bed Job**Pic Heavy***
First off....hell of a job...thanks for posting it!
<div class="ubbcode-block"><div class="ubbcode-header">Originally Posted By: John Smith</div><div class="ubbcode-body">Go ahead and try bedding a rifle with a recoil lug similar to a remington lug w/o some kind of tape etc to allow adequate room to remove lug from glass but id reccomend a big F-ing hammer and chisels in order to remove action from stock.I made tht mistake once and only once 25yrs ago cost a stock and nearly the bedded
action as the glas had securely and i mean securely form fitted itself to the lug!I was lucky simply to disssemble it with just a ruined stock.Use some sort of waterproof tape on front sides and bottom of the lug(ive used electricians tape,the wide kid in order to trim excess w/razor) and then apply plenty of release gent for excellent job otherwise get out the chisel, drift and mallet.
fair warning!!</div></div>
Why didnt you just stick it in the freezer?
I didnt see it guys but how about the recommendation to stick it in the freezer or outside if its cold enough if you happen to glue the action in and hit it with a mallet..........
Re: DIY Bed Job**Pic Heavy***
Ive been doing some things a bit different-
1. Ive ditched grease as release agent. Not that it doesnt work, but Paste wax is eaiser and cleaner.
2. To make clean shore lines, I use tape to make a dam- only high enough so that a thin layer of bedding compound can get through. Then trim it with an exacto knife.
3. Banding tape around the bbl in 1 or 2 places to support the bbl. I still use the clamp for the reciever. I cant say it enough... ONLY enough clamp pressure to hold it down, like you were holding it down with your hands.
Ive got a few 700s to bed in the next few weeks. Ill update this thread with new pics.
Re: DIY Bed Job**Pic Heavy***
New pics of a full new bed job would be great. That would help me tons. I have a 700 SPS varmint and a HS stock that I am trying to bed right now, but am still a little lost. (first time).
Where can I get all the materials to complete this bed job? Do I have to order it from someplace special?? Thanks
Re: DIY Bed Job**Pic Heavy***
Just a quick thought on taping the recoil lugs....
I wondered why tape the front of it, other than providing clearance for removal. Then I thought about differing temps. How much do you think a receiver would grow in length with a say 20 degree temp difference? lets just say .0005 per inch for easy figuring, someone can look it up, I am too lazy. But on a short action the distance from the front of the recoil lug to the rear action screw it's about 7.5" (again, I'm sure someone knows). Thats about .004 of thermal expansion (.00375 with these hypothetical #'s) something has to move somewhere. Sure there will be some movement between action screws, but the way I see it why give it something to drive off of (the front of the recoil lug).
I could be completely wrong, and if so please give me insight in the errors of my thought process. And maybe this is an irrelevant issue.
Just my .02
Re: DIY Bed Job**Pic Heavy***
Great thread...it appears everyone that has followed turned out good.
Great thread...it appears everyone that has followed turned out good.
Re: DIY Bed Job*** POPPED OUT w/ Pics****
<div class="ubbcode-block"><div class="ubbcode-header">Originally Posted By: John Smith</div><div class="ubbcode-body">Go ahead and try bedding a rifle with a recoil lug similar to a remington lug w/o some kind of tape etc to allow adequate room to remove lug from glass but id reccomend a big F-ing hammer and chisels in order to remove action from stock.I made tht mistake once and only once 25yrs ago cost a stock and nearly the bedded
action as the glas had securely and i mean securely form fitted itself to the lug!I was lucky simply to disssemble it with just a ruined stock.Use some sort of waterproof tape on front sides and bottom of the lug(ive used electricians tape,the wide kid in order to trim excess w/razor) and then apply plenty of release gent for excellent job otherwise get out the chisel, drift and mallet.
fair warning!! </div></div>
I've bedded a dozen or more of them without any tape at all. You didn't use enough release agent.
Re: DIY Bed Job*** POPPED OUT w/ Pics****
Thanks for posting this 7MM! This will be a big help when i decide what i'm gonna do with my extra a4.
Thanks for posting this 7MM! This will be a big help when i decide what i'm gonna do with my extra a4.
Re: DIY Bed Job*** NEW PICS***
Rebedded a 7mmRM, that was previously done by someone else. They did a fine job, bud did not full length bed or put a pad under the first 1.5" of the bbl. Being this is a #7 contoured bbl finnished @ 28", I feel thats ALOT of unsupported bbl hanging off the reciever.
First was to build the "dam" for the bbl pad. I did this with strips of tape until I had a very thin gap between it and the bbl. The thin line of compound is easy to cut, leaving a clean line. Notice I didnt have the old bedding cut out at this point- reason is I use it for a reference for this step and the next.

Next was to make a bbl support. With the bbled action in the stock,I figure where I want the support, then put a single ring of tape- STICKY SIDE UP. You can then slide it out of the bbl channel to wrap tape as needed. Then slide the "doughnut" up the bbl into the channel till it stops. Should be at the point where you wanted support. This will provide a nice bbl support. Just make sure that you dont put too much tape on the doughnut that it pushes up against the bbl. At this poin the bbled action will just sit in the stock as if the action screws were tight.


Next was to tape up action, and the rest of the stock. Dont be stingy on the tape. Its amazing where bedding compound can end up! Some dont like to tape the reciever, I do. It makes clean up easier for me. So do as you wish. I tape the front, sides and bottom of the recoil lug with (2) layers of tape. Some bed the lug tight on all sides, I dont. So again do as you wish.

I added some tape to the inside as well, simply for the easier clean up. Sometimes I do, somtimes I dont.

After this I ground out the old bedding, and got my long action screws ready. Wrap tape around them til they fit the pillar holes tight enough that you can still turn them.

Rebedded a 7mmRM, that was previously done by someone else. They did a fine job, bud did not full length bed or put a pad under the first 1.5" of the bbl. Being this is a #7 contoured bbl finnished @ 28", I feel thats ALOT of unsupported bbl hanging off the reciever.
First was to build the "dam" for the bbl pad. I did this with strips of tape until I had a very thin gap between it and the bbl. The thin line of compound is easy to cut, leaving a clean line. Notice I didnt have the old bedding cut out at this point- reason is I use it for a reference for this step and the next.
Next was to make a bbl support. With the bbled action in the stock,I figure where I want the support, then put a single ring of tape- STICKY SIDE UP. You can then slide it out of the bbl channel to wrap tape as needed. Then slide the "doughnut" up the bbl into the channel till it stops. Should be at the point where you wanted support. This will provide a nice bbl support. Just make sure that you dont put too much tape on the doughnut that it pushes up against the bbl. At this poin the bbled action will just sit in the stock as if the action screws were tight.
Next was to tape up action, and the rest of the stock. Dont be stingy on the tape. Its amazing where bedding compound can end up! Some dont like to tape the reciever, I do. It makes clean up easier for me. So do as you wish. I tape the front, sides and bottom of the recoil lug with (2) layers of tape. Some bed the lug tight on all sides, I dont. So again do as you wish.
I added some tape to the inside as well, simply for the easier clean up. Sometimes I do, somtimes I dont.
After this I ground out the old bedding, and got my long action screws ready. Wrap tape around them til they fit the pillar holes tight enough that you can still turn them.
Re: DIY Bed Job*** NEW PICS****
Time for release agent. I use Johnsons paste wax. Apply a couple of coates to everything you dont want compound to stick to! Dont forgetto put some on those action screws! Put moddeling clay in crevases and holes so not to make a mechanical lock.

Mix up some bedding compound. I use Devcon Steel putty. Make plenty.

Put compound in the stock. I dob it in so to work out air bubbles.

Time to set action in stock. Push action screws up a bit so you can get them started before the action hits the compound. Make sure your support doughnut is where it needs to be. Slowly set it in and get the action screws started. Push bbled action down into the compound til it seated at the appropriate point. While holding action down with my hand, I put the clamp on. I cant stress this enough- ONLY enough clamp pressure to hold it down... as if you were still holding it with your hand. I will then give it an hour or so till I trim up the compund the squeezed out. I do it wiht an exacto knife.


Time for release agent. I use Johnsons paste wax. Apply a couple of coates to everything you dont want compound to stick to! Dont forgetto put some on those action screws! Put moddeling clay in crevases and holes so not to make a mechanical lock.
Mix up some bedding compound. I use Devcon Steel putty. Make plenty.
Put compound in the stock. I dob it in so to work out air bubbles.
Time to set action in stock. Push action screws up a bit so you can get them started before the action hits the compound. Make sure your support doughnut is where it needs to be. Slowly set it in and get the action screws started. Push bbled action down into the compound til it seated at the appropriate point. While holding action down with my hand, I put the clamp on. I cant stress this enough- ONLY enough clamp pressure to hold it down... as if you were still holding it with your hand. I will then give it an hour or so till I trim up the compund the squeezed out. I do it wiht an exacto knife.
Re: DIY Bed Job*** NEW PICS****
Finnished product. The chip on the tang pillar hole is from an anxious dremel.

Finnished product. The chip on the tang pillar hole is from an anxious dremel.
Re: DIY Bed Job*** NEW PICS****
Thanks 7mmRM for your time and step by step procedure. I have done a few
bedding jobs for myself and have always had trouble cleaning the action holes. Your tip of taping the action screws is a good one. Thanks again.
Deans
Thanks 7mmRM for your time and step by step procedure. I have done a few
bedding jobs for myself and have always had trouble cleaning the action holes. Your tip of taping the action screws is a good one. Thanks again.
Deans

Re: DIY Bed Job*** NEW PICS****
One bit of advise I didn't notice mentioned that I had to learn the hard way, is to push the action screws threw the holes in the stock, THEN apply the bedding material to the stock. On my second build I applied the material and when I pushed the bolts threw the threads filled with compound... That's a bitch!
One bit of advise I didn't notice mentioned that I had to learn the hard way, is to push the action screws threw the holes in the stock, THEN apply the bedding material to the stock. On my second build I applied the material and when I pushed the bolts threw the threads filled with compound... That's a bitch!
Re: DIY Bed Job*** NEW PICS****
That Devcon 10110 is some good shit. Nice job. As a side, I tried to order an A4 today, McMillan said I'd have to run it by you first
That Devcon 10110 is some good shit. Nice job. As a side, I tried to order an A4 today, McMillan said I'd have to run it by you first
Re: DIY Bed Job*** NEW PICS****
<div class="ubbcode-block"><div class="ubbcode-header">Originally Posted By: wnroscoe</div><div class="ubbcode-body">That Devcon 10110 is some good shit. Nice job. As a side, I tried to order an A4 today, McMillan said I'd have to run it by you first
</div></div>
Ya Ya, LOL!
<div class="ubbcode-block"><div class="ubbcode-header">Originally Posted By: wnroscoe</div><div class="ubbcode-body">That Devcon 10110 is some good shit. Nice job. As a side, I tried to order an A4 today, McMillan said I'd have to run it by you first
Ya Ya, LOL!
Re: DIY Bed Job*** NEW PICS****
<div class="ubbcode-block"><div class="ubbcode-header">Originally Posted By: grandslam</div><div class="ubbcode-body"> Great thread 7mm, nevermind all the people drinking the Haterade....The rest of us love this thread and thank you for putting the time and effort into something that helps the rest of us. </div></div>
Ahh, I dont think much of the tig welding know it alls. Pretty much all of the others were simply adding suggestions. Some of which I now use.
With that said,Im glad I can help. If you have an Qs, just ask!
Re: DIY Bed Job*** NEW PICS****
7mm, how and what did you use the dremel tool for? and with what attachment. THanks. I am talking about after compound was in stock.
7mm, how and what did you use the dremel tool for? and with what attachment. THanks. I am talking about after compound was in stock.
Re: DIY Bed Job*** NEW PICS****
One of the best DIY threads I have come across. I even think I can do it. Well we'll find out when I make it home next........
One of the best DIY threads I have come across. I even think I can do it. Well we'll find out when I make it home next........
Re: DIY Bed Job*** NEW PICS****
<div class="ubbcode-block"><div class="ubbcode-header">Originally Posted By: jcvibby</div><div class="ubbcode-body">7mm, how and what did you use the dremel tool for? and with what attachment. THanks. I am talking about after compound was in stock. </div></div>
I used the dremel for some of the clean up. Especially getting out the compound that oozes into the pillar holes. I have an assortment of the metal cutter heads
Re: DIY Bed Job*** NEW PICS****
I was wondering i am going to be bedding a hs stock this weekend and my action is painted, should i take the paint off or leave it alone before i bed it?
I was wondering i am going to be bedding a hs stock this weekend and my action is painted, should i take the paint off or leave it alone before i bed it?
Re: DIY Bed Job*** NEW PICS****
Painted as in Krylon paint? Is the bottom of the receiver,recoil lug, bottom of bbl painted? If yes to both of these, I would remove the paint from the areas that will be part of the bedding process.
Painted as in Krylon paint? Is the bottom of the receiver,recoil lug, bottom of bbl painted? If yes to both of these, I would remove the paint from the areas that will be part of the bedding process.
Re: DIY Bed Job*** NEW PICS****
yet another Thank You for taking the time to show us the way! am kind of unclear on the purpose of the tape "doughnut", is this a temporary support, or is bedding material applied there also? is the bedding in front of the lug only necessary on heavy bbls, or should this be done with all contours?
yet another Thank You for taking the time to show us the way! am kind of unclear on the purpose of the tape "doughnut", is this a temporary support, or is bedding material applied there also? is the bedding in front of the lug only necessary on heavy bbls, or should this be done with all contours?
Re: DIY Bed Job*** NEW PICS****
<div class="ubbcode-block"><div class="ubbcode-header">Originally Posted By: tinhead</div><div class="ubbcode-body">am kind of unclear on the purpose of the tape "doughnut"</div></div>
1. Mainly for temporary support
2. to help align bbled action with bbl channel
<div class="ubbcode-block"><div class="ubbcode-header">Originally Posted By: tinhead</div><div class="ubbcode-body">is the bedding in front of the lug only necessary on heavy bbls, or should this be done with all contours? </div></div>
I do on all bbls heavier than a Rem Varmint contour. On Rem varmint contour bbls it sorta depends. On a high volume shooter(pdog rifles) I dont. On a hunting/tactical rifle I will. Not sure it matters one way or the other on such a contour, but thats what I do. Anything less than a Rem Varmint contour, I have no idea for I never mess with them.
Re: DIY Bed Job**Pic Heavy***
This was an AWESOME post! Thank you for taking the time to stop and take pictures, then explain what you were doing and why you were doing it. Now I'm looking forward to trying it myself. I have a few guns that I'm sure could benefit from getting a nice bedding job!
Thanks again!
This was an AWESOME post! Thank you for taking the time to stop and take pictures, then explain what you were doing and why you were doing it. Now I'm looking forward to trying it myself. I have a few guns that I'm sure could benefit from getting a nice bedding job!
Thanks again!
Similar threads
- Replies
- 24
- Views
- 1K
