Join the Hide community
Get access to live stream, lessons, the post exchange, and chat with other snipers.
Register
Download Gravity Ballistics
Get help to accurately calculate and scope your sniper rifle using real shooting data.

Install the app
How to install the app on iOS
Follow along with the video below to see how to install our site as a web app on your home screen.
Note: This feature may not be available in some browsers.
You are using an out of date browser. It may not display this or other websites correctly.
You should upgrade or use an alternative browser.
You should upgrade or use an alternative browser.
Re: DIY Bed Job**Pic Heavy***
Great post. I think it should be stickied.
On the dremel-cleaning of the pillar holes: I use a drill bit (that just fits through the pillars) by hand from the top to cut the excess DevCon at the trim stage. Allow the bit to cut the material and it won't flare up around the hole defeating the purpose of the bedding.
Hornady One Shot is my release agent of choice, and I'g going to try plumber's putty insted of modeling clay on my next bed. I have a helluva time getting all the clay outta the nooks and crannies.
Re: DIY Bed Job**Pic Heavy***
Thanks for the pics and advice to all, I had a mcmillan A-5 and a box of steel bed from brownells sitting on my table for two months afraid to ty it for fear of f*^king up a $700 stock. but with the pictures I could see it really wasn't that hard as long as I paid attention, followed a few tips from here and took my time. I now have a perfectly bedded stock and am planning on doing another couple in the next couple weks as time permits.
I used Steel bed, the spraycan release agent and the trigger block all from brownells along with some painters tape from 3M.
I will add my own tip here for those who want to use Steel Bed... the areas around the mag well and the trigger guard were trimmed with a small razor blade at the 5 hour mark when I pulled the action out. It was stiff enough I could cut through it and leave a clean line but soft enough I could tell if I was cutting into the stock itself. I also used an exacto knife and followed the tape where it met the stock when pulling it off, again, leaving a clean line.
Thanks for the help from everyone. I probably would have chickened out on doing this by myself if I hadn"t read this post.
Re: DIY Bed Job**Pic Heavy***
I put a pad on all bbl contours heavier than a Rem varmint contour, and sometimes a pad on Rem varmint contours. On lighter contours than Rem Varmint, you would have to ask someone else for I have no idea.
I put a pad on all bbl contours heavier than a Rem varmint contour, and sometimes a pad on Rem varmint contours. On lighter contours than Rem Varmint, you would have to ask someone else for I have no idea.
Re: DIY Bed Job**Pic Heavy***
<div class="ubbcode-block"><div class="ubbcode-header">Originally Posted By: 7mmRM</div><div class="ubbcode-body">I put a pad on all bbl contours heavier than a Rem varmint contour, and sometimes a pad on Rem varmint contours. On lighter contours than Rem Varmint, you would have to ask someone else for I have no idea. </div></div>
What the man said!
Re: DIY Bed Job**Pic Heavy***
Do you guys always pull the action and trim with a knife at the 5 hour mark???
Do you guys always pull the action and trim with a knife at the 5 hour mark???
Re: DIY Bed Job*** NEW PICS****
Try using pledge to clean your action and stock up after bedding while the bedding is still wet. You won't have to use any tape anywhere on the action. Pledge takes the bedding compound off easy. Also try play doe in the action holes instead of modeling clay. Cleanup is much easier.
Try using pledge to clean your action and stock up after bedding while the bedding is still wet. You won't have to use any tape anywhere on the action. Pledge takes the bedding compound off easy. Also try play doe in the action holes instead of modeling clay. Cleanup is much easier.
Re: DIY Bed Job*** NEW PICS****
I use A LOT more tape on the stock, studs mounted to the action with no heads on them as guides, Kiwi natural shoe polish for a release agent, masking tape 3 sides on the lug, and I put a 1.5" bed under the barrel. Clamping action is done with a bicycle inner tube turned into strips.
I use A LOT more tape on the stock, studs mounted to the action with no heads on them as guides, Kiwi natural shoe polish for a release agent, masking tape 3 sides on the lug, and I put a 1.5" bed under the barrel. Clamping action is done with a bicycle inner tube turned into strips.
Re: DIY Bed Job*** NEW PICS****
<div class="ubbcode-block"><div class="ubbcode-header">Originally Posted By: NineHotel</div><div class="ubbcode-body"> studs mounted to the action with no heads on them as guides</div></div>
I lopped the heads off my guide screws after doing the last job I posted here. It definately made things a little easier. Also when taped up poperly, they effectively seal the pillar holes. Making for easier clean up, which is always a good thing.
Re: DIY Bed Job*** NEW PICS****
How do you guys feel about removing the action when the epoxy is still somewhat soft in order to trim it? I've read about this other places but have always been nervous about the levering of the removal of the action (esp. if it doesn't pop out easy) compressing the bedding slightly under the tang area. Its certainly much easier to clean than using a dremel later.
On that note thoughts on bedding just under the tang/lug -vs- bedding under the full length of the action?
7mmRM I'm curious what your reason for not doing a pad under high volume varmint guns? The lighter barrel profile or less hassle for a rebarrel down the road, or another reason?
Re: DIY Bed Job*** NEW PICS****
I like to let it set at least 6-8 hours.
I like full lenght action beds... I guess I feel there is more support for the action. Whether this is makes any difference one way or the other, I dont know.

Pad or no pad...
The lighter barrel profile- Yes
less hassle for a rebarrel down the road- Yes.
or another reason?- Heat. Sometimes we get pdog rifles really HOT. The idea that as that bbl gets hot and expands, and then conseqently pushes into the pad, causing things to get a little funny made sense to me and I followed accordingly.
I like to let it set at least 6-8 hours.
I like full lenght action beds... I guess I feel there is more support for the action. Whether this is makes any difference one way or the other, I dont know.
Pad or no pad...
The lighter barrel profile- Yes
less hassle for a rebarrel down the road- Yes.
or another reason?- Heat. Sometimes we get pdog rifles really HOT. The idea that as that bbl gets hot and expands, and then conseqently pushes into the pad, causing things to get a little funny made sense to me and I followed accordingly.
Re: DIY Bed Job*** NEW PICS****
I like it harder than a wedding dick. My smith does them one day then breaks them out the next. I follow his lead on that.
If you want to break away the over spooge while it is still soft that is fine - but I want the epoxy in the stock hard.
The studs will get a mechanical lock with the bedding material. You must crank the studs out before trying to break the metal loose. Then once out trim the epoxy where it was mated to the stud over the pillar or action screw hole.
Re: DIY Bed Job*** NEW PICS****
Outstanding thread. Thanks for the inspiration 7mm.
Some great comments too.
I made studs out of 3" long, 1/4" X 28 screws and taped them to just fit the pillars. I also bedded forward of the lug 1 3/4". My thinking was that I can always cut it or sand it back or down or both if I find no improvement in accuracy and seek answers.
Much easier than the opposite condition and later feeling I need to bed the area forward of the lug.
After removing the studs, (after setting overnight, about 7 hours)I popped the action out with little difficulty, and cleaned her up. Look forward to taking her out next week.
Thanks for the peek behind the curtain Isaac! And you as well Scimitar.
A photo of my first effort;
Re: DIY Bed Job*** NEW PICS****
Another "Thank You" for posting this. This has always been a bit intimidating to me, but now I feel I could give it a try. Thanks again.
Another "Thank You" for posting this. This has always been a bit intimidating to me, but now I feel I could give it a try. Thanks again.
Re: DIY Bed Job*** NEW PICS****
yes I would also like to thank 7mmRM to an awesome how to article. I did both of my HS Precision stocks and they both came out like I had sent it off to a smith to have it done.
Thank you sir.
yes I would also like to thank 7mmRM to an awesome how to article. I did both of my HS Precision stocks and they both came out like I had sent it off to a smith to have it done.
Thank you sir.
Re: DIY Bed Job**Pic Heavy***
JLM,
The pics on the first page are gone for good. The pics on the previous page are still there. They show the same basic thing, just revised a little. I have a few bed jobs comming up, maybe Ill post another.
JLM,
The pics on the first page are gone for good. The pics on the previous page are still there. They show the same basic thing, just revised a little. I have a few bed jobs comming up, maybe Ill post another.
Re: DIY Bed Job**Pic Heavy***
I quit using the clamp awhile back, and am now doing them similar to Wnroscoe. Using the two bands of tape in the bbl channel is pretty much foolproof. I never had any trouble with the clamp, but will be doing it this way from now on. I have came up with a few little tricks for those of us with out a mill....
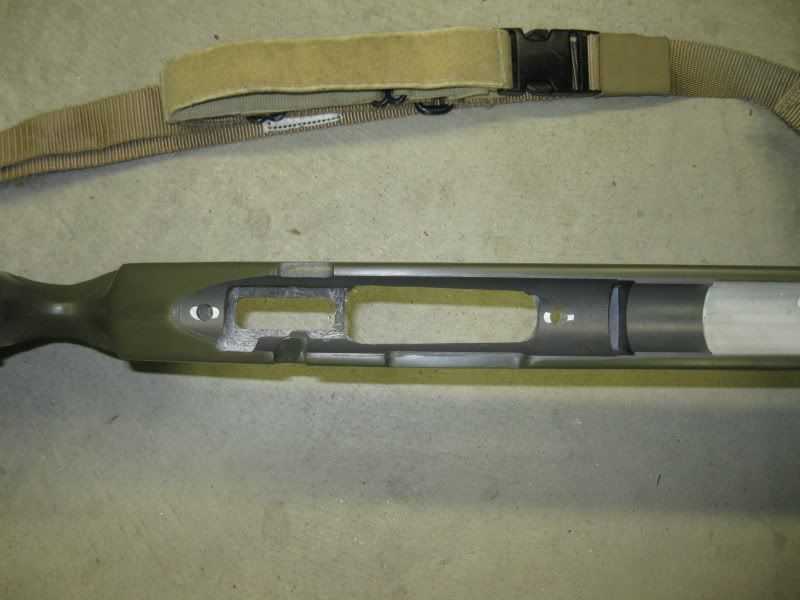
This rifle is my new 7/08. Im dropping it into an old stle A4 and Badger M5 DBM.
Pillar holes opened up and stock taped up.
Pillars with the action screws taped up for a tight fit.
My first little trick. Take a long piece of tape and tape off the inside of the mag well, leaving a long tail of tape hanging out of the bottom. This way you can pull it out and all the excess compound comes with it.
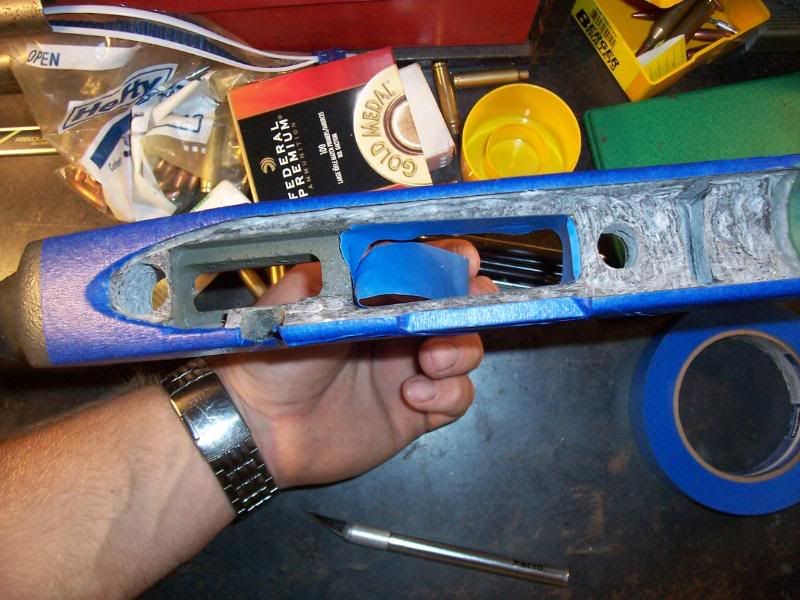
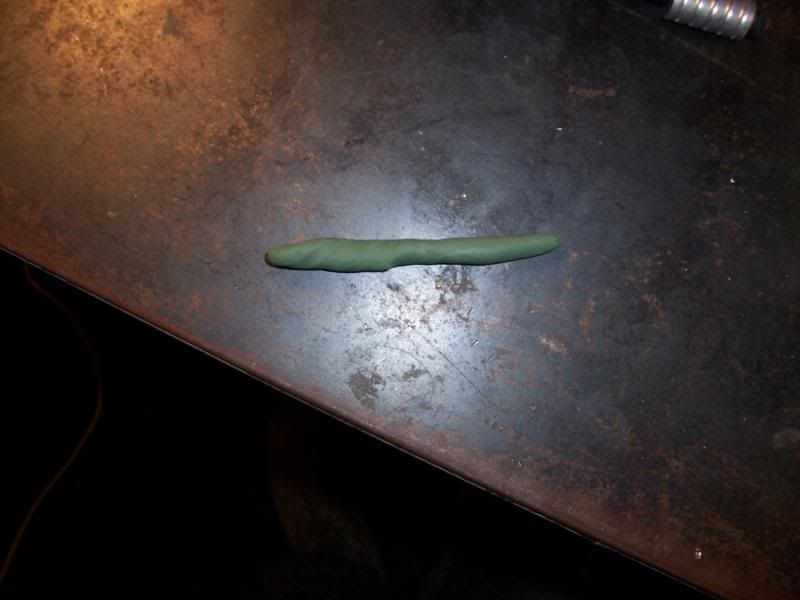
Second trick. A dam for the bbl pad. I use some moddeling clay to make a dam.
Make something like this with the clay-
Then put in stock where you want the dam to be. Make sure you put some type of release agent on the bbl and some on the clay or when you put the bble action in the stock to get the mold. If not the clay will come out with the bbled action.
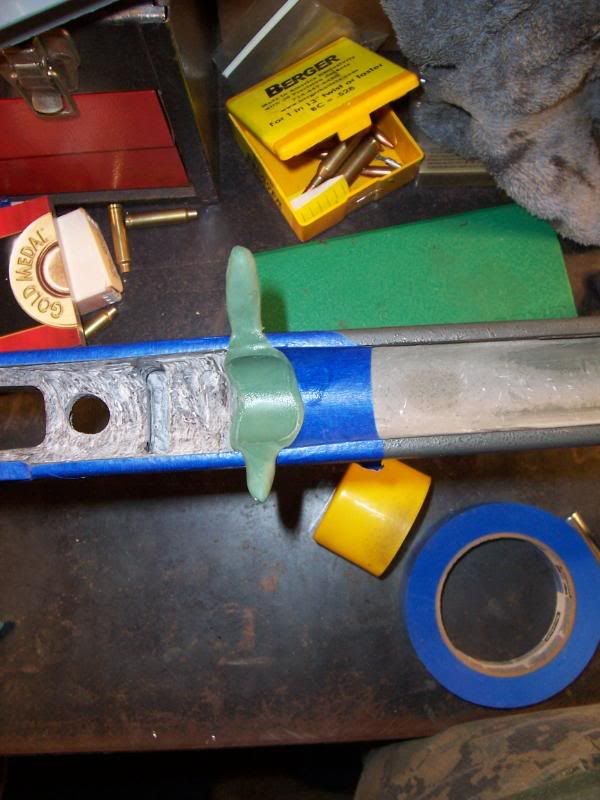
Set bbled action and get the desired mold. Take exacto knife and trim clay along the tape line.
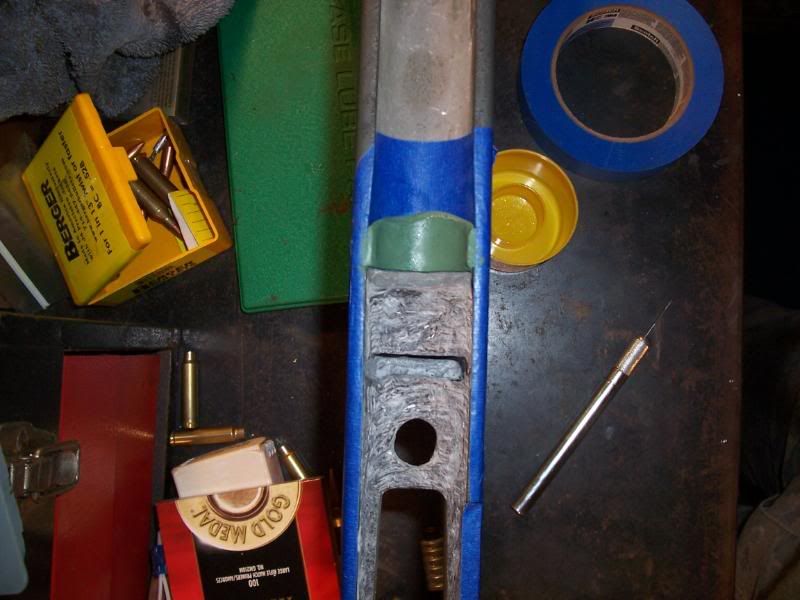
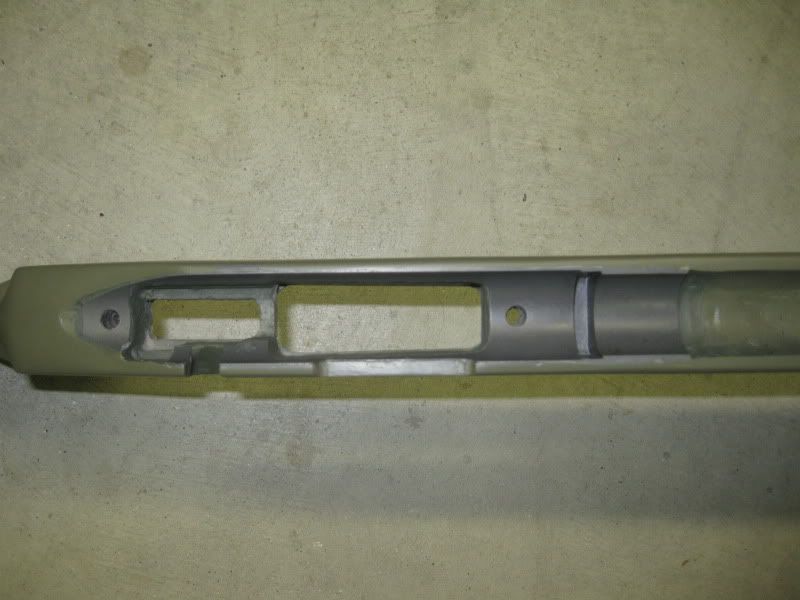
BBled action prepped and ready to rock n roll. I put some indicator lines on the tape bands to insure that I didnt get it tilted one way or the other when I set it into the bedding.
I forgot to take pics of the action setting in the stock and the clean up. Ive been using Wonder lube and qtips. Works great!
After about 6hrs I popped it out. Notice how clean the mag well is. You can also see a very thin layer of compound on the clay dam. This is trimmed up with an exacto knife.
After final clean up with the "Hand Mill"
I quit using the clamp awhile back, and am now doing them similar to Wnroscoe. Using the two bands of tape in the bbl channel is pretty much foolproof. I never had any trouble with the clamp, but will be doing it this way from now on. I have came up with a few little tricks for those of us with out a mill....
This rifle is my new 7/08. Im dropping it into an old stle A4 and Badger M5 DBM.
Pillar holes opened up and stock taped up.
Pillars with the action screws taped up for a tight fit.
My first little trick. Take a long piece of tape and tape off the inside of the mag well, leaving a long tail of tape hanging out of the bottom. This way you can pull it out and all the excess compound comes with it.
Second trick. A dam for the bbl pad. I use some moddeling clay to make a dam.
Make something like this with the clay-
Then put in stock where you want the dam to be. Make sure you put some type of release agent on the bbl and some on the clay or when you put the bble action in the stock to get the mold. If not the clay will come out with the bbled action.
Set bbled action and get the desired mold. Take exacto knife and trim clay along the tape line.
BBled action prepped and ready to rock n roll. I put some indicator lines on the tape bands to insure that I didnt get it tilted one way or the other when I set it into the bedding.
I forgot to take pics of the action setting in the stock and the clean up. Ive been using Wonder lube and qtips. Works great!
After about 6hrs I popped it out. Notice how clean the mag well is. You can also see a very thin layer of compound on the clay dam. This is trimmed up with an exacto knife.
After final clean up with the "Hand Mill"
Re: DIY Bed Job**Pic Heavy***
To help with clean up of the clay, I use saran wrap. Just lay saran wrap over the recesses of the action and push the clay in over it. Use a razor knife to trim the excess off and you are good to go. When you get ready to clean up the clay, it will come out in one chunk with no residue. I have done this several times and it works great.
To help with clean up of the clay, I use saran wrap. Just lay saran wrap over the recesses of the action and push the clay in over it. Use a razor knife to trim the excess off and you are good to go. When you get ready to clean up the clay, it will come out in one chunk with no residue. I have done this several times and it works great.
Re: DIY Bed Job**Pic Heavy***
ok, since we are on bedding, i am probablly going to do my model 700 vls next month some time, and i want to pillar bed it too, how is the best way to get the pillars straight in there, and how is the best way to drill the holes out to fit them?
ok, since we are on bedding, i am probablly going to do my model 700 vls next month some time, and i want to pillar bed it too, how is the best way to get the pillars straight in there, and how is the best way to drill the holes out to fit them?
Re: DIY Bed Job**Pic Heavy***
This is a top notch thread! Great job for 7mmRM for starting this and to wnroscoe for the previous thread on this subject, along with all the pic's from both. I've bedded some stocks before, which came out ok, not the best, but it worked. I recently tried wnroscoe's way, followed it step by step, and by bed job came out perfect. I will use this way from now on, and its so much easier to do and not have any problems.
As a side note, I use that 2" package tape that is clear to cover all my recess openings on the bottom of the reciever. One 6" piece covers the whole bottom. Since its clear and goes on even, after applied to the receiver, I then use a exacto knife and gently cut the tape close to and around the openings so I have a good cover. Saves time as compared to using putty or clay and clean up is nill on the action.
Re: DIY Bed Job**Pic Heavy***
The rifle being prepped like that looks familiar. This is by far the simplest, most fool proof method I've ever used. Looks good 7RM but, you had the process down to start with

The thing that makes this a killer way to bed is the tape around the barrel and the pillars on the receiver. The receiver and pillars are just floating in the Devcon. If there's any unevenness in the receiver OD, it's a non-issue once all cured.
The rifle being prepped like that looks familiar. This is by far the simplest, most fool proof method I've ever used. Looks good 7RM but, you had the process down to start with
The thing that makes this a killer way to bed is the tape around the barrel and the pillars on the receiver. The receiver and pillars are just floating in the Devcon. If there's any unevenness in the receiver OD, it's a non-issue once all cured.
Re: DIY Bed Job**Pic Heavy***
<div class="ubbcode-block"><div class="ubbcode-header">Originally Posted By: seaaggie</div><div class="ubbcode-body">ok, since we are on bedding, i am probablly going to do my model 700 vls next month some time, and i want to pillar bed it too, how is the best way to get the pillars straight in there, and how is the best way to drill the holes out to fit them? </div></div>
Brownells sells a piloted bit for pillars but, you cal also drill 1/2 way from the top and bottom to help with alignment. Just use a slightly larger drill bit than your pillar diameter. Once you start the dry fit check for alignment and make small adjustments as you go. Get the fit right and stress free before you add the Devcon, that’s where the magic is.
Re: DIY Bed Job**Pic Heavy***
<div class="ubbcode-block"><div class="ubbcode-header">Originally Posted By: seaaggie</div><div class="ubbcode-body">ok, since we are on bedding, i am probablly going to do my model 700 vls next month some time, and i want to pillar bed it too, how is the best way to get the pillars straight in there, and how is the best way to drill the holes out to fit them? </div></div>
I tried drilling the first hole on my first job by hand, no counterbore, and just picked up a drill press for the second. Only cost me $100.00 and I've found plenty of uses. If you drill by hand make sure you're plenty careful when going through the bottom of the stock not to widen the inlet; it looks like hell. They also got those cordless drill guide jigs that go for $30.00 at Home Depot.
Re: DIY Bed Job**Pic Heavy***
How long are the pillars supposed to be?
I was under the impression that the pillars were originally designed for wood stocks.
My understanding was that the pillars were supposed to contact the bottom metal and the receiver so when you tightened them, the tension was not related to the wood which could swell and increase the pressure through the screws.
Re: DIY Bed Job**Pic Heavy***
Tried it once and made a big sticky mess. Not sure if I would try it again.
Tried it once and made a big sticky mess. Not sure if I would try it again.
Re: DIY Bed Job**Pic Heavy***
Many thanks 7mmRM. Your tutorial gave me the courage to do a bedding job on my 223 Savage. I thought it turned out pretty decent.
Taped off a lot of areas and this made clean-up pretty easy. Used the Qtips and WD40 after about 1hr to do external clean-up. Popped it out after ~5hrs cure time at 60degF. Cleaned up with an exacto and then placed the action/barrel back in to cure for 3 days.
Re: DIY Bed Job**Pic Heavy***
Looks good man. I cant wait to try this on mine! Gonna be very nervous! I hope this is easier than it looks.
Looks good man. I cant wait to try this on mine! Gonna be very nervous! I hope this is easier than it looks.
Re: DIY Bed Job**Pic Heavy***
Good point Rarebreed. wnroscoe's thread was read and re-read many times. His and 7mmRMs tutorials are awesome.
Good point Rarebreed. wnroscoe's thread was read and re-read many times. His and 7mmRMs tutorials are awesome.
Re: DIY Bed Job**Pic Heavy***
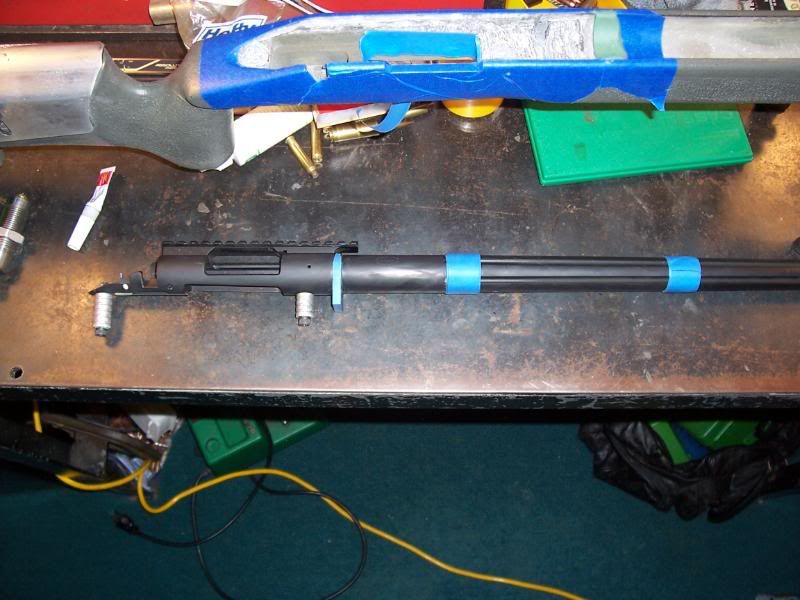
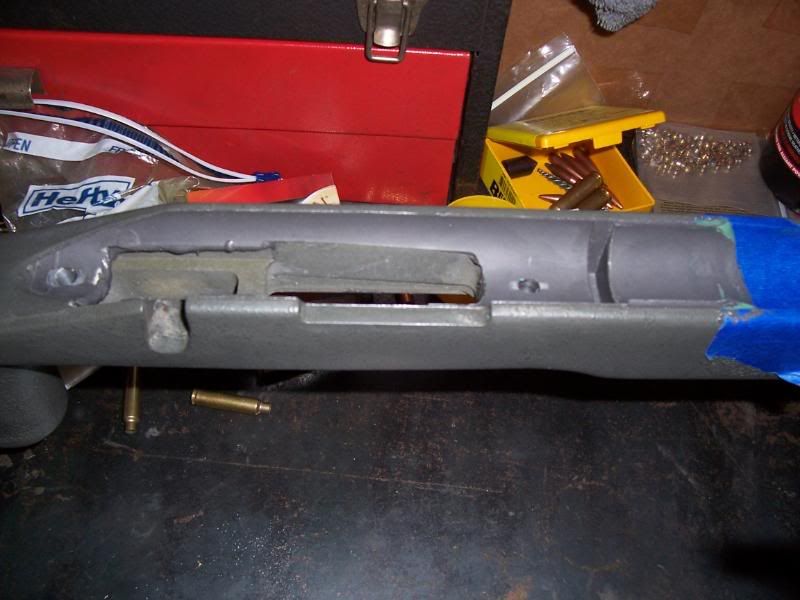
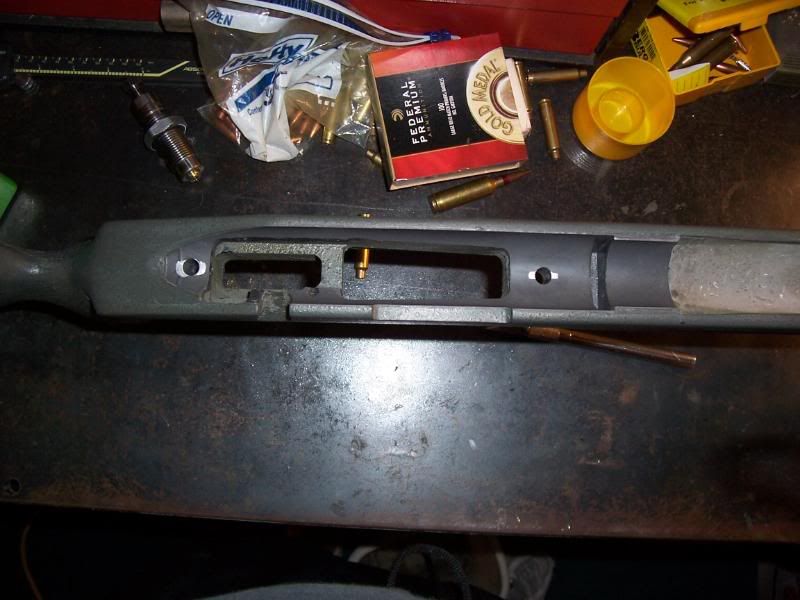
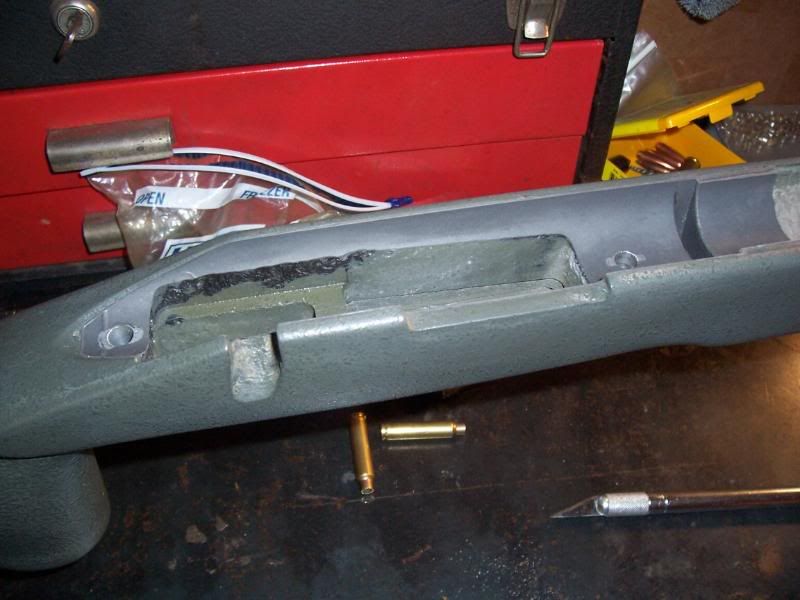
I agree. The way Roscoe shows in his thread is the way to do it. Ive been doing them the same way for a couple years now. Heres a couple Ive done in the last few days... Ive got another that gets popped out in a little bit. Ill snap a pic of it.
New unbedded stocks are easy to make look great.
Stocks like this, that have been bedded a bajillion times are a little tougher to make pretty.
Re: DIY Bed Job**Pic Heavy***
really interesting article, I just wish the pictures hadn't been removed...
really interesting article, I just wish the pictures hadn't been removed...
Re: DIY Bed Job**Pic Heavy***
<div class="ubbcode-block"><div class="ubbcode-header">Originally Posted By: 7mmRM</div><div class="ubbcode-body">I promised a fellow 'Hide member that I would give him a pictorial on bedding. Thought I would post it in case it could help someone else.
1st- Here are the stuff you need-
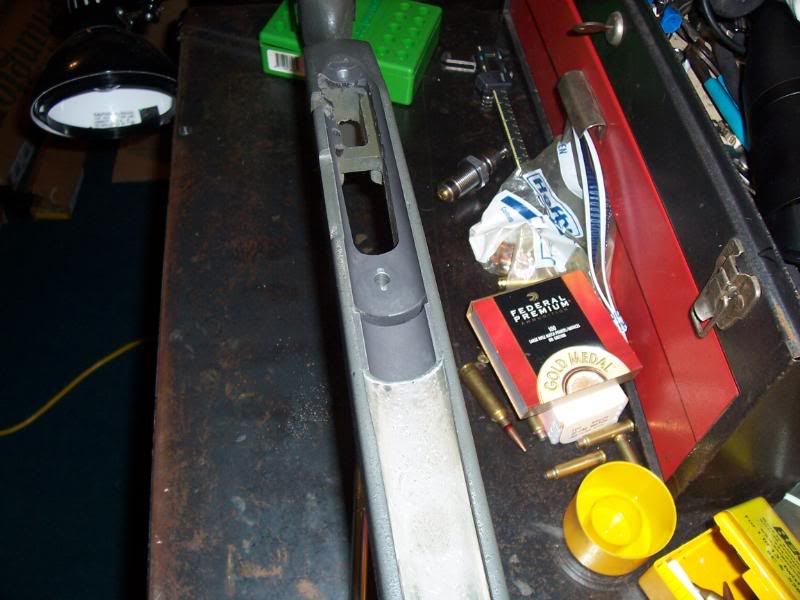
Clamp- I usea Irwin Quick Grip, couple of flat-blade screwdrivers, razor blade, Devcon Steel putty, plumbers putty or modelling clay, duct tape, blue masking tape, rubber mallet. Im using Marine Grease a release agent, but thier are many other things you can use. Long screws in the same thread pitch as the action screws.

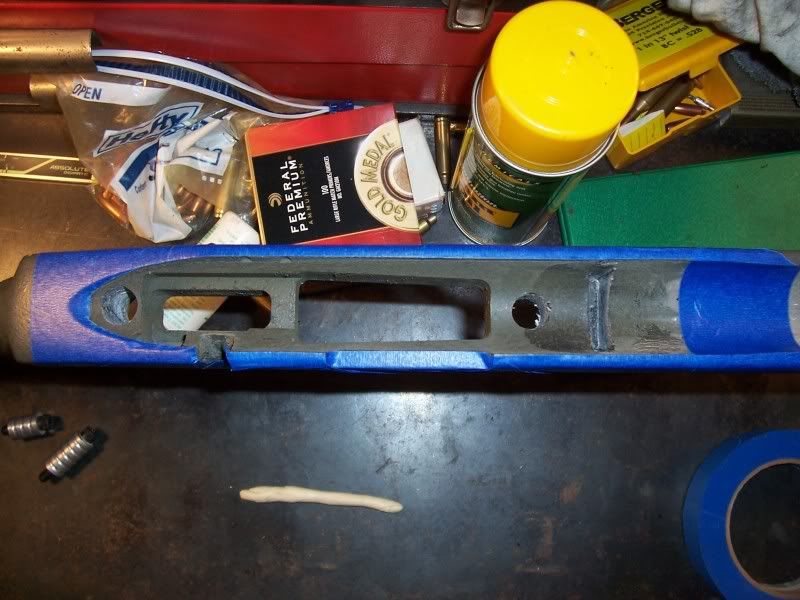
Next- Prep stock for bedding. Granted this is a HS stock, but a pillared MCM or Manners is done the same way. This stock was previously bedded, I removed all old bedding, made a few craters for mechanical locks. Blue masking tape around the action perimeter.


Next- get the long action screws. Wrap duct tape or making tape around them till they have a tight fit in the action screw holes.This will make them center in the holes, thus centering your action when you drop it in.*** <span style="font-weight: bold">Normally I will bed the bottom metal in first, with tape on action screws to "center", then bed action the same way I posted. In this instance, I checked the bottom metal with tape and such and seemed to me to be in line with each other. Hence the route I took. </span>***


Next- Prep action-
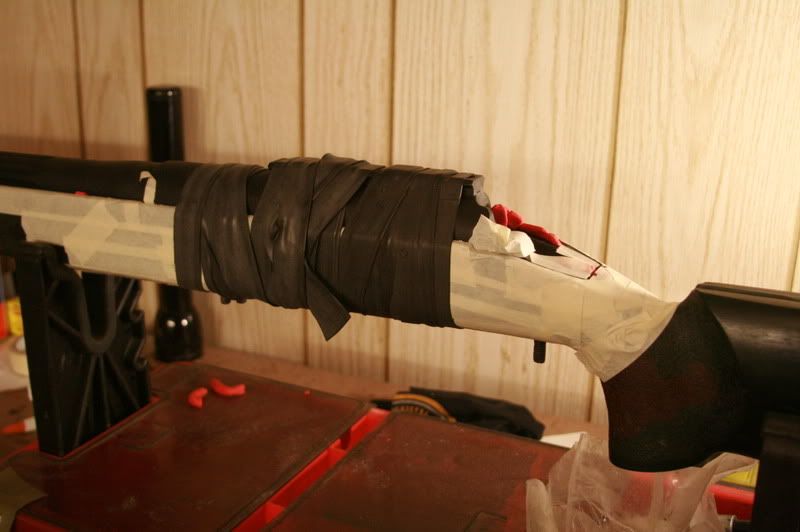
Tape off front, side and bottom of recoil lug. I used one layer of duct tape.*** I do this on a factory lug, on a tapered fat lug I put a layer of duct tape on only the bottom& front of the lug*** Note the tape on the BBL, that is so I wont have a pad that touches the bbl. I dont put pads on high volume shooting rifles like this one...Its a pdog rifle.


I then place the action in the stock and put tape on the exposed part of the action, flush with the stock-


Put some modelling clay in the trigger pin holes and some in the trigger opening. I dont put tons in, but you can if you want.
![url]](http://[url="http://i92.photobucket.com/albums/l39/7mmRM/101_0269.jpg"]http://i92.photobucket.com/albums/l39/7mmRM/101_0269.jpg[/url])
Next- Apply release agent, I used Marine grease as release agent, It works fine for me, but thier are tons of other release agents out there. Put it on anything you dont want the compound to stick to.
![url]](http://[url="http://i92.photobucket.com/albums/l39/7mmRM/101_0270.jpg"]http://i92.photobucket.com/albums/l39/7mmRM/101_0270.jpg[/url])
Next- Mix up some bedding compound. I used Devocn steel.
![url]](http://[url="http://i92.photobucket.com/albums/l39/7mmRM/101_0271.jpg"]http://i92.photobucket.com/albums/l39/7mmRM/101_0271.jpg[/url])
Apply it to the stock-
![url]](http://[url="http://i92.photobucket.com/albums/l39/7mmRM/101_0273.jpg"]http://i92.photobucket.com/albums/l39/7mmRM/101_0273.jpg[/url])
![url]](http://[url="http://i92.photobucket.com/albums/l39/7mmRM/101_0274.jpg"]http://i92.photobucket.com/albums/l39/7mmRM/101_0274.jpg[/url])
Put long action screws in screw holes-
![url]](http://[url="http://i92.photobucket.com/albums/l39/7mmRM/101_0275.jpg"]http://i92.photobucket.com/albums/l39/7mmRM/101_0275.jpg[/url])
Next your almost ready to drop in the action. Place something in the bbl cahnnel so the action doesnt just fall in.
![url]](http://[url="http://i92.photobucket.com/albums/l39/7mmRM/101_0277.jpg"]http://i92.photobucket.com/albums/l39/7mmRM/101_0277.jpg[/url])
Set the action in the compound, as you are doing this line up action screws. Get them threaded into the action or at least started. Remove the "somthing" that you put in the BBL channel.Take clamp open it up, center it on the action(center of ejection port), and clamp it down. Dont He-Man it, but good and solid. Screw the action s screws in a good bit farther.*** <span style="font-weight: bold">I agree with you completely that if one is not careful you could put some serious stress where it is not needed. The pressure on that clamp is no more than if you were holding it dowm with your hands. In talking with Randy, one of his concerns with this method was the bbl just hanging there unsupported. I have never experienced a problem, but could easliy see how it could, especially with a heavier bbl. His suggestion was this-<div class="ubbcode-block"><div class="ubbcode-header">Originally Posted By: HateCA</div><div class="ubbcode-body"> Even with the clamp method try clamping the barreled action into a barrel vise with it upside down after you drop in into the stock. This will still help with the pressure the weight that the barrel is trying to put onto the front of the bedding job.
Because the barrel is so heavy in the front this can put more pressure to the front no matter how tight the screws are. If you turn it over there is no weight pressing down onto the stock.
</div></div> If no vise is available, I would think a some tape or business cards to support the bbl woud suffice, but be careful not to cause upward pressure on the bbl.</span>***
![url]](http://[url="http://i92.photobucket.com/albums/l39/7mmRM/101_0278.jpg"]http://i92.photobucket.com/albums/l39/7mmRM/101_0278.jpg[/url])
![url]](http://[url="http://i92.photobucket.com/albums/l39/7mmRM/101_0279.jpg"]http://i92.photobucket.com/albums/l39/7mmRM/101_0279.jpg[/url])
![url]](http://[url="http://i92.photobucket.com/albums/l39/7mmRM/101_0280.jpg"]http://i92.photobucket.com/albums/l39/7mmRM/101_0280.jpg[/url])
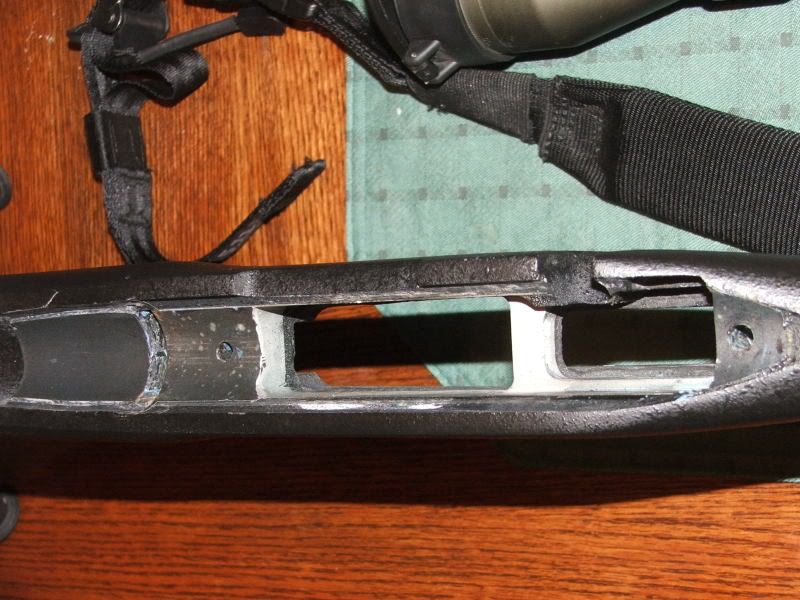
Remove excess compound the oozed out with small flatblade screwdriver.
![url]](http://[url="http://i92.photobucket.com/albums/l39/7mmRM/101_0281.jpg"]http://i92.photobucket.com/albums/l39/7mmRM/101_0281.jpg[/url])
![url]](http://[url="http://i92.photobucket.com/albums/l39/7mmRM/101_0283.jpg"]http://i92.photobucket.com/albums/l39/7mmRM/101_0283.jpg[/url])
![url]](http://[url="http://i92.photobucket.com/albums/l39/7mmRM/101_0282.jpg"]http://i92.photobucket.com/albums/l39/7mmRM/101_0282.jpg[/url])
Now all you need to do is wait til it cures for at least 3hrs, before removing the action. Im gonna wait till after work so it will be later tonight 6-8hrs. I will take more pics then and post them in the AM.
</div></div>
Wheres the pics? Did u forget to pay your hosting bill too")
<div class="ubbcode-block"><div class="ubbcode-header">Originally Posted By: 7mmRM</div><div class="ubbcode-body">I promised a fellow 'Hide member that I would give him a pictorial on bedding. Thought I would post it in case it could help someone else.
1st- Here are the stuff you need-
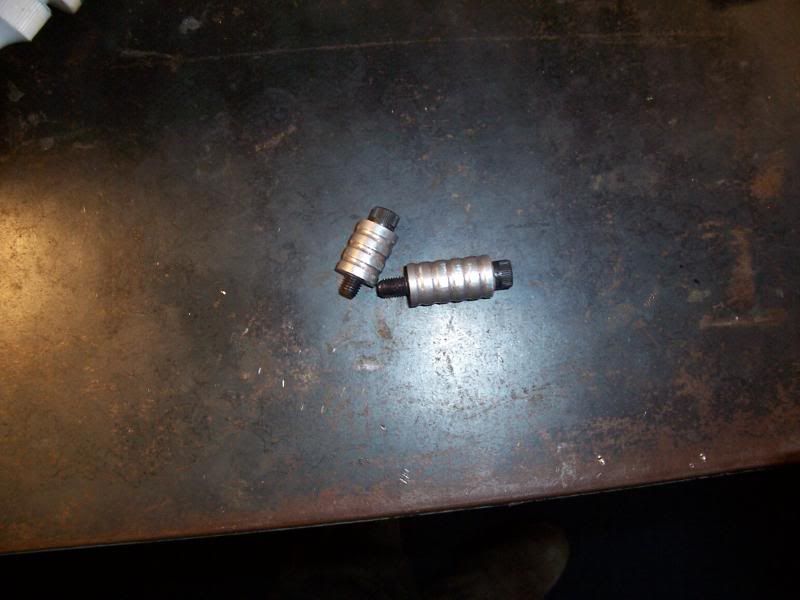
Clamp- I usea Irwin Quick Grip, couple of flat-blade screwdrivers, razor blade, Devcon Steel putty, plumbers putty or modelling clay, duct tape, blue masking tape, rubber mallet. Im using Marine Grease a release agent, but thier are many other things you can use. Long screws in the same thread pitch as the action screws.
Next- Prep stock for bedding. Granted this is a HS stock, but a pillared MCM or Manners is done the same way. This stock was previously bedded, I removed all old bedding, made a few craters for mechanical locks. Blue masking tape around the action perimeter.
Next- get the long action screws. Wrap duct tape or making tape around them till they have a tight fit in the action screw holes.This will make them center in the holes, thus centering your action when you drop it in.*** <span style="font-weight: bold">Normally I will bed the bottom metal in first, with tape on action screws to "center", then bed action the same way I posted. In this instance, I checked the bottom metal with tape and such and seemed to me to be in line with each other. Hence the route I took. </span>***
Next- Prep action-
Tape off front, side and bottom of recoil lug. I used one layer of duct tape.*** I do this on a factory lug, on a tapered fat lug I put a layer of duct tape on only the bottom& front of the lug*** Note the tape on the BBL, that is so I wont have a pad that touches the bbl. I dont put pads on high volume shooting rifles like this one...Its a pdog rifle.
I then place the action in the stock and put tape on the exposed part of the action, flush with the stock-
Put some modelling clay in the trigger pin holes and some in the trigger opening. I dont put tons in, but you can if you want.
Next- Apply release agent, I used Marine grease as release agent, It works fine for me, but thier are tons of other release agents out there. Put it on anything you dont want the compound to stick to.
Next- Mix up some bedding compound. I used Devocn steel.
Apply it to the stock-
Put long action screws in screw holes-
Next your almost ready to drop in the action. Place something in the bbl cahnnel so the action doesnt just fall in.
Set the action in the compound, as you are doing this line up action screws. Get them threaded into the action or at least started. Remove the "somthing" that you put in the BBL channel.Take clamp open it up, center it on the action(center of ejection port), and clamp it down. Dont He-Man it, but good and solid. Screw the action s screws in a good bit farther.*** <span style="font-weight: bold">I agree with you completely that if one is not careful you could put some serious stress where it is not needed. The pressure on that clamp is no more than if you were holding it dowm with your hands. In talking with Randy, one of his concerns with this method was the bbl just hanging there unsupported. I have never experienced a problem, but could easliy see how it could, especially with a heavier bbl. His suggestion was this-<div class="ubbcode-block"><div class="ubbcode-header">Originally Posted By: HateCA</div><div class="ubbcode-body"> Even with the clamp method try clamping the barreled action into a barrel vise with it upside down after you drop in into the stock. This will still help with the pressure the weight that the barrel is trying to put onto the front of the bedding job.
Because the barrel is so heavy in the front this can put more pressure to the front no matter how tight the screws are. If you turn it over there is no weight pressing down onto the stock.
</div></div> If no vise is available, I would think a some tape or business cards to support the bbl woud suffice, but be careful not to cause upward pressure on the bbl.</span>***
Remove excess compound the oozed out with small flatblade screwdriver.
Now all you need to do is wait til it cures for at least 3hrs, before removing the action. Im gonna wait till after work so it will be later tonight 6-8hrs. I will take more pics then and post them in the AM.
</div></div>
Wheres the pics? Did u forget to pay your hosting bill too
Holy old threads, BatMan!
I bed rifles now a bit different than I did back then. Ive got a bunch of bedding work at the moment, I'll take pictures and do another write up.
I bed rifles now a bit different than I did back then. Ive got a bunch of bedding work at the moment, I'll take pictures and do another write up.
Holy old threads, BatMan!
I bed rifles now a bit different than I did back then. Ive got a bunch of bedding work at the moment, I'll take pictures and do another write up.
Awesome would appreciate it! I just did a search on bedding and this was one of the threads that came up!
Similar threads
- Replies
- 24
- Views
- 1K
