Join the Hide community
Get access to live stream, lessons, the post exchange, and chat with other snipers.
Register
Download Gravity Ballistics
Get help to accurately calculate and scope your sniper rifle using real shooting data.

Install the app
How to install the app on iOS
Follow along with the video below to see how to install our site as a web app on your home screen.
Note: This feature may not be available in some browsers.
You are using an out of date browser. It may not display this or other websites correctly.
You should upgrade or use an alternative browser.
You should upgrade or use an alternative browser.
For those interested in field swapping barrels...The Ross Vise
- Thread starter Carl_Ross
- Start date
I could part with mine if anyone really needs one. It's brand new, never been used. Never ended up finding a need to swap barrels in the field.
Hello all
I am new to long range and starting a build. I was wondering if there are any of the RossVise laying around that need a new home, or for rent, or borrow. Any info on how to get one would be appreciated.
I am new to long range and starting a build. I was wondering if there are any of the RossVise laying around that need a new home, or for rent, or borrow. Any info on how to get one would be appreciated.
*** Special thanks to hide member reubenski who's setup with barrel flats inspired this rabbit hole. ***
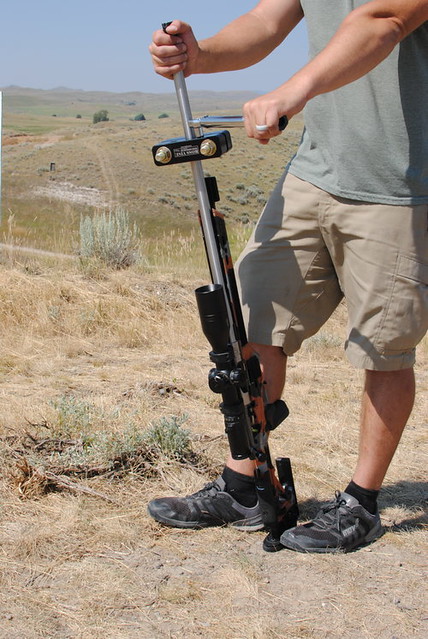
The last couple of years I've moved to a modular rifle system that uses Bighorn actions and a pile of interchangeable barrels in various chamberings and states of wear. The weak link in all of this was always the time and equipment required to swap the barrels around. Thinking about this led me to develop a system (based around a barrel vise) for quickly changing rifle barrels in the field (or at home). It came out better than I thought, and I had a batch of them made (instead of just one) because I'm certain other shooters would like the capacity it offers.
Here's a quick demo video:
To lay it out in more detail:
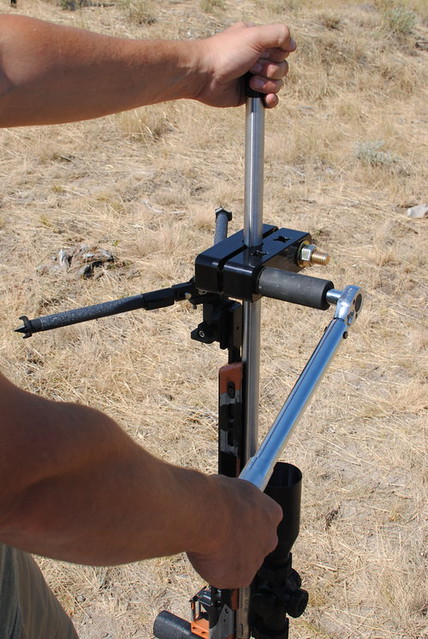
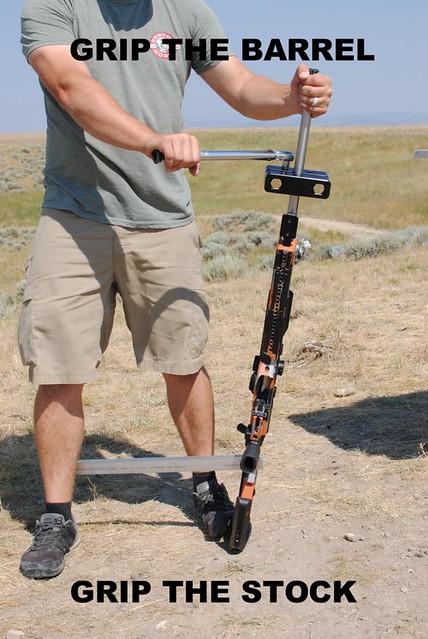
In order to remove or install a barrel using this method, you need to get a grip on the barrel and on the action or stock.
GRIPPING THE BARREL
This is what the Ross Vise is designed to do.
INSTALL THE VISE
Loosen the cap nuts, then slip the vise around your barrel with the square drive recesses facing the muzzle. Hand tighten the cap nuts.
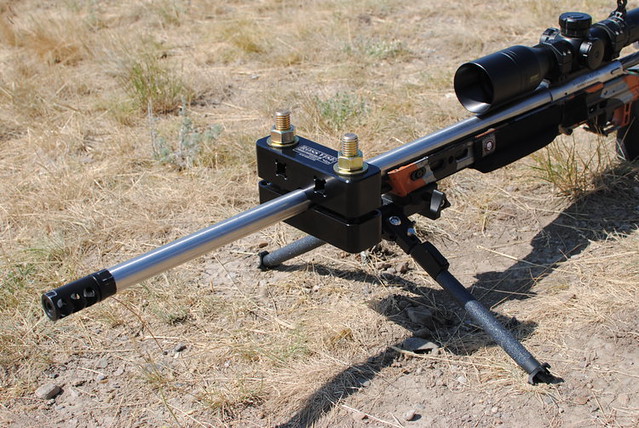
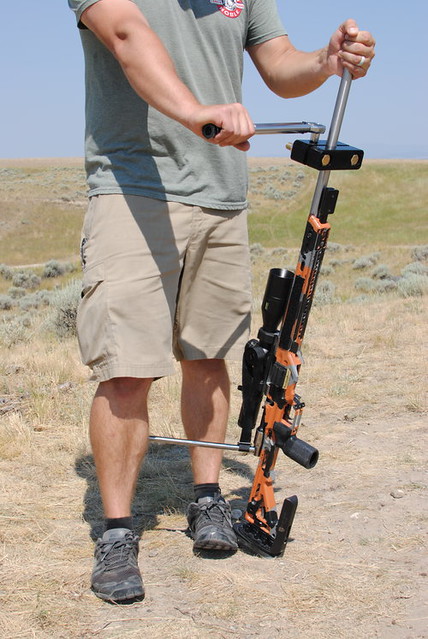
TORQUE THE CAP NUTS
Tighten the nuts using a torque wrench, ratchet, or breaker bar with a 15/16 socket (a deep socket will work best), a 15/16 end wrench, or an adjustable wrench. If using a torque wrench, torquing the cap nuts to the same spec as the barrel is tightened to has always proved sufficient to remove it without slippage. The stock or chassis makes for great leverage so it is easy to get the nuts tight, we recommend you turn the rifle vertically. Avoid using the scope or scope rings for leverage.
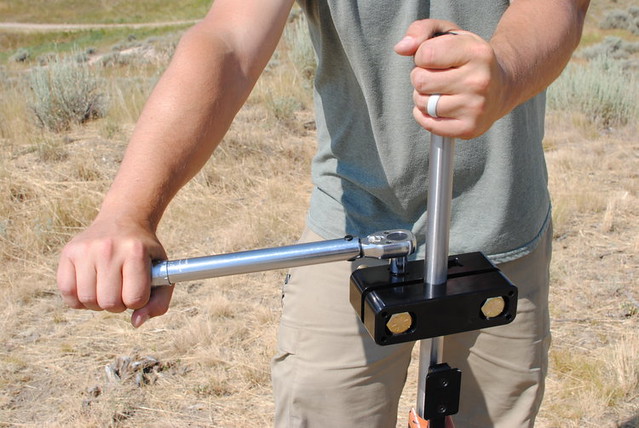
TORQUE THE BARREL
Insert a torque wrench, ratchet, or breaker bar into one of the 1/2" square drive recesses on the face of the vise. If you desire to protect the finish of your vise, we recommend using a 3/8" drive with a 1/2" adapter, or a short 1/2" drive extension, in order to keep the wrench clear of the vise. The vise is made of anodized aluminum, and while it is durable, it will show marks if you repeatedly hit it with steel!
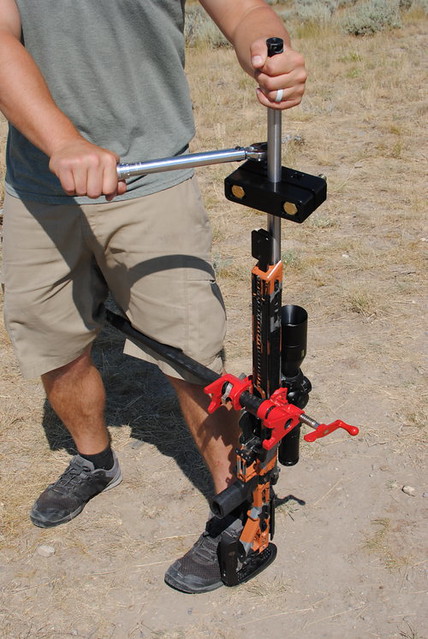
GRIPPING THE ACTION / STOCK
Now that we have plenty of leverage on the barrel, we need leverage on the action. Exactly how we get this will depend upon how tight your barrel is installed, what type of stock or chassis you have, and what you are comfortable with. Here's a few options:
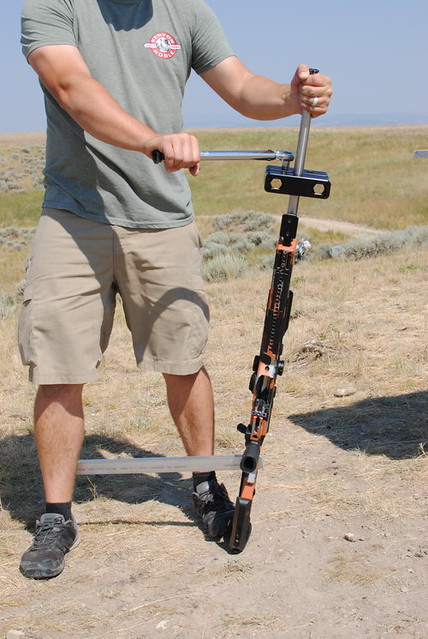
GRIP THE STOCK - AND POP THE BARREL LOOSE
If you run a light torque value on your barrels, it is possible to remove and install the barrel using only the leverage afforded by the stock. In testing we have found 30 ft-lb to be easy to reach, and 40 ft-lb to be within reach - though no longer "easy". The exact technique used matters, place your foot at the butt of the rifle and put the grip into your calf. Many competitive shooters run torque values this light on their barrels with great success. The biggest downside that we see with running a lightly torqued barrel is you are a little bit closer to having your barrel come loose. If your barrel becomes loose during a competition or a hunt, your ability to hit your target will be compromised, severely!
INSIDE ACTION WRENCH AND A T-HANDLE
By using an action wrench with a T-handle in combination with the vise, you are essentially exerting the same forces on your barrel and action as you would installing and removing barrels the traditional way, in a shop, with a bench mounted vise and an inside action wrench. By using a strap around the T-handle, you will keep the assembly from falling out of the rifle and save yourself a lot of frustration. This method will easily support the 80 ft-lb torque that is the recommended maximum for the vise, if you desire your barrels to be that tight. The only downsides to this method are that it requires you to own an inside action wrench for your action(s), and that it can be a little slower to set up, especially if you have an adjustable cheek piece in the way which must first be removed.
PIPE CLAMP
Using an inexpensive iron pipe clamp (my clamp came from Harbor Freight for ~ $10, and my 3/4" pipe came from the hardware store for less than that), tighten the clamp around your chassis or stock, and use the pipe as the leverage to remove and install your barrel. Add some rubber to the jaws (another $2 at the hardware store) to avoid damage to your stock or chassis. We recommend clamping around the recoil lug/front action screw juncture, and proceeding with caution! When using this method you are transferring force from the clamp to the stock - and then from the stock to the action via the action screws and any bedding surrounding the recoil lug. We have had great success with this method and have not damaged anything, but the potential is there. Be especially cautious about using this method with a lightly built wood, fiberglass, or carbon fiber stock. In our testing we used this method on a bedded rifle in a chassis - and after 100 removals and installs at 80 ft-lb the bedding was still tight and showed no signs of being worse for the wear, nor did any other components.
"MPA ROD"
For those with the popular Masterpiece Arms chassis, there is a recess behind the grip that will ALMOST take a 1 1/2" x 1/2" piece of aluminum stock (as seen in the demo video at the top of the page). I purchased a 2 foot piece that size from the local metal supply for ~ $10, and then spend about 10 minutes with a flap disc on an angle grinder rounding off the edges and taking the last two inches down from .500" to .475" so it would slip into this recess. As with the pipe clamp method, you are transferring force through your action screws and bedding, so proceed with caution. For testing purposes, I installed and removed a barrel set to 120 ft-lbs using this method with no ill effects, however I absolutely do not recommend that much torque, nor do I take responsibility if you manage to damage your stock using this technique. Additionally, if you are particular about the finish on your chassis inside this pocket, this will scratch it slightly, so proceed with that knowledge
If you're interested, there's even more detail at the site I set up: www.rossprecisionmt.com.

any word on these coming around again?
does anyone have one and want to part with it?
any word on these coming around again?
does anyone have one and want to part with it?
No plans at the moment, and I don't know of any currently for sale.
Another run would be cool. Or maybe a special part that could interface with the SAC modular barrel vise! That would be even cooler!No plans at the moment, and I don't know of any currently for sale.
Looks to be sooner than later, but I'm dealing with some summer vacations in the supply chain ")
indigo card
jjsploit.click
indigo card
jjsploit.click
Last edited:
I have one I’d sell if anyone is interested. Seems like these have died off and the site is down.
I sent a PM to inquireI have one I’d sell if anyone is interested. Seems like these have died off and the site is down.
Any chance you’d share the drawings? I’d like to make one myself if you aren’t going to make anymore. If not i understand I’m sure I can model one myself in Fusion.
If you’re not opposed to machining in barrel flats, that would negate the need for a Ross-type vise. Just attach a crows foot to your torque wrench.Any chance you’d share the drawings? I’d like to make one myself if you aren’t going to make anymore. If not i understand I’m sure I can model one myself in Fusion.
I’m not opposed to it, I just wanted to make sure if I put wrench flats just behind the muzzle that when torque is applied it’s not going to over stress the barrel if you torque to say 70 ft lbs or more. I guess I’m more asking at what torque value would you exceed the structural limitation of the steel? The analogy would be similar to if you torque a hex bolt to the point that you started to twist the head off the bolt. I don’t know how to calculate the amount of torque that would cause the steel of the barrel to be stressed beyond its yield strength. My question may well be a dumb question but I’m not an engineer and I don’t know how to calculate this.If you’re not opposed to machining in barrel flats, that would negate the need for a Ross-type vise. Just attach a crows foot to your torque wrench.
Yeah, I don’t know either. Obviously you need a thick enough barrel to have flats near the muzzle like an AI has. Otherwise you could have them machined in closer to the action.I’m not opposed to it, I just wanted to make sure if I put wrench flats just behind the muzzle that when torque is applied it’s not going to over stress the barrel if you torque to say 70 ft lbs or more. I guess I’m more asking at what torque value would you exceed the structural limitation of the steel? The analogy would be similar to if you torque a hex bolt to the point that you started to twist the head off the bolt. I don’t know how to calculate the amount of torque that would cause the steel of the barrel to be stressed beyond its yield strength. My question may well be a dumb question but I’m not an engineer and I don’t know how to calculate this.
My intuition is that 70 ft/lbs will be no problemo. I do that with my barrel vise and a Tikka and it’s really not much effort.
It can be done near the tenon or near the muzzle on a factory varmint barrel. Im going to try it.
Never had wrench flats. I'd think it would be more unwieldly to torque/break free in the field while in a stock/chassis the further away from the action one gets?
I couldn't get a suppressor off even when the DT hub adapter had wrench flats without putting my barrel in a vise recently so I'm just picturing the same problem with wrench flats if a guy gets his barrels on tight.
I couldn't get a suppressor off even when the DT hub adapter had wrench flats without putting my barrel in a vise recently so I'm just picturing the same problem with wrench flats if a guy gets his barrels on tight.
If you look at the Ross vise thread the inventor has lots of pics of his techniques and tips.Never had wrench flats. I'd think it would be more unwieldly to torque/break free in the field while in a stock/chassis the further away from the action one gets?
I couldn't get a suppressor off even when the DT hub adapter had wrench flats without putting my barrel in a vise recently so I'm just picturing the same problem with wrench flats if a guy gets his barrels on tight.
Similar threads
- Replies
- 30
- Views
- 2K
- Replies
- 55
- Views
- 2K
