• Watch Out for Scammers!

    We've now added a color code for all accounts. Orange accounts are new members, Blue are full members, and Green are Supporters. If you get a message about a sale from an orange account, make sure you pay attention before sending any money!

Hand Loading for Precision Rifle (Pic Heavy)

If it is the Forster Co-ax it does not use shell holders. The only way for you to adjust the amount your die will bump the shoulder would be to screw it in or further down for more shoulder bump and to loosen it or unscrew it for less shoulder bump. Obviously anyone else using any press can do the same thing even if they are not using competition shell holders.
 
Last edited:
and what happens if I do this and it never goes from 1.6220, using insert D for 308 to gather the intel. I’ve used the shellhplders accordingly off a video on YouTube but I wanna help my buddy tailor rounds for his rifle and can’t use the same method. Using rcbs competition die and I screwed it down further.
 
The only way to bump a shoulder is to make it contact that surface in the die itself. Either by raising the bottom of the case higher by going from the 0.010 shell holder to the 0.002. Or if that doesn't work screw the die in further to lower the die in the press. If you have done both and the ram is going to cam over too hard then you have a die that is probably out if spec. You can either take some material off the bottom of the die, typically done at a machine shop in a lathe or possibly a mill. Or you have to send the die back to the manufacturer or buy another one. I stick to Redding Type S FL Bushing dies and I have had very good luck in several calibers.
 
Last edited:
Maybe I missed this, but are you measuring the distance to the lands to determine bullet jump, or do you not find this to be necessary? If so, what are you using to measure the distance to the lands?
 
Great tutorial!
The pics tell more than just words.
Recently started reloading 6.5 and appreciate the details...
 
Maybe I missed this, but are you measuring the distance to the lands to determine bullet jump, or do you not find this to be necessary? If so, what are you using to measure the distance to the lands?

This article was written in order to help you load ammo to book spec. Meaning consulting a loading manual and loading your bullet of choice to the OAL that is spec'd in the reloading manual for that bullet. As I stated in the opening paragraph it was not intended for "load development" which is more along the lines of determining best jump for the bullet in your specific chamber and how to do so, but I'll answer anyway.

The way I find the lands is as follows. This is probably TMI but......Keep in mind distance to lands is somewhat subjective. It is a "hard number" but if you gave the same rifle, case and bullet to different people who use different techniques and / or tools to determine that "hard number" you'd probably come up with slightly different numbers. Albeit I'm sure they would be close.

I do not use any tools as the only one I tried was the Hornady (Stony Point) measuring tool but I never got consistent, repeatable results. Matter of fact if someone pays shipping they can have it with a 308 treaded case. The way I do it works with any caliber and any bullet without any special tools needed.


Take a case that has been resized and is spec'd to your chamber by the process outlined at the beginning of this thread. DO NOT load a primer or powder for safety reasons for the exercise. Just use the case and the bullet you will be loading for. Load a round long, so long that the bolt might not even close on the first attempt. Spin the bullet in some 000 or 0000 steel wool. This will put a very shinny polish on the bullet. By hand load the long dummy round into the chamber and GENTLY attempt to close the bolt. If you have to muscle it then the round is too long and you need to seat the bullet deeper, don't force it. (There is some risk that the bullet may get stuck in the bore but just run a cleaning rod through the muzzle and it will come free easy with a light tap.) If the dummy round didn't chamber, put it back in the press, lower the seating stem and seat the bullet deeper. Then repolish the bullet in the steel wool and try again. When you can close the bolt, pull the dummy round out of the chamber and hold the side of the case as best you can so that the round is not dragging on the chamber or action and making marks on the bullet. Inspect the ojive area of the bullet for marks made by the lands in the barrel. If you have a traditional 4 groove barrel there will be 4 marks 90 degrees apart. If you have a 5 groove, such as a 5R barrel, there will be 5 marks 60 degrees apart. Seat the bullet about 0.010" deeper, polish the bullet, chamber it again, then extract and inspect the bullet again. At first the marks will be fairly pronounced, then as you seat the bullet deeper the marks will get more faint. At some point you may want to go down to only seating the bullet 0.005" or 0.002" deeper at a time. (Another reason to have a micrometer seating die.) At some point the marks will be EXTREMELY faint. Then you will seat the bullet just a touch more and you will not see any marks. I call that measurement "The Lands". Keep a record of that measurement from the case head to the ojive. Keep in mind, as you shoot, the throat erodes and the lands move away from the chamber. So this measurement will change over time. If shooting a Berger Hybrid or a Sierra SMK I will seat the bullet 0.020" DEEPER from "The Lands" measurement for a 20 thousandths jump. If using a Berger VLD I usually seat them 0.015" LONGER because the VLD's seem to like to be jammed into the lands to shoot well. As always follow the 10% rule when starting your charge weight with any new powder or anytime you change seating depth.

You may want to repeat this with new case and new bullet. No need to start way off just a touch longer and see if what you come up with matches what you did the first time. If not exactly the same I'm usually within a thou or two and that's close enough.
 
Last edited:
  • Like
Reactions: Dooby
Now to set up your FL sizing die.
For a bolt gun you are going to want to take a piece of brass that has been fired in your weapon and measure the distance from the base of the case to the shoulder.

I’m building a new rifle in 6.5 CM. I have no brass that has been shot from this rifle as it will be new. I do, however, have some once fired brass I picked up that was shot out of a semi-auto. What’s the best way to start in this situation?

Should I just resize with no shoulder bump at first and measure after I shoot it? Is it better to just buy a box of factory ammo and measure those fired pieces of brass?
 
Last edited:
I’m building a new rifle in 6.5 CM. I have no brass that has been shot from this rifle as it will be new. I do, however, have some once fired brass I picked up that was shot out of a semi auto. What’s the best way to start in this situation?

Should I just resize with no sholder bump at first and measure after I shoot it? Is it better to just buy a box of factory ammo and measure those fired pieces of brass?
My long range rifle has never had a piece of factory ammo through it, i've reloaded for it from the beginning. With my first batch of brass I just sized it to the SAAMI specs listed in my Hornady manual for that brass.
 
My long range rifle has never had a piece of factory ammo through it, i've reloaded for it from the beginning. With my first batch of brass I just sized it to the SAAMI specs listed in my Hornady manual for that brass.

Was this from once fired brass, or new?
 
If it's new brass you shouldn't have to size it. If it was fired then if you bump the shoulder to the dimension listed in a reloading manual then it should chamber in any rifle you put it in.
 
This tutorial is excellent, and not too insane as far as the OCD of precision reloading.

I'm kinda ghetto when I measure my ogive/lands engagement:

By seating a bullet long, coloring it with black sharpie, seating the casing under the extractor and pressing it against the ejector, then slowly running the bolt home until I feel slight resistance, extract, and observe the witness marks created by the lands. The, take bullet to seating die, seat it a c-hair deeper... Color with black sharpie, seat casing against bolt face..... Etc....

Repeat until you no longer feel any resistance while still seeing witness marks of the lands touching the ogive. Save that cartridge as your reference. Then from there you can seat it longer for the "jam" effect, or you can seat shorter for tuning your jump.

It's not as precise, or quick as using all theem thar fancy measuring tools, but it has worked well for me.
 
Last edited:
Im surprised you don't neck turn your brass- Im worried about a "donut" forming inside the brass screwing up the amount of grab on the bullet.

‘By neck sizing with a bushing and the expander rod removed, we use the expander as a last step before seating the bullet long out of the neck shoulder junction so as to negate concerns of the dreaded “donut”. For me this has worked in all but the tightest of benchrest barrels where the slightest change in neck thickness mandates such xtra effort...
 
Rather new to reloading but I gathered this data a couple weeks ago. More work to do...
442852E2-7A3C-44D2-AC02-5B132F428E7A.jpeg

595C89BC-5513-45F4-A601-516F36E4ADDE.jpeg

B373B531-E9BE-4BAA-A125-1DF7D2308B18.jpeg

928B426F-1BDE-4F31-B383-5317EDE021DE.jpeg

3903D5CA-6032-4F73-85D4-306DC4087468.jpeg
 
  • Like
Reactions: rbazinet
I'm new too. Been reloading and shooting nice groups from 3 different calibers, many .25moa. I've always set my FL dies by running them down till they make contact, then one more turn downward. The shoulder bumping is taking place then, right? Thanx for a great thread!
 
  • Like
Reactions: Tacovrd
I took new pictures and made the thread GLORIOUS AGAIN!

I found this thread on Thursday! Good timing and thanks for adding the new pics!

I have a set of RCBS dies for .223, .308, and 30-06 and some brass for each. I spent the morning sorting it while on a conference call. Most of the .223 brass has been shot by 2 other rifles... For the new rifle would you suggest shooting a few rounds of factory ammo and using that to determine shoulder bump/set up the die before resizing the brass that's been shot through another rifle? I'm quickly learning that the large qty of brass I have is much smaller due to the mixed headstamps!

Also, on your brass prep, you no longer ream the primer pocket and deburr the flash hole? Or you just no longer ream the primer pocket but still deburr the flash hole?
 
Since it’s so cold (-10c) and the wind is blowing at a gale force this Saturday, I thought I would reload some cartridges for my Timberwolf (C-14) in 338LM. For time sake, I’m not showing the de-capping, wet tumbling, or the drying steps.

Step 1. Annealing. After 4 firings with the magnum, it’s time to anneal the cases. Here are the finished cases as they cool on the cooling tray.

F3C6AA2D-4765-4C6F-8412-3F5FD960FC0D.jpg


Step 2. Full length sizing with the Whidden F.L. Bushing sizing die. I like to bump the shoulder for the magnum -.002”. This measures 2.2620” in the Whidden shoulder bump guage.

6A152364-08A4-4BD7-AACF-5E623AE29A8B.jpg


Step 3. Trimming. The Lapua cases can grow substantially after sizing. The trim length is right around 2.714”.

F8B3A474-EE19-4369-BE62-69D53CD77A55.jpg


Step 4. Priming the cases. Pretty self-explanatory here.

589AA641-DAFA-4A6F-8E02-8F3436B9C528.jpg


Step 5. Charging the case with 93.6gr of Retumbo.

1BC00B69-862A-4F66-9352-DB78AFBE2627.jpg


Step 6. Seating the 300gr SMK’s. I am seating them .010” off the lands (jump). Which gives me a CBTO measurement of 2.966”. (COAL is meaningless because I single feed these.)

8FD02AE0-49FA-460F-87EC-3281E8813AB4.jpg


And now Kids, we’re done! A finished round perfectly fitted for the C-14. Here’s the finished case in the caliper and another in the case guage showing a perfect round.

ED9-BFE21-807-D-4462-8453-BEB054-A94-EEC.jpg


And that’s what makes this a mile plinking rifle....

DSCN1379.jpg


Actually, I’ve had great success out to 1900m with this combo.
 
Last edited:
If anyone is interested in the brand new V4 Autotrickler system there is a live stream this Friday!
Come see the all-new design as well as the shotmarker system

I will be streaming live on YouTube this Friday, June 4, from 8 pm to 10 pm ET (5-7 PT) to demonstrate V4 and answer questions.
https://www.youtube.com/autotrickler
The focus will be on the design features of the new AutoTrickler, however, I will also answer questions about AutoTrickler, ShotMarker, F-Class and load development if there is time.
This is our first time hosting a stream like this, and we're planning with the release of V4 to take more time to create videos. Please come show your support but try to be understanding if there are some technical glitches on Friday.
- Adam
autotrickler.com
 
Hi folks! Long time lurker, but new member here as of today! I was hoping you guys could help me with an issue i am facing:

I built a 224 valkyrie AR off a sterling TSR (AR15 pattern) receiver. Has a 1:6.5 faxon barrel. Pretty standard stuff.

I used a Hornady COAL gauge and ended up at 2.2850 for COAL to jam, and CBTO to jam is 1.7795.

To start, i backed off 15-thousandths and seated a bullet at 1.7645 CBTO, and chambered the round. I extracted the round and re-measured the seating depth to ogive and it was 5-thousands longer.

So i dialed it down to 1.7635, and had the same result on extraction. This time it was It was 0.007 inches longer to the ogive.
I dialed it down further to 1.7355 and still getting a longer round than what went it.

Is this normal in AR's?
Or is my AR chamber just not broken it yet? (it has maybe 50 rds of factory ammo thru it)... Maybe i haven't cleaned it thoroughly enough?
Am i not backed-off far enough? ((At 1.7355 I have already backed it off 44-thousands from the lands (jam length), and the bullet still getting pulled out a tiny bit on extraction))
Does brand new brass have to be neck-sized?
Should i be crimping? (i really dont want to crimp)
Any thoughts???

My fear is that i am going through all this trouble to get a consistent seating depth, and upon chambering, the bullet is getting caught somewhere... this i imagine will have a detrimental effect on accuracy. (i haven't shot hand-loads yet!)

TLDR: rounds are measuring longer than intended seating depth when chambered and extracted....

PS. there are various marks on the extracted bullet: 1) feed ramp marks, and 2) circumferential scuffing on the bullet very close to where it meets the neck of the case, and further circumferential scuffing near the tip.

EDIT: I suspect the scuffing near the tip is the bullet seating stem
EDIT 2: I am using never-fired Starline brass and 80grain Nosler Custom Competition bullets
EDIT 3: just realized the last post here is from august of this year. I am cross-posting this in a more active thread if that's allowed in these forums..
 
Trying to find the best place to post this question. Recently on my 6ARC gasser, when sizing, about 30% of the cases are extremely difficult and result in the brass being, lack of a better word, skinned just about the case head. The result is a 6ARC that looks like it has a belt. I have not narrowed down wether this is just from the factory ammo or my 1x/2x brass, but have not had this issue when resizing Hornady 6.5G 1x fired to 6ARC.

Again, this is not apparent after firing, only when sizing operation occurs. I know Johnnys Reloading Bench posted a video about it, mine is similar. Just after sizing not firing.

I have been annealing hill billy style with a drill and a torch, so maybe my annealing is off? I’m going to try some without and see what the result is. I figured I’d ask all you smart fellers on here to get some help.

Also, 6ARC is a hammer and I love that thing. If there is a specific load thread and someone knows where it is, please post or message it to me.

Again, sorry if this is the wrong thread for this.

9A921C90-0CEC-49FA-86DF-EA40C83CF49C.jpeg
0CC7A745-8804-4411-91E4-E7C8AD4C1732.jpeg
 
Trying to find the best place to post this question. Recently on my 6ARC gasser, when sizing, about 30% of the cases are extremely difficult and result in the brass being, lack of a better word, skinned just about the case head. The result is a 6ARC that looks like it has a belt. I have not narrowed down wether this is just from the factory ammo or my 1x/2x brass, but have not had this issue when resizing Hornady 6.5G 1x fired to 6ARC.

Again, this is not apparent after firing, only when sizing operation occurs. I know Johnnys Reloading Bench posted a video about it, mine is similar. Just after sizing not firing.

I have been annealing hill billy style with a drill and a torch, so maybe my annealing is off? I’m going to try some without and see what the result is. I figured I’d ask all you smart fellers on here to get some help.

Also, 6ARC is a hammer and I love that thing. If there is a specific load thread and someone knows where it is, please post or message it to me.

Again, sorry if this is the wrong thread for this.

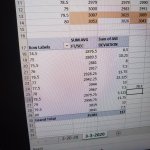
View attachment 7859780View attachment 7859781
What die are you using? That’s most likley the culprit.
FWIW the LE Wilson FL bushing die does not do this.
Hornady is .002-.003 smaller at base & will shave Lapua Grendel brass. RCBS small base is the worst.
 
Was using Hornady custom now using Hornady match with bushing and it’s worse. Just did 50 cases again this morning and 22 were destroyed/unusable.
 
The other 30ish were fine, silky smooth no issues
Look in the big 6ARC thread for load info. I posted about the die’s in there also.
 
  • Like
Reactions: MidsouthHunter
Was using Hornady custom now using Hornady match with bushing and it’s worse. Just did 50 cases again this morning and 22 were destroyed/unusable.

This has been a known issue in the Grendel for a while, but guys are rediscovering it with the rising popularity of the ARC. The brass the the belts is likely toast. You'll hear lots of theories as to what causes the "Grendel Belted Magnum" but the gent who developed the Grendel, Bill Alexander, has said that they most often saw it in guns that were timed incorrectly and so unlocking too early with too much residual pressure in the bore.

There's a thread on the hide about it here link is to Bill's first post in the thread, as he's easily the most knowledgeable person posting in it):

 
Very well written, but I do disagree with one point. Because the “comparator” Is meant to give a relative, not an absolute, reading or measurement, I would suggest/insist on zeroing the calipers only after you have carefully seated a piece of fire formed brass shot in your chamber(I will only reload ammo when I know what chamber it came out of). That way you get a clear read out of the amount of shoulder bump you are getting from the same piece of brass comes out of the sizing die, looking for “-0.002” bump for a bolt gun and maybe as much as “-0.005” for a gas gun.

Wilson and RCBS Both sell “micrometer” type case gauges that give you an absolute measurement in thousandths (zero being SAAMI spec for the case). There is noproblem with the bevel on the hole throwing off the measurement, as you would with comparators on calipers.

A few notes about Whidden products:
Some of their dies come with a click adjust lock rIng, which you can buy separately. This just about eliminates fiddling with the die threading as you set up the Sizing die.

Whidden dies also come packaged with a comparator for the specific chambering, which attaches with a set screw directly to the calipers without a separate body.

Whidden sells Individually sized expander balls.
 
Last edited:
  • Like
Reactions: brettb614